Showing posts with label Breakfast. Show all posts
April 20, 2020
Pannkakor: Swedish Pancakes
Pannkakor are less of a breakfast food in Sweden and more often served as lunch/dinner, supper, or dessert. Most famously, pannkakor are served on Thursdays after a bowl of yellow pea soup (with or without ham, drizzled with mustard). They appear on school lunch trays, on hospital menus, and in heat-and-serve portions at the supermarket (complete with lingon berry preserves).
The number of pancakes you get will be determined partly by the size of the pan you use, and partly by the size of the eggs in your batter, partly how much batter you pour.
Klassiska Svenska Pannkakor
Classic Swedish Pancakes
(Translated and adapted from Pannkakor.se)
Makes approximately 11-12 thin pancakes, if using a 28 cm skillet
250 ml (1 cup) all purpose flour
1/2 teaspoon coarse salt
600 ml milk
3 large eggs
3 tablespoons butter, divided
In a large mixing bowl, preferably one with a spout for pouring, mix the flour and salt. Add 250 ml of the milk, and whisk until the batter is smooth. Add the remaining 350 ml of milk and whisk to combine. Add all three eggs, and whisk again until completely smooth and integrated, with no streaks of yolk in the batter.
Let the batter rest at room temperature for 30 minutes. Close to the end of this time, preheat a 28cm non-stick skillet (or well-seasoned cast iron, if you have wrists of steel) over medium heat. At the same time, set your oven to warm and place a large "resting plate" on the middle or lower middle rack, so it will be ready to receive the pancakes as they come off the pan.
Melt the butter in a small bowl. add 22.5 mL (1.5 tablespoons) of melted butter to the pancake batter, and whisk through. The rest of the melted butter will be used to fry the pancakes, a little at a time between each pancake.
When the skillet is hot, just before you pour your first pancake, use a pastry brush to brush a little butter over the cooing surface of the hot pan. I measure my batter by pouring it into an actual measuring cup first, so that my pancakes are consistently sized If you have a ladle that is the right size, that will work well too. Pour 80 ml (1/3 cup dry measure cup) of batter into the buttered pan, and quickly lift and tilt the skillet so that the batter covers the bottom of the skillet in a thin layer, trying not to go up the sides of the pan.
Let the pancake cook for about 2 minutes - if you try to flip it too soon, it will tear, so be patient. If you are concerned that it is cooking too quickly, reduce the heat instead of reducing the cooking time. When the two minutes are up, slide a spatula carefully under and around the edge of the pancake, and then slide it beneath to quickly lift and turn the pancake. This may take a bit of practise to get a smooth action, but you have a lot of batter with which to practise. The cooked side of the pancake should look a bit lacy and browned in spots, like in the picture above.
Let the pancake cook on the second side for about 30 seconds, or until set, and then slide it onto the resting plate in the oven.
Put the skillet on a unheated burner. Brush with melted butter, add the next portion of batter and tilt to spread the batter, and immediately return the skillet to the hot burner (medium heat). This helps keep the skillet from overheating, and prevents the butter (and the next pancake) from burning. Continue as before, stacking up the pancakes until all the batter is used. You may need to gradually reduce the heat under the burner as you work your way through the batter, so if the pancakes are getting too dark, or dark too quickly, reduce the heat a little as you go.
If there is any melted buter left over at this point, it can be brushed over the top pancake(s) for a little extra luxury.
Pancakes are traditionally served with lingon berry preserves, or fresh berries and whipped cream, but you can also use syrup (maple, birch, any fruit syrup, chocolate) or, of course, any other fillings you choose.
Swedish proverbs featuring pancakes
Man matar inte grisar med pannkakor.
➔ One doesn't feed pigs with pancakes.
Man är aldrig säker förrän hon ligger i magen, sa pojken som tappade pannkakan i askan.
➔ You're never certain until it's in your belly, said the boy who dropped the pancake in the ashes.
Upp som en sol och ner som en pannkaka.
➔ Up like a sun, and down like a pancake.
April 05, 2020
Swedish Hash: Pytt i Panna
Pytt i Panna (AKA Pyttipanna), which translates somewhat literally as "small bits in a pan" is the Swedish version of hash. This is a classic Husmanskost (homestyle cooking) dish, and it is also classic pub food here in Sweden. Swedes don't eat it for breakfast, though - it's a lunch or casual supper in these parts. While it is very easy to make at home, it's made even easier by the vast array of frozen options that you can simply empty into a pan and stick in the oven until it's done (fried egg managed separately, of course). The most common types of pytt I see in the supermarket are Korv (sausage), Ox (roast beef), Bacon, Skinka (ham), Krogar (pub style, usually a mixture of bacon, sausage, and ham), Kyckling (chicken) and vegetarian (mushroom, peppers, and/or zucchini). When served as a supper, it is generally accompanied by diced or sliced pickled beets and/or fermented cucumber pickles on the side.
I've decided to go with Korv for my first from-scratch attempt, and found the whole process very straight-forward with delightful results. I'm using Swedish Falukorv, for which you can substitue by using bologna sausage, German Fleischwurst (or Fleischkäse, for that matter), Lyoner sausage, or even European (Frankfurter) wieners and get a very similar effect. In practice, of course, you can use any sausage you like, including vegetarian or vegan options, or indeed, any of the items listed above.
Pytt i Panna
Serves 2
1 tablespoon canola oil
80 grams yellow onion
150 grams Falukorv (or other sausage, see above)
500 grams waxy potatoes
1/8 teaspoon coarse salt
1/4 teaspoon ground white pepper
Start by warming a large skillet on low heat while you chop vegetables. Also preheat the oven to 200°C/400°F with a rack in the upper middle slot.
Peel and finely dice the onion. Part of the goal is to have all of the pieces approximately the same size, so keep that in mind when you are dicing. The onions will shrink a bit as they cook, but that's fine.
Remove casing (if any) from the Falukorv, and finely dice the meat, keeping in mind that the pieces should be roughly the same size. Go smaller than you think, because what looks small on the cutting board suddenly seems much larger in the skillet.
Add the oil to the pan and turn up the heat to medium. When the oil is hot, add the diced onions and sausage to the skillet, and spread them out a bit. While they sizzle and start to cook, prepare the potatoes. You can stir the onions and sausage a few times while you're chopping potatoes.
Peel the potatoes (or not - you can just wash them if you prefer) and remove any ugly bits. Chop into fine dice (I like to slice each potato into vertical slices, then make piles of the slices to slice again into baton shapes, and then turn to slice into dice, but you can use whatever method you like). It is especially important to keep the pieces small, so that they cook quickly, and so they match (roughly) the size of the sauasge pieces. We're talking smaller than a standard sugar cube, for scale. Perfect dice is not required, but making an attempt at general uniformity makes a more attractive dish. Just think of it as an excuse to practise your knife skills.
One the potatoes are diced, add them to the skillet andd give everything a thorough stir-through. Sprinkle with salt and white pepper (go easy on the salt if you are using a salty meat), and stir through again. Cook, stirring occasionlly for about 10 minutes, and then place the skillet in oven, uncovered, and leave it for 10 minutes. You do not need to use the oven, though. You can also continue to cook on the stovetop, stirring occasionally, for another 10-15 minutes as needed. Test one of the larger potato pieces to be sure it has cooked through, before serving.
While the pytt finishes cooking in the oven, you can use the time to tidy up and lay out any sides (such as pickled beets or cucumbers), and also to fry an egg for each portion. Sunny-side-up is pretty, but poached is another good option. In fact, you can do the eggs any way you like best.
Spoon the pytt from the skillet onto the serving dishes, top with the eggs, and add any pickles you might like. Some folks put a little parsley on top, too, but I don't bother. Boom! Beautiful breakfast, brunch, or dinner.
Freezer: You can make your own Freezer Treasure version, by spreading the diced, uncooked cubes out on a sheet, freezing until firm, and then bagging. You can cook this entirely in the oven, stirring a few times, for about 40 minutes instead of the stovetop method.
April 24, 2019
Äggakaka med Zucchini - Swedish Egg Cake with Zucchini
Äggakaka is the Swedish cousin of Yorkshire Pudding, and is typically served for lunch (or possibly as a light supper). However, the close kinship of the pancake/popover oeuvre suggested itself as breakfast to me, so that's how we had it. The most traditional versions do not contain zucchini - that appears to be a more modern option - and the garnish is generally thick slices of sidfläsk - fried, salted but uncured pork belly, and of course the ever-popular lingonberries. Adding zucchini gives it a character reminiscent of an oven frittata or firmly set quiche.
I've used chopped bacon for convenience, par-cooked on the stovetop and added straight on top of the äggakaka batter before it goes into the oven, but if you are using full slices of pork belly, you'll want to cook them separately, and simply lay them over the finished dish before serving.
Äggakaka med Zucchini
Serves 2-4 depending on appetite and other dishes
3 large eggs (at room temperature)
1/2 cup flour
1/2 cup whole milk
pinch kosher salt
300 grams zucchini, shredded
1 tablespoon butter
125 grams chopped bacon (or 4 thick slices of uncured pork belly).
Place a 23cm/10" skillet on the middle rack of a cold oven, and set it to preheat to 225°C/425°F. Set a second skillet (for the bacon) to preheat over low heat on the stovetop.
In a mixing bowl, whisk/beat the eggs until smooth (whisk or electric beaters are fine) and add the flour. Whisk/beat again until smooth. Add the milk and salt, and stir through again. Grate the zucchini using a box grater on the large hole side. I like to slice the zucchini lengthwise, stopping just short of the stem-end, and then holding it together to grate into shorter strands, but you can use longer strands, too. Squeeze the excess water from the zucchini, and stir it into the batter.
Let the batter stand while you cook the pork. If you are using uncured pork belly, start frying it over medium temperature now, and it will continue to cook through while the äggakaka goes into the oven. If you are using bacon, turn the heat to medium high and stir fry the bacon pieces until they are about half-cooked. Drain the excess fat, and use a slotted spoon to remove the meat from the pan.
When the oven has come fully up to temperature, remove the skillet (carefully, of course, it's very hot) and add the butter to the skillet. Let the butter melt and swirl the pan to coat the entire bottom of the skillet. Pour the batter into the hot pan, giving it a shake to level the zucchini. Add the half-cooked bacon to the top of the batter (avoiding, if possible, about a couple of centimetres around the edge of the pan), and return the pan to the preheated oven. Cook for 15 minutes, or until puffed and golden, and then serve with lingonberry preserves. If serving for lunch or dinner, a green salad would be a good addition.
It is very easy to slice the äggakaka into portions with the side of a firm spatula.
September 09, 2018
Curried Egg Breakfast Sandwich
When I lived on Commercial Drive in Vancouver, we used to quite enjoy weekend brunch at Fets Whisky Kitchen. My favourite order was the breakfast egg sandwich named the "Woodford Handheld" which consisted of a ciabatta bun, crispy bacon, cheese, and just a hint of curry in the generous amount of scrambled eggs. As to why they called it the Woodford, I can only imagine that there might have been a little bourbon in the mix somewhere, which wouldn't be a shock from a place known for its whisk(e)y and bourbon selection. Over the years their menu has changed, and they have moved on from the Woodford. But I haven't.
Fortunately, it's a really easy thing to make, although it does take a bit of organization. The important thing is to get the amount of curry powder just right. It should be noticeable, but not jarring or interfering with the flavour of the eggs, bacon and cheese. You can opt not to toast the buns, but I think it's much nicer if you do. It's a departure from the original, but hey - why not use garlic butter while you're toasting them?
Curried Egg Breakfast Sandwich
AKA "The Woodford" (more or less)
2 Sandwiches
2 ciabatta-style buns (or equivalent), split
1 tablespoon butter, or garlic butter
4 - 6 strips of bacon, to taste
Monterey Jack, young Gouda, or melting cheese of your choice, enough to cover the bottom half of each bun
4 eggs, lightly beaten
2 tablespoons cream
pinch of coarse sea salt
1/4 teaspoon hot Indian-style curry powder
Start with the bread. Spread cut sides of the buns with butter (or garlic butter) and place butter-side down in a preheated skillet over medium heat until lightly toasted. Remove buns to serving plates, and lay the slices of cheese on the bottom pieces. The heat will cause the cheese to soften slightly, which is fine.
Wipe out any crumbs and add into the now-empty skillet the strips of bacon. Cook the bacon until slightly crispy, but not too hard, turning as needed. Prepare the eggs by beating them together with the cream, salt, and curry powder. If you plan to use a different skillet to scramble your eggs, get it preheating now.
Remove the bacon from the skillet and distribute between the two cheese-dressed buns.
Scramble the eggs as you please. I use medium high heat with a bit of butter to get it going, and stir frequently to get loose, soft curds. It only takes about a minute. When the eggs are just about to set, take a large serving spoon and serve the eggs on top of the bacon. Close the sandwiches with the toasted bun tops, and devour right away.
It was every bit as delicious as I remembered.
December 03, 2017
Çılbır: Turkish Poached Eggs in Yoghurt with Spiced Butter
I love a good breakfast, and Turkish culture really knows how to do it up as a feast. Menamen (scrambled eggs in pepper sauce) might be the best known (internationally) egg-based breakfast dish from Turkey, but by golly cilbir should be on everyone's list, too. Cilbir (anglicized somewhat from Çılbır) is pronounced, roughly, as CHILL-ber (like Wilbur, but, you know, chill).
What is it? Well, the beauty-base-zero version is poached eggs in garlicky yoghurt, drizzled with browned butter infused with chile flakes. There are a LOT of variations to be had, though - most of which appear to be placing the basic version on top of an additional element - kıyma, for example (fried seasoned ground meat), or sautéed spinach (like a Turkish version of eggs Florentine). This versatility explains why cilbir is eaten not only for breakfast, but for any other meal of the day.
Between the above description and the pictures, you probably don't need a recipe, but I'm going to give you one anyway:
Çılbır: Turkish Poached Eggs in Yoghurt
Serves 2
Yoghurt base
300 grams plain thick yoghurt
1-2 cloves garlic, minced or pressed
2 tablespoons minced fresh parsley (or dill, or mint)
1 teaspoon olive oil
1/4 teaspoon kosher or coarse sea salt
2 - 4 Poached eggs
I'm going to assume you know how to poach eggs, and have a preferred method. If not, go ahead and google it, or even just fry your eggs sunny side up, or soft boil them (I won't tell)
Spiced Butter
2 tablespoons salted butter
1/2 teaspoon - 2 teaspoons Turkish pepper flakes (eg. Aleppo) or paprika, adjusting for the level of heat as desired
Assembly
Prepare the yoghurt base first, because you want it more room-temperature than fridge-cold. I take the yoghurt out of the fridge as soon as I get up, before I shower or make coffee, to let it warm up a bit. When you're ready to get cooking, combine the yoghurt base ingredients in a small bowl, and beat until everything is well integrated. Set aside for the flavours to mingle while you prepare the rest.
Warm a couple of bowls by filling them with hot water and letting them stand. You probably don't need to do this in the summer.
Prepare the spiced butter next. Melt the butter in a small pan over medium heat. If you are using unsalted butter, add a tiny pinch of salt. Reduce the heat to medium-low and let the butter boil and seethe until the water evaporates and the milk solids start to brown (alternatively, you can use ghee). Remove the butter from the heat, and add the chile flakes. I was using extra-hot oiled Pul Biber (Turkish chile flakes), so I didn't add a lot, but with a milder chile you can add quite a bit more (which does look very pretty). Let the butter and chile flakes infuse together while you prepare the eggs.
Prepare the eggs as you like - I poached mine in a skillet of bubbling water for 5 minutes, but your mileage may vary.
Just before the eggs are ready, take your warmed bowls (drained and dried) and add a generous spoonful of yoghurt base into the bottom of each. Use the spoon to swirl it out to cover the bottom of the bowl. When the eggs are ready, use a skimmer to lift them from the water, and place them in the bowls. Use a teaspoon to drizzle the desired amount of spiced butter over and around the egg(s). Serve at once with warm flatbread, and maybe some nice sliced vegetables and hummus.
October 03, 2017
Amethyst Perogies
Okay, this is kind of cheating, because it's not really a new recipe. I just wanted to share with you all the amazing thing that is these Amethyst perogies I made recently from purple potatoes from my local farmers' market.
The dough recipe that I used is essentially the same as for the Šaltinosiai, although made with warm water instead of cold, which coincidentally happens to be exactly the same as the pierogi dough recipe in my Polish cookbook. You could, of course, use whichever perogy dough you like (including this potato-dough recipe from my friend Sandi's family).
Once you have a good dough, you need to make the filling. Whole books have been written on the endless possibilities of fillings for perogies (not that you'd guess from Canada, where potato, onion, and cheese appear to reign supreme, with or without bacon).
These ones, of course, are potato. Specifically, they are a purple sort of potato varietal called "quartz" - probably from the veins of white that run through the potato in its raw state. Once cooked, however, the dark purple overwhelms the paler parts of the flesh for a consistent, deep violet colour. The ones for this recipe were steamed in their skins, which were peeled off after the potatoes had finished cooking and allowed to cool. You could use any purple potato, of course, but the colour will depend on both the type and any additional ingredients you use for the filling. To keep the filling as vivid as possible, I used red onions - sautéed in a little butter, and just a whisper of parmesan cheese. The ratios you will use is completely up to you, but think along the lines of fancy mashed potatoes or twice-baked potatoes.
Cook the fresh perogies in plenty of simmering water (salted, as you would for pasta) for about ten to twelve minutes, then use a slotted spoon or spider to transfer them to a hot skillet with melted butter (bacon and/or onions optional), and fry them until lightly coloured on each side. Serve plain or with sour cream. They look quite typical, before you cut them open!
Since this recipe actually made quite a few, I had a big dinner from them and then froze the rest. To freeze them, spread them out in a single layer on a cutting board, plate or baking sheet, if you can fit one in your freezer, and freeze for a few hours until hard. Then bag them up in thick freezer-bags, and store frozen until needed. To cook, add the frozen perogies directly into simmering water, and give them an extra few minutes of cooking time.
September 24, 2017
Pulla — Finnish Cardamom Bread
This recipe is from one of my mother's sisters, my Aunt Linda, who had married into a Finnish family. The word pulla technically just means "buns" but often refers to this somewhat sweet, rich bread, also known as Kahvileipä (coffee bread), or even just nisu (wheat). I've been making it since I was quite young, and no longer have any sense of how close my recipe, with my penchant for adjusting things, has remained. It scores big points with every Scandinavian I've fed it to, though - cardamom breads are highly appreciated there.
There are definitely some similarities between pulla and challah, although I tend to think of challah as a savoury or neutral bread, it does have its sweet versions, too. I took one of these loaves in to work with me, and one of my colleagues remarked on its similarity to German Hefezopf (yeast braid), but noted that the German version doesn't have the cardamom. This is a sharply distinguishing feature, though, as the Finnish variety simply must have cardamom.
Pulla
Yield: 2 large braided loaves
Total prep and cooking time: 3.5 hours
15 mL (1 tablespoon) dry active yeast
60 mL (1/4 cup) warm water (warm, but not hot - test on your wrist)
180 mL (3/4 cup) warm milk
120 mL (1/2 cup) sugar
1/2 teaspoon coarse salt
2 eggs, plus extra for glazing*
1 teaspoon ground cardamom
1.12 litres (4 1/2 cups) all-purpose flour (approximate - you may need more)
112 grams (1/2 cup) butter, melted
Cinnamon for dusting
Coarse sugar (or pearl sugar) for finishing (optional)
In a large mixing bowl, combine the yeast and warm water with a pinch of the sugar. Let the mixture stand for 5 minutes, or until foamy. Blend in milk, sugar, salt, eggs, cardamom, and 2 cups of the flour. Beat until smooth. Add the butter, stirring until it all becomes incorporated and smooth once more. Then stir in the rest of the flour (the exact amount you need will depend on the humidity and they type of flour you have) and knead the dough until it is smooth and satiny - approximately 5 - 10 minutes. Place in a large, greased bowl to rise, turning the dough over so that the top is lightly greased. Cover the dough lightly with plastic or a tea towel and let it stand in a draught-free place (such as the inside of an oven, with the light on) for 1.5 - 2 hours, or until doubled. Knead lightly on a floured board, just enough to press the air out of the risen dough.
Divide the dough into 6 equal pieces, and roll each between your palms and counter top to make 6 14-inch "snakes." Braid into two loaves, pinching the ends to seal well, and folding the ends under the loaves. Place the braids side-by-side with room to expand on a greased baking sheet. Let rise for 1/2 hour only - bread should look puffed but not doubled - and gently brush the tops and sides with beaten egg. Sprinkle with cinnamon and coarse sugar. The bread will rise more in the oven, a phenomenon known as "oven spring".
Bake at 180°C / 350°F for 25 - 35 minutes or until the loaves are richly browned and sound hollow when tapped on the bottom (you will of course need to lift the loaf off the sheet pan for this test). Let the loaves cool completely on a rack before bagging. You can store them at room temperature for a day or two, but after that put them in the fridge.
As this makes 2 big loaves, I sometimes braid only one loaf, and turn the other half of the dough into buns by rolling it out to a 1/2" rectangle, sprinkling with brown sugar and extra spices, rolling up and slicing into 9 pieces. Place slices cut-side up in a greased 8" metal pan, let rise 1/2 hour, and bake for 25 minutes. These freeze beautifully: cool completely, break apart, and wrap individually.
* It doesn't take a whole egg to provide the egg wash for two loaves of bread. It uses maybe 1/3 of an egg. I usually put the leftover beaten egg in a small lidded plastic container in the fridge, and the next day fry it up to put on toast for breakfast. Your mileage may vary.
Last thing to mention - if you take more than a day or two to get to the end of the loaf, I note that pulla toasts up beautifully. I like it with a slice of cheese at that point, but butter, nutella, honey, or even just plain are all delicious options.
August 26, 2017
Zucchini Cornmeal Muffins
To be perfectly honest, these muffins are essentially derived from my Spicy Cheddar Corn Muffins.
Savoury muffins are a great grab-and-go breakfast option (or coffee-break snack, for the breakfast-impaired). These ones are extra good because they aren't loaded with sugar and they're not too rich.
Zucchini Cornmeal Muffins
Makes 12 regular sized muffins
1 ½ cup all-purpose flour
½ cup yellow cornmeal
2 teaspoons baking powder
1 teaspoon baking soda
½ teaspoon salt
½ to 1 teaspoon cayenne (optional)
120 grams cups shredded sharp cheddar cheese
150 grams shredded zucchini
¼ cup canola oil
2 large eggs, lightly beaten
¾ cup milk
Preheat oven to 205°C/425°F. Lightly spritz 12 regular sized muffin cups with canola oil (or grease lightly) - or line with paper or silicone liners.
Grate the cheese and zucchini separately, using the large holes of a box grater. Short strands work best for both the cheese and the zucchini.
In a large mixing bowl, combine flour, cornmeal, baking soda and baking powder, salt, cayenne, and cheese. Toss the cheese well to keep the strands from clumping.
In another bowl, mix together the canola oil, eggs and milk. Stir in the zucchini. Pour into a well in the centre of the flour mixture and use a spatula to fold the wet ingredients into the dry. Try not over stir. The batter will be thick and a bit gloppy - it should not be completely smooth, but there should not be big clumps of flour.
Spoon the batter into the muffin cups. Bake on a centre rack for approximately 20 minutes, or until muffins are golden and toothpick inserted in the centre comes out clean. Remove to a rack to cool or serve warm. You might need to side a knife around them to get them out of the pan - if any of the cheese melts up right against the metal of the tin, it may cling a little, and need a little extra encouragement.
Once the muffins are cooled, you can wrap them tightly and freeze until needed. Because of the zucchini, they should not be left at room temperature for longer than a day or so, but they keep very nicely in a sealed container or bag in the fridge. For best results, warm them for 15 seconds in the microwave before eating, if you have one handy.
July 22, 2017
Turkish Breakfast, Wrapped
Full disclosure, you're probably not going to get this anywhere in Turkey. If you want an actual Turkish breakfast wrap, I'd suggest gözleme, but that's not what I've made here. This is more of an homage to the wonderful breakfasts of Turkey, but wrapped up in a flatbread. You could vary the flatbread based on what you have at hand: Dürüm would be a good (and very Turkish) choice, but I had Arabic-style thin pita bread, so that's what I used.
There's so many things that I could have used in this. Ajvar could be swapped in for the hummus, for example, and I didn't manage to sneak any peppers in, due to lack of room. Next time, it will probably be different - just because of what I have on hand in the kitchen. And there WILL be a next time, oh yes. Because this was delicious.
Turkish Breakfast, Wrapped
Serves 2
2 large flatbreads, (ideally, warmed enough to be pliable)
2 heaping tablespoons hummus
166 grams sucuk sausage (I like the spicy garlic one), peeled and sliced
1 medium pickled cucumber, julienned
2-3 eggs, lightly beaten
30 grams feta
1 large roma tomato, deseeded & chopped
6 cm long english cucumber, deseeded and chopped
1/2 cup chopped parsley
1 thick slice of red onion, minced
1 tablespoon lemon juice
pinch kosher salt
pinch Isot (aka Urfa) chile flakes or Sumac (optional)*
1 tablespoon olive oil, divided
2-3 tablespoons tahini dressing
1 tablespoon hot sauce (I used green zhug)
First things first: I already had the tahini dressing and the hummus leftover from the day before, but if you need to make them, do that first. Next, I made the chopped vegetable salad by combining the tomato, cucumber, parsley, red onion, lemon juice, 1/2 the olive oil, and chile flakes. Stir well. Set aside.
Julienne the pickle.
Peel and slice the sucuk, and fry gently in a skillet until they darken and get a little bit crispy of each side.
Lay the flatbreads on plates, and smear the hummus over half of each flatbread. Lay the fried sucuk on top of the hummus, and top that with the pickles.
In a small skillet, heat the remaining olive oil and add the beaten eggs. Stir briefly, and crumble the feta into the pan. Stir again until soft curds form, and then divide the egg mixture between the flatbreads.
Add a big spoonful of the chopped salad to each bread, and then drizzle the tahini over the egg mixture. Finish with a smear (or a more generous amount) of the hot sauce, and then prepare to eat.
By prepare to eat, I mean, take it to the table, have napkins on hand, and the beverage of your choice standing by. Once you roll this bad boy up and start eating, you're probably not going to want to put it down before you're finished. It will probably be a bit messy.
Once you're ready, roll up the flatbread into a bulky wrap shape, pinching one end closed with one hand while you raise it up to take your first bite. Some juggling may be required, depending on how friable your flatbread is, but it will soon be in your mouth, and you probably just won't care about a bit of escaped juices - which, of course, you can lick off of your fingers.
Enjoy.
* Isot (or Urfa) pepper is a dark, not-too-spicy condiment that often takes the form of oiled pepper flakes. You could substitute ancho powder for this - the flavour is different, but in the same "spicy raisin" family.
** Sumac is an earthy, lemony, mild seasoning.
March 11, 2017
Dutch Pannekoeken
Let's start by clarifying that this is not at all the same as a "Dutch Baby" pancake. This pancake is cooked entirely on the stovetop, and has more in common with the French crêpe than the puffy, popover type of pancake. It is notable for its silky texture, which is derived from beaten egg and not a chemical leavener, and famous for the variety of fillings and/or toppings, both sweet and savoury.
Yes, fillings and/or toppings. At it's most simple, the pancake is topped with the ingredients of choice after cooking, but there are other versions that require you to cook the fillings right into the pancake. The ones with fillings are accomplished by laying the (paper thin) filling ingredients in a single layer on the raw side of the pancake while the first side cooks, which then sink a bit into the batter until the pancake is flipped, and they cook right into it. Some recipes call for adding a little extra batter once the fillings have been laid, but this makes a much thicker pancake, and you don't get to see the various toppings at the end.
We're big fans of savoury toppings, so that's my usual go-to, but you can of course also deploy syrup or even the classic combination of a dusting of confectioner's sugar and a squeeze of lemon.
If you're making them filling-style, you should precook any fillings that will take longer than a few minutes in a hot pan to cook, or they might still be partially raw when the pancake is finished. Thinly sliced mushrooms don't need to be precooked, but bacon probably should be.
This recipe makes two large pannekoeken, which is perfect for two people. Double, or even triple the recipe if you're cooking for more (and keep the finished ones warm in the oven until ready to serve).
It's a good idea to pre-warm the plates so that the pancakes don't go cold the instant they're plated.
Dutch Pannekoeken
Serves 2
1 egg, beaten
250 mL milk
1 cup flour
pinch of salt
butter for frying
Toppings of your choice (sausage, mushrooms, cheese, in this case)
In a large mixing bowl, beat the egg until very frothy. I use a whisk, but you could use a food processor or blender, too. Slowly add in the milk, continuing to whisk, and then slowly whisk in the flour and salt. Unlike most pancake recipes, where you need to be careful not to overmix or risk toughness, you can beat these ones until your arm tires, if you like, as long as you add the ingredients in the right order.
You can make the pannekoeken right away at this point, or you can let the batter rest a bit (good time to take a shower, for example, or even just use the time to prepare your toppings).
When you're ready to cook, heat a large, non-stick skillet over medium heat. Add a little butter (a couple of teaspoons or so is fine) and swirl it around to slick the bottom of the skillet. Add half the batter, and swirl the pan again to distribute the batter to the edge of the pan.
If you are filling your pancakes, as opposed to topping them after they're cooked, now is the time to lay your ingredients in a single, sparse layer over the wet surface. Continue to let the pancake cook a few minutes until the bottom is nicely dark golden brown, and then flip to cook the other side. When the second side is also done, flip the pancake onto the plate so the filling is showing. Here's one made filling-style, with ham, mushrooms, and green onion. It's not quite as pretty, but it's just as delicious (cheese was added post photography):
Otherwise, simply slide the plain pancake out without flipping it again and, if topping, arrange your topping ingredients immediately.
Serve, or keep warm whilst you cook the other pancake.
Update! These also make an incredible base for fried chicken and gravy...like chicken and waffles, but without the need for a waffle iron.
January 28, 2017
Pumpkin Muffins
These were actually made with Hokkaido squash (aka Red Kuri, amongst other names), rather than what we might usually think of as a pumpkin in Canada, but the net effect is the same. You could also use butternut squash. I made this recipe because I had a cup of mashed, roasted squash to use up, but you could also use canned pumpkin. The raisins are optional, but if you like raisins at all, they are a delightful little burst of extra sweetness in a muffin that isn't trying to be a cupcake. Cranberries might be nice, too.
Great for the lunchbox, if that's a thing you do.
Pumpkin Muffins
Adapted from Muffins & More, by Jean Paré (Company's Coming)
Makes 10 - 12 muffins
1.5 cups (375 mL) flour
1 teaspoon baking soda
1 teaspoon baking powder
1/2 teaspoon coarse sea salt
1 teaspoon cinnamon
1 teaspoon ground ginger
1/2 teaspoon nutmeg
1/2 cup (125 mL) raisins (optional)
1 egg, beaten
1/3 cup (90 mL) canola oil
1/3 cup (90 mL) sugar
1 cup (250 mL) pumpkin or squash puree
1/4 cup (60 mL) milk
Pumpkin seeds for garnish
Preheat the oven to 400°F (200°C) with a rack in the middle. Lightly oil or grease the wells of a 12-cup muffin tin, or line with paper or silicone muffin liners.
Combine the flour, baking soda, baking powder, salt, spices, and raisins in a large mixing bowl.
In another bowl, beat the egg, and the sugar and the oil and beat again. Add the pumpkin, beat until smooth and, finally, add the milk and stir until combined.
Make a well in the centre of the dry ingredients, and pour the alarmingly coloured wet ingredients into the well all at once. Use a spatula or broad spoon to fold the mixture gently together, until there are no more dry patches. Be careful not to mix too vigorously, or you will get tough muffins. Be gentle.
Spoon the batter into the muffin cups, coming just barely to the top of each cup. Don't smooth the tops or press the batter down, just let it be lumpy. I got 10 muffins out of this, but the original recipe claims to get 14, so your mileage may vary.
Top each muffin with a few pumpkin seeds, and bake for about 15 minutes, or until a toothpick (or strand of raw spaghetti) comes out clean.
Let stand for 5 minutes in the tin, and then remove to a rack to cool. These keep well at cool room temperature for a couple of days. After that, put them in the fridge or freezer (well wrapped, of course).
December 27, 2016
Breakfast: Eggs baked in Bell Peppers
This was taken pretty much directly from a Buzzfeed Tasty video. I've adjusted things to our tastes and the current state of the pantry, but the method is solid.
Essentially, this is what you do:
Halve the bell peppers lengthwise, and remove the stem, veins, and seeds. Transfer pepper cups (cut side up) to a baking tray lined with aluminum foil. Season each pepper with salt and pepper, and bake for 15 minutes at 375°F/190°C, until peppers are softened.
Stabilize any peppers that look extra floppy (see below).
Sprinkle some grated cheese and chopped green onion or chives evenly among the four pepper halves. Crack an egg into the centre of each pepper. Sprinkle with salt, pepper, bacon (if you're using it), and more cheese on top of the eggs. Back into the oven it goes; bake for 15-20 minutes, until egg whites are set.
I note that next time I will create rings of aluminum foil to stabilize the peppers and ensure that they don't tip over as the eggs are added. This happened with one of my peppers, but it wasn't the end of the world. After baking just long enough to set the bit of white that lay on the pan, I was able to scoop the egg up and pile it back into the pepper shell with minimal hassle and no real deleterious effect (other than cosmetic, and a bit more grated cheese fixed that right up).
Definitely something I will make again.
Labels:
Breakfast
October 03, 2016
Gingered Plum Crisp
Apple Crisp is one of my favourite homemade desserts. It's good enough to serve to company, yet still relaxed enough for any casual supper. Even better, if there is any leftover, you can easily enjoy it the next day for breakfast. Fruit, oats, right? Practically health food.
This is not Apple Crisp, of course, but it follows the same principles of preparation: pile your fruit into a baking dish, sprinkle with sugar, add a crumbly layer of oat streusel, and bake. The biggest difference between this and my Apple Crisp, in fact, aside from the use of plums instead of apples, is the spicing. Oh, and this one's vegan. Don't worry, though, you can always replace the coconut oil with butter, if that's how you roll. The coconut oil gives it a delicately tropical note that is very pleasant with the ginger and the plums. You could also accentuate that aspect by adding a tablespoon of grated unsweetened coconut to the oat mixture.
I made one larger baking dish (16-centimetre round baking dish, not pictured), and these two little gem-sized (perfect for bento, might I add) to take to work to share with a colleague. I forgot to take any pictures of the larger one, but here are the little bitty ones.
Gingered Plum Crisp
Fruit Layer
500 grams prune plums
1 tablespoon raw sugar
1 inch fresh ginger root, coarsley grated
Crisp Layer
1/2 cup all-purpose flour
1/2 cup rolled oats
1/2 cup raw sugar
1/4 teaspoon kosher salt
1 teaspoon ground ginger
1/2 teaspoon ground coriander seed
3 tablespoons solid-state coconut oil
Wash the plums and slice them in halves to remove the pits. Chop them into small bite-sized chunks (not too small, or they will lose too much texture). Toss with sugar and ginger, and put them evenly into an baking dish. They should come up about three quarters of the height of the dish. If you are using silicone cup moulds, put them on a tray or inside another baking dish for stability. Fill them 3/4 high, too.
In a medium mixing bowl, combine the dry ingredients of the topping with a fork. Add the coconut oil last, and stir very thoroughly with a fork or pastry blender to ensure that the oat mixture gets thoroughly coated. There should be very little dry and no floury-looking bits, so keep stirring until it all comes together. If you absolutely have to, add another tablespoon of oil (you shouldn't need to). If you press a bit of the topping between your fingers, it should clump together in a crumbly sort of way.
Scrape the topping out of the bowl onto the fruit. Spread it out to evenly cover all of the plums, and press lightly with your fingers to help create a surface-crust when it bakes. Don't press too hard, or you'll compact the topping and it will be a bit tough. Note that you can fill your dish right up to the edge, since it will "settle" a little as it bakes. If your plums are very juicy, they might bubble up a bit over top of the oat mixture in places. This is fine, if not quite as tidy looking.
Bake uncovered at 375 F/190 C for 40 minutes (25 for the little ones), or until the topping has taken on a dark golden hue and has sunk down in the dish slightly. It might be a bit darker on the edges - that's okay. Allow to cool at least a few minutes before serving (but it is plenty delicious at room temperature, or chilled, too). Serve on its own, or with a topping of your choice. Whipped coconut milk, perhaps?
Adorable, aren't they? Just perfect for dessert, breakfast, bento, or a tea-time treat.
January 30, 2016
Toad in the Hole - Sausages in Yorkshire Pudding
No toads were harmed in the making of this recipe.
Toad in the Hole is a rather off-putting name for a really tasty comfort food from the UK, namely well-browned sausages baked into a Yorkshire pudding. It's classic pub food, both hearty and surprisingly simple, and doesn't take too long to make. You can use any kind of sausage you want, really, but since I live in Germany, I've gone with a fairly neutral bratwurst. A good English banger would be perfect, but you wouldn't go wrong with Cumberland links or Lincolnshires, if you can get them.
In fact, you can use almost any bits of cooked meat and it would be within your rights to call it Toad in the Hole, although the standard that has arisen is for sausages. I wouldn't recommend spam, but apparently that was sometimes used during wartime rationing. You can use big or small sausages, as you wish. Smaller sausages make for easier portioning and serving, of course. There are plenty of vegetarian versions out there, too, featuring field mushrooms and roasted vegetables. Your mileage may vary.
As a quick aside, I followed Various Internet Instructions™ to lay the sausages on top of the batter, but I think next time I will lay the sausages down first, and pour the batter around and partially over them, to get a more classic look.
This recipe uses two skillets, because the gravy is made separately while the "Toad" is in the oven.
Toad in the Hole with Onion Gravy
Serves 2 - 3
400 grams fresh sausage links (I've used large pork bratwurst)
1 medium onion, sliced (I've used red)
2 cups beef (or vegetable) broth
2 tablespoons flour
Batter
3 eggs, beaten really well
1/2 cup flour
1/2 teaspoon salt
1 good dash of Worcestershire sauce
1 tablespoon grainy mustard
1/2 cup milk
2 tablespoons bacon fat or lard, to grease the skillet
The first thing to do is mix up the batter, so that it can rest and fully rehydrate the flour. This is an important step, if you want a nicely risen pudding. In a medium mixing bowl, whisk the eggs really well, and slowly add in the flour, continuing to whisk until smooth. Add the salt, Worcestershire sauce, and grainy mustard, and whisk until thoroughly integrated. Finally, slowly whisk in the milk until the mixture is smooth. Set aside at room temperature while you get everything else ready.
If you have a cast iron skillet, that's the thing to use. Preheat your oven to 220 C. (425 F.), with the skillet on the middle rack, so that it preheats nicely, too.
While the batter rests and the oven and skillet are preheating, cook the sausages and start the onion gravy. In a large, skillet, brown the sausages on all sides (I use a little cooking spray to get them going). Let them build up a little fond on the bottom of the pan, which will provide flavour for the gravy. When the sausages are nicely browned, add the sliced onion to the skillet, and stir it all about, so the onions start cooking.
When the sausages are ready, pull the pre-heated skillet out of the oven, and add the bacon fat to the hot skillet. Put the skillet back in the oven for a minute to fully melt and heat the fat. Pull the skillet back out of the oven, and lay the sausages (but not the onions) down in the hot fat. It will spit at you, so be careful. Working quickly and carefully, pour the rested batter (give it one last quick stir) around the sausages, partially covering them (I did this in the reverse order, putting the batter down and then laying the sausages, which is also fine, but makes the sausages float on top of the batter at the end).
Put the skillet back in the oven as quickly as possible, so that it doesn't cool down at all, and set your timer for 15 minutes. It will probably take 20 minutes, but depending on your oven you will want to at least look at it at 15. Don't open the oven if you can avoid it - this is a popover, and they notoriously won't puff if the oven door gets opened too soon.
Meanwhile, add the broth to the onions cooking on the stove top, and stir well, scraping up any fond. Depending on the quality of your broth, you might want to add an extra shot of Worcestershire sauce, too. Your choice. Make a slurry by shaking together the flour with a half-cup of water, and slowly add it to the pan, stirring. When the mixture comes to a full boil, it will be nicely thickened from the flour. Let it continue to cook, stirring frequently, so that the raw taste is cooked out of the flour. Taste, and adjust the seasoning if necessary.
At the 15 minute mark, check your Toad in the Hole's progress. The batter should have risen up nicely, but it might still be rising at 15 minutes. It will also start becoming a rich golden brown. There should be no liquid in the centre of the pan. Unless it looks in danger of burning, leave it in the oven for another five minutes, then remove, admire, top generously with gravy and serve without delay.
We served ours with English-style baked beans in tomato sauce, which is a classic pairing. A bit of salad would not go amiss, and peas are also a frequent side in the UK (not so much in our house, though). Leftovers heat up surprisingly well in the microwave.
Labels:
Breads,
Breakfast,
Comfort Food,
Miscellaneous,
Pork
October 24, 2015
Crumpets
I've always enjoyed making breads - pancakes, biscuits, tortillas, pizza crusts, sandwich loaves, challah, pita with self-forming pockets, crisp coiled flatbreads full of green onions...and of course, recently, bagels. I probably won't ever run out of new ones to try. The world is full of amazing bread.
This is the first time I've ever made crumpets, though. They are a quintessentially English bread that is cooked on a griddle or skillet rather than in the oven, and I can't find them easily in Germany. So, of course I decided to make my own, especially as they've been on my list for quite a while, now. There is, however, a surprising number of recipes to be had. I read a lot of them online, and combed through my cookbook collection for good measure. I wanted something that was easy, didn't take too long, and yet had the true characteristics of a ideal crumpet - airy, with a nice holey structure throughout and a tender middle. I ended up hybridizing several recipes to create the one below, with a hat-tip to the Tesco website for providing the starting point for the ratios.
You will need crumpet rings, or egg-poaching rings, or some other food-safe way of corralling your batter in the pan. The standard size is about 3 inches or 7 3/4 centimetres diameter.
Crumpets
Makes 8 - 10
1 teaspoon canola oil
225 grams (1 3/4 cups) all-purpose flour (Type 505 in Germany)
150 ml whole milk
150 ml water plus extra as needed
1 teaspoon dried yeast
1/2 teaspoon sugar
1/2 teaspoon coarse salt
50 ml warm water
1/2 teaspoon baking soda
Warm the milk and 150 ml water together until just pleasantly warm but not hot. While it heats, in a mixing bowl, combine the flour, yeast, sugar, and salt, and stir together well with a whisk to integrate and aerate the ingredients. Make a well in the centre, and pour in the warm milk-water mixture. Stir briskly with a whisk to get a smooth batter. It should be about the consistency of pancake batter, so if it is too thick, add another tablespoon or two of water to loosen it up.
Scrape down the sides and cover the mixing bowl with a clean kitchen towel, and put it someplace warm to rise. I use my oven, which I had turned on for a minute or two to warm up, and then shut off before using. Let the batter rise for 45 minutes.
Preheat a large nonstick skillet over medium heat. Spritz it with canola oil, or use a pastry brush to brush on a thin coating. Brush your crumpet rings lightly with oil, too.
While the pan is warming up, mix the warm water and baking soda together, then stir it quickly but thoroughly through the crumpet batter. The batter is kind of stretchy at this point.
When the pan is ready, add about three tablespoons of batter to each crumpet ring (I use a small ladle to scoop the batter), turn the heat down, and set your timer for 5 minutes. It might take as long as six or seven minutes, depending on how thick your batter and hot your pan is, so you need to watch them. Bubbles will start to form quite quickly, but you want to wait until they burst and become holes that stay visible, before removing the rings (using tongs or a glove, because they are hot!), and flipping the crumpets over.
Let the crumpets cook for about one minute on the second side, and then flip them over again and remove to a rack to cool.
Bag them and store them in the fridge once cooled.
They toast up beautifully for breakfast or afternoon tea - top them with a little butter, with or without jam, or a slice of good sharp cheese. You could also use them as a base for poached or fried eggs, of course. Perhaps even some sort of unholy breakfast sandwich. It's up to you.
Labels:
Baking,
Breads,
Breakfast,
Vegetarian
September 20, 2015
Lye Water Bagels
Bagels always sounded like a lot of work. First you have to make the dough, then let it rise, shape, boil (!), and finally bake. And then there's the lye water, which is a separate sort of anxiety on its own. Lye is caustic and requires careful, safety-forward handling, which raises a additional barrier to being motivated enough to begin.
Happily, although there are lengthy-process recipes out there, you can absolutely make delicious bagels in only a couple of hours. I started these after breakfast, and we ate them for lunch.
I scoured around the internet for recipes, and finally hybridized the likely-looking ones into the recipe below. These are made partially with high-gluten flour, but you could as easily use only white bread flour instead. The extra gluten in bread flour helps these bagels develop their trade-mark chewiness.
These are somewhere between the aesthetics of New York style bagels and Montreal style. I make no claims to authenticity, so if you're a style hard-liner, this recipe may not be for you. If you happily eat any kind of bagel you encounter, I hope you'll give this one a try.
Lye Water Bagels
Makes 8 medium-large bagels
300 mL water, heated to wrist-warm
1/2 tablespoon honey
20 grams raw sugar
7 grams active dry yeast
10 grams salt
200 grams high-gluten or bread flour (such as German flour type 1050)
200 - 300 grams all purpose flour
For boiling:
1 tablespoon lye water* (I get mine from an Asian supermarket)
12 cups water
For baking:
Cornmeal as needed
egg wash (optional)
This dough will be a very firm one, and I caution you not to all all of the flour at once, lest you make it too firm. I was a little careless myself, and added a bit more flour than I should have. The end result was that I had a tough time shaping my bagels, and one of the hand-looped ones came apart during boiling (it was still delicious).
Pre-warm the oven so that the dough will have a nice warm place to rise.
Into a large mixing bowl, dissolve the honey and sugar in the warm water. If the water is a bit hot, let it cool until it's pleasantly warm but not hot against the wrist. Sprinkle the yeast over the sweet water, and wait until it proves itself by foaming up and smelling yeasty.
Add the 200 grams of high-gluten (or bread flour) and the salt, and beat vigorously with a wooden spoon until it is nice and smooth. Add 200 grams of the all-purpose flour, and stir it in, turning it out onto the work surface eventually, to knead it all in. If needed, add the remaining 100 grams flour a little at a time until you have a stiff dough.
Knead the stiff dough for 10 minutes, either by hand or with a very sturdy stand-mixer. If you are kneading by hand and are having a tough time, clean your hands thoroughly and oil them before continuing to knead. After ten minutes, smooth the dough into a compact ball and return it to the mixing bowl, which you have cleaned and lightly oiled. Roll the dough around in the bowl so that the surface of the dough picks up some of the oil. Cover the bowl loosely with plastic wrap, and let sit until the dough has doubled in size - about an hour.
Preheat the oven to 450 Fahrenheit, with a rack in the middle slot.
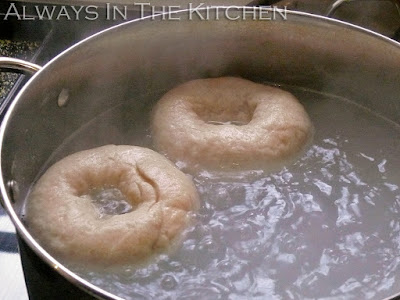
In a large pot (I used my Dutch oven) on the stove, heat the 12 cups of water until boiling, and then add the lye water just before you add the bagels.
While the water is heating, shape your bagels. Squeeze the excess air out of the dough, and then divide into 8 equally sized (more or less) pieces. You can shape your bagels by making a dough rope (or "snake") and looping it into a ring by wrapping it around your hand, pressing the ends together very firmly, or by making a smooth ball of dough and then forcing your thumb through the centre, gradually expanding the hole until the desired doughnut-shape is achieved. I tried both, but found the second method a bit easier than the first.
Prepare a plate or wooden cutting board with a thin layer of cornmeal. Also prepare a baking sheet with a thin layer of cornmeal for the oven stage.
When the water is boiling, add the lye water, and then immediately add 2 or 3 bagels, carefully, by hand, and time them for one minute. After the minute, turn the bagels over, and boil for one more minute. Use a spider-tool to remove the bagels from the water, onto the cornmeal-covered cutting board. Add the next bagels into the water and start the timer again.
If you want toppings on your bagels - poppy seeds, or sesame seeds, or whatever - now is the time. Brush the tops of the just-boiled bagels with an egg wash, and press them upside-down into a plate of seeds/toppings. Place the bagels topping-side-up on the baking sheet.
Move all the boiled bagels onto the baking sheet, cornmeal-side down. Bake at 450 F for 10 minutes, or until nicely browned. Allow to cool for at least 15-20 minutes before eating.
We had ours with cream cheese, of course, and a heavy grinding of black pepper.
Once completely cool, bag up and store as you would any freshly baked bread.
*I should note that I may use more lye water next time, as I couldn't find a reliable guide to how much lye water to add to my boiling water. Most instructions assume you will be using a dry form of lye, which is more concentrated. A higher concentration of lye should make for a somewhat darker colour on the finished bagel.
June 25, 2015
Bacon, Egg, & Mustard Scones
Breakfast muffins and breakfast biscuits have become a very dependable item for casual and fast food restaurants, and I know a surprising number of people who make them at home. Me, for example. It's a pretty easy breakfast that one can make with a minimum of fuss, although items such as bacon will of course add to the dirty dish count. Sometimes, however, you might want the convenience of a homemade biscuit without the need for actually cooking anything right at that minute. If you have a stash of these charming, bite-sized scones - where the bacon and egg and already incorporated right into the dough - you're just that much closer to the grab-and-go breakfast of your dreams.
Okay, okay. These do not fully replace the kinds of biscuits (or English muffins) stuffed with freshly-fried or scrambled egg (plus cheese and/or bacon), which of course have a different character than these scones. But they're quite satisfying, and a nice change from sweet, fruit-studded scones if that's your usual fare.
These are adapted from the Australian Women's Weekly Home Library publication "Muffins, Scones & Breads". As with the Chocolate Guinness Cupcakes, the heavy lifting here was done by my friend James, while I stuck to my moderately autocratic, slightly bossy, kitchen maven routine.
Bacon, Egg, and Mustard Scones
Adapted from Australian Women's Weekly
Makes 16 - 20
4 rashers bacon, fried, drained and crumbled
335 grams cake flour
4 teaspoons baking powder
1/2 teaspoon baking soda
1/2 teaspoon salt
90 grams butter
2 hardboiled eggs, finely chopped
1/4 cup freshly grated parmesan, plus 2 tablespoons extra
3 tablespoons finely chopped fresh chives
1 tablespoon wholegrain Dijon mustard
1 cup (250 mL) whole milk
We made these in a cast iron skillet, which is pretty old school.
Preheat the oven to 450 F / 220 C. Warm your cast iron pan gently on the stovetop to take the chill of it (it should be a little warm, but not hot.
Sift together the flour, baking powder, baking soda, and salt. Cut in the butter with a pastry blender (or a fork, or two knives, as you see fit), until the bits of butter are no larger than the size of a small-ish green pea. Add the bacon, egg, Dijon, chives, and 1/4 cup of parmesan, and stir through with a fork, making sure everything is evenly distributed.
Make a well in the centre, and pour the milk in. Stir very rapidly with a fork until it all comes together. If it is too wet, add a bit more flour until it's not quite so sticky (a little bit sticky is okay). Turn it out onto the counter. Mix with your hands, until you can gently massage it into a thick, flat dough.
Use a biscuit cutter to cut out the individual pieces (do not twist the cutter, or you will inhibit the rise of the scone as it bakes - straight up and down is the way to go). Use a knife if necessary to loosen them from the counter so you can move them into the skillet, arranging them so that they're close to each other but not quite touching. You might need to do two batches, depending on the size of your skillet.
Brush the tops of the biscuits with a little milk (or cream - not listed above), and sprinkle with the remaining bits of grated parmesan. Bake in the preheated oven for about 15 minutes, or until tall and golden. Remove to a wire rack to cool.
Because these have meat in them, store them in the refrigerator (in a sealable bag or airtight container) after they've cooled completely. They're not a good item to hold at room temperature for long.
If you prefer them warm, pop a cooled one in the microwave for about 15 seconds.
May 27, 2015
Orange Blintzes with Warm Strawberry Sauce
Blintzes, either sweet or savoury are ultimately a particular handling of the ever-so-versatile crêpe. They are a bit decadent and a little fiddly to make, but can be prepared a day in advance (or frozen, if you have the freezer space for it), and a wonderful item to look forward to - especially for breakfast or dessert. Their origin appears to be central and eastern European, with the Russians, Hungarians, and Poles (and maybe more) all laying claim (and infinite regional variations). They were popularized in North America by the Jewish population, where they are a holiday favourite (particularly for Shavuot) and are also a Shrove Tuesday classic for Christians.
Because this is meant to be a luxurious, festive dish, I am using my recipe for the egg-rich French-style crêpes, but after consulting a lot of references, I decided to go with what appears to be the standard method, namely cooking the crêpe itself only on one side until the top becomes somewhat dry, and using that as the inside surface of the wrapped blintz.
Living in Germany, quark is the natural cheese of choice for the filling, although ricotta would also work nicely. These are sweet, with both sugar and orange marmalade in the filling, but not too sweet. I've topped them with fresh strawberries that have been warmed in melted marmalade, but you do run the risk of the strawberry flavour dominating. The solution for that would be to use peeled mandarin slices instead of strawberries, so that the orange flavour stays consistent. We were pretty happy with the combination of flavours, although the orange was a little overwhelmed.
Orange Blintzes with Warm Strawberry Sauce
Makes 6 Blintzes
Wrapper
1/2 recipe egg-rich crêpes
butter for frying finished blintzes
Filling
250 grams quark
3 tablespoons cream cheese
2 tablespoons sugar
2 tablespoons orange marmalade
1/2 egg, beaten
zest of one orange (optional)
Sauce
2 tablespoons orange marmalade
2 tablespoons water (or one tablespoon water, one tablespoon lemon juice)
6-8 fresh strawberries, sliced
First thing: I have not lost my mind when I call for half an egg in the filling. A half-recipe of the crêpes calls for one and a half eggs, and the filling calls for half an egg. I simply beat two eggs until smooth, and then remove 2 tablespoons of beaten egg to use in the filling, reserving the remaining 1 1/2 eggs for the crêpe batter. Easy. Of course, if you decide to double the recipe, you can operate in terms of whole eggs.
You can make the filling ahead and store it in the fridge while the batter for the crêpes rests, and then cook all of the crêpes before you start filling them. You do want to make sure the crêpes have cooled at least to room temperature before filling, though, or the filling will start to melt and slide around, and the rolled-up blintz will be super floppy and hard to transfer to a plate or skillet; I know this from curse-laden experience. Let your crêpes cool! Spread them on a cooling rack until they're all cooked, and then start with the oldest to fill them. By the time you get to the last crêpe, it should be cool enough to handle without melting everything.
Cook the crêpes according to the recipe in the link, but only cooking on one side. As soon as the top of the crêpe is dry looking, remove the crêpe to a cooling rack and start the next one. The dry "top" side of the crêpe will be the inside of the finished blintz.
Fill the blintzes by piling a couple of tablespoons' worth of filling on the lower third of the cooled crêpe. Fold the bottom up just to cover the filling, and fold the sides in, envelope (or burrito) style. Continue to roll up until the blintz is a tidy package. It may take a few tries to get the shape the pleases you most - longer and thinner, or shorter and squarer. Your choice.
Move the filled blintzes to a tray or plate, cover with plastic wrap, and chill up to one day. At that point you could move the tray to the freezer until they are frozen solid, and then pile them carefully into a bag for longer-term storage. Or, you could fry them up right away.
You can make the sauce ahead, too, but it is best made just before you fry the blintzes. Melt the marmalade and water together and stir until smooth. Add the sliced strawberries (or orange segments) and stir gently until glossy and coated with the glaze. Turn off the heat.
Blintzes should be fried in butter, for the best flavour. They don't take very long, so make sure your attention is not needed elsewhere. If you're also making other items, or you're making a double batch, you can make the blintzes and keep them hot in a warm oven until you're ready to serve.
Heat a knob of butter in a large skillet over medium-high heat. When the butter has foamed out, start laying your blintzes in a single layer in the pan. I find my 12-inch skillet works very nicely for 6 blintzes at a time. As soon as the blintzes are golden and starting to crisp on the underside, carefully turn them over using a spatula or flipper - don't try to use tongs, because they are far too delicate. When both sides have browned nicely, transfer to the tray in the pre-warmed oven, or serve immediately.
Just like with crêpes, there are many ways to finish blintzes. If you've made the strawberry sauce, go ahead and spoon that over the plated blintzes, but you could also go with powdered sugar with-or-without a squeeze of fresh lemon juice, or a pile of mixed fruit on the side, for example. A few curls of orange zest would be beautiful on these - I would have absolutely done that, if I had had a fresh orange on hand.
Enjoy.
February 15, 2015
Ful Medames
Ful Medames (also transliterated as Foul Mudammas, or Fuul Medammes, amongst other spellings), commonly referred to simply as Ful (pronounced "fool"), is a middle-eastern bean dish that deserves broader recognition in the western world. It is a popular breakfast dish in Egypt, but its reach extends easts through Saudi Arabia, north throughout the eastern Mediterranean countries, and south into the horn of Africa. It is cheap, filling, and delicious.
As can be expected from a dish that reaches through so many disparate cultures, there are countless iterations. The essentials appear to be fava beans, olive oil, cumin, and lemon juice, but there are variations that include any of (or a combination of) garlic, chopped onion, parsley, tahini, and even chopped tomatoes.
Ful is most commonly served with flatbread, which is used as a utensil to scoop up the beans. The type of flatbread used is going to vary by whichever culture you're in - the good news being that you can safely use whatever flatbread you've got on hand. I served mine with freshly made pita bread (because it was Sunday and I had no choice but to make it if I wanted it), but you could easily use lavash, Somalian canjeero, or heck, even tortillas or chapati. You can also spread it on toasted sandwich bread.
Ful is often served on its own, but equally often as part of a larger, tapas-style meal, especially at lunch or dinner.
While sometimes other beans are used to make Ful, depending on culture and geography, the fava appears to be dominant. Fava beans are a bit more intensely flavoured than chickpeas. They are quite earthy tasting, and therefore pair really well with cumin, and stand up very well under the pungency of fresh garlic and the sharpness of lemon.
You can store it in the fridge for a few days without ill effect, simply adding a little more water to loosen it up as you reheat it. I find that I can make a double batch on Sunday, and have it for breakfast for the rest of the week.
Ful Medames
Adapted from Serious Eats
Serves 2 - 4
2 cups cooked fava beans (or a 400 gram can)
1 tablespoon olive oil
2 small cloves garlic, lightly smashed
pinch of salt
1/2 tablespoon cumin seeds
juice of 1 lemon
1 1/2 tablespoons tahini
In a small skillet, toast your cumin seeds until fragrant, and then carefully pour them out onto a cutting board (or into a mortar).
Into the emptied, unwashed skillet add your beans (with their liquid if they're canned, otherwise with about 1/3 cup water) and heat over a medium flame.
On the cutting board, add your garlic cloves and a pinch of salt, and run your knife through a couple of times until the garlic is finely chopped (or, in a mortar, pound the garlic and cumin together until the garlic is a smooth paste). Scrape the garlic/cumin mixture into the beans, and stir through. If you like things spicy, feel free to add in a few chile flakes, too.
The beans should be gently bubbling away at this point. Once the garlic and cumin have been stirred around a few times, add the tahini and olive oil, stir through, and continue to cook, stirring. At this point, you can mash up some of the beans against the side of the skillet, to make a thicker gravy, or if your skillet is looking a bit dry, you can add a little more water to thin it out. Add a tablespoon or two of the lemon juice and stir through. Taste, and decide if it needs more salt (if you use canned beans, probably not, but if you cooked them up from dried, probably yes). Stir and mash the beans as needed until everything looks well heated and the texture is somewhere between baked beans and thick soup. I know, that's a lot of leeway, but you really do get to choose how thick or thin you want this to be. This shouldn't really take more than about five minutes total cooking time.
Pour/scrape the beans into a bowl. At this point, you can add any final finishing touches that you like (an extra drizzle of olive oil, Egyptian style, or a sprinkle of Aleppo pepper, Syrian style, for example, or maybe some carmelized onions, or some parsley).
Serve with warmed flatbread.
Subscribe to:
Posts (Atom)