Showing posts with label Italian. Show all posts

July 14, 2017

Smoked Duck & Artichoke Lasagna Bianca with King Oyster Mushrooms


This recipe was partly inspired by the fact that I had a can of artichoke bottoms to use up, and partly inspired by the fantastic smoked duck & artichoke étouffée that my husband makes. It's such a great combination, and I figured it would translate well to lasagna. And boy, did it ever! I decided against a tomato base for this lasagna because I thought bechamel would better offset the smokiness of the duck between the layers of pasta.

We served this with Prosecco (highly recommended), and chased it with a bright-tasting, lightly dressed, veggie-packed salad.

Smoked Duck & Artichoke Lasagna Bianca

Serves 6

one 20 x 30cm baking dish

Ragú Layers

1 smoked duck breast (about 300 grams), finely chopped
75 grams pancetta, finely chopped
1 400 gram can artichoke bottoms (220 grams drained weight), chopped
1 medium onion, finely chopped
3 large King Oyster Mushrooms, finely chopped (about 3 cups)
2 cloves garlic, minced
2 tablespoons duck fat
1/2 cup duck broth/fond
2 sprigs fresh thyme
pinch coarse salt
2-3 tablespoons dry vermouth or dry white wine
1 tablespoon all-purpose flour
water, as needed

Ricotta layer

250 grams ricotta
1 egg, beaten
2 tablespoons minced parsley
2 tablespoons grated parmesan cheese

Bechamel layers

3 cups whole milk
60 grams all-purpose or blending flour
65 grams butter
1 bayleaf
pinch white pepper
small pinch nutmeg

Noodles

Enough fresh or no-boil lasagna noodles to cover the bottom of your pan three times.

Extra

1 1/2 cups coarsely grated parmesan cheese
2 tablespoons parsley, for finishing

Process is rather important here, so make sure you have a very clean space to work in - it's about to get messy.

Prepare the ragú layers first: Heat the duck fat in a large skillet, and sauté the onion and the pancetta. Add the mushrooms, and continue to sauté while you chop up the duck and the artichokes. Add the thyme, and the pinch of salt, and stir through. Deglaze the pan with a tablespoon or so of vermouth or dry white wine, as needed. Add the duck and artichokes to the pan, and stir well. Add the minced garlic, and stir through again. Sauté until the ingredients start to catch, and the mixture has become dry. Add a bit more vermouth, and stir again. If the mixture is still quite dry, add a couple of tablespoons of water. Sprinkle the flour over the mixture, and stir it in. Allow the mixture to simmer very gently on the lowest heat, covered, while you prepare the other elements. Stir occasionally, and if it looks like it's drying out, add a little more water.

Grate the parmesan cheese and chop the parsley, including the amounts that you need for the ricotta layer.

Combine the ingredients for the ricotta layer in a bowl, and set aside.

For the bechamel layer: you can make this using the roux method, but given the long cook-time in the oven, it's not strictly necessary. Combine the cold milk and flour in a saucepan, and add the butter. Over medium heat, stir the mixture until the butter melts and the sauce begins to thicken. Stir carefully, scraping the bottom, to ensure nothing burns. Add the bayleaf, the white pepper, and the nutmeg. Be very discreet about the nutmeg, you just want a whisper. Continue to stir and cook until it is nicely thickened, and then stir in a pinch of salt, and remove from the heat. It is time to start layering.

First, preheat your oven to 350°F/ 180°C, with a rack in the lower-middle position.

Prepare your baking dish: either spritz it with a bit of canola oil, or a thin layer of butter, as you wish. Place a small amount of bechamel in the bottom of the dish, and spread it around thoroughly. This helps keep the first layer of noodles from adhering to the dish.

Add a layer of noodles, and then half of the duck mixture. Sprinkle with 1/3 of the grated parmesan, and dollop the ricotta mixture (all of it) over the parmesan. Spread the ricotta so that it makes a more-or-less even layer. Drizzle with a third of the remaining bechamel. Add the second layer of noodles, and repeat the duck mixture and parmesan layers. Top those with half the remaining bechamel (you have already used all the ricotta in the layer below), and add the third layer of noodles. Pour the remaining bechamel over the third layer of noodles, and spread it around so that it perfectly covers everything. No noodle bits should be bare, no duck bits should be peeking out of the sides. Cover the Bechamel with the last of the parmesan, and sprinkle with parsley.


Place the dish, uncovered, in the oven, and bake for 30 minutes. If the top is not nicely spotted with golden flecks, crank up the broiler and give it another couple of minutes (watch closely!) until the surface is attractively browned, and then remove from the oven and place on a hot pad. Allow the lasagna to stand, uncovered, for 15 minutes once it comes out of the oven, to make for easy, mess-free slicing. Use a serrated knife to cut into six portions (and loosen the lasagna from the edges of the dish, and use a lifting spatula/flipper to ease each piece up and onto a plate.


Once again, Prosecco is the perfect drink with this.


June 10, 2017

Chicken Parmigiana


Chicken Parmigiana is a bit of a process, but it doesn't have to be an ordeal to make at home. Moreover, there's one truly excellent reason to do so: leftover chicken parmigiana makes simply amazing sandwiches.

It helps lighten the workload if you have some good homemade basic tomato sauce on hand (I like to keep some in the freezer), but you could use a purchased one. The chicken itself is shallow-fried rather than deep fried (you could also bake them), and the cooking time is actually pretty quick. You might want to have your side dishes already to go when you lay the chicken in the pan, because the cooking time is mostly active and it can be challenging to do tend to two items that are highly active at the same time. Fortunately for me, my chosen side dish of spaghetti aglio e olio wasn't time or labour intensive (and the mise en place was done in advance), which minimized the juggling.

Restaurant versions of chicken parmigiana often are a bit light on the parmesan cheese, and for extra gooey-ness include a lot of mozzarella. Now, I like mozzarella just fine, but I didn't want its rich presence to overshadow the parmesan itself, so I simply went to town with a lot of parmesan before it went into the oven, and a renewed layer of freshly grated parmesan when it came out.

It's always important to maintain good kitchen hygiene when working with raw chicken, so I lay out the breading bowls in a straight line, to ensure I'm not going back and forth.

Chicken Parmigiana

Makes 4 cutlets

2 large boneless, skinless chicken breasts
1/2 cup flour
1/2 teaspoon salt
1/2 teaspoon ground white pepper
1 egg, beaten
2 cups coarse, dry breadcrumbs, such as panko

1 cup basic tomato sauce

1 cup freshly grated/shredded parmesan

canola oil - enough to cover the bottom of a large skillet about a centimetre deep

Before you start with the chicken, get your pan ready with the oil - you'll want it heated to about 180-190°C (350-375°F) if you have the ability to control/set the temperature. Otherwise, set it over medium heat for now. Turn the oven on to preheat to 200°C (400°F) with the rack in the middle of the oven. Place the tomato sauce in a small skillet or saucepan to warm up.

Using a sharp knife, slice each chicken breast horizontally into two thin cutlets. With a mallet or other meat-flattening device, gently pound the cutlets until they are about a quarter bigger than they were, and the meat is as even as you can make it. Move your four cutlets to the start of your breading line (be sure to have a clean plate and the end of the line, to hold the breaded cutlets).

Mix the flour with the salt and pepper (you can add a pinch or two of dried basil or oregano if you like) in a wide, shallow bowl wide enough to fit the flattened cutlet. In the next bowl, place the beaten egg. In the final bowl, the breadcrumbs.
Without hurrying, dip the first cutlet into the flour mixture to thoroughly coat it on all sides, and give it a good shake to remove any excess flour back into the bowl. Then, dip the floured cutlet into the egg, again, coating it thoroughly, and letting any excess drip back into the bowl. Next, lay the cutlet in the breadcrumbs, and press it down firmly so the breadcrumbs really stick to it. Turn it over and press again. Lift gently (no need to shake this time) and lay it on the receiving plate at the end of the line. Repeat until all four cutlets are breaded.

When your oil is ready (it may already be ready - test it by sticking a wooden skewer or raw spaghetti strand in, and if it bubbles immediately it's good to go), lay the first two cutlets side by side in the pan (I use tongs to gently lay them in the pan). While they fry, place a metal baking/cooling rack on a sheet pan and have it standing by to receive the fried cutlets. When the bottom side is golden brown, use the tongs to flip the cutlets over to the other side. It doesn't take longer than a couple of minutes, because the cutlets are so thin, so pay attention to them. When the first two are done, remove them to your rack-on-the-baking sheet, and start frying the remaining two cutlets the same as the first. While they are frying, grate your parmesan.

When the second pair of cutlets have finished frying and have joined the first pair on the rack, spoon a little of the tomato sauce onto each cutlet, spreading it to cover the top surface (you might have some sauce leftover). Next, add a hearty layer of grated parmesan on top of the tomato sauce, and then transfer the whole rack & sheet to the oven for a few minutes until the parmesan is melted and the dish comes together as a glorious whole. Remove the rack from the oven, add a fresh layer of parmesan, and serve immediately.


But wait...I mentioned sandwiches, right?


So, if you planned to have some cutlets leftover, leave them on the rack to cool completely, and then transfer to an airtight container in the fridge. When you are ready to turn them into sandwiches, take them out of the fridge and place them in a dry skillet over medium heat for a few minutes, to take the chill off of them. Then, they are ready to slide into a lightly buttered bun (you don't need other condiments, although if a few fresh basil leaves happen to mysteriously fall into the sandwich it wouldn't end the world). Slice each bun in half, and serve - or wrap well in greaseproof paper for a picnic.

You could of course use other bread, but I find a nice, fresh bun has the sturdiness to cope with such an imposing filling. It also means that the cutlet will just slightly overhang the bun, which is an ideal ratio of bread for this kind of sandwich.

April 08, 2017

Arancini: Italian Rice Balls


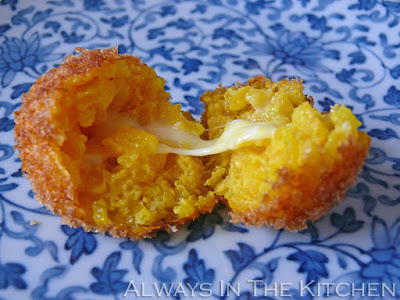
Arancini means "little oranges", and you can find them in many parts of Italy, often as a bar snack. They can be served hot, or at room temperature. It is a way of upcycling leftover risotto into a dish that feels wholly different, while still packing all the same satisfaction. These arancini were made using leftover Risotto alla Milanese, and filled with fresh buffalo Mozzarella. You can make this with pretty much any leftover risotto, although if there are any large featured ingredients, you will want to remove them and either dice them finely and add them back into the rice, or add them to the filling. You can use any melty cheese you have on hand.

I don't deep fry things very often, partly due to the mess, partly due to general anxiety about deep frying, but I'll make an exception for these. As a killer bonus, once these are made, you can reheat them for 15 minutes in a very hot oven a day later with no loss of quality! Can you say...party food? Look at this one -- it's a day old, reheated, and is still fantastic:


Added bonus: you can make them any size you like.

Arancini

About 6 large or 12-14 small

About 3 cups leftover risotto, such as Risotto alla Milanese
1 egg, beaten
100 grams fresh Mozzarella, such as buffalo
About a cup of panko or other dried breadcrumbs
Oil for deep frying

While the oil heats to 175°C / 370°F, loosen the risotto gently with a fork. Add the beaten egg, and stir very gently to thoroughly combine. Turn the mass of risotto out onto a cutting board, and divide into the number of arancini you want to make. I've made 6 larger ones and one smaller one. Dice the mozzarella (or other melting cheese, such as Provolone or Fontina, for example) into at least the same number of arancini you are making. Don't make the cheese cubes too huge, or you'll have trouble closing the rice around them.

Set a clean cutting board or plate as a receiving plate for the completed arancini. Then, pick up the risotto for the first ball, and flatten it in your hands into a rough disc. Place a piece of mozzarella (or two, if you find you've chopped them quite small) in the centre of the disc, and curl your fingers up to start to enclose it. Get your other hand in there to help close the rice completely around the cheese, and shape into a nice round ball. Roll the ball in the breadcrumbs. Set aside on the receiving plate, and repeat until all of the rice has been formed into arancini.


Wash your hands, which will be sticky and coated with egg/risotto goo. Prepare a receiving plate for the fried arancini by lining it with a few paper towels.

When the oil is ready for frying, lower one arancino (singular) into the oil, using a mesh skimmer or spider. Let it cook for about a minute before adding another. Do not have more than four of the larger ones in the pot at the time, or the temperature of the oil will drop too far, and the arancini will not fry as nicely. Let each arancino cook for about five or six minutes, turning them from time to time, and then retrieve from the oil with your spider, and place on the paper towel-lined plate. They should be golden-y, orange-y brown and incredibly tempting. Repeat until all the arancini are cooked, and then serve and devour.


Arancini are often served with a dipping sauce - often a simple basil and tomato pasta-type sauce, but these ones are so creamy they don't strictly need it.

I served these with a lentil soup made from the leftover braised beef shanks that had accompanied the original risotto.

April 01, 2017

Risotto alla Milanese


Risotto (alla) Milanese, also sometimes called Risotto Giallo Zafferano, is a luxurious dish. It is not cheap to make, nor is it vegetarian; alongside its famously expensive saffron, the other signature ingredients include bone marrow and meat stock. The risotto kits that one can find on supermarket shelves tend to include only the merest whisper of saffron (if at all) and rely on turmeric or other colorants for the vivid yellow colour. They may make a serviceable side dish of sorts, but you would be in for a disappointment if you expected it to live up to the magic of a traditional Risotto alla Milanese.

I've made saffron rice dishes before, and while I've always enjoyed the flavour, I'd never achieved the deep, dark golden hue that is one of the signatures of this, one of the most famous Italian dishes. It turns out, it very much matters no only what kind of saffron one uses, but also how fresh it is. After recently making a saffron risotto that was underwhelming in colour, texture, and flavour, I decided to set aside what I've learned making other risottos, and learn how to do this one in all of its traditional glory.

I had used up the last of my good Persian saffron in the previous batch. While that saffron was indeed top quality when I received it, I had been eking it out over a few years, and gradually the remaining strands had greatly diminished in both their pungency and the amount of colour they provided. So I bought a new tiny tube of beautiful, dark red threads, and used them generously. Note that not all saffron is created equal. Don't be deceived by "safflower saffron", Carthamus tinctorius AKA "American saffron" or "Mexican saffron" or even "Dyer's saffron" (it has colour, but no flavour). It's not even from the same type of plant as true saffron. The one you want is Crocus sativus.

One departure from other risottos that I've made is that this one has you boil the onions in wine before adding the rice. This made the onions virtually disappear into the dish, adding a depth of texture to the sauciness of the dish. I note that Claudia Roden's other The Food of Italy (so, not the region-by-region version from which the below recipe is adapted) has a slightly different recipe given for Risotto alla Milanese, with slightly different proportions of some ingredients and, more importantly, with the wine added after the rice, following the more classic risotto-building method. Undecided at first, I eventually chose to go with the unusual version, which turned out to be nothing short of glorious.

Risotto alla Milanese

Adapted from Claudia Roden's The Food of Italy: Region by Region

Serves 4

300 grams rice for risotto - eg. Arborio, Carnaroli, Vialone Nano
30 grams butter
30 grams beef or veal bone marrow
1 litre (4 cups) beef or veal stock, warm
125 mL dry white wine or dry white Vermouth
1 small onion, finely chopped
1/2 teaspoon coarse sea salt (only if your stock is not too salty)
60 grams freshly grated Parmigiano Reggiano cheese
3/4 teaspoon saffron threads
50 mL hot water (from a recently boiled kettle)

As always, risotto is best (and the cook less harried) when the mise en place, the advance preparation of all necessary ingredients, is done before actually starting to cook.

Risotto needs near constant attention, but it does not require continuous stirring, no matter what you might hear. A stir once per minute will suffice. If you overstir, especially if you are making a drier, non-soupy style, your rice will be half way to congee by the time you've added all your stock. So: stir frequently, and gently, but not continuously.

Chop your onion very finely (try to match the size of a grain of rice), grate your Parmesan, warm the stock in a small pot on the stove, and prepare the saffron infusion: in a small mug or measuring cup, pour the 50 mL hot water from a recently boiled kettle, and crush the saffron over it, letting the dark red dust fall into the hot water. You can crush the saffron with a spoon, a mortar and pestle, or simply use your fingertips. Let the saffron steep in the hot water, which will gradually turn bright yellow.

Melt the bone marrow in a medium-sized saucepan over medium heat. When it has all melted, add half the butter (a tablespoon) and let that melt, too. Next, add your very finely chopped onion, and let it sauté for a few minutes, and then add the white wine. I used dry Vermouth for the wine, which is my usual risotto practice, but you could also use a nice Pinot Grigio or Soave. Let the wine boil almost dry, until the mixture of fat, onions, and wine looks syrupy, and then add the rice. Stir the rice around well, to coat each of the grains with the viscous liquid. Stir in the salt.

Add a ladle of stock to the rice, and give it a few stirs. Let it simmer, lid off, until much of the liquid has evaporated, and then give it another stir, and another ladle of stock. Stir again, and let it be for a minute. Repeat this process, stirring about once per minute or as needed (if you need to stir more often, turn the heat down), until half of your stock is gone, about 12 - 15 minutes in. You may stir more than once between each addition, of course.

When half of your stock has gone in, add the saffron and its steeping liquid and stir it through, marvelling at the abrupt change of colour, and intense fragrance! I like to add a bit of stock to the emptied saffron cup, and swirl it about to make sure I get every last speck of saffron into the risotto. Continue with the stirring and the adding of stock as before, until all of the stock has been added and mostly absorbed, and the grains of rice are just on the verge of being tender. Turn off the heat, and stir in the remaining tablespoon of butter and the parmesan cheese. Partially cover with a cocked-lid and let it stand for a few minutes while you plate any other elements of your dinner (in case of the above, braised beef shank and cauliflower mornay), and then spoon the risotto onto the plate last. If you like a very wet style of risotto, you may wish to use a shallow bowl to serve, instead.


Should you be lucky enough to have any leftover, they make wonderful arancini (Italian rice balls). Coincidentally (cough cough), that is next week's recipe. Stay tuned!


September 13, 2015

Chanterelle Risotto


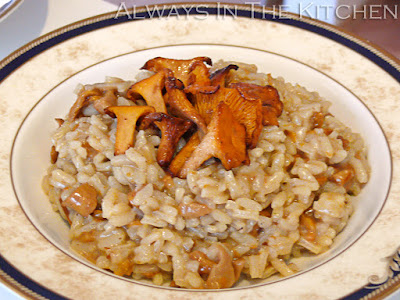
Late summer through fall is chanterelle season here in Germany. You will see market stalls piled high with Pfifferlinge, as they are called here, and you will see specials on the chalkboard of almost every restaurant: chanterelles with dumplings (especially a variety called Serviettenknödel), chanterelles with pasta, creamed chanterelles on toast, and of course, chanterelle risotto.

The secret to a nice mushroom risotto is not to overcook the mushrooms. I like to fry a few decorative ones in butter to set aside to use as a garnish, and then sauté the rest for the main risotto itself. By sautéing the mushrooms first, before anything else goes in the pot, it's easy to remove the lightly sautéed mushrooms to a plate to add back in later, so that they don't get that wrung-out squidgy quality that happens with overcooked mushrooms.

As always, everything that is not a feature ingredient in a risotto should be so finely chopped as to not exceed the size of a cooked grain of arborio.

Chanterelle Risotto

Serves 4

300 grams fresh chanterelle mushrooms
4 tablespoons salted butter, divided
2 shallots, finely minced (or small onions)
2 cloves of garlic, pressed or microplaned
220 grams risotto rice (I'm using Baldo here, but arborio is fine)
1/2 cup dry white vermouth (or dry white wine)
1/2 teaspoon coarse sea salt or Kosher salt
4 cups warm vegetable stock/broth (or mushroom stock)
juice of 1/2 lemon
1/2 cup freshly grated parmesan cheese

Clean your mushrooms and set aside the ones you want to use for garnish. Remove hard stem-ends from the rest, and roughly chop. Finely chop your shallots and press your garlic. Measure out everything else and have it standing at the ready.

In a large pot, such as a Dutch oven, heat 2 tablespoons of the butter and quickly fry the chanterelles reserved for garnish. Set aside, and then add the rest of the mushrooms to the pot. Sauté briefly, then set aside in a bowl until the risotto is almost finished.

In the same pot, add one more tablespoon of butter, and then add the shallots and garlic. Stir and sauté until slightly translucent, and then add the rice, stirring well to make sure none of the grains stick and burn. When the grains of rice are all coated with the butter and they start to catch at the bottom of the pan and a little golden colour starts creeping in to the bottom of the pan, add the vermouth (or white wine), all at once. Stir vigorously to make sure everything is scraped up from the bottom. Add the salt, and stir through.

The vermouth will disappear pretty quickly, so be prepared to start ladling stock into the rice. Use a small amount at first, just adding a little at a time, stirring well over medium heat, and waiting until most of the liquid has been absorbed before adding more.

When you are halfway through your stock, stir in the lemon juice. Continue to stir and add stock until you have no more liquid to add, and then return the reserved chopped mushrooms to the pot and gently stir through. Add the final tablespoon of butter, and stir through. Turn off the heat, cover the pan, and let stand for 5 minutes. Remove the lid and stir in the parmesan cheese. Spoon into shallow bowls and top with the reserved fried mushrooms, and maybe a little extra sprinkle of parmesan.

May 13, 2015

Easy Weeknight Risotto Bolognese


This was inspired by Nigella Lawson's recipe for Risotto Bolognese from her book Kitchen, but to be honest, I didn't really follow it. I skimmed the ingredient list and directions and decided that it was more about the idea, the fact of combining two normally discrete dishes into a delicious juxtaposition, and then I just ran with that. Consequently, my ingredients, ratios and even my method ended up being quite different from hers.

The shortest possible version of this recipe goes something like this: Build a bolognese sauce, and then use that as a base to build a risotto on top of. That of course depends on the cook knowing what normally goes into both of those things, and otherwise being willing to take the rest on faith. Fortunately, that's me. This is a true skillet dinner, without the need to remove anything to a separate plate or pan at any point during the cooking process.

I won't claim that this is a really serious Bolognese (note the use of "Easy Weeknight" as a modifier), but it's a meaningful nod in the general direction, and for this dish, that's good enough for me. Although, if you happen to have some genuine Bolognese tucked away in your freezer that you want to use instead, go for it. It's not a lightning-fast dish to make - risotto takes time, after all, but it's very straight forward, and if you use a chop-and-drop method, it all comes together surprisingly quickly.

Easy Weeknight Risotto Bolognese

Serves 4

4 thin (or 2 thick) slices of bacon, finely chopped
1/2 tablespoon olive oil
1 small onion, very finely diced
2 cloves of garlic, crushed or minced
1 medium carrot, peeled and grated
400 grams minced beef/pork blend (or meatloaf mix)
2 teaspoons beef stock paste (such as Better Than Bouillon or Alnatura Rinderbrühe)
pinch dried oregano
big pinch dried basil
big pinch ground white pepper
1/2 cup whole milk
1/2 cup vermouth
2 tablespoons tomato paste
1 400 gram can of finely chopped tomatoes
1 cup arborio (or other suitable risotto rice)
4 cups hot water from a recently boiled kettle
Fresh basil, for finishing and garnish
Freshly grated parmesan

In a large heavy skillet, over medium-high heat, fry up the bacon until it is a bit crispy and releases its fat into the pan. Add the olive oil and stir through. Add the onion and garlic, and stir through. Stir and cook until the onion is thoroughly softened and translucent. Add the grated carrot, and stir through, cooking for about five minutes until wilted and starting to become tender, and the excess liquid has evaporated.

Add the minced meat and stir, breaking it up with a big wooden spoon as you go. Fry and stir until the meat is a little browned, and then add the stock paste, oregano, dried basil, white pepper, and the vermouth. Stir and scrape up the bottom of the skillet while until the vermouth has evaporated. Add the milk in two stages, stirring until mostly evaporated in each case. Add the tomato paste, and stir through. Add the chopped tomatoes and their juices and stir through.

Let the mixture get completely hot and bubbly, and then stir the rice in. Reduce the heat to medium. Add a bit of water from the kettle, and stir until the extra water is absorbed by the rice. Basically, at this stage you just keep repeating that, adding the water a bit at a time, stirring between additions until the water is mostly absorbed, until you've either used all the water, or the rice is cooked to your liking. The rice will slowly absorb not only the water but the juices from the sauce itself, the grains swelling to full size and taking on a creamy appearance. The combination of the carrots and the tomatoes will give the finished dish a uniquely orange-red tone, quite different from most meat/tomato based sauces, but it coats the rice grains beautifully.

When all of the water is absorbed and the rice grains are cooked to your satisfaction, spoon into shallow bowls and garnish with basil and freshly grated cheese. And maybe some garlic bread.

If you have leftovers of this, it reheats very nicely in a covered casserole in the oven (you will want to add in a bit of water, and poke some holes to allow speedier reheating), and I imagine it would reheat well in a microwave, too. If you must reheat it on the stovetop, try not to over-stir it. While it's stirred to death during the making, after it is fully cooked, cooled, and reheated again, it can get a bit mushy if you stir it too vigourously.

March 01, 2015

Pasta & Cauliflower with Brown Butter and Sage


Sometimes really great dishes come simply out of the desire to avoid wasting food. I can't remember quite what I was cooking last week, but I do know that I turned my back on it for a moment, and the butter I was melting turned nutty and golden brown. Which was exactly what I didn't want. While inventing new curse-words, I poured the hot, browned butter off into a shell of tinfoil, wiped out the pan, and started again. Then later, when I was cleaning up, I looked at it and thought - there's got to be a use for that.

There's rather a lot of browned butter recipes flying around on the internet - everything from muffins to frosting to ice cream, but I wanted something simple - something I could do on a weeknight, when I get home at seven o'clock, starving and wanting easy answers. Pasta naturally sprang to mind.

Pasta with brown butter sauce (and sage) is a classic Italian dish. In my experience, it is almost always long noodles that are served this way, and that was my original plan, too. Then I realized that I had a half-head of cauliflower that was quietly aging in the crisper, and decided to go for a short, chunky pasta instead.

It's a pity you cannot see the sage in this - it seemed to mostly drift to the bottom of the skillet (probably because I shredded it), and what didn't hide beneath the pasta and roasted cauliflower, quickly got snowed under with a thick blanket of parmesan. If I had been less hungry, I might have arranged it more attractively, but nope.

This was a dish that used up leftover cauliflower (freshly roasted), accidental brown butter, and a weird pasta shape that I had already lurking in my refrigerator. The fact that it was also delicious made it into end-zone dance category.

I also served this with lamb cutlets (not pictured), because it seemed like a nice combination. They were delicious, but probably unnecessary. If I were serving this as a a vegetarian entree, I think I might add a few toasted pine nuts, as well, for heartiness (and delightful crunchiness).

Pasta & Cauliflower with Brown Butter and Sage

Serves 2

100 grams short pasta
2 tablespoons browned butter
1 small handful fresh sage leaves, in chiffonade
1/2 small head of cauliflower (freshly roasted with olive oil and a good pinch of salt)
parmesan cheese for finishing

Cut up the cauliflower until the pieces are just slightly chunkier than the pasta you are using. Toss well with a little olive oil and a big pinch of coarse salt, and roast at 400 F for 20 minutes or until tender when pierced with a fork (and ideally, golden brown where they touch the pan - a metal pan works best for this).

While the cauliflower is roasting, heat up the water to boil the pasta, and warm the browned butter (or, starting from scratch, brown the butter) in a medium skillet. Add the sage leaves to the butter once the pasta is almost cooked.

Cook the pasta to your preference (remembering to salt the water), and then, using a wire skimmer/spider spoon it into the brown butter and sage. Stir well. Add the roasted cauliflower to the pan, stirring gently but thoroughly to get everything coated with the browned butter. Dust thoroughly with freshly grated parmesan, and serve.

Leftovers reheated beautifully in a microwave.

February 07, 2015

Prawn & Pumpkin Risotto


This is the traditional Hallowe'en dinner in our household, but really, you can make it all winter long when the winter squashes are cheap and plentiful. I've used a butternut squash here, but you could of course use any cooking pumpkin with firm, dense flesh (acorn or muscat squash might not be at their best here, because they would likely turn to mush with all the stirring). The final colour of the dish will depend greatly on which squash you decided to use, but usually ranges from an intense yellow to a vibrant orange.

For the shrimp, please check out this Oceanwise resource page for prawns/shrimp if you need help making an informed choice about sustainable harvesting.

If you're vegetarian/vegan, or just not a fan of seafood, you can omit the prawns and still have a beautiful, delicious side dish. Either way, don't drown in in cheese at the end - it really doesn't want or need it.

Prawn & Pumpkin Risotto

Serves 4

4 cups diced-small pumpkin or winter squash
250 grams risotto rice (arborio, carnaroli, or similar)
1 small onion, finely diced
4 cloves of garlic, minced or pressed
4 cups vegetable broth
1/2 cup white vermouth or dry white wine
2 tablespoons olive oil or butter
1 1/2 tablespoons tomato paste
1/2 teaspoon coarse sea salt
1/4 teaspoon ground white pepper
250 grams raw prawns or large shrimp (frozen is fine)
Hot water from a recently boiled kettle (just in case)

If you've read my other risotto recipes, you will know that I am extremely particular about the size of ingredients in my risotto. My theory is, broadly, if it's not a featured ingredient, it should be no bigger than a (cooked) grain of the rice that you are using. Basically, onions, I'm looking at you. Because the squash and prawns are features, they get to be bigger, but I do find having a small dice for the pumpkin here makes a more visually and texturally pleasing choice.

First step, as always, is get your mise en place ready: Peel, clean, and dice your pumpkin, and set aside. If you have a little less pumpkin than 4 cups, it's still fine, although 4 cups gives the best result. Finely dice your onion, and mince your garlic. Warm up your broth and keep it on a low flame on the stove, so it's ready to be ladled into the rice. Clean the shrimp, removing shells (if necessary) and veins. If frozen, rinse them in a sieve under cold running water until they are mostly defrosted. Basically, get all ingredients prepared, measured, and standing by, because you get no further time to prep once you've started cooking. Be sure to boil a kettle, and have the hot water standing by in case you need it later.

In a large saucepan, heat the butter or olive oil over medium heat until quite hot, and then add the shrimp and quickly sauté them until they just barely change colour. Remove to a nearby plate/bowl to add into the risotto later.

In the same saucepan, without cleaning it, add the onion and garlic, and sauté just until the onion begins to turn translucent. Add the salt and white pepper, and stir through.

Next, add the rice and stir well, to get a nice, thin coating of fat on the rice grains. Add the tomato paste, and stir through until it is completely integrated and there are no streaks of red running through the rice. Add the diced squash, and stir it through gently. (You can also reverse the order of adding the rice vs. the squash, no biggie as long as everything is nicely coated in the end. I find it easier to add the tomato paste before adding the squash, though, to get it evenly distributed.)

Add all of the wine/vermouth at once, and stir, carefully scraping up the bottom of the pot so that nothing sticks. Lower the heat to medium-low, and begin to add the warm vegetable broth, one ladleful at a time, stirring gently but pretty much constantly in between each addition until the liquid has been absorbed before adding more. It should take about 25 - 35 minutes to add all of the liquid, and that variable is based on how hot your burner is.

If you get to the end of your broth and find that the rice is not quite cooked enough to your taste, add a little of the hot water from your recently boiled kettle, and continue until the texture is just right - a little bite to the rice, but not crunchy. Next time, you might want to lower the heat a bit more.

When the rice is ready, stir the prawns gently into the risotto. If you want an especially luxurious dish, add in another tablespoon of butter or olive oil, but it's not strictly necessary. Cover the risotto, and remove from the heat. Let stand for five minutes, and then spoon into shallow bowls and serve. Feel free to add a garnish of parsley if you like, but steer clear of the parmesan.

October 08, 2013

Venetian Chicken Livers - Fegato di Pollo alla Veneziano


So! We've found a place to live, and will be moving in on November 1. My kitchen should be arriving shortly thereafter, and I am anxiously awaiting the opportunity to cook once again. Seriously, boiling eggs in an electric kettle may technically count as cooking, but crikey! What I wouldn't give for a simple skillet dinner right now...

In the interim, I've found a couple of photos in my archive from dishes we cooked earlier this summer, and so I plan to trickle those out until I'm cooking again. This one is from late June.

I apparently need to get more iron into my diet. I do take iron supplements - as much as my poor system can handle, but it's not enough to correct the serious deficit that I'm running, so I am finding ways to squeeze more red meats and offal into my diet. Yes, I know that there are plenty of vegetable sources of iron (I'm eating those too); I simply need all the iron I can get.

Liver is a rich source of easily absorbed iron, even poultry liver, so it seemed obvious to me that we should take a crack at a classic Venetian recipe for chicken livers with fettuccine. My husband was the cook this time, and I was the lucky person who simply had to show up and eat. This dish comes together very quickly, so make sure your prep is done before you start cooking.

Venetian Chicken Livers - Fegato di Pollo alla Veneziano
Adapted from Claudia Roden's Food of Italy

Serves 2

Fresh fettucini (2 servings)
225 grams fresh chicken livers, cleaned and sliced into medium-large chunks
1 - 2 shallots, sliced pole-to-pole into strips
2 cloves garlic, finely sliced
2 tablespoons butter
1 tablespoon olive oil
¼ teaspoon kosher salt
pinch white pepper
3 tablespoons red (or dry white) wine (approximately)
¼ cup freshly shredded parmesan cheese
2 tablespoons freshly chopped parsley

Prepare the pot with water for the pasta, and get it ready to drop the pasta (fresh pasta only takes about three minutes to cook). If you must use dry pasta, obviously start the pasta first, and adjust the timing accordingly. Warm some pasta bowls and have them standing by.

Clean and slice the livers, removing any grotty bits of sinew or connective tissue, and set aside. Slice the shallot(s) and garlic and set aside.

In a large skillet, heat the butter and the olive oil over medium-high heat until the butter foams and subsides, and then add the livers in a single layer. Sprinkle with the salt and white pepper, let them sear briefly to get a tiny bit of colour on them (about a minute). During that minute, drop your pasta into the boiling water, and make sure there's a colander or sieve ready to receive it. Give the livers a quick stir to flip them over, and push them to the outer edge of the skillet. Add the shallot strips and garlic into the bare centre of the skillet (you can add another bit of olive oil if it looks dry). Sauté briefly, and then gently stir the livers through the onion mixture. Add the wine (or a splash of vermouth) to deglaze and create a bit of a pan sauce, scraping up the bottom of the skillet. Continue to cook gently until the pasta is ready (in the other pot), and then turn off the heat under the livers.

Drain the pasta and portion into the warmed pasta bowls. Spoon the livers mixture over the pasta, being sure to pour any collected juices from the pan over each serving, and top with parmesan and parsley. Enjoy with a nice glass of wine.

If I recall correctly we utterly failed to remember to add the garlic, but it wasn't missed so it's clearly an optional ingredient (a Venetian may disagree with me). I do think that the next time I make this I might top it with a lemon gremolata, rather than just the parmesan and parsley, because I think it would beautifully - the sharpness of the lemon zest and raw garlic cutting through the richness of the dish. I'll be sure to report if that's the case.

February 04, 2013

Venetian Chicken Frisinsal


There is a wonderful, medieval attraction to the notion of tearing apart a roasted chicken with one's bare hands, and this dish can be the wonderful result.

There are quite a few recipes for this floating around, many of which appear to be derivatives of "Tagliatelle W/ Chicken From The Venetian Ghetto" from Nigella Lawson's "How To Eat" or "Tagliatelle Frisinsal" which appears in Claudia Roden's "The Book of Jewish Food" which appears to be its antecedent.

I've adjusted the name into something that makes better sense for the amendments that I've made. Gone is the Tagliatelle, because I'm using broad egg noodles instead (and less of them). Other adjustments include opting in for the parsley which Nigella uses (absent from the original), and roasting the chicken on ribs of fennel (to be discarded after), which adds a subtle perfume to the dish, and lifts the chicken off of the roasting pan.

This is a glorious recipe. It may not look terribly exciting, and it is assuredly not low-fat, but it is wonderfully fragrant and delicious, making it a beautiful comfort food sort of meal.

Venetian Chicken Frisinsal
Serves 4

1 medium chicken
3-4 stalks of fennel
1 tablespoon extra-virgin olive oil
kosher salt, as needed
1 long sprig of fresh rosemary (about 5 inches)
1/3 cup golden sultana raisins
1/2 cup pine nuts
225 grams broad egg noodles

Rub the chicken with olive oil and salt lightly on all sides. Place the chicken, breast side down, onto your roasting pan (I use a large cast iron skillet) which has been lined with enough stalks of fennel to keep the chicken elevated from the bottom of the pan. Roast at 400F for 50 minutes, then turn the chicken breast-side up, and continue to roast until the chicken is completely cooked - 20 minutes to 1/2 hour will do nicely for a 3 pound chicken. Remove the chicken from the roasting pan to a plate, and allow to cool for twenty minutes or so, until it is cool enough for you to remove the chicken from the bones with your bare hands.

While the chicken is roasting (and then cooling), soak the sultanas in a little water for about half an hour, and then drain. Toast the pine nuts until just lightly golden brown - this can be done in a dry skillet on the stovetop, and only takes a few minutes. Mince the rosemary finely, and set aside. Chop the parsley as you like it, and set aside.

While the chicken is cooling, remove the fennel stalks from the roasting pan (let the drippings on them fall back into the pan) and discard. They are stringy and tough, and now overcooked, so there's not much use for them; they have given up their flavour to the chicken juices, which is as good a fate as they could hope for. If you really need to watch your fat intake, pour all of the drippings from the chicken into a bowl, and let the fat rise to the top. Skim off some of the fat as desired. Otherwise, just leave the drippings in the skillet, add the chopped rosemary, the pine nuts, and the drained raisins to the drippings, and bring to a simmer. Next, pour any liquid that has pooled around the chicken (on its cooling plate) into the skillet with the rest of the drippings. Reduce the heat to very low and cover, while you prepare the rest.

Bring a large pot of water up to the boil (for the pasta) while you remove the meat from the chicken. Using your hands, strip the meat and skin from the bones and tear into bite-sized shreds, putting them in a large serving bowl. Be sure to use the crispy skin, as well, but any flabby skin can be discarded with the bones. When all of the chicken is shredded* (you can put the bones aside to make stock or to freeze for later use), quickly cook the pasta (do add a little salt to the water). Egg noodles only take a few minutes to cook, which is handy. Drain the noodles, or use a spider-tool to lift the noodles right from the water onto the shredded chicken meat in the bowl. Pour the sauce of drippings, raisins, rosemary and pine nuts over the top, add the parsley, and toss gently to combine.

I recommend a fresh salad with a bit of crunch, to balance the richness of this dish. Fennel & Radish Salad is about perfect with this (since you already have the fennel).

In the spirit of full disclosure, I note that I actually removed the chicken breast (but not the tender) to a separate plate, because a whole chicken's worth of meat was more than we needed for the four servings of this dish. You could, of course, increase the amount of pasta, use all of the chicken, and feed two to four more people, especially if you had a side dish or two to round it out. The chicken breast that I hived away in this instance made a lovely chicken and fennel white pizza two days later.

*When you are stripping the meat from the chicken, be sure to take the meat from the back of the chicken - especially the two lovely roundish bits referred to as "the oysters" from just above the thighs. This is the closest thing to a tenderloin on a chicken, and is a wonderful bit not to be missed. They are small, firm, intensely flavourful bits of dark chicken meat, sometimes doled out as a special favour, or harboured as a cook's treat.

September 20, 2012

Meatballs & Polenta

Technically, not new recipes, simply a serving suggestion: the meatballs are my all-beef Italian-seasoned version of these meatballs here, and the polenta is my all-purpose polenta recipe which you previously saw when I was making polenta fries. This is just how easy it can be to get a good dinner on the table, when you have a stash treasures, such as meatballs, in your freezer (I haven't tried freezing polenta, but I imagine the texture would suffer). We had a tossed salad on the side, but you could add any extra vegetable you like to round out the meal (roasted fennel, anyone?)

The meatballs are somewhat smaller than usual, about half the size indicated in the linked recipe, as they were originally made up as part of a big batch designated for meatball subs, and I find slightly smaller meatballs are preferable in that context (so that you can have more of them, of course). I used a two-tablespoon disher (60 mL, or 1/8 cup) per meatball, and baked them in my usual fashion. Leftovers were briefly frozen on a baking sheet, and then tipped into a freezer bag for storage for another day.

The polenta recipe is particularly unchanged, simply necessitating that you pour it into individual serving bowls as soon as it is cooked, and serve it hot. The texture is a little bit like mashed potatoes - the creamy, finely whipped restaurant style, that is. If you have extra polenta (the recipe makes four servings, served in this manner), you can simply pour it into a baking dish or other small container, and let it set up to make fries (or simply re-heat and eat) at a later date. It would work wonderfully in a bento, although I didn't think of that in time to deal with the leftovers in such a way - I simply plunked slab of cooled polenta on top of the remaining meatballs in sauce, in a standard plastic container.

For the tomato sauce, you can use any one you like, of course. This was, again, a "freezer treasure" - the sauce leftover from making the same meatball subs. Essentially, a simple combination of a little onion and garlic sauteed in olive oil, a 398 mL tin of high-quality diced tomatoes (don't you hate opening a tin and finding it full of stem ends?), fresh oregano and basil, and a little simmering time. Your mileage may vary, of course. A few chile flakes wouldn't be amiss, either.

Reheating the meatballs in the tomato sauce saves time and dishes. Adding a little extra fresh basil as you reheat gives a little lift to the sauce, and makes you forget that you're essentially just eating up leftovers. This can happen almost untended while you stir up the polenta.

Parmesan, of course, is the natural finisher. Mozzarella would also be good, or any grating/melting cheese you fancy.

Now, for those of you following the "convertible to vegan" tag, I haven't completely lost my mind! Here's the fix: Instead of meatballs, use roasted cauliflower chunks, and simply toss them in the sauce for a few minutes before ladling onto the polenta. And as for the polenta, with its pesky sour cream and parmesan? Omit those ingredients in favour of a little silken tofu (beaten well until creamy) and a bit of prepared vegan shredded cheese-substitute. You may need to adjust the salt to your taste, depending on the brand you use. Change the chicken broth to vegetable broth (or just use water, as I sometimes do), and presto: converted to vegan.

April 14, 2012

Pasta Alla Mizithra

This pasta dish is almost blindingly simple, to the point of being a little...incomplete, shall we say, on its own. But oh, how tasty! I recommend pairing it with a big, colourful Greek salad, and a nice glass of wine. The salad will take longer to make than this dish.

For those of you whose only experience with mizithra is the Spaghetti with browned butter and mizithra at The Spaghetti Factory (where it is one of the tastier items on offer, as I recall), you can make this dish so easily and quickly at home that there's no need to order it out; you just need to get your hands on the cheese itself. Mizithra can be had by the chunk, or pre-grated. The pre-grated stuff is usually so fluffy and finely textured that it disappears entirely into the pasta, instead of giving you the delightful little flecks that you get when you grate it yourself. I recommend buying a small chunk, and grating it yourself, so you can get the size of shavings you prefer.

Pasta Alla Mizithra
Serves 4

250 grams long pasta of your choice (such as the linguine shown here)
1/4 cup butter
60 grams grated mizithra cheese

Melt the butter slowly (ie, over a low temperature) in a skillet or saucepan. Once the foaming stops, and the butter has melted, allow the colour to darken to a dark gold. Do not stir or disturb the sediment in the pan. Once the colour is dark gold/light brown, remove the pan from the heat. If you like a very clear browned butter, carefully pour the liquid off of the solids (and discard the solids), but I confess I like the toastiness of leaving the solids in. You can do all this while the water boils for the pasta.

Cook the pasta and drain. Toss the pasta thoroughly with the browned butter, making sure every strand is coated.

In a large serving bowl, spritz a little olive oil, then sprinkle 1/4 of the grated cheese. Layer three more times with buttered pasta and grated cheese, ending with cheese. Present at table, and toss gently while serving up portions. Finish with parsley, if you like a bit of green, and lots of black pepper.

You can see how a nice, bright vegetable salad will perk this right up. If you want to go into butter overload territory, add garlic bread on the side, too. A glass of wine will cut the richness of butter and cheese nicely. I recommend a crisp white, or a lighter bodied red - such as sangiovese, gamay noir, or cabernet franc, for example.

The portions indicated here are smaller than you'd get at a restaurant, but that's because I usually serve modest portions of pasta, in the Italian model (although I don't usually serve it as a first course for a larger meal). It's an approach that particularly makes sense for a rich dish, such as this one. If you want the "big pasta experience", I guess this would serve two people, by North American standard serving sizes.

Enjoy!


March 17, 2012

Vegetarian Lasagna


For a while, it seemed like the default vegetarian option at any pre-set or group menu at restaurants in this town was vegetarian lasagna. Not being vegetarian myself, I had more options to choose from, but I recall sitting next to any number of folks who would fork disdainfully through their entrees muttering about the general lack of anything resembling a vegetable other than tomato (in sauce form) and perhaps a sliced mushroom (if they were lucky), or mushy cube of something indeterminate, and which might have once been zucchini, or possibly bell pepper. Mostly, they were bland and unimaginative, as far as I could determine from the reactions. I avoided the dish at all costs, personally, because I never, not even once, heard anyone say that it was delicious.

But really, there are so many reasons that vegetarian lasagna could be fantastic, that I became determined to work one out. This is the vegetarian recipe that has been my staple for the past 15 years.

Notes: The idea of grated zucchini and chopped mushrooms standing in for ground meat comes from from Anne Lindsay's Lighthearted Everyday Cooking. The idea of roasted fennel comes from the now-defunct Cafe S'il Vous Plait on Robson Street (although, I'm not sure they roasted it). Mixing the cheese and egg with the spinach is a tip I stole from my sister. The rest is pretty much classic!

Vegetarian Lasagna

Serves: 8
Total prep & cooking time: 2 to 2 1/2 hours, depending on your level of organization

1 tablespoon olive oil, divided
1 foot-long zucchini, grated
500 grams mushrooms, button or cremini
1 large onion, finely chopped
3 cloves of garlic, minced
796 mL canned diced tomatoes (no sodium added)
2 cups tomato sauce (no or low sodium)
1 fennel bulb, thinly sliced
200 grams mixed wild mushrooms
2 tablespoons tomato paste
2 cups part-skim ricotta or 1% cottage cheese
300 grams chopped frozen spinach, thawed
1 egg
pinch grated nutmeg
9 lasagna noodles (or equivalent fresh noodles)
200 grams mozzarella, grated
1/2 cup parmesan, freshly grated
1/4 teaspoon kosher salt
1/4 teaspoon white pepper
pinch of chile flakes
1 teaspoon fennel seed
1/2 teaspoon oregano leaves (less, if using powdered)
1 teaspoon dried basil leaves (or 1/4 cup fresh)

Pre-heat the oven to 400℉. Spritz a 9x13" glass baking dish lightly with cooking spray, or rub lightly with canola oil. Toss the sliced fennel bulb with 1/2 tablespoon of olive oil and a tablespoon of water, and add a pinch of salt. Roast uncovered in the oven for about 30 minutes, until the fennel is completely tender. Remove from oven, scoop the fennel onto a plate or bowl, and set the oily pan aside to build the lasagna in, later. Start heating your water to boil the noodles.

In the meantime In a medium bowl, combine the ricotta, the spinach (squeeze out excess water first), the egg, and the nutmeg, and mix thoroughly with a fork.

Prepare the wild mushrooms by cleaning, removing any woody stems, and slicing into large, recognizable pieces.

Use a food processor or mini-prep to finely chop (pulse) the button mushrooms until the pieces are mostly roughly the size of green lentils. In a large skillet, heat the remaining olive oil, and begin to saute the onions and garlic. Feel free to deglaze with a little splash of water or wine as you go, to keep them from sticking. Once the onions are starting to turn translucent, add the grated zucchini, and the chopped mushrooms. Stir and saute until the vegetables are tender, and any excess liquid has evaporated. Add the wild mushrooms, and stir them through. Add the salt, white pepper, chile flakes, fennel seed, and oregano, and continue to stir and saute. When the herbs are all nicely integrated in, add the diced tomatoes with their juices, the tomato paste, the tomato sauce (except for about a half-cup), and, if the mixture instantly looks too thick, a half-cup to a cup of water. Add the basil, and let the sauce cook gently, covered, over low heat, while you boil up the noodles.

Get the noodles going, and drain in a colander once just barely tender. Lay the noodles out on a cutting board or sheet, if you want to keep them from sticking to each other.

Layering time!

In your oily 9x13" baking dish, put down the reserved bit of tomato sauce, and spread it out to cover the bottom of the dish. Add three noodles to cover the sauce, and then add 1/3 of the simmered vegetable sauce, spreading it out evenly. Next, add all of the roasted fennel bulb, spreading it out into a nice even layer. Add half of the mozzarella cheese, sprinkling it over the fennel. Lay down the next three noodles. Lay down half of the remaining vegetable sauce, spreading it nice and evenly. Add the ricotta cheese and spinach mixture, carefully spooning it around the dish, and then using the back of the spoon to smooth it all into a layer. Top with the last three noodles, and the last of the sauce. Cover the top of the dish with the remaining mozzarella and the parmesan. If you like a little green, you can throw some chopped parsley in there, too.

Cover the dish with foil (spray the underside lightly with canola oil or rub it with olive oil first) and bake for 40 minutes, or until bubbling and hot. Remove from the oven and let it stand, uncovered, for about 10 minutes before you cut it, to make sure that it serves up nicely, and doesn't just slide apart. You can use that time to knock together a salad, or some garlic bread or something.

Enjoy with a nice glass of wine, and the comfort of knowing that you will eat well for days to come.

Does it take a while? Yeah. But, you can make it in advance for a dinner party, and it freezes well, too.

I'm currently contemplating a version that includes some coarsely/medium-ly chopped chickpeas somewhere in the mix, but I'm undecided if I should add them to the vegetable sauce or the cheese-and-spinach layer. I'll report back, once I've taken a crack at it.

September 25, 2011

Caponata & Polenta

These two dishes make excellent friends. The starch of the polenta creates a filling sense of satisfaction, and its creamy solidness plays counterpoint to the vegetable frenzy that is the caponata.

Of course, you can tell (I'm quite sure) that the polenta rounds in the picture were not from a polenta that I had made myself, but rather from one of those prepared tubes that you can buy. We didn't find it an entirely acceptable substitute, by the way, but once we drowned the grilled-up rounds with the deliciousness of caponata, it sufficed for the evening. Homemade polenta would have made this absolutely heavenly.

The real story here is the caponata. I've been making this for a few years, now, since I first saw a recipe from Giada De Laurentiis for Caponata Picnic Sandwiches. I've tweaked it a little to reduce the oil, and upgraded it from side dish to feature, although any leftovers certainly do make wonderful sandwiches (particularly if you have some leftover garlic bread and bocconcini). I like a piquancy in my caponata, so I reduce the sugar, but your mileage may vary. More sugar emphasizes its sort of sweet-and-sour character.

Easy Caponata
Adapted from Giada De Laurentiis
Serves 4 as a main dish

2 tablespoons olive oil
1 medium Italian eggplant, diced
1 to 2 stalks celery, diced
1 red bell pepper, diced
1 tablespoon dry white vermouth (optional)
1 medium red or yellow onion, diced
1 1/2 to 2 cups unsalted canned diced tomatoes (with juices)
4 tablespoons raisins
1/2 teaspoon dried oregano leaves
4 tablespoons Italian Red Wine Vinegar
1-2 teaspoons granulated sugar
1 tablespoon capers
1/2 teaspoon Kosher salt
1/2 teaspoon ground black pepper
1 - 2 branches fresh basil, stems removed

This dish comes together very easily. Heat the oil in a large skillet. Add the celery and saute a little, then add the eggplant and continue to saute until it begins to soften. Add the salt, and then the red pepper, and splash with a little vermouth if it is sticking (you can also use water). Stir and saute a little more, and then add the onion. Continue to saute, and once the onions are starting to get tender, add the tomatoes, raisins, oregano. Reduce the heat and simmer for about 20 minutes.

Taste, and season with salt and pepper to taste (I don't usually add any more salt here). Add the vinegar, one teaspoon of sugar, and the capers (rinsed and drained, please!), and stir through. Simmer very gently for a couple of minutes, then taste again. If needed, correct by adding more vinegar or sugar. Garnish with torn up basil leaves.

I note that this is much more colourful a dish than it may actually seem from the picture, which I blame on the inordinately, festively coloured (and busy) plate that I served it on.

That's it. Easy, right? And you can grill your polenta while it simmers, or you can make the caponata first, and serve it at room temperature once the polenta is grilled up - it's full of flavour and equally tasty warm or cool - and therefore, excellent picnic fare, as the recommended original application. You could also serve this warm over hot, soft polenta, rather than the firm version.

Now, I haven't mentioned the scruffy looking mushrooms on the other side of the plate, yes, I know. They are simply broiled mushrooms - tasty, but not very glamorous (or photogenic, apparently). Portabella mushrooms cut into slices, tossed with soy sauce and olive oil, and popped under the broiler until tender. That's it! Although, it does lead to another lovely possibility for serving the caponata: brush whole, gills-removed portabellas with a little olive oil and roast until tender, then fill with warm caponata, garnish with basil, and present triumphantly, perhaps with a nice crusty loaf of bread on the side.

August 11, 2011

Garlic Scape Pesto

Ah, the special treats of summer that truly are still seasonal! Seize them when you can, or wait a full year for another taste.

I encountered garlic scapes last summer, in my friend Willie's garden. He had us over to dinner, and, after remarkably little slave labour helping to pick the scapes, served us some of his famous handmade fettuccine with garlic scape pesto. He also gave us a giant bag of garlic scapes to take home and play with ourselves.

Unfortunately for all of us, the scapes had gotten a bit on the large size, with the attendant increase in fibrousness. We had to discard a certain amount of each scape, and had to sieve the two dishes that we made - a simple pesto to top pork tenderloin pintxos, and a cream soup. The flavour was wonderful, but lordy, was it work.

This year, we were fortunate to receive scapes again, younger ones this time, from our bacon-curing friend, Rodney. They were much thinner and shorter, and considerably more tender, despite having spent some quality time in the fridge before we got around to using them. We went with pesto on fettuccine, because we liked it so much the first time. This pesto recipe was likely a bit different from the first one we had, but it turned out very well. We used fresh fettuccine from The Ravioli Store, because it is lovely stuff.

Garlic Scape Pesto
Serves 4 - 6

1 cup garlic scapes, finely chopped
2 tablespoons ground almonds
5 tablespoons extra virgin olive oil
2 cups fresh basil
1/2 teaspoon Kosher Salt
2 tablespoons lemon juice
1/2 cup finely grated Parmesan Cheese

Place the finely chopped scapes into a blender or small food processor, along with the almonds and basil. Pulse a couple of times, then add the salt and olive oil. Pulse and then puree until smooth. Taste it, and see if it wants the lemon juice. If so, add the juice and pulse it through. If you are going to freeze some of the pesto, put that portion aside now. If you are using it right away, stir in the cheese and you are good to go: Add to freshly cooked, drained pasta, dab onto any savory appetizer, really, or use as a pizza sauce (that's the likely fate of the bit that's in the freezer, actually). You can also stir it into a soup (white bean, for example...ooh, now I want to try that!), or as a sandwich spread, or use it pretty much as you would use any other pesto.

March 30, 2011

Lemon Risotto


I make a very lemony risotto.

Oh. Hello, there. Is it the end of March already? I'd ask where the time has gone, except that I know (all too well): I've been moving. My last few weeks especially have been a haze of restaurant meals, often at odd hours, and foraged food that is less cooked than it is assembled. We're all moved in, now, which is to say that there are boxes everywhere and loads to do, but the kitchen is up and running (thank goodness!) and I hope to be back to more frequent posting now.

But back to the matter at hand. Risotto! Specifically, a deeply yellow, unabashedly lemony risotto that is neither sour nor acidic, but has wonderful lemon flavour that is dialed all the way up to eleven. A little goes a long way, but even a small serving of Lemon Risotto makes a meal feel like a special occasion.

The trick to all this lemony bounty without the pain and suffering is the sneaky third ingredient in the recipe, that is, preserved lemon. Now, I'm sure there are shop-bought preserved lemons that you can buy, and frankly I don't know whether or not they would do the trick here (perhaps they would serve quite nicely), but I can tell you that making your own preserved lemon is both astonishingly easy and very rewarding. For one thing, it keeps for a surprisingly long time (tightly bottled in the fridge), and you only need a little tiny bit of it to get huge flavour. Essentially, preserving the lemon means that you get all of the intense flavour of the zest, without the bitterness of the pith. The lemon simply becomes a wobbly translucent mass - chutney textured if, like me, you wholly quarter your lemons and then slice them, as opposed to leaving them connected at the base in quarters. The clean, sliced lemons are tossed with kosher salt and the spices of your choice (I like to put a bare pinch of turmeric in there, to enhance the colour), packed into a jar and completely covered with freshly squeezed lemon juice. There's a quick version here, which has a very basic, clean flavour profile, but you can also google your way through Nimbu Achar recipes to get something more interestingly flavoured.

This risotto really has a triple lemon threat: the preserved lemon, yes, but also the zest and juice of a fresh lemon. With all that lemon going on, what do you pair it with? In restaurants, it can sometimes be found as a bed for seared scallops or prawns, which is a fine idea. Or, as seen above, it makes a beautiful plate partner with roasted chicken and braised fennel. But, right at the moment, asparagus is in season, and that's my go-to favourite. Anything that could benefit from a lemony kick, really.

The link provides a pretty comprehensive recipe for the risotto, but a couple of extra notes: take your time, when you're making risotto. You don't have to stir it for every single second, while it cooks, but almost! It pays to have all of your prep done ahead, and any other dishes you plan to serve mapped out.

Give a really lemony risotto a try. It's a great way to celebrate Spring.

February 12, 2011

Pizza Bianca


Oh, how I do love my pizza. We have it at least once a month, sometimes more, and we always make it from scratch. Palle is especially fond of non-tomato sauced pizzas, although he's generally pretty happy with any homemade pizza, including old faithful - pepperoni and mushroom with a classic, oregano-laden sauce. In the interests of keeping our pizza consumption from being monotonous, I like to try new things, from time to time. A recent effort involved miso gravy for the sauce, and shabu-shabu thin cut beef dressed with sesame oil and soy sauce. It went over rather well, and I'll certainly be keeping that in mind the next time I have leftover miso gravy lurking in the fridge.

But this one really wowed me. It's not even a recipe (excepting the crust, which is my usual recipe (expired link removed, please see comments below for recipe) using a three-hour rise and a fraction of the yeast) I was particularly pleased to be able to make it entirely out of things that I already had on hand, repurposing leftover roasted chicken and roasted fennel from the previous night's lemon risotto dinner, and using up the tail end of bocconcini which we had after making Messy Giuseppes (Palle's rather Italianate Sloppy Joes). Even the parsley was leftover from garnishing the risotto!

I chopped up the fennel, which had been roasted in thick wedges. I used the tenderest bits of fennel and scattered them over the crust - no sauce, I simply depended upon the olive oil that had been used to roast the fennel to get the party started. Next, meat from the roasted thighs and legs and back of the roast chicken. I generally pull the meat off the bones after dinner, while it is still warm, and plate it up for easy use later, and so it certainly stood me in good stead here. I chopped up the larger pieces, and tore some with my fingers, to get nice distribution. Finally, I dotted the small amount of bocconcini around the perimeter, sprinkled the whole thing with the already-chopped parsley, and bashed it into the oven until the crust started to turn gold. Once out of the oven, we grated some long strands of parmesan over it, and watched them melt artistically onto the pizza.

This was really a triumph of keeping things simple, too. I resisted the urge to add peppers or mushrooms or anything else, didn't overload on the cheese, and ended up with a very satisfying pizza that was very different from the taco pizza, vegetarian pizzas, or buffalo-wing pizzas that I've shared before.

There's a lot more things I want to try, pizza-wise, but for the record, I have no objection to any particular style of pizza. I like thick crust, thin crust, wood-fired, grilled, red-sauced, mustard-sauced, no-sauce at all. Best of all, I like my pizzas homemade.

June 12, 2010

Chicken Canzanese


I had some sage that needed using. A friend had uprooted a monstrous sage bush from his yard, and I became the beneficiary of a whole lot o' sage leaves that needed using (or drying) post haste.

Happily, my June 2010 issue of Cook's Illustrated had a recipe for Chicken Canzanese, an appealing-looking braised chicken and wine dish that is fairly different from anything I'd tried before. The dominant seasoning notes of the dish are fresh sage and garlic, but it also contains whole clove buds, which is an intriguing departure from the usual suspects.

The recipe suggested serving the dish over polenta, boiled potatoes, or noodles, and I decided that the generous amount of liquid in the dish could be converted into a nice sauce for linguine. In fact, it was a little on the too-thin side, but was delicious anyway. In the future, I think I would probably reduce the amount of cooking liquid by about 1/2 cup, which shouldn't be detrimental to the main braise, but would result in a slightly thicker sauce at the end.

There was, in fact, so very much sauce that I used it as the basis of a pot pie for the remaining pieces of chicken (stripped from their bones), the next day. Even so, there was more sauce than strictly necessary, and reducing the overall liquid by a half cup is definitely in this dish's future. It also could have taken even more sage, had I only known. I did add a little more to the pot pie, just because I could.

The flavour of this dish is fantastic - familiar, comforting, and somewhat sophisticated, all at the same time. It takes a little while to make, but is definitely worth the wait.

Chicken Canzanese
Adapted from Cook's Illustrated, June 2010

1 tablespoon olive oil
2 ounces of diced prosciutto cubes (very small)
4 garlic cloves (sliced lengthwise)
8 bone-in, skin-on chicken thighs (back attached), trimmed of excess fat and skin)
2 teaspoons flour
2 cups dry white wine (or 1 1/2 cups...)
1 cup chicken stock or broth
4 clove buds
1 sprig of fresh rosemary, minced
12 whole fresh sage leaves (15 would be better)
2 bay leaves
pinch of red pepper flakes
juice from 1/2 lemon
2 tablespoons unsalted butter
kosher salt

Pre-heat oven to 325℉, with the rack at middle-lower position. Season the chicken lightly with kosher salt, and a little ground white pepper if you wish.

In a large skillet (minimum 12"), heat half the olive oil and saute the prosciutto cubes until fragrant, and add the garlic slices, cooking for just a minute or so until lightly golden (be careful not to burn). Remove to a small bowl and set aside.

Without cleaning the pan, add the rest of the olive oil and heat until very hot. Add the chicken pieces, skin side down, and cook without disturbing for about 8 minutes or until golden brown. Flip pieces over and cook a further 5 minutes. You may need to do this in two batches. Remove the chicken to a plate.

Remove some of the rendered fat from the pan, leaving about 2 tablespoons. Make a blond roux by adding the flour to the pan, and stirring and scraping with a wooden spoon or spatula until fragrant, about one minute. Add the wine and broth, slowly, stirring to make a smooth, if thin, sauce, continuing to scrape the bottom until all the browned bits have been scraped up off the bottom of the pan. If the sauce is lumping up on you, whisk vigorously until it smoothes out. Add in the clove buds, red pepper flakes, sage leaves, bay leaves, and reserved prosciutto and garlic.

Carefully return the chicken to the pan in a single layer, skin-side up so it sticks out of the liquid. Bake uncovered until tender, about 1 hour 15 minutes. You should check on the chicken after about 15 minutes into the cook time, and the liquid should be barely bubbling. If it is doing something else (or nothing) raise or lower your temperature slightly, accordingly. While the chicken cooks, you can prepare your side dish(es). A big green salad nicely complements the richness of the dish.

Remove chicken from pan to a clean plate, and tent loosely with tinfoil. Place pan over high heat on the stovetop, and boil vigorously until sauce is reduced and thickened. Turn off the heat and add the lemon juice, butter, and minced rosemary. Pour sauce around chicken, and serve.

This chicken was so incredibly tender, moist, and delicious, even when re-heated the next day in pot-pie format, that I will absolutely be making this dish again. Next time: less liquid, more sage. Next time, also, I will make a full recipe (even for the two of us) and plan to make another stunning pot pie out of the extra.

January 20, 2008

Soup Weather (Brown Lentil & Tomato Soup)


Winter, particularly its snowy, rainy, and slushy bits, is the weather for enjoying a good steaming bowl or mug of soup. I like soup. I especially like soup that has an identity. While I grew up with the ever-evolving (mutating?) pot of "Heirloom Soup", which served a terrific purpose and was generally tasty, there is certainly something to be said for creating a soup that will dependably turn out to be exactly what you are craving.

Lentil soups are often on the uninteresting side - serviceable, but not truly delicious. Oh, there are exceptions, of course, and much depends on the nature of the type of lentil being used. For a hearty yet basic brown-lentil soup that is full of vegetables, I have been developing this particular recipe for a few months now, and have come to the conclusion that it overtakes all others in terms of a go-to, dependable, delicious winter lentil soup. Its foundation is European, somewhat along the lines of an Italian soup, but I've never really tasted one quite like it. The addition of red wine vinegar at the end perks up the flavours remarkably, and contributes substantially to the overall depth of flavour.

It is much more handsome if you add a cup of finely chopped parsley (or indeed, a fine chiffonade of spinach) and stir it in right at the end, and the fresh, scarcely cooked greenery adds a certain brightness of flavour that is very pleasing, too. However, if you are planning to freeze the soup for future lunches and dinners, you may wish to leave those out, and add them upon re-heating. The soup in the photo is greenery free, because I forgot that I was out of both parsley and spinach when I started making it. It was still very tasty.

I have yet to try this as a purely vegetarian (or indeed, as it would be, vegan) soup, which would entail exchanging the beef stock for vegetable, but I am confident that this particular recipe would be delicious either way. Next time I plan to try it as a vegetarian version, with the added spinach as suggested above, and (possibly) with a little hit of cumin.

Brown Lentil & Tomato Soup

Makes about 8 cups

1 cup dry brown lentils, rinsed and drained
1 stalk of celery, strung and diced small
1 medium onion, diced small
1 1/2 cups small-diced carrots
3 garlic cloves, minced
2 tablespoons olive oil
3 cups beef stock (I use Better Than Bouillon)
2 cups water
2 bayleaves
1 14 oz./398 ml. crushed tomatoes (I prefer no salt added)
1/2 teaspoon oregano leaves (less, if powdered)
1/2 teaspoon ground white pepper
1/2 to 2 tablespoons red wine vinegar (to taste - start small)
1 cup finely chopped parsley (or spinach)

In a large soup pot, heat the olive oil and saute the onion, celery and carrots until the onions are tender and a little translucent. Season with white pepper, bay leaves, oregano, and add the garlic. Stir through. Add the drained lentils, the beef broth, the crushed tomatoes, and the water. Bring to a simmer, reduce heat, and let cook at a low temperature (bubbles just barely breaking the surface of the soup) with the lid on, until the lentils are tender - 30 to 35 minutes. Taste, and add salt if needed. If the soup is thicker than you like, stir in a little more water. Stir in vinegar, parsley (or spinach). Taste, and add more vinegar if you like.

If you like the look of the perfectly round little carrot pieces, use "baby" carrots, and simply slice them into coins. Otherwise, dice as you like. I think that a sort of evenness of size makes a soup like this the most attractive but, certainly, feel free to to adapt as the spirit moves you.

September 30, 2006

Meatball Minestrone

I love soup. I cannot think of a culture that does not have some sort of soup. It can be an eloquent, evocative way to capture a sense of a particular cuisine, or a memory of a place. It can also be a tasty repository for things lurking in the refrigerator, slowly measuring their last useful gasps of usability until metamorphosis turns them into - if neglected, well, sludge, but if lovingly tended - a warming, welcoming breakfast (think menudo), lunch, or dinner.

As someone who grew up with "heirloom soup" in the winter, an ever-evolving pot of plenty into which most leftovers eventually found their way, I've always thought as soup as a somewhat ambiguous term, and was amused by people who made "mushroom soup" or "barley soup" because at any given time there might be mushrooms or barley or both in the heirloom soup. Even a soup that started off quite specific - chicken noodle, or oxtail, perhaps - would mutate quickly and, I thought, inevitably. As I grew older, I began to have an appreciation for the carefully thought out soups that highlighted a particular item. I've always had a fondness for minestrone, which somewhat bridges the gulf between the two philosophies of soup.

People will tell you that there are very particular things that one needs to put in (or omit from) a "true" minestrone, but these things vary by region and are often contradictory. Many minestrones are vegetarian, using plain water as the cooking medium instead of stock, and deepning the overall flavour with a rind of parmesan, and others will start with pancetta or bacon, and move on to a chicken broth. To achieve this particular minestrone, I went with a fairly classic approach, chose from the "acceptable" vegetables (since I had them on hand) and then spoiled it all by adding beef meatballs at the end. I'm not a bit sorry - the whole thing turned out just as I wanted.

Meatball Minestrone

2 tablespoons olive oil (or duck fat)
1 large onion, diced
3 cloves garlic, minced
1 fennel bulb, diced medium-small
2 carrots, diced
1 small zucchini, diced (about 1 1/2 cups)
2 stalks of celery, chopped
1 cup of small cauliflower florets
8 cups water or vegetable stock
1 28 oz. can of diced tomatoes
1 15 oz. can of cannellini beans, with liquid
1/4 cup tripolini or other small soup pasta
1/2 teaspoon dried oregano leaves
1/2 teaspoon dried basil leaves
white pepper
salt to taste
small, cooked meatballs from 1 pound of ground meat (I bake mine in the oven for 25 minutes, rather than frying them)

In a large soup pot or dutch oven, heat your olive oil over medium-high heat. Add onion, garlic, fennel, carrots and celery, and stir well. Season with a little salt and white pepper, and stir for a few minutes until the vegetables begin to go translucent.

Stir in the water/stock, tomatoes (with their juices), zucchini, cauliflower, and herbs to taste. bring to a boil, reduce heat and simmer gently, covered, for about 30 minutes.

Stir in the cannelini beans with their liquid, and the pasta. Simmer for an additional 10 minutes or until the pasta is al dente and beans are heated through. Add meatballs and stir through. Adjust for salt and pepper to taste before serving, and garnish each bowl with some fresh basil or a a dollop of basil pesto.