Showing posts with label Japanese. Show all posts
July 15, 2018
Mapo Nasu
I'm a big fan of Mapo Tofu, a Sichuan dish that integrates small cubes of tofu into a spicy (think Sichuan peppercorn) flavourful minced pork sauce (or, if you want to get old-school, integrates spicy pork sauce into cubes of tofu) and served atop rice. Whether you lean more heavily to the meat-side or the tofu-side, it's a delicious meal. But wait! There's more.
While classic Chinese Mapo Tofu is very popular in Japan, Mapo Nasu is a localization that substitutes the tofu with eggplant. As with the original, there are a lot of versions vying for position as the ur-recipe, but that just means you can be very flexible in your approach.
I recommend long, narrow East Asian type eggplants, here, rather than the Mediterranean type, as they are generally less seedy and less bitter. The ones I used here were super skinny Japanese eggplants, the diameter of bratwurst, but wider ones work just fine (and are a bit less fragile). You can choose to sauté the eggplant strips in hot oil instead of broiling them, if you prefer, but they do tend to fall apart a bit more that way.
Mapo Nasu
Serves 2-3
Total prep and cooking time: 20 - 30 minutes
1/2 lb. lean ground pork or beef
2 tablespoons dry sherry or vermouth
1 teaspoon cornstarch
1/2 medium yellow onion, finely chopped
300 grams Japanese eggplant
1 teaspoon toasted sesame oil
Sauce ingredients
1 tablespoon fermented chile bean paste
1/2 teaspoon cayenne pepper or to taste (optional)
2 tablespoons less-sodium soy sauce
3 cloves of garlic, crushed
1 teaspoon minced fresh ginger
1/2 teaspoon white pepper OR ground Sichuan pepper
1/2 cup chicken broth
1 tablespoon cornstarch diluted in 1/4 cup water
If you're serving this over rice, get it started first, as it can wait patiently if need be. Preheat the broiler with a rack set 15cm/6inches from the burner.
Combine the meat, sherry, 1 teaspoon of cornstarch, and set aside. In a small bowl, combine sauce ingredients up to the white pepper and set aside.
Slice the leafy ends off the eggplant(s) and quarter the eggplant lengthwise. Slice the long spears of eggplant into finger-lengths, and brush with sesame oil. Place skin-side-down in a single layer on a baking sheet and broil for 7 - 10 minutes or until slightly browned and blistered. Remove from oven and keep to one side.
In a large skillet, over medium heat, cook the meat until evenly browned, breaking up any large clumps. Add the onion and cook until the onion turns translucent. Stir in the spicy sauce mixture until the meat is evenly coated. Add the eggplant and stir gently (you don't want to mash the tender pieces). Pour in the chicken broth and bring to a boil. Stir in the dissolved cornstarch and cook, stirring constantly but gently, for a couple of minutes until the sauce has thickened.
Serve over steamed rice with a green vegetable. May I suggest Kale Gomaae?
January 14, 2017
Japanese Ginger Salad Dressing
Ginger salad dressing is so fresh and delicious tasting that it can make even the saddest pile of limp iceberg lettuce palatable. It turns out that it's even better when homemade and you can control the sweetness, so you may need to forcibly restrain yourself from just drinking it down like a smoothie.
I find a lot of the ginger salad dressings I've a had in restaurants to be a bit too sweet for my taste, so I've put very little sugar in this one. If you like your dressings sweet, you might want to taste it after it's made up and then add a bit more sugar and give it a final blitz. This recipe was synthesized from myriad online sources, but none in particular. There are some surprising ingredients, but go with it.
Japanese Ginger Salad Dressing
Makes 2/3 cup
1/4 cup peanut oil*
3 tablespoons unseasoned rice wine vinegar
1 tablespoon water
1 - 2 tablespoons finely grated fresh ginger root (or finely minced)
1/4 cup sliced green onion - white parts only (about 3-4)
2 tablespoons finely grated carrot
2 tablespoons minced celery
1 tablespoon tomato ketchup
1 teaspoon less-sodium soy sauce
1/2 teaspoon sugar
1 teaspoon lemon juice
1 small clove of garlic, minced
1/4 teaspoon coarse salt
Pinch of ground white pepper
*If you don't use peanut oil, for whatever reason, be sure to use a neutrally flavoured vegetable oil. Strong-tasting oils like olive or walnut are out of place here.
I used a microplane-type grater for the carrot and the ginger, and everything else was just finely chopped by hand. I like a strong ginger flavour, so I used the full 2 tablespoons, but you can scale it back to one if you're feeling mild.
Place everything in the order given in a cup suitable for an immersion-blender (or the cup of your blender or food processor), and blend on high until mostly smooth. This dressing has a lot of body for a vinaigrette, so it will still have a little bit of texture, but that's fine - it's how the dressing is usually served in restaurants, too.
Cover well and refrigerate for a couple of hours before use if possible - but use it up within three days.
To use, simply give it a stir (or a shake, if it's in a jar) and spoon over your composed salad. It can also be used to dress thinly sliced cucumber on its own, or plain, finely shredded cabbage to make a sort of gingery coleslaw.
September 25, 2016
Oyakodon: Japanese Chicken & Egg Rice Bowl
Oyakodon, or "parent-child rice bowl" (in reference to the use of both chicken and egg in the same dish) is a beloved Japanese comfort food. It is simple food, quickly and easily prepared, packed with protein and satisfaction. It is also cooked without any additional fat, which means it doesn't taste or feel heavy.
It can be a wetter or drier dish, but in all the different oyakodon I've eaten over the years, the biggest point of variation that I've encountered is the amount of onions used. But, like many recipes that are based on loose formulae, you can really make your own decision about the relative levels of pretty much all of the ingredients, so once you know the basic formula and general ingredients, you can make it however you like. I like a moderate amount of onions and I add fresh ginger to mine, which isn't exactly canon, but goes beautifully.
This dish can also be halved for a simple supper for one.
Oyakodon
2 servings
2 cups hot, cooked Japanese rice
1 uncooked chicken breast or 2 chicken thighs
1 small-to-medium yellow onion
3 coins of fresh ginger
2 eggs, lightly beaten
1-2 tablespoons less-sodium Japanese soy sauce
1 tablespoon mirin
2 tablespoons sake
1/2 teaspoon sugar
1 cup vegetable stock (you can also use dashi, kombu stock)
1 green onion
Togarashi pepper blend, to taste
Peel and halve the yellow onion, and slice thinly lengthwise. Stack the ginger coins, and slice them into thin slivers. Clean the green onion, and slice it thinly on a steep angle. Slice the chicken breast horizontally into two filets, and slice those crosswise into strips.
In a shallow skillet over moderate heat, heat the stock with the sugar, mirin, saki, and soy sauce. Add the sliced yellow onion and the ginger slices, and push them down into the broth. Once the onions are translucent and a little of the broth has cooked down, add the chicken strips, and push them down into the broth. Cook the chicken for about five to seven minutes or until just cooked through.
Add the beaten eggs in a thin stream, pouring them evenly around the chicken in the skillet, pop the lid on for about 30 seconds until the eggs are just set, during which time you can divide the rice between two bowls. Using a large serving spoon, slide the chicken, onions, and eggs out of the skillet overtop the rice. Pour a little or a lot of the broth around the edges of the bowl to bring extra flavour to the rice.
Top each bowl with green onion and a sprinkle of Togarashi, and serve (I also added some toasted sesame seeds).
Traditionally, the egg is added at the very last minute (into the individual bowls, even), and cooked solely by the heat of the broth, chicken and rice, but I prefer to let the eggs set a bit more. If you're not sure how safe your eggs are to consume raw, definitely cook them through.
Labels:
Chicken,
Comfort Food,
Healthy,
Japanese,
Rice
May 07, 2015
Garlic-Braised Pork Belly
This recipe is one component of the intriguing multi-step Vampire Slayer Ramen-Express recipe by the wonderful Lady and Pups.
While I wasn't quite prepared to make the entire ramen recipe as written, the pork belly on its own seemed worth trying immediately, and that was exactly correct. It will make your house smell insanely good, and is definitely worth the long wait after it goes into the oven. I note that the original recipe calls for 30 cloves of garlic (and there's another 14 in the rest of her finished dish), but I felt that 20 was plenty given that the ones I was working with were giant mutant German garlic cloves.
Because pork belly is a bit tricky to slice when freshly cooked, it's a great idea to make this ahead, and then simply slice and gently reheat it to serve.
We had this the first night with veggie yakisoba made from homemade ramen noodles (which I completely forgot to photograph, once cooked) and reheated the leftover pork belly to serve over rice with carrot kinpira, a few nights later, to make the donburi above.
The original recipe recommended a cooking vessel just barely big enough to fit the pork, which is what I did. It did mean that I had to be quite careful later on, not to smash to paste the fragile braised garlic cloves. My piece of pork belly fit perfectly into the oval dutch oven when raw, although once it had been seared on all sides, it drew itself up, becoming narrower and taller. I would probably cut it into two chunks next time, for ease of handling and more surface-contact with the braising liquid.
Garlic-Braised Pork Belly
minimally adapted from Lady and Pups
Serves 4
4 whole dried shitake mushrooms (or 16 small ones) + 1/2 cup hot water
400 grams skin-on pork belly
20 large garlic cloves, peeled
1/2 cup sake
2 tablespoons less-sodium soy sauce
1/2 tablespoon mirin
1/2 teaspoon coarse salt
1/8 teaspoon ground white pepper
1/2 tablespoon peanut oil
Trim any excessive stems from the shiitake, clean them well with a damp cloth, and let them soak in the hot water for 20-30 minutes. Peel the garlic cloves, but leave them whole. Combine the sake, soy sauce, mirin, salt, and white pepper in a small bowl and set aside. Now remove the mushrooms from their soaking liquid, retaining both separately.
Preheat your oven to 330 F/ 165 C.
In a heavy (preferably cast iron) pan that's not too big for your piece of pork, heat the peanut oil and then carefully sear the pork belly on all sides (start skin-side-down). The pork skin should be nicely blistered and a little freaky-looking, if you're not used to that sort of thing. Remove the pork (browned on all sides, now) and add the whole garlic cloves to the pan. Give them a quick stir about and then scoot them to the sides to make space, and put the pork back in the pan. Add the mushroom soaking liquid (pour it in carefully, and don't let any sludge in the bottom go into the pan) and the sake mixture to the pan, and then tuck the mushrooms in around the pork, submerged where possible.
Cover the pan with its lid, or cover tightly with foil if there's no lid, and put the pan in the preheated oven. Allow it to braise for 2 1/2 hours, turning the pork belly over every 30 minutes, carefully not smashing up the garlic too badly.
Remove the finished pork belly from the dregs of the braising liquid, and let cool. If you are making it ahead, once it is cold you can wrap it up tightly and put it in the fridge. If making ahead is not an option and you want to serve it right away, you will need to be okay with the fact that the slices will be rather messy-looking.
I used the remaining braising liquid and the mushrooms to make yakisoba, with a few of the garlic cloves thrown in for good measure. The slices were a mess, because I sliced it warm from the oven, but the rest was packaged up to make the donburi that you see above, and the slices are much, much neater.
In order to reheat the pork belly, I first sliced it, and then lay the slices in a small skillet with a quarter-scaled version of the braising liquid (minus the mushroom liquid). I then reheated it, slowly, covered, over very low heat on the stovetop. A couple of times I gently swirled the pan to make sure the liquid had contact with the cut surfaces of the pork belly slices.
This is without a doubt the best pork belly dish that I've made yet. I can't wait to make it again.
March 10, 2013
Kale Gomaae
I've always loved the enticing little dishes of blanched spinach dressed with sesame that one finds in Japanese cuisine. My earliest attempts at making them at home were somewhat laughable - I firmly believed that I shouldn't need to cut the spinach, despite all evidence to the contrary - but what I really disliked was the step of squeezing the water out of the cooked vegetable. I didn't like the squeezing, and I didn't like the look of the spinach after I was done. I was doing it utterly wrong.
Happily, this recipe does not require squeezing of any kind. I make no claims for culinary authenticity, of course, and I must confess that this is ultimately an outgrowth of an Italian recipe for balsamic-glazed kale with pine nuts, of which I am also very fond. I can say without hesitation that this dish is both a delightful addition to any lunchbox that wants a little extra vegetable, and a perfect companion to a rice or noodle based dinner. There are many different dressing recipes for a Japanese gomaae, so if this one doesn't strike your fancy, I suggest that you keep the method and substitute the dressing of your preference.
One of the delightful things about kale is that it is quite sturdy. While it does require a bit of preparation to clean, remove central stalk, and slice the kale (see below), you can do this ahead and keep it crisp and ready for a few days, in a sealed container in the fridge. Then, dishes such as this become a snap to pull off at the last second when you decide that you really should have some sort of vegetable with your chicken teriyaki or tonkatsu, or even miso halibut cheeks.
Kale Gomaae
Serves 2 - 4
250 grams lacinato kale, cleaned and prepared (see below)
1 tablespoon lower sodium soy sauce
1 tablespoon mirin
1 teaspoon sesame oil
1/2 teaspoon honey (or agave)
1 teaspoon sesame seeds, lightly crushed
1/2 teaspoon sesame seeds, for garnish
Combine the soy sauce, mirin, sesame oil, and honey/agave with the crushed sesame seeds. Set aside.
Run cold water over your prepared kale, drain immediately. The water still clinging to the leaves is desirable, to provide steam. In a medium skillet or wok (I use a 9" steel skillet - nonstick is not necessary), over high heat, place the prepared and drained kale and begin to move the kale around as it wilts (I use a silicone spatula). If necessary, sprinkle a little more water over the kale, and continue to stir it around until the leaves start to become tender, but are still bright-looking (well, as bright as "black kale" gets, anyway).
Add the combined sauce mixture, and continue to stir until the dressing has been evenly stirred through and each leaf is lightly dressed. Remove to serving bowls, and garnish with extra sesame seeds.
The kale can be served warm or cold.
I plan to serve it the next time I make the Miso Halibut cheeks mentioned above, in fact (which is likely going to be soon, because that sounds really good). Incidentally, you can see one of my messy spinach gomaae attempts over in that link, too.
How To Prepare Lacinato Kale - in pictures
For long leaves, I cut them in half to make them easier to manage
Cut along the spine of the leaf, as close as you possibly can
Turn the leaf around, slice the spine off and discard
Repeat with the other half of the leaf
Stack the leaves and slice into ribbons
If you want to store them for a few days, use a container with a good seal, and place a dampened paper towel on the top before closing. Store in the crisper of your fridge
Ready to go!
June 08, 2012
Gyoza Stir-Fry
This recipe is my version of the Chicken Pot Stickers in the highly useful Cook This Not That! Kitchen Survival Guide by David Zinczenko and Matt Goulding. It is fast, tasty, and relatively healthy. It makes a light meal, so if you want something more substantial, you might consider serving it over rice or noodles, but it's also good simply on its own.
To be sure, it's more of a recipe concept, since it revolves around a pre-made ingredient (the pot stickers themselves), but you can easily outfox that by making your own dumplings. I've gone with my favourite recipe for pork gyoza, a Japanese-style dumpling that is kissing-cousin to the Chinese pot sticker, making up a batch of 36 dumplings. The stir-fry recipe calls for 24, leaving me 12 to stash in the freezer. If you don't want to do that, there's always the ones from the freezer section of the supermarket, totally up to you.
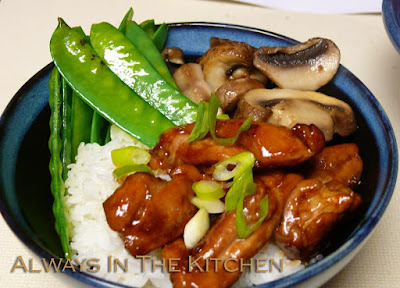
The stir-fry, then, is pretty much self-explanatory from the photo above:
You start by par-cooking the frozen dumplings for a couple of minutes in boiling water (you could also steam them), although if you're using freshly made non-frozen dumplings, you can skip this step and just add a couple of minutes to the stir fry time.
Next, heat a small amount of sesame oil in a large non-stick skillet, and add some sliced shittake mushrooms, a couple of cups' worth. A few shreds of fresh ginger are great at this point, too, but not necessary. Stir fry those for a minute or two, then add the dumplings, cooking for 2 or 3 minutes per side until browned.
Add a couple of cups of trimmed snap peas (or snow peas, if you prefer) for one more minute of cooking, then remove from the heat and stir in a tablespoon of low sodium soy sauce, a tablespoon of rice vinegar, and however much sriracha you fancy (more sriracha can be used as a condiment, of course).
Stir it all through, and divide between four bowls. Sprinkle with toasted sesame seeds (I use a combination of black and white sesame seeds, because I like the effect) and throw a sliced green onion on top for a burst of fresh flavour. I totally forgot the onion in the above picture, as you can see - it's not necessary, it is tasty.
Easy, yes? If you have the dumplings already in the freezer (one way or another), it only takes about 15 minutes to make, including waiting for the water to boil for the dumplings, and prepping the vegetables.
May 27, 2012
Miso Halibut Cheeks
I know this looks like yet another pasta recipe, but really it's about the lovely bit of fish perched on top of the gingered noodles. The noodles could easily have been a bowl of Japanese rice, and possibly will be, next time.
You may have noticed that I do not tend to post a lot of fish or seafood recipes, and when I do they are usually for prawns, which is hands-down the most common type of seafood cookery for me. There is a reason for this: When I was a child, I had an allergic/food sensitivity reaction to finned fish. Shellfish were fine, but rare in our household, so I learned to like them without any adverse effects intruding. For finned fish, however, I grew to hate even the smell in the air, raw or cooked, however fresh. I would try to hold my breath in disgust, as I angrily ate my fried egg while the rest of the family had fish. When I eventually grew out of the physiological reaction to fish, I had no idea how to cook it, and little desire to learn, because the smell was so off-putting.
Sushi was the thing that broke the barrier for me, in the late 1980s. I started with the predictable California rolls, and eventually worked up my courage to try the others. The Japanese preparations tended to control the objectionable fishiness quite excellently. From there, I found myself eating fish as part of elaborate tasting menus at places like (the now-defunct) Lumiere, where elegant little morsels of sablefish might be cooked with sake and maple foam, for example. Tiny portions just right for sampling and exploring, which opened the door to other cooked fish preparations. When I started ordering fish in fine dining restaurants during departmental lunches for work, it was a real eye-opener in terms of how skilled preparation and bright flavours can make all of the difference. I even learned to like fish and chips (although I am particular about what fish it is, preferring mild, creamy white fish).
So, finally, when I saw the Miso Cod recipe in Cook This Not That! Kitchen Survival Guide, I was intrigued. I prefer halibut to cod, so that's what I hand in mind when I went to my local fish monger, The Daily Catch. They had halibut fillet, no surprise, but they also had halibut cheeks, and I knew in a blazing flash that they would be perfect for this dish. Halibut cheeks are boneless, which is part of the appeal, but they also possess a sort of delicacy of texture that appeals to me.
The recipe also included the marinated cucumbers shown to the side of the fish, which were a simple preparation of salt, sugar, rice vinegar and chile flakes that I enjoyed, but found overly salty. The spinach and sesame salad (goma ae) was thrown together to use up some spinach.
Miso Halibut Cheeks
Adapted from Cook This Not That! Kitchen Survival Guide
Serves 4
4 medium halibut cheeks (about 4 oz. each)
1/2 cup white miso (shiro miso)
2 tablespoons mirin
2 tablespoons sake
1 tablespoon brown sugar
Combine the miso, mirin, sake, and sugar in a non-reactive bowl that is large enough to also hold the fish. Rinse and pat dry the halibut cheeks, and add them to the miso mixture, turning gently to ensure that each piece is well coated. Cover well, and refrigerate for up to 12 hours.
Preheat your broiler with a rack set at 15 cm (6 inches) below the flame, and prepare an edged baking sheet by lining it with foil and misting with cooking oil. Remove the halibut cheeks from the miso, and place, evenly spaced, on the prepared sheet. Brush a little extra miso mixture over the top of each cheek, to ensure it is evenly coated. Broil, watching carefully, for about 8 - 12 minutes, depending on your broiler, removing when the miso glaze begins to caramelize, and the fish begins to flake under gentle pressure. Garnish with a sprinkle of black sesame seeds.
Halibut cheeks may be a little pricy, depending on where you live, but fillet, such as in the original recipe, or any other mild, creamy white fish should work nicely - check out Ocean Wise for any other fishies you might want to use. My fish monger is an Ocean Wise partner, and only uses sustainable seafood, which is reassuring because I don't need to do in-shop analysis before I pick my fish.
December 31, 2011
Nasu Dengaku - Miso-Glazed Eggplant
I first had this at a little Japanese restaurant in my neighbourhood, one which is both one of the best in town in addition to being one of the closest restaurants to my house. Vancouver is awash in a sea of sushi joints, often of middling quality, so one that offers dishes that go beyond the California roll are a joy to see.
The restaurant version of this tends to be deep fried, but lightly done, but the home version, simply popped under the broiler, is just as delicious, with a sweet and salty glaze that either revs up your taste buds as an appetizer, or beautifully complements a main course. It's also great in a bento (see below), either at room temperature or re-heated. I went a little light on the sauce, as you can see, and would probably use a little bit more next time. You can also use dark purple, smallish, round eggplants for this, which do tend to keep their colour a bit better, if elegance of presentation is important to you. Really large eggplants are likely too tough for this type of dish, however.
Nasu Dengaku
Serves 4
2 medium-small asian eggplants (thin skinned if possible)
3 tablespoons miso (I like red miso, but any will do)
1/2 tablespoon sugar
1 tablespoon mirin
1 tablespoon sake
1 teaspoon sesame oil
1/2 teaspoon soy sauce
Wash and trim your eggplants, and halve lengthwise. Cut a large diamond pattern into the fleshy cut side with a sharp knife, not going down through the skin. Brush the cut side with sesame oil, and roast or broil, cut-side-down, for 10 to 20 minutes. You can also dry-roast the eggplant in a skillet on the stovetop, if you prefer.
Mix up the dengaku sauce of miso, sugar, mirin and sake, until thoroughly blended, and heat in a small saucepan. Beat vigorously with a wooden spoon, until the sauce turns glossy, thinning with a couple of drops of water, if needed. Divide the sauce between the four pieces of eggplant, brushing it into the diamond cuts. Broil the eggplant very briefly to caramelize the edges of the sauce, slice into chopstick-friendly pieces, and serve. As you can see, I favour green onion as a garnish, because it looks very pretty, and the mild pungency of the onion is a nice contrast to the salty-sweet of the sauce.
The sauce also works as a lovely glaze for pan-seared tofu, or sauteed or broiled mushrooms.
Like the dinner plate above, this bento contains a layer of thinly sliced sesame beef with beech mushrooms on Japanese rice in the one tier, and nasu dengaku, black sesame carrot kinpira, and a mini cucumber in the other.
Happy New Year, everyone! May your year be filled with deliciousness.
Labels:
Bento,
Healthy,
Japanese,
Vegetarian
April 25, 2011
International Bento (Japan): Gyoza-Meatball Bento!
What happens when you are making gyoza, and run out of wrappers before you run out of filling? Well, you could run out and buy more wrappers, certainly, or make up another batch by hand if that's the way you roll. However, if you only have a small amount of filling left over, why not just make meatballs?
To make sure they fit nicely into my rather flat bento, I shaped them more like tiny burger patties, and simply fried them up. So, I guess you could either call this "skinless gyoza" or flat meatballs. I "dressed" them with a little dollop of leftover tonkatsu sauce from a previous dinner, which was absolutely the right condiment (although spicy bean paste or miso gravy would have also been good). The filling I was making was pretty much the same as the pork filling, but I sometimes play fast and loose with the quantities of mushrooms and/or cabbage, which is why I ended up with a little extra this time. You can also substitute the ground pork for ground turkey, with tasty results, and one day I do intend to get around to trying a scallop-prawn gyoza.
Since gyoza filling is not cooked in advance of dumpling assembly, it's easy enough to shape any leftover bits into meatballs - you could freeze them uncooked, naturally, but I just cooked them up on the spot, downed one as a snack (just to make sure they were tasty, you understand) and packed up the rest for a lunch.
The rest of the bento is probably fairly self-explanatory: Radish lotus flowers (they look more like lotus flowers or lilies to me than roses, when cut this way), raw snow peas, and Japanese steamed rice with togaraschi shichimi sprinkled on top.
This was a fairly filling bento, between all the rice and four large meatballs, so it wasn't as balanced as it could have been. A little more veggie matter, or some fruit for dessert would have sorted that out nicely but, to be fair, I made this bento out of refrigerator scraps, essentially, so I was pretty pleased with it.
I'd like to get back into making more bentos. We've been eating out in restaurants a lot since the move, what with work schedules, hockey playoffs, and loads of new restaurants suddenly more available to us, so our leftovers haven't always been bento-friendly (or I've been too lazy to make them so). I do enjoy the way bento-making encourages the planning of a balanced lunch more than simply putting leftovers of a main dish into a container without thought or side dishes. It feels like a step in the right direction, and gets more fruit and vegetables into my lunchtime.
April 16, 2011
Takikomi Gohan
Another rice post - but rather different from risotto!
I've always enjoyed the small bowls of mixed rice, or takikomi gohan that one can get in Japanese restaurants - they provide a wonderful, warm, savory hit of satisfaction. The kind I tend to see around Vancouver are usually made with chicken, with mushroom, or with both, and I went for the combination, since it struck me as a fine idea for a casual supper at home.
I went looking online for suggestions regarding recipes, and there certainly is a number to choose from, each with a different approach to the necessary components. After a lot of searching, I finally came back to the incredibly useful Just Hungry food blog, the sister site of Just Bento. Her recipes are for straight-up mushroom (one traditional, one vegan), but she does mention the addition of diced chicken instead of bean curd, so that's the option I took. I thought I was getting the chicken pieces small enough, but next time I will dice them more finely.
The recipe itself is simplicity, if you are using a rice cooker. Chop your mushrooms (and chicken) and allow to marinate for an hour or so in a small amount of a mixture of roughly equal proportions of soy sauce, mirin, and sake. Add this mixture on top of the rice and water mixture in your rice cooker, then turn it on as usual for plain rice. Gently mix with a paddle when it is cooked, to integrate everything. Garnish as you please.
It is not a particularly elegant dish, as you can see below. It is simple, comforting, and easy fare, and one I intend to repeat again soon. The leftovers, as you can see above, made absolutely charming onigiri for a bento lunch the next day (and froze fairly nicely, too).
You can use whatever mushrooms you like. We used a combination of shiitake, king oyster, and enoki. Next time, I plan to include shimeji (beech mushroom), since I found that HMart carries the more widely cultivated bunashimeji. But really, any mushroom that you enjoy eating will work just fine.
I'm surprised it took me so long to try making this for myself, because it is very rewarding for the small amount of prep involved. Even if you've never had the restaurant version, you might want to give this a try: it is a solid entry in the grand category of soothing rice-with-bits dishes.
September 26, 2010
International Bento (Japan): Tonkatsu Bento
As promised, a bento which ventures into Japanese content. In this case, the bento is an exact redux of the dinner from the night before (see below): tonkatsu, Japanese rice, miso-glazed carrots, and gingered daikon salad. The vegetable content was a little light, as I intended to combine the carrots with lotus root slices (very pretty together!) but failed to acquire the lotus root on my way home. Next time, I mean to do a combination of carrot, lotus, and burdock (gobo). The preparation is much like a kinpira, but with a little red miso mixed with water and sesame oil added in and reduced until it glazes the vegetable pieces. An extra vegetable, maybe something green to balance out the meal, too - perhaps a little finely chopped snow-pea "coleslaw", made in a vaguely sunomono-like fashion, would be a good addition here.
I'm very fond of tonkatsu, a breaded, shallow-fried pork cutlet, in this case made from a slightly pounded pork sirloin chop. The conventional flour/ dip in egg / dredge in crumbs is employed, using panko, the airy, coarse style of breadcrumb that gives Japanese breaded foods a delightfully fuzzy appearance. For the recipe, I refer you to Maki's excellent site Just Hungry, the sister site to Just Bento, which is a favourite resource for my forays into Japanese cuisine.
The little fish-shaped sauce bottle in the bento is filled with a Tonkatsu sauce which Palle assembled after perusing various recipes online and taking the best of them to form a hybrid (his favourite way to cook). I don't think he noted it down, though, so the next iteration might be quite different, depending on how well he remembers what he did. The little fish-bottle is one of a veritable school of fish bottles I got in a little box from a Japanese dollar-type store here in Vancouver. They are generally used for soy sauce, or other smooth and not-too-thick sauces that can be loaded by suction through the fish's "mouth". A bargain at two dollars for a box of them (if one doesn't make it home, I'm not too broken up by it).
If you recall my Fear of Frying post, you will know that this involves more oil and temperature control issues than I am strictly comfortable with, so making the Tonkatsu also helped me push my boundaries and further develop my frying skills. To be fair, I made a crash decision to shallow-fry the cutlets instead, using about an inch of oil in a large skillet, based on a different recipe that I found in a cookbook. The first two of the four cutlets I cooked were beautiful, but I had my predictable troubles controlling the heat for the second batch. The cutlets were all delicious, but the second batch were considerably less attractive.
More practice is clearly in order, but I was really happy with how well this turned out.
January 03, 2010
Sesame Beef Rice Bowl with Miso Gravy
My current enthusiasm for Japanese cuisine is clearly alive and well in the New Year.
Miso gravy is the only thing I ever really enjoyed from the famous, wildly overrated Naam restaurant in Kitsilano. They did a very nice sesame fries with miso gravy, and the gravy became so popular that they eventually marketed it to local supermarkets.
However, being fairly confident in my gravy-making abilities, it struck me that this should be pretty darn easy to do, just winging it. After, all, other bloggers have done just fine. Essentially, you get to make gravy however you like best, but using miso paste instead of roast drippings. If you want it vegetarian, use vegetable broth/stock for your liquid instead of meat stock. If you want it gluten-free, use chickpea flour as a thickener. If you want it to further complement Asian flavours, add soy sauce(or tamari), ginger and sesame oil. It is infinitely customizable, and quick to do. An immersion blender helps smooth out the garlic/ginger/onion particulate flavourings that I've used in this one. You can make it ahead, and store it in the fridge. It re-heats beautifully.
The sesame beef was very simple and quick, too. The marinade is from Just Bento, but I used sliced beef from our local Vietnamese butcher - very, very thin sheets, rather than the thin strips you would get from slicing minute steak, per the recipe. However, thin sheets of beef may not be readily available, so do as you see fit. I also didn't have any mirin (although I do now, it is not Hon mirin, which I understand to be the best), so I used sake - what with the brown sugar in the recipe, and my dislike of overly sweet meat dishes, it worked just fine - although, to be fair, I'm planning to re-do this with the mirin, just to see the difference.
To cook the beef, I simply heated a skillet until very hot, spritzed very lightly with canola oil, and sear the meat quickly in batches. It only took a few minutes to get through the lot - about a half-pound of meat, in total. At the end, I dumped the remaining marinade (not much left) into the pan and quickly scraped up the beefy goodness from the bottom of the pan, and then tossed it with the cooked beef.
The asparagus spears were quickly stir-fried, and the enoki mushrooms were steamed in sake. The radish is pretty self-explanatory, and the hint of pink over on the far side is some pickled ginger that I picked up at a local Korean market. Steeply angled green onion slivers complete the garnish (along with a few sesame seeds, for emphasis), and the whole lot is served on top of Nishiki steamed rice (gohan), with the gravy on the side for dipping the asparagus.
I am already planning when to make this again.
Labels:
Japanese
November 02, 2009
Scotch Eggs for dinner
This is technically also part of the Japanese cookery kick that I'm on right now.
I love Scotch eggs, but they're pretty few and far between on menus in these parts. Except, that is, for at Ping's, the funky little Yoshoku (western influenced Japanese comfort food) restaurant that opened up a year or two ago in my neighbourhood. Turns out, the Japanese are quite keen on the whole philosophy of Scotch eggs, and have embraced the idea of wrapping meat around a cooked, peeled egg and then dumping it into the fryer.
I don't tend to deep fry food at home, thanks to the mess and expense of the oil, so I had long considered Scotch eggs of any stripe to be out of my production possibilities. However, after seeing some pretty cute online versions that had been baked instead of fried, I figured the time had come to give it a whirl.
I figured I'd go with Japanese flavourings, so I used ground pork, which is what I had at hand, and seasoned it with a little ginger, soy sauce, white pepper, and garlic. I wrapped very thin patties around slightly under-cooked peeled, boiled eggs. Then, I baked them for about 25 to 30 minutes, rotating half way through. They stuck a bit while I was turning them, so parchment paper might be useful next time.
My sealing techniques were a bit dodgy, so some of the meat casing cracked along the seam where I had pressed the edges together, but overall the experiment was wildly successful. Delicious, in fact, and made even better by the fact of leftover Scotch eggs to take to work the following day. I intend to tweak this recipe over and over until I get perfect results on all the eggs. In the meantime, even the slightly lopsided ones are mighty good eats.
The rest of the meal sort of speaks for itself: simple onigiri (no filling, still practising the shaping side of things), a spinach and sesame salad (minus the actual sesame seeds which, it turned out, I was out of), and some beginner-level carved radishes, for a touch of kawai.
Labels:
Japanese
October 27, 2009
Chicken Teriyaki Donburi = Chikiteridon!
I had no idea that delicious chicken teriyaki was so darn easy.
I've become very interested in Japanese cuisine, of late. I learned how to make maki sushi years ago, but frankly it's not something that I tend to make at home. I have never been to Japan, so my assumptions about the cuisine are somewhat biased by the Japanese restaurants in Vancouver, and somewhat ruthless reading. I'm currently trolling for cookbook recommendations, if you have any suggestions, please leave me a comment or shoot an e-mail my way.
I recently purchased some Japanese rice, and have consequently been playing a little. I've always been fond of donburi - Japanese rice topped with assorted delicious bits - and I had some luck with an oyakodon (chicken and egg donburi) several years ago. Donburi is a favourite (and infinitely variable) and filling lunch when I'm out and about.
Chicken Teriyaki is one of those things that I tend to find, in restaurant preparations, rather too sweet for me, although I do like the flavours. Most of the attractive recipes that I could find specified a mixture of sake, mirin, sugar and soy sauce. Some had ginger and garlic, which doesn't seem to suit the smooth texture of the sauce. The most user-friendly recipe that I found was from Just Bento, a website devoted to the marvels of the bento lunch. This is also where I found the term "Chikiteri", which is quite wonderful. Here is my adaptation.
Chicken Teriyaki
Adapted from Just Bento
Serves 4
Total Prep & Cooking time: 45 minutes, including 30 minutes marinating time
Note: I didn't have mirin (alas! Next time!), so I made do with just sake. The good news is, it was excellent, so don't let a lack of mirin put you off making this as soon as possible.
¼ cup Japanese soy sauce (low sodium)
¼ cup sake
2 Tablespoons honey
1 Tablespoon plain rice vinegar
6 skinless chicken thighs
1 Tablespoon canola oil
2 green onions, sliced diagonally
Mix the soy sauce, sake, rice vinegar and honey in a wide, shallow dish.
Remove any big fatty bits from the chicken and slice the thighs into chopstick-friendly pieces – I cut with the grain into pieces roughly the size of short, fat, carrot sticks. Add the chicken to the soy sauce mixture, stir well, and allow to rest for 15 - 30 minutes (or overnight, if you can plan ahead).
Drain the chicken in a sieve, reserving the marinade.
In a large, non-stick skillet, heat the canola oil over high heat. Once it is hot enough for a drop of water to sizzle, add 1/3 of the drained chicken to the pan in a single layer. Let it cook without moving the pieces for 30 seconds, then add half the remaining chicken in the spaces around the first batch. Allow to cook further 30 seconds undisturbed, then stir through once and add the rest of the chicken to the pan. Let it cook undisturbed for about a minute (you can keep an eye on the earlier pieces, and flip them if they look like they’re going to burn otherwise) and then stir everything through so that the chicken browns and turns glossy on all sides.
Add the reserved marinade and stir through. Cook, stirring occasionally, until the chicken is a lovely dark golden brown and the sauce has reduced to the desired consistency.
Serve with Japanese rice, and garnish with green onions. Stir fried snow peas and shiitake mushrooms make a lovely accompaniment.
Garnish with green onion. Serve with Japanese rice, preferably, and some crisply cooked vegetables (upon reflection, I should have added some ginger to the mushrooms above).
Labels:
Chicken,
Japanese,
Make It Forever!,
Rice
July 17, 2005
Gyoza factory
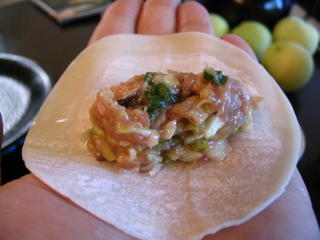
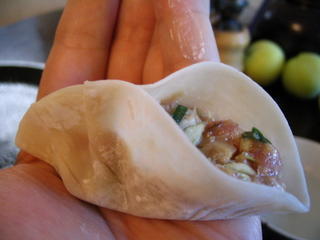
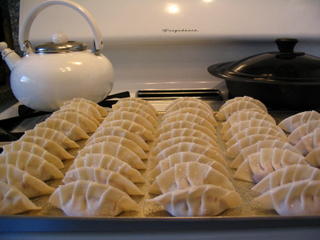
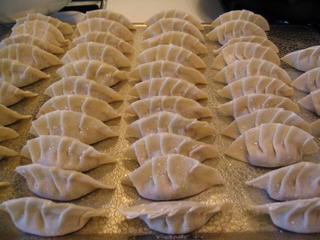
I have been told that in some Asian families, children often participate in making dumplings - quickly learning the skills required to nimbly fold soft sheets of dough around a variety of succulent fillings - and the entire family sits around a table making dozens of dumplings at a time. Some for now, some for the freezer. It's a mental image that I love: it reminds me of making perogies with my mother, although we never made them in such a quantity (or all that often).
For the most part, I am a factory of one. Still, after the first couple of clumsily folded dumplings, I usually get into a groove and manage to fold three dozen neatly folded dumplings in less than an hour all by myself. Today, I decided to fold both halves of my package of gyoza skins - a total of six dozen dumplings. Since mixing up the filling takes the same amount of time, whether you are doing one or six dozen, it doesn't really add much time to the task to do a whole lot at once.
Since my last batch of gyoza were chicken, ginger, and water chestnut, I decided to go back to my standard pork recipe for this batch. Who knows what the next batch will be - I'm thinking I might try something with shrimp. So now, once again my freezer is stuffed with little treasures. I have my Jamaican Jerk Patties, I have some burritos (although they are running low) and I have six dozen gyoza, just waiting for a noodle-feast! I am pleased with my afternoon's work. Less than a couple of hours, really.
July 04, 2005
Yowza! Gyoza!
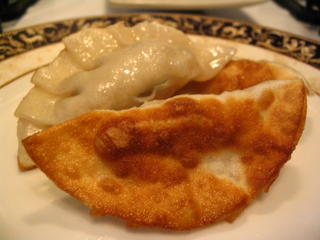
This is why I love having a stash of homemade things in the freezer. Even straight from the freezer, these little devils cook in mere minutes, and if you're feeling frisky, a quick little fry on one side gives a fantastic result.
This was the last of my most recent batch of gyoza - chicken with shiitake mushrooms, ginger and green onion. I must make more soon! Every time I make them, I vary the ingredients on whim and availability, and I've never had anything less than stellar results. While admittedly, this is a tiny serving - 3 dumplings of 2 1/2 inches long - it makes a wonderful topping for ramen, soba, or spicy somen, or as an appetizer.
(Note: expired link removed - instead, please see recipe(s) in the comments, below)
Subscribe to:
Posts (Atom)