Showing posts with label Miscellaneous. Show all posts

February 17, 2020

Sausage & Butternut Pearl Couscous


This is an intensely fragrant supper dish with a unique and heady spice signature. It's not quite a one-pot meal, because you roast the vegetables on a tray before adding them in the final cooking stage, however, it is still a simple and delicious meal and the leftovers reheat well. The roasted vegetables lend a subtle sweetness that balances out the spices really beautifully.

Sausage & Butternut Pearl Couscous

Adapted from A Little and a Lot

Serves 4 - 6 depending on hunger and whether or not there are side dishes.

Note about Pearl Couscous: this recipe uses moghrabieh, the largest version of pearl couscous (sometimes called Lebanese Couscous). If you are using a smaller pearl, such as ptitim (aka Israeli couscous), the cooking time for the couscous can be reduced to about 6 or 7 minutes. Test as you cook, to be sure!

Note about butternut squash: butternut squash has an enzyme just beneath its skin that has a peculiar effect on the skin of your hands when you handle it, leaving your hands feeling very tight and dry afterward. This feeling is not solved by simply washing and moisturizing; to avoid this unpleasantness, I recommend that you wear rubber gloves (such as for washing dishes) while you peel. I use a sturdy Y-peeler, which has no difficulty tearing through the tough skin.

750 grams butternut squash, peeled, deseeded, and cut into large dice (about 3 cups)
2 large or three medium carrots, peeled and cut into large dice*
30 ml (2 tablespoons) extra virgin olive oil
1/4 teaspoon salt
1/4 teaspoon ground white pepper
300 grams sausage, such as Andouille, Krakauer, Kielbasa, or any pre-cooked grilling sausage
30 ml (2 tablespoons) butter
250 ml (1 cup) minced shallot (about 1 big banana shallot, or a small onion)
1/2 teaspoon ground cinnamon
4 whole star anise
1/2 teaspoon ground ginger
1/4 teaspoon turmeric
1/2 teaspoon smoked paprika
1/4 - 1/2 teaspoon red pepper flakes
1/2 cup (125 ml) dry white wine or dry vermouth
420 ml (1 3/4 cups) chicken broth or water
12 dried apricots, chopped into six pieces each
225 grams Moghrabieh pearl couscous (if using smaller pearl couscous, reduce cooking time)
1 cup chopped fresh cilantro

Heat the oven to 190°C (375°F) degrees with a rack in the middle position.

Place diced carrot and butternut squash in a large bowl, drizzle with olive oil and salt and pepper, and toss gently to coat. Spread them out on a large, rimmed baking sheet, and roast uncovered for 15 minutes.

While the vegetables roast, slice the sausage into chunky bites. After the carrots and squash have been roasting for 15 minutes, add the sausage slices. Give the pan a shake if necessary to even everything into a roughly single layer, and return to the oven to roast for another 15 minutes. Test one of the larger pieces of squash and carrot to make sure they're tender (if not, roast another five minutes, but they should be fine). If the vegetables and sausage are ready before you need them, simply leave them on their tray on a cooling rack until you're ready for them.

While the vegetables and sausages roast together, combine the spices: cinnamon, star anise, ground ginger, turmeric, smoked paprika, and pepper flakes, together in a small bowl. Heat a large skillet, braising pan or dutch oven over medium heat. Add the butter and, once the butter has melted, add the minced shallots and stir through. Once the shallots are starting to soften, add the pearl couscous. Stir and cook until the onions are translucent, and the pearl couscous is picking up a hint of colour. Add the spices to the skillet, reduce the heat to low, and cook for another 1-2 minutes, stirring constantly.

Pour in the white wine or vermouth, turn the heat up to medium-high and cook, stirring frequently, until much of the wine has evaporated. Stir in the broth or water, bring to a gentle simmer, then add the chopped apricots. Lower the heat enough to maintain a gentle simmer, cover the pan, and let cook for 10-12 minutes (a little less for smaller pearls - test a couscous pearl for doneness, and if necessary, continue to cook until tender). There should still be a little liquid in the pan when the couscous is ready, enough to dress the roasted vegetables once they're added. If your liquid is disappearing too quickly while the couscous cooks, be ready to add a little more - preferably hot water from a recently boiled kettle, so to not disrupt the cooking process.

Once the couscous is tender (or even while it's still a little bit al dente) add the sausage, carrots, and squash to the skillet with the couscous and stir to combine. Let cook gently for another 2-3 minutes to meld the flavours. Remove the pan from the heat and stir in half the cilantro, reserving some to garnish plates.

*Large dice = chunky bite-sized pieces.

December 07, 2018

Stuffed Pumpkin


Everyone can enjoy a beautiful centrepiece main dish that is as fun to make as it is satisfying to eat. Plus, it's even easier to make than a carved jack-o'-lantern, since you don't have to carve a face (I suppose you could, though...) The use of a pumpkin makes it terrific for Thanksgiving or other harvest feasts, but it would be beautiful on a Christmas dinner table, too.

Naturally, you could use any stuffing you like in your pumpkin, but I've chosen my mother's classic bread stuffing with bacon, sage, and onions. If you're feeling extra, go ahead a spoon a little mornay over the top to help seal in the moisture, but that's purely optional, especially if you're serving it with gravy (recommended).

You can use a larger pumpkin if you're feeding more people, although it might take a little longer in the oven. I'd actually suggest two medium pumpkins, baked side-by-side if you want more servings. Of course, if you have lots of other dishes on the table, you can certainly cut smaller slices.

The pumpkin part is so easy that it's almost not a recipe, but I'll give you the stuffing recipe at least. I've used a French "Muscade/Musquée de Provence" pumpkin, but a cheese pumpkin would work beautifully, too, as would any firm-fleshed winter squash with a spacious cavity and fleshy walls.

Stuffed Pumpkin

Adapted from Epicurious

Makes 1 medium stuffed pumpkin - 4 to 8 servings

1 medium fleshy pumpkin (1-1.3 kg/2-3 lbs)

To prepare the pumpkin, cut the top off and hollow out the seeds and strings the same way you would for carving a Hallowe'en jack-o'-lantern. Brush a little canola oil or melted butter over the inside of the hollowed out pumpkin, and set aside while you make the stuffing.

Preheat your oven to 170°C/350°F with a rack set low enough to accommodate the tray with the pumpkin on it. Prepare the tray (baking sheet, pizza pan, or similar) by lining it with foil for easiest clean up. You could theoretically bake it in a Dutch oven (or a French oven) but you'll have a much more difficult time getting it out, so I wouldn't recommend that approach.

Stuffing

4 large slices French bread, preferably stale or left unwrapped for a few hours
1/2 medium yellow onion
2 medium stalks celery
1 leek, sliced
2 - 4 pieces dry cured bacon, diced
2/3 cup hot chicken stock or broth
1 egg, beaten
2 teaspoons dried sage
1 teaspoon fresh thyme leaves
1/4 cup chopped fresh sage leaves
1/2 teaspoon white pepper
1/8 teaspoon ground celery seed

Dice the bread, toss with a teaspoon of dried sage powder, and set aside. Dice the onions, leek and celery, and bacon.

Fry up the bacon in a big skillet until crispy, then remove the bacon pieces to a plate and fry the onions, celery and leek in the bacon fat. Once the vegetables start to turn translucent, add the bread and stir it all around. Add the rest of the seasonings, and stir around. Empty into a large bowl. If you think it wants more sage or even a little more thyme (go easy on the thyme!), sprinkle a little more of the herb of your choice over the mixture, and stir through.

Add the bacon to the bowl and stir to distribute the pieces throughout. Add the beaten egg and stir well with a fork until combined. Pour the chicken stock over the bread mixture and stir again, vigorously.

Immediately spoon the stuffing into the pumpkin, packing it in gently until the pumpkin is full.


Top with the lid, and bake the pumpkin for about 1.5 - 2 hours, or until a wooden skewer (or dry spaghetti strand) inserted into the fattest part of the pumpkin slides in easily and comes out clean.


Serving can be done in a variety of ways: you can slice it, as we have done here, or you could scoop the stuffing and squash out with a spoon, as either separate items or mixed together. Either way, pass the gravy!


September 23, 2018

Quail Scotch Eggs


Okay, here's the thing. Quail Scotch Eggs are really no different than regular scotch eggs, other than the obvious: quail eggs are smaller, so... they're smaller. So, if you already make a killer chicken egg version, here's just the suggestion to try using quail eggs instead. Perfect for parties, picnics, bento, or any other time you want a delicious savoury treat.

Essentially, a scotch egg is an egg-stuffed glorified meatball. Traditionally they are deep fried (as these are), but you can bake them in the oven, too (although the longer cooking time may lead to the meat shrinking away from the egg in places). So again, if you have a favourite meatball flavour profile, you can simply go ahead with what you already know and love. That being said, I do find that chicken, turkey, pork (or a blend) tend to work best with these little quail eggs, because they don't overwhelm the delicate flavour in a way that beef or lamb might. Your mileage may vary.

Quail Scotch Eggs

Makes 12

12 quail eggs

Meat layer
500 grams ground meat (shown: 60% pork/ 40% beef)
2 shallots
1 clove garlic
1/2 teaspoon coarse salt (eg. sea salt or kosher)
1/4 teaspoon ground black pepper
1/4 teaspoon dried oregano
1/2 teaspoon dried basil
pinch of chile flakes if you like

Coating:
1/2 cup all purpose flour
1 (chicken) egg, beaten well and seasoned with a pinch of salt
1 - 1 1/2 cups bread crumbs (I use panko style breadcrumbs)

Oil for deep frying

First you will need to cook the quail eggs. Heat water in a small pot, and when it comes to a simmer, carefully lower half of the eggs into the pot and set the timer for 2 minutes (3 minutes if you want the yolks firm), and then remove them to an ice bath to cool them and stop the cooking process. Repeat with the other half of the eggs. I like to use my skimmer to raise and lower the eggs out the boiling water, because it's broad and I can load six quail eggs onto it at once no problem. A spider might also work. Timing is important here, because if you dither about getting them out, they will probably overcook. Not the end of the world, but the yolks won't be soft, and they might even get those nasty grey rings.

While the eggs are cooling, mix up the meat layer: break up the meat using your finger or a fork, to aerate it and make it easier to introduce the seasonings. Finely chop the shallots and garlic (or press the garlic), and sprinkle the herbs and spices over the meat. Use a fork, or your impeccably clean hands to distribute the seasonings throughout the meat without packing it down too much. Just like you would season meat for making burgers or meatloaf. If your meat is very lean, you can always add a bit of beaten (chicken) egg at this stage, too, but I don't find it necessary. Set the meat aside for the flavours to meld while you peel the eggs.

Very carefully tap/roll the eggs to break the shells, and peel them using a small teaspoon to help ease the shell away from the egg. Place on a clean plate to one side until they are all peeled. This will take a few minutes, so be patient.

Divide the meat mixture into 12 portions

Dip each egg in flour, and shake off any excess; this step is important, because it will help the meat layer adhere to the egg. In the palm of one hand, flatten out a portion of meat into a thin patty. Place a floured egg in the middle, and shape the meat up around the egg, enclosing it completely. Pay extra attention to make sure the seams where the meat comes together are strong. Set aside, and repeat with the other 11 eggs.

Prepare your deep fryer, or in my case, a pot with a couple of inches of oil in it. Heat the oil to 370°F/185°C. While the oil heats, use the time to coat the meatballs. Dip each meatball in the flour, dust/pat off anything but the thinnest of layers, dip briefly in the beaten egg, let drip a moment, and then roll in breadcrumbs to coat. Set aside.

When the oil is ready, fry the scotch eggs in batches until the coating is golden brown and delicious looking. Remember, the centre of the meatball is the already-cooked quail egg, so these babies fry up very quickly, since the heat doesn't need to penetrate the centre. Mine took about four minutes to cook, turning them over from every minute or so. Use a metal slotted spoon or spider to remove them to a clean plate lined with paper towels.

Serve hot, room temperature, or cold...with your choice of dipping sauce. I've used everything from aioli to hot mustard to tonkatsu sauce, depending on the flavours in the meat seasoning. We had three apiece for dinner, with potato salad, and then three apiece for lunch the next day.

July 05, 2018

Z-Balls - Zucchini Polpette


These delicious veggie-packed Z-Balls can be everything from a pakora-like appy (pass the chutney), to a sandwich filling, to a stand-in for traditional meatballs on a big plate of spaghetti (or spaghetti squash, if that's how you roll).

This recipe was developed from my classic Zucchini Fritters recipe, but has a bit more body to better withstand the round(ish) shape without getting doughy. I'm using classic Italian flavours for these ones, since they'll be topping spaghetti, but you can of course customize the seasoning profile to your taste (Old Bay-type seasoning would be awesome for sandwich-filling Z-Balls, for example).

It's zucchini season! What are you waiting for?

Z-Balls (Zucchini Polpette)

Makes 24 Z-Balls
Total prep and cooking time: 45 minutes

5 cups grated zucchini
2 eggs, beaten
2 tablespoons butter, melted
1 1/2 cups fluffy breadcrumbs ~ such as panko
1/3 cup finely minced onion
1/2 teaspoon dried basil
1/4 teaspoon dried oregano
1/2 teaspoon chile flakes (optional)
1/2 teaspoon kosher/coarse sea salt
1/4 cup flour
oil for shallow-frying

Make sure that the strands of grated zucchini are not too long - cut a slice into the zucchini lengthwise (stopping before you hit the stem) before grating, and then position the zucchini against the grater so that the grated strands will be short. You could also grate the zucchini normally, and then give it a quick chop-through with a knife. Either way, Squeeze the grated zucchini by the handful (over a colander in the sink, to catch escaped strands) to release extra liquid. Place the shreds in a medium mixing bowl.

Add the flour and stir with a fork to thoroughly distribute the flour throughout the zucchini strands. Add the eggs, melted butter, bread crumbs, minced onion, salt and herbs. Mix well with a fork, so that all ingredients are evenly distributed. The batter will be quite wet, so you will need a scoop to shape the balls. A disher with a release mechanism works best. The one I use a no. 18-8 disher, which has a tablespoon capacity, which makes a nice sized ball, whether it's a meatball or z-ball. Without a scoop, I would use two tablespoons, and the quenelle method.

Pour frying oil into a skillet to make about 5mm deep. Heat the oil over medium heat, and be patient until it gets hot enough to fry, about 190°C/375°F. You don't want it too hot, or the balls will burn before they cook through. Also, if you overheat the oil, it will begin to break down and smell fishy (especially canola oil), so never let it get so hot it smokes. You can test the oil by putting a strand of zucchini in the pan. If it starts to sizzle immediately, the oil is ready. If it browns immediately, remove the oil from the heat, because it's too hot. Let it cool off the heat and try again. You can also use other methods to test the oil temperature if you don't have the right kind of thermometer.

When you're ready to start frying, use the scoop/disher to shape the ball, and release it directly into the hot oil in the skillet. Add a few more balls, well spaced to avoid over-crowding the pan, and fry for a few minutes on each "side", until dark golden brown. These are pretty soft, so you may need to gently re-shape them as you turn them - tongs are the best tool for the job, but two forks works well, too. Or you could learn to love the slightly irregular, rustic shapes they form naturally, like the ones shown here.

Finished balls can be kept warm in a warm oven. Continue to cook the z-balls in batches until you've used up all the batter.

Top a bowl of pasta and tomato sauce with these crisp, flavourful nuggets for Spaghetti & Z-Balls - sure to make anyone smile from their sheer deliciousness!


Leftover Z-Balls can be reheated very nicely on an ungreased baking sheet (or pizza pan) in a hot oven (200°C/400°F) for 10-15 minutes (flip halfway through) to restore the crisp exterior. Perfect for wraps!

January 28, 2018

Couscous Lunch Boxes - Lazy Lunch Prep


One Cup of Couscous = 4 lunch boxes.

I admire the folks who assemble beautiful identical lunch boxes on the Sunday evening to set them up for the first four (or five) days of their work week. This doesn't really suit me for a few reasons. One, I'm not inclined to eat the exact same thing every day, no matter how delicious, and two, even if I were so inclined, our tiny German fridge simply doesn't have room for this many packed lunches at any given time - even for one person, let alone two. I also try to use up any cooked meats within three days of cooking (unless it's going into the freezer). My packed lunches need to be cold or room temperature, as I do not have access to a microwave or stove at work.

In the spirit of planning a bit ahead and also using up foods already on hand or leftover from the previous night's dinner (not to mention avoiding the canteen at work), I had the idea that I could prepare a base of flavourful couscous on Sunday night, and then portion it out over the following four days. While you'll see a certain amount of repetition in the ingredients, each box was different enough from its predecessor to feel like a completely different meal.

I started by making my standard fluffy couscous base, which takes about 5 minutes active time, plus 15 minutes inactive:

Couscous Base

1 cup dry couscous
1.25 cups boiling water
1/2 teaspoon coarse salt, divided
2 tablespoons fresh lemon juice
2 tablespoons olive oil
1/2 teaspoon paprika powder (check that it's not stale)

In a large container (preferably one with a tight-fitting lid), add the dry couscous, half the salt, and the paprika. In a small bowl, stir together the lemon juice, olive oil, and the other half of the salt. Basically, you're making a vinaigrette of sorts. Stir it well until it emulsifies, for the best effect. Pour the vinaigrette over the couscous, and stir quickly with a fork until every grain is coated with the lemony oil mixture. Add the boiling water and stir quickly to distribute the grains of couscous evenly, and then cover tightly. Wait for 15 - 20 minutes, remove the lid, and marvel at how easily the couscous grains fluff up when you stir them with a fork. Let the couscous cool, and store in a sealed refrigerator container.

Lunch Box #1 - Monday

Couscous, baked chicken thigh (curry seasoning), finely diced cucumber, tomato, yellow bell pepper, and spiced sweet potato coins with a bit of sliced green onion.

The chicken and sweet potato were leftovers from Sunday dinner. The bone and skin were removed from the chicken. You can't actually see the bottom layer of couscous, but it's definitely there!


Lunch Box #2 - Tuesday

Couscous, Berbere-spiced chickpeas, diced tomatoes, diced cucumber, crumbled feta, sliced avocado.

In the morning, I opened a tin of chickpeas and extracted half of them. The rest were transferred to a refrigerator container, along with their liquid. I rinsed the chickpeas, and then quickly sauteed them in 1/2 teaspoon olive oil and a 1/2 teaspoon of Berbere spice mixture. I spread out the couscous in the bottom of the box, and scraped the seasoned chickpeas into one side before filling in the rest of the ingredients. I let the box cool before closing and stashing in my work bag.


Lunch Box #3 - Wednesday

Couscous, boiled egg, diced yellow bell pepper, avocado, and spiced sweet potato coins.

The egg was boiled up the night before and stashed in the fridge overnight. In the morning, I peeled it quickly with a spoon, and cut it before putting it in the box. The spiced sweet potatoes are continued use of leftovers from Sunday's dinner. You can actually see the bed of couscous in this one!

This box was full of delicious things, but in combination it was a bit dry. A bit of sauce or dressing would have made a big difference, which I will keep in mind going forward.


Lunch Box #4 - Thursday 

Couscous, Caribbean-curry-spiced chickpeas, finely diced cucumber, yellow bell pepper, crumbled feta, spiced sweet potato coins with sliced green onions, and diced dried apricots.

These chickpeas were done quickly in the morning, using the other half of the can of chickpeas I'd opened on Tuesday, and opting for a spicy Caribbean curry powder for the seasoning. The other items we've seen in previous boxes, but the one special ingredient here was the diced dried apricots which lent a wonderful fruity sweetness that went very well with the curried chickpeas. The inclusion of the apricots made this final box feel a bit special.


By Friday, I was ready for something entirely different, and had a homemade bento with Japanese rolled omelette with yakionigiri and gingered carrot coleslaw. But that's another type of lunch, for a different type of post.

This was not a completely effortless scenario - each day I had a couple of small tasks to pull the day's box together - but having the couscous waiting for me did inspire me to make good use of my leftovers, to vary my ingredients, and motivated me to actually do it.


October 03, 2017

Amethyst Perogies


Okay, this is kind of cheating, because it's not really a new recipe. I just wanted to share with you all the amazing thing that is these Amethyst perogies I made recently from purple potatoes from my local farmers' market.

The dough recipe that I used is essentially the same as for the Šaltinosiai, although made with warm water instead of cold, which coincidentally happens to be exactly the same as the pierogi dough recipe in my Polish cookbook. You could, of course, use whichever perogy dough you like (including this potato-dough recipe from my friend Sandi's family).

Once you have a good dough, you need to make the filling. Whole books have been written on the endless possibilities of fillings for perogies (not that you'd guess from Canada, where potato, onion, and cheese appear to reign supreme, with or without bacon).

These ones, of course, are potato. Specifically, they are a purple sort of potato varietal called "quartz" - probably from the veins of white that run through the potato in its raw state. Once cooked, however, the dark purple overwhelms the paler parts of the flesh for a consistent, deep violet colour. The ones for this recipe were steamed in their skins, which were peeled off after the potatoes had finished cooking and allowed to cool. You could use any purple potato, of course, but the colour will depend on both the type and any additional ingredients you use for the filling. To keep the filling as vivid as possible, I used red onions - sautéed in a little butter, and just a whisper of parmesan cheese. The ratios you will use is completely up to you, but think along the lines of fancy mashed potatoes or twice-baked potatoes.

Cook the fresh perogies in plenty of simmering water (salted, as you would for pasta) for about ten to twelve minutes, then use a slotted spoon or spider to transfer them to a hot skillet with melted butter (bacon and/or onions optional), and fry them until lightly coloured on each side. Serve plain or with sour cream. They look quite typical, before you cut them open!


Since this recipe actually made quite a few, I had a big dinner from them and then froze the rest. To freeze them, spread them out in a single layer on a cutting board, plate or baking sheet, if you can fit one in your freezer, and freeze for a few hours until hard. Then bag them up in thick freezer-bags, and store frozen until needed. To cook, add the frozen perogies directly into simmering water, and give them an extra few minutes of cooking time.

January 30, 2016

Toad in the Hole - Sausages in Yorkshire Pudding


No toads were harmed in the making of this recipe.

Toad in the Hole is a rather off-putting name for a really tasty comfort food from the UK, namely well-browned sausages baked into a Yorkshire pudding. It's classic pub food, both hearty and surprisingly simple, and doesn't take too long to make. You can use any kind of sausage you want, really, but since I live in Germany, I've gone with a fairly neutral bratwurst. A good English banger would be perfect, but you wouldn't go wrong with Cumberland links or Lincolnshires, if you can get them.

In fact, you can use almost any bits of cooked meat and it would be within your rights to call it Toad in the Hole, although the standard that has arisen is for sausages. I wouldn't recommend spam, but apparently that was sometimes used during wartime rationing. You can use big or small sausages, as you wish. Smaller sausages make for easier portioning and serving, of course. There are plenty of vegetarian versions out there, too, featuring field mushrooms and roasted vegetables. Your mileage may vary.

As a quick aside, I followed Various Internet Instructions™ to lay the sausages on top of the batter, but I think next time I will lay the sausages down first, and pour the batter around and partially over them, to get a more classic look.

This recipe uses two skillets, because the gravy is made separately while the "Toad" is in the oven.

Toad in the Hole with Onion Gravy

Serves 2 - 3

400 grams fresh sausage links (I've used large pork bratwurst)
1 medium onion, sliced (I've used red)
2 cups beef (or vegetable) broth
2 tablespoons flour

Batter

3 eggs, beaten really well
1/2 cup flour
1/2 teaspoon salt
1 good dash of Worcestershire sauce
1 tablespoon grainy mustard
1/2 cup milk
2 tablespoons bacon fat or lard, to grease the skillet

The first thing to do is mix up the batter, so that it can rest and fully rehydrate the flour. This is an important step, if you want a nicely risen pudding. In a medium mixing bowl, whisk the eggs really well, and slowly add in the flour, continuing to whisk until smooth. Add the salt, Worcestershire sauce, and grainy mustard, and whisk until thoroughly integrated. Finally, slowly whisk in the milk until the mixture is smooth. Set aside at room temperature while you get everything else ready.

If you have a cast iron skillet, that's the thing to use. Preheat your oven to 220 C. (425 F.), with the skillet on the middle rack, so that it preheats nicely, too.

While the batter rests and the oven and skillet are preheating, cook the sausages and start the onion gravy. In a large, skillet, brown the sausages on all sides (I use a little cooking spray to get them going). Let them build up a little fond on the bottom of the pan, which will provide flavour for the gravy. When the sausages are nicely browned, add the sliced onion to the skillet, and stir it all about, so the onions start cooking.

When the sausages are ready, pull the pre-heated skillet out of the oven, and add the bacon fat to the hot skillet. Put the skillet back in the oven for a minute to fully melt and heat the fat. Pull the skillet back out of the oven, and lay the sausages (but not the onions) down in the hot fat. It will spit at you, so be careful. Working quickly and carefully, pour the rested batter (give it one last quick stir) around the sausages, partially covering them (I did this in the reverse order, putting the batter down and then laying the sausages, which is also fine, but makes the sausages float on top of the batter at the end).

Put the skillet back in the oven as quickly as possible, so that it doesn't cool down at all, and set your timer for 15 minutes. It will probably take 20 minutes, but depending on your oven you will want to at least look at it at 15. Don't open the oven if you can avoid it - this is a popover, and they notoriously won't puff if the oven door gets opened too soon.

Meanwhile, add the broth to the onions cooking on the stove top, and stir well, scraping up any fond. Depending on the quality of your broth, you might want to add an extra shot of Worcestershire sauce, too. Your choice. Make a slurry by shaking together the flour with a half-cup of water, and slowly add it to the pan, stirring. When the mixture comes to a full boil, it will be nicely thickened from the flour. Let it continue to cook, stirring frequently, so that the raw taste is cooked out of the flour. Taste, and adjust the seasoning if necessary.

At the 15 minute mark, check your Toad in the Hole's progress. The batter should have risen up nicely, but it might still be rising at 15 minutes. It will also start becoming a rich golden brown. There should be no liquid in the centre of the pan. Unless it looks in danger of burning, leave it in the oven for another five minutes, then remove, admire, top generously with gravy and serve without delay.

We served ours with English-style baked beans in tomato sauce, which is a classic pairing. A bit of salad would not go amiss, and peas are also a frequent side in the UK (not so much in our house, though). Leftovers heat up surprisingly well in the microwave.


June 15, 2015

Imam Bayīldi - Turkish Eggplant Casserole


Traditional recipes for Imam Bayīldi involve stuffing hollowed out eggplants (or halved eggplants) with onions and spices, and braising them in a surfeit of best quality olive oil until tender. I've made some serious versions in the past, but they've always felt like a lot of work for something that is primarily a side dish to me (although I acknowledge that it makes a terrific main course for lunch). So, naturally, I was very excited to see this streamlined casserole version from Feed Me Phoebe.

The slightly scandalous name, which translates "The Priest Fainted" has entertaining stories as to why exactly, the Imam keeled over - everything from swooning at the deliciousness to fainting at the cost (or sheer amount) of the olive oil. Various other versions abound in the Eastern Mediterranean, varying the spices, or in some cases the vegetables. I assume that there are versions of this that date back to considerably before the introduction of the tomato, but it seems that the tomato-and-onion version is one of the most popular.

Imam Bayīldi

Serves 4

2 small (but not baby) eggplants
Kosher or coarse sea salt
Olive oil (about a third of a cup, total)
1 small yellow onion, finely diced
2 large garlic cloves, minced or pressed
1/4 teaspoon chile pepper flakes
Dash of cinnamon
Dash ground white pepper
400 mL canned diced tomatoes, with juices
1 tablespoon tomato paste
1/4 cup finely chopped fresh parsley, divided

Prepare the eggplants by removing the cap and slicing lengthwise into 1/2 centimetre thick slabs. If you cut them into coins, it's much harder to get even coverage of the pan without gaps, so lengthwise is by far the better way to go for this dish. Dissolve a generous tablespoon of salt in hot water, and then add cold water until you have about six cups in a large bowl. Add the eggplant slices and allow them to brine for 10 minutes, or up to 8 hours. Drain, rinse, and press the slices firmly with paper towels or fresh linen towels to dry them out.

In a medium skillet (this one is a 24 centimetre steel skillet), heat a tablespoon of olive oil over medium-high heat until it just shimmers. Tilt the pan to ensure the bottom of the pan is well coated. Have a receiving plate standing by. Fry the dried-off eggplant slices, in batches, with a little extra olive oil added between each batch, just until golden on each side - about one or two minutes per side. Remove them to the nearby plate as they finish to make room for the next pieces.

Preheat your oven to 180 C (350 F) with a rack in the middle.

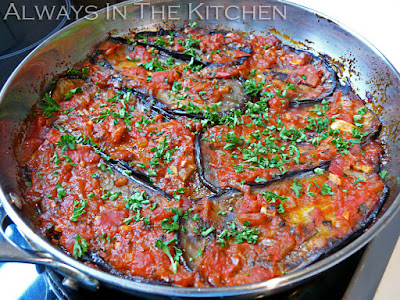
When all the eggplant has been fried, start building the sauce in the same (now emptied) skillet. Start by adding a little more olive oil (this is the last addition of olive oil), and then add the onions and garlic. Add a pinch of salt (not much, especially if your canned tomatoes are salty) the chile flakes, the cinnamon, the white pepper, and half of the parsley. Sauté until translucent and tender, and then add the diced tomatoes and their juices, and the tomato paste. Cook altogether until it starts to resemble a sauce, about four or five more minutes. Then remove about 2/3 to 3/4 of the sauce to a nearby bowl, wipe down the edges of the skillet, and start layering the eggplant into the skillet, on top of the bit of sauce that should nicely coat the bottom of the pan. Alternate the layers of eggplant with the layers of tomato sauce, and try to stack the eggplant slices in so they cover the surface of the pan in a neat, jigsaw like fashion. Make sure the top layer is sauce (ideally a thin layer of sauce so you can admire the prettiness of the eggplant slices), and place it, covered, in the preheated oven. If I use small eggplants, I only get two layers from them, but that works nicely with the amount of sauce.

Bake covered for 25 minutes, and then remove the cover and bake for another 20 minutes. Remove and allow to cool somewhat before serving. Garnish with remaining parsley.

This dish is often served at room temperature or even chilled, so it makes a surprisingly good picnic dish (or take to work dish). Paired with a nice chickpea salad, it's a beautiful, satisfying lunch.

January 22, 2015

Devilled Eggs with Feta


Devil(l)ed eggs go in and out of fashion, party-wise. However, they are easy enough to make and, it seems, always gladly received, even when they are not at their most popular. Call them Eggs Mimosa, Russian Eggs, Dressed Eggs, or Stuffed Eggs if you will, add your favourite twist to the garnish, and customize them to your specifications, but do find a place for them on your appetizer table. Even folks so jaded as to roll their eyes and say "oh, devilled eggs, I see!" can seldom resist taking one...or two. And of course, if you have dyed easter eggs (thinking ahead here, obviously), you will find devilled eggs a delightful way to quickly use up the leftovers.

I guess it's not a real shocker that I like devilled eggs, since I've used a photo of them as the banner for this blog for years and years. Perhaps it is a shocker that I've never posted a recipe for them until now. While I do make several different variations, depending on the needs of the moment, this version which incorporates tangy feta cheese into the filling has been a stalwart of my bring-along arsenal for quite some time. The feta gives the flavour a bit of a lift, as well as adding bulk to the yolk mixture, enabling you to pile the filling up prettily.

Scale the recipe to suit your needs.


Devilled Eggs with Feta

Makes 8 pieces

4 eggs, cooked in their shells (plus an extra, for safety, if you like)
2-3 tablespoons mayonnaise
1-2 tablespoons mild Feta cheese
pinch white pepper
pinch mustard powder (optional)
dash Tabasco pepper sauce
1 tablespoon finely minced green onion (or chive)
paprika to garnish (optional)

Cook the eggs gently, so they don't become over-hard and end up with green-grey rings around the yolk. My favourite method is to put the eggs in a pan of cold water, turn the heat on high and bring to a very gentle simmer, cover, turn the heat off, and set the timer for 10 minutes. When the timer dings, drain the eggs and cover with cold water. Leave for about 10 minutes for the eggs to thoroughly cool, and then peel. To peel easily, tap each end on the counter to shatter the shell, then roll the egg gently under your palm to break up and loosen the shell around the middle of the egg. Usually it works great - sometimes it just won't, so it's a good idea to start with an extra egg, just in case one of them is a jerk.

Slice the eggs in half lengthwise, and pop the yolks into a waiting bowl, taking all possible care to avoid tearing the whites. Place the egg white "boats" on the serving dish (some folks like to put down a bed of chopped lettuce or green kale to help stabilize them, and if you're serving for a party, that's a fine idea. If we're just having them around the house, I don't usually bother). If you have a really well equipped kitchen, you might even have one of those lovely little platters with the specially egg-sized divots, in which case go for it, no lettuce required.

Place the yolks in a medium-fine mesh sieve, and use a spoon to press them through into a bowl below. Essentially, this works just like a big garlic press. The yolks will have a slightly stringy, slightly pellet-y look about them, but that largely dissipates once the other ingredients are added. Be sure to scrape the bottom of the sieve to make sure you get all of the yolk into the bowl.

When the yolks are pressed through, and consequently nicely aerated, do the same with the feta cheese. If you feta is mild, you will probably want the full two tablespoons for this many eggs, but if it is quite sharp, you might want to go with one tablespoon, at least to start.

Add the remaining ingredients, except for the minced green onion. Start with two tablespoons of mayonnaise, and add one more if it seems a bit dry, as much will depend on the size of the eggs yolks, how firmly they were cooked, and the type of mayonnaise you are using. Stir in the onion last. Taste, and adjust the seasoning if necessary. With both mayonnaise and feta in there, you probably won't need any more salt, but you might want to adjust the amount of pepper or add a bit more green onion. If your egg yolks are very pale, you can always add a pinch of turmeric to the filling to strengthen the yellow colour.

Use a small spoon (or a cake-decorating syringe, if you're feeling fancy, and you like swirled ridges) to heap the filling back into the egg white boats. Garnish with a final pinch of paprika (smoked or regular) if you wish, or any other topping you please (although I wouldn't recommend caviar for these ones, since I don't think it would play nicely with the feta).


November 15, 2014

Grilled Cheddar & Mango Chutney Sandwich


It is my understanding that every food blogger must at some point commit a post to a cheese sandwich. This is one of my favourites.

Okay, okay, it's not really grilled, it's panfried in a skillet. We called these "toasted cheese sandwiches" when I was a kid. You could absolutely grill it, though.

In my mind, I invented this recipe, a natural outgrowth of my favourite childhood cheddar-and-pickle relish (non-grilled) sandwiches, but honestly I was not at all surprised to discover that plenty of other people had already invented it. It's a winning combination and, if not original, utterly delicious and well deserving of widespread enjoyment.

You make it exactly as you think you do:

Grilled Cheddar & Mango Chutney Sandwich

2 slices sandwich-type bread
Sufficient aged cheddar cheese to cover at least one of the bread slices
Sufficient mango chutney (I prefer the spicy version) to cover (thinly) one of the bread slices
butter

You may wish to finely chop any extra-large pieces of mango in your chutney, for ease of eating.

Assemble the sandwich exactly how you'd expect by spreading one of the slices of bread with chutney, covering the chutney with cheese, covering the cheese with the other slice of bread. Butter the outside slices of bread, and fry the sandwich over medium-high heat until golden, then (carefully) flip and repeat.

Serve with soup. Again from my childhood, a Simple Tomato Soup (recipe in the comments below) is a clear winner. But might I also suggest a Mulligatawny, or Brown Lentil & Tomato Soup?

September 07, 2014

Gâteau de Crêpes


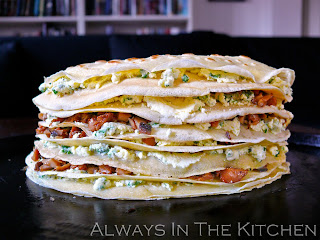
Looking for something interesting to do with a batch of crêpes? This is a Gâteau de Crêpes, aka Crêpe Cake or Crêpe Stack. It can be savoury, like this ones (full of mushrooms, herbs, and mascarpone), or they can be sweet (for example, alternately layered with dark chocolate and sour cherry jam). The possibilities are almost endless.

Since I was making only two servings (albeit very filling servings), I used a total of six crêpes, but in order to get a tall and pretty tower of a gâteau, I cut them in half and made a half-moon shaped stack.

For a filling, I chose duxelles (basically, finely chopped mushrooms, onion, garlic, butter, and brandy that have been sautéed together into an almost paste consistency), and a cheese mixture of mascarpone, crushed garlic, fresh parsley, basil, and sage, a good pinch of salt and a tablespoon or two of butter, which functioned as a sort of delicious glue to keep any stray mushrooms from running amok. If I'd done a better job chopping my mushrooms, the glue factor would have been moot, but worth including from a flavour perspective in any event.

If you are making a round Gâteau de Crêpes, simply double the ingredients and leave your crêpes intact.

Gâteau de Crêpes

Serves 2

6 6-inch crêpes, each sliced in half

Duxelles
450 grams mixed mushrooms, finely minced
(I used half chanterelles, half cremini)
2 tablespoons butter
1/4 medium onion, finely minced
2 cloves crushed garlic
2 tablespoons brandy
Kosher salt

If you have a food processor, use it to pulse the mushrooms until they are finely chopped. Otherwise, you'll need a knife and a bit more patience than I have. In a medium skillet over medium heat, sauté the onion, garlic, and mushrooms in the butter. Add a pinch of salt, and continue to sauté until the mushrooms start to stick. If you have any fresh thyme, you might want to add a pinch or two. Add the brandy, and stir through. Turn the heat to low and continue to cook and stir until the brandy has evaporated, and the mass becomes a purée.

Savoury Mascarpone
125 grams mascarpone
2 cloves garlic, crushed
large pinch of salt
2 tablespoons butter
1/3 cup chopped fresh herbs (parsley, basil, sage)

Mix everything together with a fork until thoroughly integrated.

If your crêpes are cold, warm them up. They won't be spending much time in the oven at the end, and you don't want them to start out chilly.

Lightly butter (or oil) a baking sheet (or pizza pan).

On each crêpe-half, spread a small amount of the mascarpone cream and a tablespoon or so of the duxelles. Be sure to spread the fillings all the way to the edges, to keep the stack from sagging at the sides. Place the first crêpe on the greased sheet, and then stack each "filled" crêpe-half on top of the previous one, until you run out of filling and crêpes. If you like, you can top the final crêpe with some grated parmesan, but it works just fine without, as well.

Place in a 400 F oven for about 10 minutes, or until the mascarpone is bubbling slightly and the top appears crisp at the edges.

Slice into two portions with a sharp chef's knife (a serrated knife would be more difficult to slice cleanly). Cut each slice again, to serve as an appetizer. Serve right away, or at room temperature. I served this one right away, with a chopped salad to follow.

Here it is once more, just before it went into the oven.

Flat side:


Round side:

August 28, 2014

Cucumber Tea Sandwiches with Chile-Basil Butter


These darling little sandwiches were inspired by Madhur Jaffrey's Indian-accented tea sandwiches, which call for chile-mint butter, and don't contain cucumber. I was tempted to add a hint of ground coriander and cumin to the butter mixture, just to elevate the sense of Indian flavours, and I might do that next time. Hers also had a touch of lemon juice in the butter mixture, which I might try as well, as I think the added brightness will work nicely.

Cucumber Tea Sandwiches with Chile-Basil Butter

Makes 8 Tea-sized Sandwiches

4 larges slices of thinly sliced soft white bakery bread
2-3 inches finely sliced cucumber
3 tablespoons soft butter
2 tablespoons minced basil
1 minced green chile
Kosher salt
Black pepper to taste

Mix the butter, basil, green chile, and a pinch of salt (along with any bonus seasonings you'd like to add) until thoroughly combined. Spread the butter mixture thickly on one side of each piece of bread.

On two of the slices of buttered bread, layer as many pieces of cucumber, overlapping, as you can fit onto the bread. Don't worry about peeling the cucumber (unless it has an inedible peel), the dark green adds a nice bit of contrast. Top the cucumber'd bread slices with the other buttered slices of bread, to make two large sandwiches.

Trim the crusts, using a very sharp knife and a single downward slicing motion for each side, to prevent the sandwiches from trying to fall apart. Slice each sandwich into quarters, in whichever way you see fit, or use a sandwich punch or cookie cutters if you want fancy shapes.

Serve right away, so that the bread doesn't have a chance to dry out. If necessary, cover tightly with plastic wrap until ready to serve.

February 28, 2014

Quick-Pickled Red Cabbage


This is an easy, refreshing pickle to add colour and texture to a meal. It is not, however, a German recipe, despite a prodigious reliance on cabbage here in Germany; cabbage here tends mostly to be served as sauerkraut (fermented) or braised with apples, in my experience (such as was shown in my Hasenpfeffer post).

Rather, this recipe was inspired by some marinated cabbage that I had as part of a salad in a Croatian restaurant. Applying similar principles to those in the Mexican Pickled Red Onions from a couple of years ago. I did a quick search online, and found that Gluten Free Girl has a version as well which is also very similar.

Quick-Pickled Red Cabbage

Makes 4 cups

4 cups finely sliced red cabbage
1 1/2 teaspoons coarse sea salt or kosher salt
3/4 cup red wine vinegar
1/2 cup white wine vinegar
1/4 cup water
2 tablespoons honey
2 bay leaves
1 teaspoon peppercorns
1 very small piece of cinnamon stick or 1 star anise (optional)

Mason jar or other sealable glass or pottery vessel that can fit in your fridge (I used a tempered glass bowl that has a plastic lid)

Make sure that your vessel is spotlessly clean, and rinse well with boiling water to be sure.

Toss the cabbage with the coarse salt and let it sit in a colander to drain for a few hours. Make sure that there's a plate under the colander (or it is in over the sink) because purple juice will be rendered out during this time, and it stains like a sonofagun. Combine the remaining ingredients and bring them to a simmer in a non-reactive saucepan. Cover and let cool while the cabbage drains in the colander.

A few hours later, rinse the salt off of the cabbage, and pack it into the clean glass/pottery vessel. Strain the spices out of the vinegar mixture, and bring back to the boil. Pour the vinegar over the cabbage, covering the cabbage completely with liquid. If you need a bit more liquid, you can add a little more water at this point.

Cover loosely, and let cool to room temperature before covering tightly and storing in the fridge. Allow a day or two for the flavours to meld before eating. It makes a lovely, crunchy garnish to a dinner, or adds interest to a salad (use sparingly if adding it to a salad, or it will overwhelm everything else). I've also been known to eat a small bowl of it (as shown) as a snack, but that may just be me.

If you really dig a spiced flavour profile, you can leave the cinnamon/star anise and bay leaves in the vinegar, but you may want to remove the black peppercorns (or some of them) because they're not all that pleasant to bite on accidentally. If you leave the spices in the vinegar, the spices' flavours will continue to intensify as it sits in the fridge.

This keeps for a couple of weeks, up to about a month, stored covered in the fridge.

Because this dish is so super-crunchy, I think I might try a version where the cabbage has been blanched first, just to see what the effect is on the texture. My guess is that it will remain crisp and somewhat crunchy, but might have a gentler texture. I'll be sure to let you know.

November 07, 2013

Heart & Blade Burgers


These were intensely, astoundingly, beefy. I got the idea from Jennifer McLagan's book "Odd Bits" where she exhorts the reader to make burgers entirely of heart, but for my inaugural attempt at cooking beef heart I decided to go with her further suggestion of cutting the heart 50/50 with non-organ muscle meat. She suggested brisket, but, based on the availability of the day, I went with bottom blade. For four patties, I used 250 grams trimmed heart, and 250 grams bottom blade, making each patty roughly a quarter pound.

I do not have a meat grinder, which is the only reason that it took me this long to make these. However, I cribbed from Alton Brown's instructions for making ground meat using a food processor, and that worked incredibly well:

Heart & Blade Burger Patties

Prepare the beef heart by trimming any muscle sheath, silverskin, tendons, or veins that may be clinging to the outside. Using a chef's knife, dice the meat into short, thick strips about 5 centimetres long. Next, trim and dice the blade meat into the same sized pieces.
Place the meat in a metal pan in the freezer for about 20 minutes, so that the meat begins to freeze and stiffens, but is still somewhat pliable.

Scrape the meat off of the pan into a food processor fitted with a metal blade, about 250 grams at a time - you don't want to overload the machine. Pulse the processor's blade repeatedly until the mixture begins to look like ground beef. Empty the processor, and repeat until all of the meat is chopped.

At that point, I put all of the meat together in the processor, added a tiny dribble of olive oil, and gave it another few pulses, simply to integrate it into a single mass and make sure there was enough fat to keep the meat from drying out.

Remove the metal blade and season to taste. We wanted to go with simple, almost stark burgers, so that we could really taste the meat. We used only a good pinch of kosher salt, but you could season these any way that you like to season your burgers.

Next I turned all of the meat out onto the counter, and shaped the mass of fluffy meat into four patties, which we fried over medium-high heat in a little butter (you could also use olive oil, of course). I worried that the patties might not hold together nicely, but they did. I was struck by how dark a red they were - lots of iron, for sure. These patties are quite lean, because heart meat is inherently lean. I patted them out quite thinly, because I wanted good bun coverage, but a thicker patty would work fine, too. If you're making them very thick, you might want to poke a hole through the centre to speed up and even out the cooking process, but that's up to you.

Now, I won't lie to you: there is a faint trace of gaminess, of "organ meat flavour" that one gets from the heart, but it is quite mild compared to, say, liver or kidney, and the overall effect is so overwhelmingly meaty tasting that the general impression that you get when biting into your burger is simply that of beef (and rightly so). I suspect that the all-heart burgers would be a little gamier, which would certainly be fine with me, but these were a wonderful introduction into cooking beef heart. Piled up onto a bun with all of the fixings (not pictured, sadly, because we fell on the finished burgers ravenously, and I forgot to take pictures), it made a delicious dinner.

So, what's next? All-heart burgers? Heart Loaf? "Heart"y Meatballs? There seem to be an awful lot of options, and I'm looking forward to further experimentation.


October 03, 2013

Minor Update

I am in Germany!

My kitchen, however, is still afloat somewhere in the Atlantic (more or less) until we manage to find an apartment to rent.

I hope to be cooking again soon...

Wish us viel Glück; we could use it!

Tschüß

September 08, 2013

Interlude

Dear friends, readers, and subscribers:

Please note that there will be no new content for a little while, as my kitchen is in the process of being shipped to Germany. For now, I am always in other people's kitchens.

Once I am up and running again, I expect to resume posting, but there may be a little bit bigger of a gap than usual.

Please do check back for updates - I'm looking forward to getting back into the kitchen, and cooking up great food in a completely different environment!

Until then...

Guten Appetit!

April 26, 2013

Greek Lemon Potatoes


These are so very, very delicious. They were fantastic as dinner, and they were a miracle fried up as hashbrowns the next day at breakfast. They are unabashedly lemony, with all the crispy-edged goodness of a good roasted potato.

We started with Martha Stewart's recipe, and tweaked it to suit ourselves. Since this was a trial run, and we were only feeding two people, we halved the recipe (which provided four servings). Next time, I'd be tempted to make the full amount, just to have lemony potatoes left over for breakfast, or as a cold potato salad. We added garlic, because we love garlic. We reduced the amount of oregano, because oregano can be quite bitter, and we figured we could always bump it up with a little extra sprinkled over the top at the end of cooking, if it seemed necessary.

Greek Lemon Potatoes
Adapted from Martha Stewart (Click here for original recipe)

Serves 4

4 medium russet or other baking potatoes
1/4 cup olive oil
1/4 cup freshly squeezed lemon juice
1/2 cup water
6-8 cloves garlic, whole
Big pinch dried oregano leaves
1/2 tablespoon kosher salt
a few "grinds" of black pepper

Preheat the oven to 475 - 500 F.

Peel potatoes and cut lengthwise into quarters. Lay potatoes in a single layer in a metal baking dish (with sides), and sprinkle lightly with dried oregano. Toss the garlic cloves in there, too. Combine the olive oil, lemon juice, salt, and water, and pour over the potatoes and garlic. Stir around to make sure everything is evenly coated, and lying in a single layer in the dish.

Bake in the very hot oven for 25 minutes, and then remove pan from oven to allow you to turn each potato slice over onto its other side, still keeping the pieces in a single layer. Handle carefully, the potato slices can be a little fragile at this stage, and may try to stick. Gently does it. If the liquid has all disappeared (evaporated and absorbed), add another half cup of water to the pan after the potatoes are turned, and return the dish to the oven for another 25 minutes. The potatoes should now be golden brown with crispy edges, and the garlic nicely caramelized. Remove potatoes carefully, using a spatula. Serve hot, room temperature, or cold.

Enjoy them with a side of Gigantes and Briam - or maybe alongside a nice braised lamb shank or moussaka.

April 04, 2013

Yorkshire Puddings


Yorkshire puddings are essentially a simple popover that has been flavoured with the drippings of the roast that they are made to accompany. They are airy, eggy, and made a perfect vessel to drunkenly cradle a gravy payload, half of which seeps slowly into the rest of your plate (and, if you're lucky), particularly your potatoes.

The batter is remarkably like crêpe batter. The only difference, really, is that instead of putting any fat in the batter, you place it in the cups of the popover/muffin tin before adding the batter. Well, and they're cooked in a very, very hot oven, as opposed to over a medium-ish flame on the stovetop. But enough about crêpes.

Yorkshire puddings are also somewhat terrifying for a lot of cooks - not because they're difficult, but because they require precise adherence to the rules, or they will come out as sad, dense little muffin-pucks. Some cooks claim that it's best to make the batter a bit ahead and let it rest - something about rehydrating the flour, I think - and I always do, simply for convenience. Here are the rules that make all the difference:

1) Preheat the empty popover or muffin tin. Preheat the hell out of it. I like to put mine into the oven 15 minutes before the roast is due to come out, and then leave it in when I crank the temperature up so that it will be ready to cook the popovers. That baby is hot! If you omit this step, all is lost. Have a dinner roll instead.

2) Preheat the fat. Once the roast is out of the oven, whether you are using roast drippings for a proper pud, or vegetable oil, or some leftover chicken fat that you've got stashed in the freezer (looks at ceiling, whistles to self), get the fat into the blazing hot pan...and put the pan back in the oven, for at least a few minutes, and put the overhead fan on high. If you omit this step, the pan and fat will not be hot enough, and all is lost. Have a dinner roll instead.

3) Add the batter quickly to the hot fat in the cups. Use a pouring jug with a spoon drip-catcher for maximum efficiency (actually, true maximum efficiency suggests that you would have your batter standing by in a squeeze bottle with a large bore opening, but unless you have such a pancake dispenser sort of setup, a jug with a lip (such as a big measuring cup) is your best bet). If you omit this step, the pan will cool down too much, and all is lost. Have a dinner roll instead.

4) Get the tin back into the oven pronto! Do not open the oven door until the puds are cooked - or at least 15 minutes have gone by. If you omit this step, all is lost. Have a dinner roll instead.

5) Marvel at how beautifully risen and crazy tall your popovers are, and serve right away.

A note about using vegetable oil instead of drippings or schmaltz - for the love of dinner, please use something with a really high smoke point, or you will fill your kitchen with acrid burnt-fat smell, and...and all is lost. Have a dinner roll instead.

So...here's the recipe. I really do measure the flour by weight, but if you don't, it's approximately a scant cup of sifted flour)

Yorkshire Puddings

Makes 12 regular-muffin sized

115 grams flour
3 eggs
285 mL 1% milk
1/8 teaspoon kosher salt
3 tablespoons fat (roast dripping, schmaltz, or high-smoke-point oil)

Whisk the eggs, flour, salt, and milk together until smooth to make your batter. Pour the batter into a jug, and let it sit for 30 minutes before you use it.

See the critical steps listed above, or this abbreviated version: Turn your oven up to 475F, and place a dry 12 cup muffin tray in the oven to heat up for at least 5 minutes (or however long it takes the oven to get up to that temperature).

Place 1 teaspoon of fat in each muffin hole, and put the tray back into the oven and heat until fat is very hot, at least another 5 minutes.

Extract the muffin tin and carefully (and quickly!) pour the batter into fat in the muffin cups - only half-fill each cup. This bit kind of looks gross, because the fat swirls all around the batter. That's fine; it's supposed to.

Close the door and cook for 15 minutes without opening the oven door, reduce heat to 350 F and bake for another 5 - 10 minutes, or until golden.


If you have leftover puds, try them for breakfast, gently re-heated and filled with jam, or cheese, or even scrambled eggs! If the exterior is a little squidgy from sitting overnight, blot well with paper towels before heating/filling. They lose their crispness, but they are still delicious.

June 01, 2008

I Think I'm Ready For Summer (Iced Tea)

Even if summer isn't quite ready for me.

In summer, I'm always fighting dehydration. Water is essential, of course, but really, a girl can only drink so much water without wanting something flavourful, not to mention wanting to be able to move about without sloshing sensations.

Sugar, however is the issue. I like real sugar. I approve of sugar, especially where the alternatives and fake sugars are concerned. I do not, however, need large quantities of it. For some reason, most summery drinks are filled to the brim with sugar, far in excess of the quantities I find desirable, or worse still, "sugar-free" sugar substitutes which may or may not lead to health problems unto themselves, while still tasting uncomfortably sweet. Juices, lemonades, iced teas, and "virgin cocktails" are all quite sweet...usually, too sweet.

In parts of the United States, one can blessedly get iced tea that has not been pre-sweetened. That does not appear to be the case in most places in Vancouver. I can, however, make my own so that at least when I return home, hot and exhausted from tripping around farmers' markets and beaches, I can drink something delicious that doesn't feel like it's going to kill me in one way or another.

Despite my crankiness above, I do like a little hint of sweetness in my iced tea. A little simple syrup, or even a couple of teaspoons dissolved in a half-cup of hot water and then added to the steeped tea as it cools does the trick nicely, and doesn't leave me feeling like I've just mainlined a candy bar. I can get it just to my taste, and just to my comfort level.

I have a couple of favourite iced tea recipes that are both easy to make and delicious, and a little unexpected. Make the tea as strong or as weak as you generally like it hot. If you like adding ice to your drinks, but don't want to dilute the flavours, make a batch of iced tea just to freeze into ice cube trays and use them in place of ordinary ice cubes.

Isis Tea

1 litre freshly brewed black tea, cooled
2 tablespoons simple syrup (equal parts sugar and water, boiled for one minute on the stove, then cooled)
1 teaspoon rosewater
Juice of half a lemon

Chill thoroughly. Serve in a tall glass, with a mint sprig

Lavender Iced Tea

1 litre freshly brewed lavender-scented black tea, cooled
2 tablespoons simple syrup
2 drops 100% pure lavender essential oil

Chill thoroughly. Shake well before serving.

I wouldn't keep either of these for longer than a few days in the fridge, due to the botanicals added, but that's not usually a problem, for me. I drink these up pretty quickly.

Basically, any tea, whether black, green, or herbal, can be made into a delicious iced tea. It just takes a little preparation to have some on hand, and a jug to keep it in.