February 24, 2013

French Crêpes


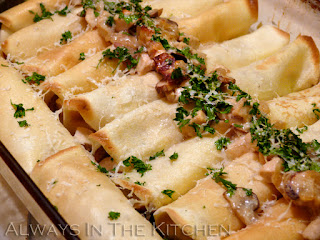
These simple crêpes are the lovely foundation for many different fillings and styles - from Suzette to seafood, from lemon-and-sugar to stacks of savouries sliced into neat wedges. Some particular favourites include a filling of bacon, mushroom, and chicken (topped with parmesan), and tomato, goat cheese, and fresh basil. You can fill them with pretty much anything you like. These ones are filled with a creamy mixture of bacon, chicken, mushrooms, onion, and brandy. The recipe for the filling is below. The filled and baked crêpes heat up wonderfully the next day. Best of all - these are not difficult. They take a little time if you cook one at a time (recommended, to start), but rather low effort, especially once you get the knack of tilting the pan around.

Crêpes (Plain)

Makes 12 crêpes (8" diameter)
Total Prep & Cooking Time: 40 minutes (faster if you can cook two at a time)

3 eggs
1 cup milk (1% is fine)
1 tablespoon oil
3/4 cup unbleached flour

Combine in a blender or food processor until smooth. If you are beating by hand, you may wish to take the extra step of straining the batter once you have finished mixing, to ensure a smooth result.

If you are making a filling, let the batter stand at room temperature until you finish preparing the filling.

Heat a crêpe pan or 8" (20 cm) nonstick skillet over medium heat until a drop of water dances. Spritz with canola oil, or brush lightly with mild oil of your choice.

Using a ladle or scoop that holds 3 tablespoons, measure your first crêpe's worth of batter. Lift the skillet off of the heat (I hold it in the air) and quickly pour the batter into the middle of the pan. Drop the ladle and rapidly tilt the pan in a circular motion, to spread the batter until it evenly covers the base of the pan. Return the pan to the burner, and allow the crepe to cook until lightly golden, and the edges release from the pan, about a minute or two.

Slide a silicone spatula under the crêpe (or grab the edge carefully with your fingers) and flip it over. Let it continue to cook for a minute, and then slide the crêpe onto your work surface for filling.

Repeat until all of the crêpe batter has been cooked.

If I am making baked crêpes, I fill the finished crêpe and place it in a greased baking dish while the next crêpe is cooking, so the process becomes an alternation of tasks. You can also make the crêpes ahead, and fill them all at once. Crêpes keep well in the fridge for a day or so (unfilled, separated by waxed or parchment paper sheets) and can be frozen for up to a month with no ill effect.


Chicken & Mushroom Crêpe filling

Makes enough to fill 12 8-inch crêpes (enough to serve four people)

4 pieces thick cut bacon
2 tablespoons butter
200 grams cremini mushrooms (or mushrooms of your choice)
450 grams cooked chicken breast
1 medium yellow onion, minced
1 teaspoon chicken bouillon paste
2 tablespoons brandy
3/4 cup Greek style yoghurt, plain (or sour cream)
2 teaspoon cornstarch
1/2 cup water
4 teaspoon grated parmesan cheese
1/4 cup parsley

Dice the bacon and fry until almost crisp, and remove most of the rendered fat from the pan. Add the butter, chopped mushrooms, and onion, and cook until tender. Add the brandy, and stir through, and then add the chicken paste. Add the water mixed with 1 teaspoon of the cornstarch and stir through, and then the and yoghurt mixed with the remaining 1 teaspoon of cornstarch. Stir and cook until the mixture is reduced to a thick creamy sauce. Add finely diced chicken, and stir through until everything is nicely heated.

Lightly grease a 9x13" baking dish, and preheat your oven to 350 F. On your work surface, lay one crêpe golden-side-down, and place two tablespoons of filling on the bottom third of the circle. Fold the bottom edge up, and then roll the crêpe into a compact cylinder. Place in the baking dish. Repeat until all the crêpes are filled and in the pan - they should just fit nicely, ten across and two side-ways. Any leftover filling can be mixed with the parmesan and parsley, and spooned down the centre of the row of crêpes.

Put the pan of crêpes in the oven for about ten minutes, and then broil for a few more minutes, or until the edges are golden-tinged.


February 20, 2013

Breakfast at home: Chile Corn Breakfast Casseroles

These are individual breakfast casseroles adapted from "Mini Chile Relleno Casseroles" recipe from Eating Well magazine. It's really not that much work, but it does take a bit of time in the oven (time to have a shower, and make coffee, perhaps?) so is best suited for weekends. Chorizo would make a lovely side dish, as would tortillas, johnnycakes, or cornbread.

Chile Corn Breakfast Casseroles
Serves 2

1/2 cup pickled green chiles
1/3 cup frozen corn
1 green onion
1 cup shredded Pepper Jack cheese
1/4 teaspoon ground cumin
1/2 cup 1% milk
3 large egg whites
2 large eggs
1/4 teaspoon salt
pinch dry mustard
Tabasco pepper sauce to taste
1/4 teaspoon paprika (or ground chipotle)

Preheat the oven to 400 F with the rack in the middle of the oven.

Prepare two ramekins (295 ml/10 oz.) by spritzing very lightly with olive oil. Place the ramekins on an edged baking sheet for easy manoeuvring.

Drain the chiles very well, squeeze dry with a paper towel, and mince. Rinse the corn in a strainer under very hot water until thawed. Drain very well, and squeeze dry with a paper towel. Finely mince the green onion. Divide the chiles, corn, green onion, and cheese equally between the two ramekins. Sprinkle with the cumin.

Combine the eggs, egg whites, milk, salt, dry mustard, and Tabasco sauce, and whisk or blend until smooth. Pour the egg mixture over the vegetables and cheese in each ramekin. Sprinkle with paprika (or chipotle, or ancho).

Slide the baking tray with the ramekins into the oven for about 25 - 30 minutes, or until the top is domed and the dish appears set when jiggled. Serve in the ramekins.

February 12, 2013

Breast of Turducken

Intrigued by the idea of an extravagance like the infamous "turducken", but without the oven space (or the army of people to eat it up)? Why not make a smaller beastie overall by stuffing a turkey breast instead of a whole turkey? After all, Valentine's Day is coming, and if you were wanting a sexy little meal for two, with a bit of extra panache and just a few leftovers for sandwiches or a casserole, then this is the recipe for you.

Sure, it looks difficult, what with the layers and all, but I assure you that it is actually quite simple. It's just showy that way. Best of all, it's really two dishes in one, since the gravy is made from the braising liquid.

My initial inclination was to use duck confit for the "duck" portion of the turducken, but whilst shopping at Oyama Sausage Co., I noticed that they had a special on black truffle duck sausages, and asked myself "What could be fancier than that?" Since sausage is a ground mixture, it also solved the question of how I was going to keep the disparate layers from falling apart when sliced; I simply placed the sausage layer between the flattened turkey and chicken breasts.


Which is, in essence, almost my entire recipe, but for the cooking instructions. You could easily figure the rest out for yourself, I'm sure, but here are the details, just for fun:

Breast of Turducken

Serves 6 - 8

1 large turkey breast (about 750 grams)
250 grams duck sausage
1 large chicken breast (about 200 grams)
1/4 teaspoon kosher salt
1/2 tablespoon peanut oil (or other)
1/2 cup dry vermouth
1 1/2 cups turkey broth
2 tablespoons flour
salt & pepper to taste

Butterfly and pound flat the turkey breast. Take the duck sausage out of its casings, and spread three quarters of it evenly over the inner surface of the turkey. Add the chicken breast (also butterflied and pounded flat) and place the last bit of sausage in a thin line down the centre of the stack. Roll up (in such a way that the centre-line of sausage will run the length of the resulting roulade) and tie with butcher's twine at two-inch (or so) intervals. Rub the surface of the roulade with peanut oil (or olive oil, or grapeseed oil) and sprinkle with salt.


In a large skillet, over medium-high heat, sear the roulade on all sides. Add the vermouth, cover well with foil, and transfer to a preheated oven at 375 F for 1 hour, or until completely cooked (use a probe thermometer to get it to a safe temperature).

While the roulade is in the oven, you can prepare any side dishes that you like. Mashed potatoes are a great one, since you're going to have gravy. Carrots, corn, Brussels sprouts, yams, any or all of these make a fine side to your breast of turducken.

Let stand for 15 minutes on a carving board (loosely tented with the foil) to let rest before slicing. This gives you enough time to make some gravy (not shown, because it obscured the pretty bullseye pattern of the sliced roulade).

If your turkey broth is cold or room temperature to start (you could, of course, also use chicken broth or duck broth), shake it with the flour in a lidded container (holding tightly), and add to the now-empty skillet - do not clean the skillet first! Stir over medium heat until the gravy thickens, scraping up any goodness from the bottom of the skillet. If it is too thick, you can add a little more stock or water, or any vegetable water you might have from, say cooking potatoes, or carrots, or corn, or some other side dish.

If your turkey broth is hot, shake the flour with a little cold water and add it to the skillet after you have added the broth. Feel free to proceed in your usual gravy fashion, if you don't care for either of these methods. Let the gravy simmer very gently on low while you carve the roulade (make sure you remove the strings, first) and plate the rest of the meal, and then pour it into a gravy boat or bowl with spoon and take it to the table.

February 04, 2013

Venetian Chicken Frisinsal


There is a wonderful, medieval attraction to the notion of tearing apart a roasted chicken with one's bare hands, and this dish can be the wonderful result.

There are quite a few recipes for this floating around, many of which appear to be derivatives of "Tagliatelle W/ Chicken From The Venetian Ghetto" from Nigella Lawson's "How To Eat" or "Tagliatelle Frisinsal" which appears in Claudia Roden's "The Book of Jewish Food" which appears to be its antecedent.

I've adjusted the name into something that makes better sense for the amendments that I've made. Gone is the Tagliatelle, because I'm using broad egg noodles instead (and less of them). Other adjustments include opting in for the parsley which Nigella uses (absent from the original), and roasting the chicken on ribs of fennel (to be discarded after), which adds a subtle perfume to the dish, and lifts the chicken off of the roasting pan.

This is a glorious recipe. It may not look terribly exciting, and it is assuredly not low-fat, but it is wonderfully fragrant and delicious, making it a beautiful comfort food sort of meal.

Venetian Chicken Frisinsal
Serves 4

1 medium chicken
3-4 stalks of fennel
1 tablespoon extra-virgin olive oil
kosher salt, as needed
1 long sprig of fresh rosemary (about 5 inches)
1/3 cup golden sultana raisins
1/2 cup pine nuts
225 grams broad egg noodles

Rub the chicken with olive oil and salt lightly on all sides. Place the chicken, breast side down, onto your roasting pan (I use a large cast iron skillet) which has been lined with enough stalks of fennel to keep the chicken elevated from the bottom of the pan. Roast at 400F for 50 minutes, then turn the chicken breast-side up, and continue to roast until the chicken is completely cooked - 20 minutes to 1/2 hour will do nicely for a 3 pound chicken. Remove the chicken from the roasting pan to a plate, and allow to cool for twenty minutes or so, until it is cool enough for you to remove the chicken from the bones with your bare hands.

While the chicken is roasting (and then cooling), soak the sultanas in a little water for about half an hour, and then drain. Toast the pine nuts until just lightly golden brown - this can be done in a dry skillet on the stovetop, and only takes a few minutes. Mince the rosemary finely, and set aside. Chop the parsley as you like it, and set aside.

While the chicken is cooling, remove the fennel stalks from the roasting pan (let the drippings on them fall back into the pan) and discard. They are stringy and tough, and now overcooked, so there's not much use for them; they have given up their flavour to the chicken juices, which is as good a fate as they could hope for. If you really need to watch your fat intake, pour all of the drippings from the chicken into a bowl, and let the fat rise to the top. Skim off some of the fat as desired. Otherwise, just leave the drippings in the skillet, add the chopped rosemary, the pine nuts, and the drained raisins to the drippings, and bring to a simmer. Next, pour any liquid that has pooled around the chicken (on its cooling plate) into the skillet with the rest of the drippings. Reduce the heat to very low and cover, while you prepare the rest.

Bring a large pot of water up to the boil (for the pasta) while you remove the meat from the chicken. Using your hands, strip the meat and skin from the bones and tear into bite-sized shreds, putting them in a large serving bowl. Be sure to use the crispy skin, as well, but any flabby skin can be discarded with the bones. When all of the chicken is shredded* (you can put the bones aside to make stock or to freeze for later use), quickly cook the pasta (do add a little salt to the water). Egg noodles only take a few minutes to cook, which is handy. Drain the noodles, or use a spider-tool to lift the noodles right from the water onto the shredded chicken meat in the bowl. Pour the sauce of drippings, raisins, rosemary and pine nuts over the top, add the parsley, and toss gently to combine.

I recommend a fresh salad with a bit of crunch, to balance the richness of this dish. Fennel & Radish Salad is about perfect with this (since you already have the fennel).

In the spirit of full disclosure, I note that I actually removed the chicken breast (but not the tender) to a separate plate, because a whole chicken's worth of meat was more than we needed for the four servings of this dish. You could, of course, increase the amount of pasta, use all of the chicken, and feed two to four more people, especially if you had a side dish or two to round it out. The chicken breast that I hived away in this instance made a lovely chicken and fennel white pizza two days later.

*When you are stripping the meat from the chicken, be sure to take the meat from the back of the chicken - especially the two lovely roundish bits referred to as "the oysters" from just above the thighs. This is the closest thing to a tenderloin on a chicken, and is a wonderful bit not to be missed. They are small, firm, intensely flavourful bits of dark chicken meat, sometimes doled out as a special favour, or harboured as a cook's treat.