Showing posts with label French. Show all posts
September 17, 2017
Salade Niçoise et Libanaise
Having recently come to appreciate a perfectly cooked green bean, I have been keen to find interesting ways to serve them. This dish contains the wonderful arrangement of Salade Niçoise, along with the Lebanese-type tahini dressing. It was a perfect confluence of tuna dishes that I wished to make, namely samke harra (a sesame-smothered fish dish from Lebanon) and the classic salade composée from Nice (whose ingredients are a hotly debated subject anyway).
I was sorely tempted to name it Salade Libaniçoise.
You can pretty much see everything in the picture, but I'll lay out the recipe for your entertainment, anyway. The tuna and the capers are the only elements served warm - I used the same skillet for both - the other parts can be prepared in advance. The purple potatoes are a type called Quartz, here in Germany, but you can of course use any kind of waxy potato that you like. These were too pretty not to showcase.
Salade Niçoise et Libanaise
Serves 2
150 grams mixed greens (I've used lambs' lettuce with arugula and shreds of beetroot)
2 eggs, boiled
125 mL Niçoise olives, stones in
30 mL capers, rinsed & fried in olive oil
100 grams potatoes, boiled, cooled, & sliced
100 grams haricots verts, or other fine green beans, steamed and quick-cooled in ice water
a few cherry tomatoes, halved
200 grams of tuna steak, pressed with sesame seeds and lightly seared on all sides (do not overcook!)
Tahini Dressing
45 mL (3 tablespoons) tahini, stirred well
big pinch of coarse/kosher salt
Juice of half a lemon
1 clove garlic, pressed
15 mL olive oil
cold water, if necessary, to made a thick salad-dressing consistency
In a small bowl, combine the dressing ingredients, mixing well with a fork or stick blender. Add a little cold water, a tablespoon at a time, and stir until it becomes creamy and the texture of pourable salad dressing.
Layer the ingredients onto the platter. If you green beans are still wet, lay them on some paper towel to dry off, so they don't sog out the salad. Arrange the greens around the bottom, and then place the potatoes, egg halves, beans, and tomatoes, however you like, but leaving a space to put the tuna. Tumble the olives into all the nooks and crannies between the other elements.
As soon as the tuna and capers are added to the platter, drizzle the dressing as artistically as you can manage over the various elements of the salad. I see from this that I really need to invest in a sauce bottle with a nozzle, so that I can better control the flow - this one got a bit blobby-looking.
It was really quite filling, and completely delicious.
August 12, 2017
Cherry Clafoutis
Clafoutis defies a truly comprehensive description. It's part custardy flan, part pancake, part coffee cake, and a distant relation to the soufflé -- while not really being any of these things. What it actually is, is an iteration of the amazingly versatile eggs/milk/flour matrix that comprise the batter for crêpes, Yorkshire puddings, and Dutch babies (and more), neatly proportioned to create a simple French country dessert.
Just like the eternal cakey vs fudgy brownies debate, there are different styles for clafoutis. This one is decidedly more like a set custard than a cake, with a glossy interior revealed when sliced up to serve. A bit more flour would make it cakier, but might therefore also benefit from a bit of leavening agent.
The quality of the cherries counts, here. If your cherries are bland, the clafoutis will not be as good.
Clafoutis aux Cerises
Adapted from Everyday French Chef
400 grams fresh, sweet cherries
70 grams (1/3 cup) flour
80 grams (1/3 cup) granulated sugar
pinch of salt
1 teaspoon vanilla extract
2 large eggs
175 mL (3/4 cup) whole milk
2 tablespoons whipping cream
1 tablespoon icing sugar
Butter, for greasing the casserole dish.
Preheat the oven to gas 180°C (350°F), with a rack in the middle.
Wash and gently dry the cherries, remove any stems, and remove the pits (I use an olive pitter).
Lightly butter a small (1 litre / 4 cup) casserole or baking dish. Add as many of the cherries as you need to form a single layer (not too tightly packed - there needs to be a little room for the batter).
In a small mixing bowl, combine the flour, sugar, and salt. Whisk to combine.
In a medium mixing bowl, whisk the eggs thoroughly until they are perfectly integrated and foamy.
Add the dry ingredients to the eggs and stir through. Next, add the milk, cream, and vanilla extract. Mix until smooth.
Pour the batter evenly over the cherries. Place the dish in the oven and bake for 25 minutes, or until the clafoutis is golden and still a little wobbly in the middle. Sift the icing sugar over the clafoutis and return it to the oven until it is firm in the middle, about 5 minutes more. Check for doneness with a toothpick or sharp, clean knife in the middle. If it comes out clean, the clafoutis is ready. If not, bake it for a few minutes more.
Serve warm. If you are preparing the clafoutis in advance, reheat it gently before serving. Serves 4.
March 25, 2017
Poule au Pot: French simmered chicken
This wonderfully easy dish is one of the hearts of French country cooking. There is a bit of prep, and a rather long simmering time - but one that requires little effort from the cook. The end result is incredibly tender poached chicken, an assortment of vegetables, and an outstanding stock that can be served with the dish (pooled around the chicken and vegetables), alongside the dish (in a small bowl or cup), or kept aside for any other use you might have for a large quantity of fragrant, intense chicken stock.
Poule au Pot (Chicken in the pot) is the very close cousin of Pot au Feu (Pot on the fire) which is essentially the same dish by method, but made with beef instead of chicken and slightly different seasonings. There are a lot of variations of Poule au Pot, but I have chosen a fairly classic combination of vegetables. Some versions include a ground meat stuffing for the chicken, but I decided that it would be plenty of food on its own, and instead used the chicken cavity to hold the fresh thyme safely out of the way of the cooking vegetables.
When I was researching the recipe, I discovered a lot of references to a (poorly documented) speech by France's King Henry IV declaring the goal of "a chicken in every labourer's pot" - for certain values of labourer, anyway. A more modern example of the sentiment is found in Herbert Hoover's US presidential campaign in 1928, in the form of a circular promising "a chicken in every pot and a car in every garage."
There are a lot of ways to boil a chicken; I was honestly a bit skeptical of the long simmering time, given my almost complete conversion to the steeping method for cooking poultry. But the chicken is not cottony or tough. In fact, the chicken falls from the bones so easily that one should pay attention when separating the meat from the bones and what we like to call the grebbly bits.
I chose to serve this one with a white, roux-based sauce which I have seen named variously Sauce Blanche, Sauce Ivoire, and Sauce Suprême, amongst others. It is made with a velouté, using some of the stock from cooking the chicken, an egg yolk, milk, and crème fraîche. Recipe for my version of the sauce follows the Poule au Pot recipe below. We originally draped the sauce only over the chicken, but subsequently added it to the vegetables, too.
Speaking of the vegetables, I only cooked enough vegetables for two servings, which is why the mise en place looks a little light in the pictures below. Increase the number of vegetables as needed (or as your cooking pot allows).
Poule au Pot
Serves 4 - 6
1 whole chicken
water, enough to almost cover the chicken in a dutch oven
1 tablespoon coarse salt, plus extra salt to exfoliate the chicken
1 medium onion
4 whole cloves (spice)
3 - 4 sprigs fresh thyme
2 bay leaves
4 medium potatoes
8 small carrots
4 small turnips
2 small leeks
2 stalks celery
4 cloves garlic
Step 1: exfoliate the raw chicken. This is a technique I learned from Singaporean cuisine (specifically, Hainanese Chicken). First, remove any pinfeathers or feather debris from the chicken skin. Take a handful of salt (preferably smooth-surfaced coarse salt, such as pickling salt, to avoid tearing the skin), and massage it thoroughly into the chicken. All over. This is best done over a sink, so you can let the salt fall freely down the drain for easy clean up. When the chicken skin is smooth and tight-looking, rinse the salt from the chicken, drain and place the chicken in a large cooking pot (I used a dutch oven).
Step 2: Stuff the thyme into the cavity of the chicken, and tie the legs closed. Wash all of the vegetables thoroughly, and peel or trim where needed. Remove the dark green parts of the leeks and tuck them (and the feathery tops from the celery) around the chicken. Peel and quarter the onion, and stick the outer layer of each quarter with a clove. Add the onion quarters to the pot. Add the bay leaves to the pot. Gently pour cold water over the chicken until it is almost covered, with just the top of the breast above water.
Step 3: Turn the heat on high, and cover the pot until the water starts to just barely boil. Remove the lid and skim away any grey scum that may rise to the surface (there will be a lot less scum if you have exfoliated the chicken - I only needed to wipe the inside edge of the pot with a towel). Turn the heat to low, cover the pot again, and let simmer very gently for 80 minutes. Check it from time to time, and it if is bubbling too vigorously on the lowest temperature, leave the lid cocked to release some of the heat. You can use some of this time to peel and trim the vegetables.
Step 4: Use tongs or a slotted spoon to removed the leek tops from the pot. You can discard them (they are fibrous and have given up all of their flavour to the stock already). Raise the heat under the pot, and carefully add the raw vegetables to the pot, tucking them around the chicken if possible. If you really need more space, you can lift the chicken up (carefully!) and put the raw vegetables underneath it. More of the chicken will stick out of the water, but that's fine. If you need to remove some of the liquid to avoid the pot from overflowing, scoop some of the broth out with a measuring cup into a clean bowl or mug. The raw vegetables will cool the broth, which is why you've turned the heat up. When it begins to bubble once more (gently!) turn the heat back to minimum and cover the pot. Continue to cook for another 30 minutes (35 minutes if your potatoes are as large as these ones).
Step 5: While the vegetables finish cooking, and make the Sauce Suprême (see below). Warm some shallow bowls or plates, if necessary.
Step 6: Test the potatoes for doneness with a fork, and if they are not ready, continue to cook for another five or ten minutes, as needed. When they are cooked through, use a slotted spoon and/or spider to gently remove the vegetables and the chicken from the stock, being careful not to crush them.
Arrange on a platter if serving at the table, otherwise, divide the vegetables between the individual bowls. Carve the chicken into quarters (or sixths) and distribute amongst the bowls. You can add a little of the chicken stock to the bottom of each bowl, if you like. Spoon a little sauce over the chicken, and garnish with freshly ground black pepper. Serve with extra sauce on the side, if you like.
Accompany with a crisp white wine.
Sauce Suprême
Serves 4 - 6
30 grams salted butter
30 grams flour
400 mL chicken stock (or a combination of chicken stock and whole milk)
1 egg yolk
200 grams crème fraîche
In a small saucepan, melt the butter and stir in the flour. Cook and stir over medium heat for about five minutes, but don't let the roux darken. Add the chicken stock to the roux, slowly, whisking constantly, until smooth, and then turn the heat to low. Add a spoonful of the crème fraîche to the egg yolk, and stir to combine. Add the yolk mixture into the sauce, and whisk until thoroughly incorporated. Add the rest of the crème fraîche, and stir it through. Keep the mixture on low heat, stirring, and let it heat thoroughly, but do not let it boil. If you see any bubbles at all, remove the pot from the burner entirely. The sauce can stand while it awaits the chicken and vegetables to be ready.
One final note - you can of course customize the vegetables, and even the seasonings, to your taste. I've seen versions with green cabbage (blanche, before adding to the pot, to defeat the infamous "cabbagey smell"), rutabaga, parsnips, fennel bulb, tarragon, parsley, and shallots. Sweet potato might be nice, too. Essentially, any vegetable you'd like in a stew, you can pretty much use here. If you are not a fan of potatoes, feel free to omit them from the recipe and instead cook up some rice on the side (or do both if you just really like carbohydrates). Plain rice or mushroom pilaf both appear to be popular choices.
Labels:
Chicken,
Condiments,
French,
Soup
May 22, 2016
Porc Normandie
Despite the deliciousness of roasted asparagus, this post is actually about the lovely slices of pork tenderloin peeking out from behind the wall of green.
Technically, this should be Porc à la Normande, in the original French, or Pork Normandy, in English. Somewhere along the line, however, I started calling it Porc Normandie, and that's how it remains in our household. A linguistic abomination, but a delicious and somewhat unusual plat principal. Either way, it's pork tenderloin that has been simmered in wine and served in an apple cream sauce.
Because apples (and the products thereof) are an extremely important crop in Normandy, there are a lot of potential variations on the apple theme in this dish. The apples in the sauce are non-negotiable, but the braising liquid could be wine or apple cider, and many versions add Calvados as a finishing touch. There's a lot of room to customize for your personal preference.
There are two points of interest in the following recipe that fly in the face of most of our assumptions about European food: First, there is no onion or garlic in any form. Secondly, there is no added salt (although I do use salted butter for browning). Of course, you can either or both of those things to the side dishes - mashed potatoes certainly like a bit of salt and usually enjoy a bit of garlic or chive, too, and I always sprinkle a little salt on my roasted asparagus. But the main dish itself does not call for these things as an ingredient (although there are other versions of Porc à la Normade that do - it isn't necessarily a hallmark of the dish). In all the times that I have made this, I have never found it wanting for either.
This recipe has been minimally adapted from French Cooking Made Easy by the Australian Women's Weekly.
Feel free to double the quantities.
Porc Normandie
Serves 4
1 large pork tenderloin (about 700 grams)
1 tablespoon butter
1 tablespoon canola oil
1 cup dry white wine (or dry apple cider)
1 apple
1 sprig of fresh rosemary, minced
1 tablespoon red currant jelly
1/2 cup cream
1 teaspoon cornstarch
Juice of half a lemon
Select an apple that holds its shape, unless you want the pieces to melt during cooking. I use a granny smith, but that might be a little too tart for some tastes. A Gala should also work nicely. Peel and core the apple, and cut it into thin slices. Place the apple slices in a small saucepan with the wine (or apple cider) and minced rosemary. Bring to a simmer, cover, reduce the heat and let cook for ten minutes. Strain, reserving both the apple slices and the liquid separately.
Lay the pork tenderloin out on the cutting board, and trim away any excess fat or silverskin (the shiny coating of connective tissue that often forms a partial sleeve on the outside of the thick end of the tenderloin). Here is a resource for how to remove the silverskin, if you're not sure.
Cut the tenderloin into two or three pieces, so that it can fit in your skillet.
In a medium or large skillet, heat the butter and the canola oil over medium-high heat until a drop of water will dance on the surface of the pan. Place the tenderloin halves in the pan, and lightly brown on all sides. Add the reserved liquid from simmering the apples, bring to a simmer, cover, and allow to cook for ten minutes. The pork will still be slightly pink in the centre, but that's fine. Remove the pork to a plate and set aside.
Increase the temperature to a brisk simmer, stir the red currant jelly into the simmering liquid, whisking or stirring until it is fully dissolved. Add the cream, and stir through. Allow the sauce to bubble while you combine the lemon juice and cornstarch in a small bowl until smooth. Stir the cornstarch/lemon mixture into the sauce, and continue to cook and stir until it thickens into a gravy.
Pour the juices that have collected on the plate under the resting pork into the sauce, and stir through. Reduce the heat to low, and leave uncovered. Slice the pork into thick medallions, and lay it into the sauce. Spoon some of the sauce over the pork, and then add the apples back into the sauce. Allow the pork about five minutes to finish cooking in the sauce, periodically spooning more sauce over the slices.
Serve with something that can take advantage of the beautiful apple-infused sauce - such as the rosemary mashed potatoes shown above, or buttered egg noodles, and a seasonal vegetable of your choice. And maybe a dry Sauterne, if you used wine, or more cider, as you like.
If you have leftovers, they reheat quite beautifully. Simply remove the pork slices, scrape the solidified sauce (with apples) into a small skillet and reheat until bubbling. Turn the heat to the lowest setting, slide the pork slices into the hot sauce, and cover, giving it five or ten minutes to heat through, stirring or turning the pork pieces over mid-way.
September 07, 2014
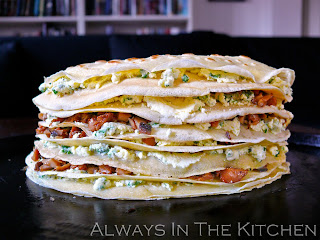
Gâteau de Crêpes
Looking for something interesting to do with a batch of crêpes? This is a Gâteau de Crêpes, aka Crêpe Cake or Crêpe Stack. It can be savoury, like this ones (full of mushrooms, herbs, and mascarpone), or they can be sweet (for example, alternately layered with dark chocolate and sour cherry jam). The possibilities are almost endless.
Since I was making only two servings (albeit very filling servings), I used a total of six crêpes, but in order to get a tall and pretty tower of a gâteau, I cut them in half and made a half-moon shaped stack.
For a filling, I chose duxelles (basically, finely chopped mushrooms, onion, garlic, butter, and brandy that have been sautéed together into an almost paste consistency), and a cheese mixture of mascarpone, crushed garlic, fresh parsley, basil, and sage, a good pinch of salt and a tablespoon or two of butter, which functioned as a sort of delicious glue to keep any stray mushrooms from running amok. If I'd done a better job chopping my mushrooms, the glue factor would have been moot, but worth including from a flavour perspective in any event.
If you are making a round Gâteau de Crêpes, simply double the ingredients and leave your crêpes intact.
Gâteau de Crêpes
Serves 2
6 6-inch crêpes, each sliced in half
Duxelles
450 grams mixed mushrooms, finely minced
(I used half chanterelles, half cremini)
2 tablespoons butter
1/4 medium onion, finely minced
2 cloves crushed garlic
2 tablespoons brandy
Kosher salt
If you have a food processor, use it to pulse the mushrooms until they are finely chopped. Otherwise, you'll need a knife and a bit more patience than I have. In a medium skillet over medium heat, sauté the onion, garlic, and mushrooms in the butter. Add a pinch of salt, and continue to sauté until the mushrooms start to stick. If you have any fresh thyme, you might want to add a pinch or two. Add the brandy, and stir through. Turn the heat to low and continue to cook and stir until the brandy has evaporated, and the mass becomes a purée.
Savoury Mascarpone
125 grams mascarpone
2 cloves garlic, crushed
large pinch of salt
2 tablespoons butter
1/3 cup chopped fresh herbs (parsley, basil, sage)
Mix everything together with a fork until thoroughly integrated.
If your crêpes are cold, warm them up. They won't be spending much time in the oven at the end, and you don't want them to start out chilly.
Lightly butter (or oil) a baking sheet (or pizza pan).
On each crêpe-half, spread a small amount of the mascarpone cream and a tablespoon or so of the duxelles. Be sure to spread the fillings all the way to the edges, to keep the stack from sagging at the sides. Place the first crêpe on the greased sheet, and then stack each "filled" crêpe-half on top of the previous one, until you run out of filling and crêpes. If you like, you can top the final crêpe with some grated parmesan, but it works just fine without, as well.
Place in a 400 F oven for about 10 minutes, or until the mascarpone is bubbling slightly and the top appears crisp at the edges.
Slice into two portions with a sharp chef's knife (a serrated knife would be more difficult to slice cleanly). Cut each slice again, to serve as an appetizer. Serve right away, or at room temperature. I served this one right away, with a chopped salad to follow.
Here it is once more, just before it went into the oven.
Flat side:
Round side:
Labels:
Breads,
French,
Miscellaneous,
Vegetarian
August 10, 2014
International Bento (Mixed): Ham, Cheese, & Walnut Crêpes with Greek Salad
I've been making crêpes fairly often since we moved to Germany. They're a wonderful, multi-purpose flatbread that you can make in advance, even refrigerating for a few days (or freezing...separate each one with parchment, and bag them up) so that you can have them on hand for quick breakfast, lunch, snacks, hors d'oeuvres, dinner, or dessert. It's all about what you fill them with, and how many of them you want to eat at a time, that determines their role.
I have posted a recipe for Crêpes before, showcasing one of the wonderfully tender and silky French styles of crêpe. I still make those (they are especially good as dessert crêpes, with a sweet filling), but I also have another, slightly less eggy-and-rich go-to recipe for an everyday crêpe that can be used in exactly the same way.
These crêpes are the ones you want to use if you want the emphasis to be on the filling slightly more than the crêpe itself (don't worry, they're still delicious!), if you want a slightly lower fat/calorie version, or if you go to make crêpes and discover that you only have two eggs on hand. If you are planning breakfast crêpes with an egg filling, you probably want to use this recipe rather than the other.
The ratios are from Cook This Not That! but with better (I think) mixing directions.
You can easily halve the batch, or double it, as you see fit.
Everyday Crêpes
Makes 10-12 6-inch crêpes
1 cup unbleached all-purpose flour
pinch of salt
2 large eggs
3/4 cup milk
1/2 cup water
1-2 tablespoons melted butter
In a medium mixing bowl (or food processor, or blender), mix the flour and salt. Separately, combine the eggs, milk, and water, and beat well. Add the liquid mixture to the flour, and whisk (or process with a cutting blade) until smooth.
If you are mixing by hand and cannot get rid of a few lumps, simply pour the batter through a sieve, and push-through or discard any lumps left behind.
Stir in the melted butter, and then let the batter rest for about 15 minutes so that the flour fully hydrates. If you're planning to fill the crêpes right away, you might want to get your filling(s) ready while the batter rests. Otherwise, just pour yourself a glass of something pleasant - might I suggest wine? - to sip at during the cooking process.
To make a six-inch (15 cm) crêpe, I use an eight-inch (20 cm) non-stick skillet. The skillet is usually measured by the width of the top of the pan, but the base is usually somewhat smaller. The base of my skillet is just over 6 inches. You can use whatever size skillet you like, for whatever size crêpes you like, but I find this to be the best all-purpose crêpe size.
Just like in the previous recipe:
Heat the skillet over medium heat until a drop of water dances. Spritz with canola oil, or brush very lightly with mild oil of your choice. You only need to do this for the first crêpe, if you're using a non-stick pan.
Using a ladle or scoop that holds 3 tablespoons, measure your first crêpe's worth of batter. Lift the skillet off of the heat (I hold it in the air) and quickly pour the batter into the middle of the pan. Drop the ladle back into the batter-bowl and rapidly tilt the skillet in a circular motion, to spread the batter until it evenly covers the base of the pan. Return the pan to the burner, and allow the crepe to cook until lightly golden, and the edges release from the pan, about a minute or two.
Slide a silicone spatula under the crêpe (or grab the edge carefully with your fingers) and flip it over. Let it continue to cook for a minute, and then slide the crêpe onto your work surface for filling.
Repeat until all of the crêpe batter has been cooked. This does take a little bit of time, unless you've got multiple skillets going and are multi-tasking like a champ, which is (well, one reason) why I suggest having a beverage on hand to sip while you cook.
The crêpes in the bento above have a filling of Tilsit cheese (you could substitute Havarti), very thinly sliced ham, and chopped toasted walnuts. I find that it's important when considering crêpe fillings to ensure that there is something that will act as a sort of "glue" to keep the filling together while you're eating. A filling of only dry items, such as dice chicken, chopped almonds, and asparagus will simply fall apart into its discrete components once you cut into it. A small amount of cheese, or scrambled egg, or thick sauce (or paste) of any kind will help keep the filling together.
The other compartment of the bento above has a Greek-ish salad chopped cucumber, bell pepper, tomato, feta, radishes and an oregano lemon dressing, and the little dark item is a miniature Chocolate Oatmeal Peanut Butter Chip muffin, as a tiny little dessert.
Labels:
Bento,
Freezer Treasures,
French,
Pork
November 13, 2013
Bacon Cheddar Cauliflower Quiche
Good news! My kitchen has now arrived from Canada. Some attrition, unfortunately - my mother's ceramic bread bowl did not make it in one piece, my Lagostina Dutch Oven arrived misshapen and with a dented lid, and my 8" square tempered glass pan was shattered into fragments. The spider was bent out of shape (but has now been bent back into shape, more or less), and the plastic smoothie-blending cup was also broken. Sigh. The packers appear to have had no concept of load shift.
So now, I get to reassemble my spice collection, purchase some staple items (flour, cornstarch, yeast, baking powder, live herbs for the window sill in the kitchen, for example), draft some dinner menus, get cooking, and take some pictures!
In the meantime, please consider this delightful quiche as a brunch option:
Bacon Cheddar Cauliflower Quiche
You will need:
- Your favourite pie crust, lining the pie plate of your choice (this one is a small, six-inch (?) pie plate).
- crisply cooked bacon, crumbled finely, enough to cover the bottom of the pastry
- a layer of grated cheddar
- enough cooked cauliflower to loosely cover the layers below it (make sure the cauliflower is not wet)
- another layer of grated cheddar
- a royale mixture (eggs beaten with milk, seasoned with salt, pepper, Tabasco sauce, any any other seasoning you like)
For a 9" quiche I use a royale made from 3 eggs and 2/3 cup of 1% milk, but you can use any set-custard ratio that pleases you, sized for whatever pan you are using.
Pour the royale carefully over the other ingredients so that they maintain their positions. If you like a golden, glossy crust, dip a brush in the royale and carefully brush a little over the exposed upper portion of the crust.
Preheat your oven to 350 F and bake for 45 to 50 minutes (for a full sized quiche, a bit less for a smaller one - start checking at 30 minutes), or until the crust is golden and the filling is slightly puffed and firmly set. Allow to stand for 5 minutes before cutting, for easiest removal.
Here it is "in the raw", just before it went into the oven:
May 22, 2013
Lapin à la Dijon: Bunny in Mustard Cream Sauce
There are an awful lot of recipes out there for rabbit in mustard sauce. A LOT. And, a lot of them are fairly awful, in my opinion - heavy, trudging things where both the rabbit and the sauce have been assaulted with unnecessary use of flour, or which involve multi-staged cooking in that various bits must be fried before baking (almost guaranteed to make a tough bunny, in my opinion).
This is the first recipe for Lapin à la Dijon that I ever made, and after trying a few other iterations, I can safely say that it is the best - easiest to execute, and most delicious. There are plenty of other wonderful recipes out there that involve rabbit (another favourite is Lapin aux Olives, from Les Halles Cookbook, and Rabbit in Saffron Sauce from Jennifer McLagan's Bones, but for mustard cream sauce, this one is my winner. I'd love to credit the source, but unfortunately that has been lost in history. It's been written on my little recipe index card for too many years, for me to have noted its origin.
If you have a very cooperative butcher, you can probably get your bunny fully prepped and ready to go, making this dish ridiculously simple to make. If, however, you are on a budget and own a sharp knife and an extra hour or so of time, you can easily do it yourself. I followed the directions in James Pederson's Essentials of Cooking for how (and where!) to cut. Front and back legs are each removed at the proximal joint, and then the spine and ribcage are carefully sliced around with a boning knife until you can lift the bones right out of the meat. Then, simply (ha ha, I crack myself up) roll up the remaining boneless meat, which is called a "saddle", and consists of the tenderloins and the thin flaps from the side and breast of the rabbit, and tie with butcher's twine into a tidy package (as if you were trussing a roast). Even if you accidentally cut through the skin over the spine, and have two separate halves when you are done (cough), thanks to the miracle of twine, you can still make a lovely, tidy looking roulade of the rabbit saddle. Of course, you can also just chop the rabbit into parts, and cook them all bone-in. It's quicker to make, but fiddlier to cope with at the table.
Okay! That's the tough part out of the way - the rest is clear sailing.
Lapin à la Dijon
Serves 4
1 rabbit, jointed, liver and kidneys removed
1 tablespoon olive oil
1/2 teaspoon kosher salt
2-3 tablespoons butter
1/2 cup room-temperature white wine (dry riesling is an excellent choice)
2-3 finely minced shallots
1 cup crème fraîche
4 tablespoons Dijon mustard
1/4 cup minced fresh tarragon (or fresh parsley)
Place the rabbit pieces in a baking dish (one with sides). Rub the pieces with olive oil, sprinkle sparingly with kosher salt, and dot with butter.
Bake at 400 F for 30 minutes. Remove dish from the oven, and add the shallots, and white wine. If your baking dish is made of glass, such as Pyrex, it's a good idea to pour the wine gently over the rabbit pieces themselves, rather than directly onto the glass, to avoid shocking the glass (a rapid change of temperature can cause breakage).
Isn't this pretty? The minced shallots look like fallen cherry blossoms. It seems like it would be perfect for a sakura festival.
Bake for another 45 minutes.
Combine the crème fraîche with the Dijon, and spoon into the pan (it might be easier to remove the rabbit pieces first, so that you can integrate the creamy mustard mixture into the liquid in the pan. Reduce the heat to 350 F, and return the pan (and the rabbit, if you removed it) for another 15 minutes. Stir the tarragon (or parlsey) into the sauce.
Serve with rice or egg noodles or something to take advantage of the creamy, saucy goodness. The roulade can easily be sliced into beautiful little rounds to share about, since not all of the legs are created equal, and because it's nice to have a bit of rabbit where you don't need to work around the bone.
If you have leftovers, for example, say you were only feeding two people with this dinner, the leftover meat can be made into absolutely delicious crêpes or even used as a pizza topping (using the leftover Dijon sauce instead of tomato, of course). In that case, be sure to take the meat off the bones (if necessary) before refrigerating, as it is much, much easier to do.
You'll note that I didn't tell you what to do with the liver and kidneys which may have come with your rabbit. Here's what you do: Saute those bad boys in a little butter with a sprinkle of coarse salt and pepper, chop very roughly, and serve them on fried bread or toast points to your delighted guests. Or, devour them yourself, as a much earned treat.
One final note: If you are feeling particularly hardcore, having deboned the rabbit saddle and now being faced with a bunch of bones, go ahead and make them into stock for the freezer. Because, at some point in the future, you may want to make bunny pie, or some sort of fricassee, and this will be your absolute treasure at that nebulous point in the future.
February 24, 2013
French Crêpes
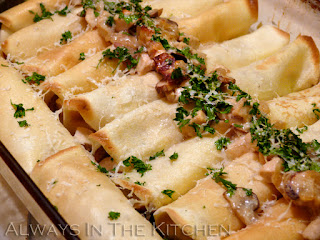
These simple crêpes are the lovely foundation for many different fillings and styles - from Suzette to seafood, from lemon-and-sugar to stacks of savouries sliced into neat wedges. Some particular favourites include a filling of bacon, mushroom, and chicken (topped with parmesan), and tomato, goat cheese, and fresh basil. You can fill them with pretty much anything you like. These ones are filled with a creamy mixture of bacon, chicken, mushrooms, onion, and brandy. The recipe for the filling is below. The filled and baked crêpes heat up wonderfully the next day. Best of all - these are not difficult. They take a little time if you cook one at a time (recommended, to start), but rather low effort, especially once you get the knack of tilting the pan around.
Crêpes (Plain)
Makes 12 crêpes (8" diameter)
Total Prep & Cooking Time: 40 minutes (faster if you can cook two at a time)
3 eggs
1 cup milk (1% is fine)
1 tablespoon oil
3/4 cup unbleached flour
Combine in a blender or food processor until smooth. If you are beating by hand, you may wish to take the extra step of straining the batter once you have finished mixing, to ensure a smooth result.
If you are making a filling, let the batter stand at room temperature until you finish preparing the filling.
Heat a crêpe pan or 8" (20 cm) nonstick skillet over medium heat until a drop of water dances. Spritz with canola oil, or brush lightly with mild oil of your choice.
Using a ladle or scoop that holds 3 tablespoons, measure your first crêpe's worth of batter. Lift the skillet off of the heat (I hold it in the air) and quickly pour the batter into the middle of the pan. Drop the ladle and rapidly tilt the pan in a circular motion, to spread the batter until it evenly covers the base of the pan. Return the pan to the burner, and allow the crepe to cook until lightly golden, and the edges release from the pan, about a minute or two.
Slide a silicone spatula under the crêpe (or grab the edge carefully with your fingers) and flip it over. Let it continue to cook for a minute, and then slide the crêpe onto your work surface for filling.
Repeat until all of the crêpe batter has been cooked.
If I am making baked crêpes, I fill the finished crêpe and place it in a greased baking dish while the next crêpe is cooking, so the process becomes an alternation of tasks. You can also make the crêpes ahead, and fill them all at once. Crêpes keep well in the fridge for a day or so (unfilled, separated by waxed or parchment paper sheets) and can be frozen for up to a month with no ill effect.
Chicken & Mushroom Crêpe filling
Makes enough to fill 12 8-inch crêpes (enough to serve four people)
4 pieces thick cut bacon
2 tablespoons butter
200 grams cremini mushrooms (or mushrooms of your choice)
450 grams cooked chicken breast
1 medium yellow onion, minced
1 teaspoon chicken bouillon paste
2 tablespoons brandy
3/4 cup Greek style yoghurt, plain (or sour cream)
2 teaspoon cornstarch
1/2 cup water
4 teaspoon grated parmesan cheese
1/4 cup parsley
Dice the bacon and fry until almost crisp, and remove most of the rendered fat from the pan. Add the butter, chopped mushrooms, and onion, and cook until tender. Add the brandy, and stir through, and then add the chicken paste. Add the water mixed with 1 teaspoon of the cornstarch and stir through, and then the and yoghurt mixed with the remaining 1 teaspoon of cornstarch. Stir and cook until the mixture is reduced to a thick creamy sauce. Add finely diced chicken, and stir through until everything is nicely heated.
Lightly grease a 9x13" baking dish, and preheat your oven to 350 F. On your work surface, lay one crêpe golden-side-down, and place two tablespoons of filling on the bottom third of the circle. Fold the bottom edge up, and then roll the crêpe into a compact cylinder. Place in the baking dish. Repeat until all the crêpes are filled and in the pan - they should just fit nicely, ten across and two side-ways. Any leftover filling can be mixed with the parmesan and parsley, and spooned down the centre of the row of crêpes.
Put the pan of crêpes in the oven for about ten minutes, and then broil for a few more minutes, or until the edges are golden-tinged.
Labels:
Breads,
Chicken,
Freezer Treasures,
French,
Holiday
March 28, 2012
Artichoke & Feta Quiche
Perhaps you recall back in December 2010, when I reviewed a cookbook called Cook This, Not That! (subtitled "Easy & Awesome 350 Calorie Meals") by David Zinczenko and Matt Goulding on my (sadly neglected) other blog "Much Ado About Diet" or the other recipes that I have made since then, either straight from the book, or somewhat adapted therefrom. In fact, it should be noted that many of the recipes that I've made from the book (each one a success) which haven't made it onto the blog are simply because either a) the photos were crummy, and I need to take better ones next time, or b) I am a lazy blogger who sometimes forgets that I haven't already written them up.
This recipe is not from that book. This recipe is from the other Cook This, Not That! cookbook by the same duo, subtitled "Kitchen Survival Guide." As a test recipe, it was a big hit, and I'll definitely be making it again (or other versions inspired by this one). In the spirit of "use what you have", I substituted thick-cut dry cured bacon for the recipe's turkey or chicken sausage, and, not having any frozen pie crust hanging about, I used my mother's basic recipe for a simple pastry shell. Since I knew I would be making this on Sunday, on Saturday I mixed up the crust, rolled it out, and stuck it (in the pie pan) in the fridge overnight.
Artichoke, Feta & Bacon Quiche
(Adapted from Cook This! Not That! Kitchen Survival Guide)
Serves 6
3 large eggs
1 cup 1% milk
3 canned artichoke hearts, drained, chopped, and squeezed dry
60 grams feta (I use sheep feta)
2 tablespoons sundried tomatoes, chopped
4 slices of thick bacon, fried until crisp and well drained
While the oven is preheating to 350℉, chop and cook the bacon, and set aside. Mix the eggs and milk together until smooth. In an unbaked pie crust, arrange the chopped artichoke hearts, sundried tomatoes, bacon, and crumbled feta for even distribution. Pour the egg and milk mixture over the filling, and bake for 45 to 50 minutes, or until the crust is golden and the filling is slightly puffed and firmly set. Allow to stand for 5 minutes before cutting, for easy removal.
Next time I do this, I will at the very least add some snipped chives or fresh parsley or basil (or chile flakes!) to the the mixture, I think, but it was very good on its own, too. We finished the individual slices with black pepper and a tiny drizzle of truffle oil.
I was using paler-yolked eggs than I usually do, so the quiche was rather lighter-coloured than my quiches ordinarily are. I imagine that if you use orange-yolked eggs you will have a more golden quiche.
For those of you who don't have a frozen pie crust lurking about, and would like an easy one to make yourself, here's mine:
Single Pastry Crust
for a 8 or 9" pan
3/4 cup all purpose (unbleached) flour
1/4 cup butter
pinch of salt
1 tablespoon vodka
1 1/2 tablespoons cold water
Place the flour in the bowl of a small food processor fitted with a metal cutting blade. Add the pinch of salt and the butter (cold is best) in chunks, and pulse until well mixed, and the butter is in pieces no larger than a piece of confetti. Add the vodka and the water, all at once, and pulse again, continuing to pulse until the dough comes together and pulls away from the edge of the bowl. Dump it out and massage the dough, as minimally as possible into shape. Chill the dough for 10 minutes, then roll out as needed. This recipe can be doubled to make a double crust pie.
The recipe was published as containing 250 calories per slice. My bacon-y adaptation with a freshly made crust (and using 1% milk instead of 2%) clocked in at 237 calories (based on an online recipe calculator), so at least I didn't damage the healthiness of the recipe with the few adjustments that I made.
October 08, 2010
International Bento (France): Terrine
It's bento time again! This time, in the manner of a fairly classic French picnic.
Palle made this terrine from veal and pork, lining the exterior with swirls of pancetta, although I rather tragically failed to show off the pretty edge to the slice when I was packing my bento (although you can see it in the photo below). Clearly I need more practice in making the bento show off the attractiveness of the ingredients. To be fair, it was a hasty assembly, and upon review I should have put the piccalilli relish (in the small container) into an even smaller cup and wedged it in with the lentils, which only come half-way up the side of their section of the container.
The lentils were braised in wine (and, I believe some chicken stock), and contain finely diced onion, celery and carrot (sauteed in olive oil), as well as some seasonings that I do not quite recall (again, Palle made this dish, along with the Piccalilli, which used cornichons as a foundation), but may have included both bayleaves and fresh thyme. They were excellent hot for dinner on the first night, and equally good cold the next day in my picnic.
Finally, one of my favourite-ever crunchy vegetables, the radish. No fancy carvings into roses or toadstools today, just a rushed quartering and cramming them into the bento.
This is one of the few bentos which I actually ate at cool-room temperature. Most of what I take in my bentos is refrigerated, and then removed to microwave-safe crockery to be re-heated, but this particular bento really didn't need re-heating at all. Perfect for taking one's lunch to the park, or the library steps, instead of staying cooped up in the office.
Note the wine below - while a nice Côtes du Rhone was the perfect accompaniment to the dinner the night before, I only drink wine at work for special occasions, such as when the boss is buying lunch, so just water for me for this bento!
Labels:
Bento,
French,
Palle cooks
August 04, 2007
French Skillet Dinner, or "Not Cassoulet"
I love French food. I like the flavours, the unabashed use of butter and garlic, the reliance on duck and rabbit as part of the cuisine ordinaire. I like the traditions of wildcrafting, and of seasonal eating - abundance of whatever happens to be in season. I like the rustic stuff, and I like the highly refined, elegant stuff.
There are plenty of simple French dishes, many of which (for example, a classic omelette) I make without stopping to think of them as French, per se. Then, of course, there are the dishes that simply use French accents - combining carrots and tarragon, or thyme with mushrooms.
I am also very, very lazy in my weekday cooking, and as such, I often look for ways to shortcut methods and still feel like I'm dining reasonably well. I'm also pretty big on variety, and cannot face pan-fried hamburgers in mushroom gravy three nights of the week on an ongoing basis (although, back in school, I suspected that I could).
Of late, we've been all about the skillet dinners. Assorted combinations of rice or pasta and some sort of meat (often chicken) and vegetables, and one-pan programming. You know, the sort of dinner that you can bang out quickly when you get home from work and you're kind of bagged, or you don't feel much like spending all night in the kitchen. There are, however, only so many variations of pasta and rice that can be made in a one-pot dinner, and I thought that I had run their course. Until, as it turned out, I was standing in the butcher shop staring at some lovely looking lean duck sausages, and a glimmering of an idea came about.
I've seen plenty of "easy cassoulet" recipes over the years, recipes which promise the rich, soul-satisfying taste of cassoulet in less time than the requisite two-day operation. I've seen one-day "cassoulet" and four-hour "cassoulet" but it seems a little disingenuous to claim them as the real deal. I suppose, what it comes down to, is that there are a lot of bean and sausage dishes, but not all of them are cassoulet.
I didn't have time to muck about with confit, and I didn't have any pork or fatty lamb handy, but I figured that, since the French themselves have such varied and vehement opinions as to what really qualifies as cassoulet, as long as I'm not claiming to make a particularly authentic dish, I can do what I want with the idea of it. Out of this perhaps somewhat arrogant reasoning, came dinner, in exactly 45 minutes from wandering into the kitchen and curling up on the sofa with a big old bowl in my lap.
I was somewhat shocked to realize that it is actually a fairly healthy dish, since the sausages that I used were not terribly fatty, and there was no added fat or oil in the dish. Quel surprise! I'll definitely be making this again.
French Skillet Dinner
aka "Not Cassoulet"
4 large duck sausages
1 large onion, diced
3 bay leaves
2 cloves of garlic, sliced
2 whole cloves (the spice)
pinch ground cloves
good pinch ground sage
pinch ground thyme, or sprig of fresh thyme
white pepper, to taste
2 - 3 cups cooked white beans, such as cannelini, white kidney, great northern, flageolet
2 medium carrots, diced
dry white vermouth
water
parsley
In a large, heavy, cast iron (or any not-non-stick) skillet, brown the sausages on all sides over high heat (no oil needed). Push the sausages to the side, and add the onions. Saute, stirring occasionally, until well caramelized, and add one of the cloves of garlic, and a good pinch of salt. Add the carrots, and saute and stir, adding a little vermouth from time to time if necessary to keep from burning.
The sausage should have developed a nice sticky brown fond on the bottom of the pan. Add about a half-cup of vermouth and scrape it up into the onion and carrot mixture. Add the bayleaves, whole cloves, ground cloves, white pepper, sage and thyme, all at once. Stir to distribute evenly. Add beans, and enough water to make a fairly loose stew. Simmer, uncovered, over a medium-low flame for about fifteen minutes, or until the gravy thickens and reduces.
Remove sausages and cut into chunks. Return sausage chunks to pan along with the second sliced clove of garlic. Stir well (but gently, so you don't mash all the beans). Taste the gravy and adjust for salt as needed. Drizzle an extra tablespoon of vermouth over the top, sprinkle generously with parsley, and serve with a nice glass of wine and a piece of crusty baguette.
Labels:
French,
Skillet Dinners
April 18, 2006
Easter Dinner - Cooking together
Much as I like ham, which was my family's traditional Easter dinner when I was growing up, I confess that these days I find myself leaning more towards the Australian tradition of lamb to celebrate the Spring. Of course, the Australian tradition usually involves roasting a great big leg of it, which presents much the same problem as a ham does in a household of two-plus-cat: too much leftover.
When one is not tied to unwavering expectations, however, one can feel free to walk on the wild side and do something completely different. So, with remarkably little discussion required, Palle & I settled on a lamb Daube Provençal as our dinner of choice.
Now, a daube is essentially a meat stew, and this one certainly was stewed for quite some time. 90 minutes, to be exact. Fortunately we had lunched well and further fortified ourselves with snacks in the afternoon before we got to cooking. Palle took point, and I took prep, so the dish is really his execution of the Daube Provençal from Anthony Bourdain's Les Halles Cookbook - his third recipe from that book.
So, Palle handled the batch-browning while I chopped, poured and wrangled the mise en place at kibitzed at him about raising or lowering the flame, when to add certain ingredients, and whatever else I could think of. He is always patient with my sometimes never-ending stream of chatter and general kitchen bossiness, and happy to let someone else do the prep for a change, I think.
More often than not it is he who helps me in the kitchen, deftly retrieving things from the fridge or freezer, opening, peeling, slicing, chopping endless amounts of mushrooms and peppers, which are among our most frequent fliers. I enjoy it when he steps out from behind the cutting board and cooks, which would probably happen more frequently if he had more reasonable work hours.
My contribution to the night's dinner was a pear and ginger cheesecake (from the latest issue of Eating Well) for which - alas! there are no pictures. It was quite nice, but the ginger flavour outshone the pear. Of course, if you choose to drink a little Poire William with it, you probably wouldn't notice...
Labels:
French,
Palle cooks
August 20, 2005
Return to the Kitchen: Crepes!
It always feels a little strange, stepping back into my kitchen after being away from it. True, I was only gone ten days, but that's a pretty long time to go without cooking anything, as far as I'm concerned. I'm always slightly concerned that I'll have forgotten how to do something important, or that I'll fail to remember simple things like monitoring pan-temperatures, or whether something has been left in the broiler. Such things have never come to pass - yet! - but I am always still a little concerned.
Today also brought a return to a dish I've not made in a long time: Crepes. I've always been partial to them, but when I travelled to France on my Big Trip ten years ago, I fell in love with them. Sweet, savory, stacked, folded, on a plate, or in a folded paper cone, crepes were my number one hunger-buster on the streets of Paris, and they're awfully good at home, too.
Since I have been primarily cooking lighter meals since we got back from Scotland, I decided to make a breakfast of savory crepes. With their payload of a single egg and but a half-teaspoon of canola oil, they fit well enough in with my criteria that I decided to include slices of Freybe's Italian sausage - part of their line of lower-fat chicken and turkey sausages that I use in a number of supper dishes (like Sausage and Hominy Chili) quite frequently.
Like a number of food bloggers, I've recently been pillaging the Williams Sonoma website for its recipes, and the one that I decided on for my crepes was their Black Pepper Crepes with Goat Cheese and Tomatoes. Since I was using a 9 or 10" non-stick frying pan instead of a WS crepe pan, I only got five crepes instead of eight, but I also was using between a third and a half cup of batter for each one, too - so that sort of makes sense. I also decided that the black pepper element of the crepe batter was negligible, so next time I may well add more pepper - or perhaps grind additional pepper over the crepe as it cooks on its first side, so the fresh black pepper sinks evenly into the batter and is locked in when the crepe is turned.
I also discovered that I did not need to re-season the pan between crepes, as the recipe suggests. Perhaps that is an advantage of the non-stick pan over the crepe pan, but it worked in my favour, so I'm not complaining.
I had forgotten how much fun crepes are. You can prepare them in advance. You can fill them with practically anything. You can dress them up or down. You can freeze them. And, you can microwave chilled crepes to heat them back up!
Subscribe to:
Posts (Atom)