Showing posts with label Rice. Show all posts

June 10, 2018

Coconut Lime Chicken & Rice Skillet


I developed this recipe because I had a lot of jalapeños to use up, and because I love skillet dinners. It's not quite Caribbean, not quite Mexican, and not quite South East Asian, but it's extremely tasty and a very satisfying meal that takes just over an hour to get on the table - half of that time unattended.

We served this with a salsa fresca (pico de gallo) on the side, but any nice fresh salad would also do the trick. I'm pleased to report that the leftovers, if you're that lucky, also make an excellent filling for wraps - with or without the rice.

Coconut Lime Chicken & Rice Skillet

Serves 3-4

6-8 bone-in chicken parts, with skin
2 tablespoons coarse salt
zest of 1 lime
juice of 1 lime, about 2 tablespoons
200 grams (1 cup, 7.05 oz) uncooked parboiled rice
165 mL (2/3 cup, 5.5 oz) canned coconut milk
4 large jalapeños
1 small onion
2-3 tablespoons shredded fine unsweetened coconut
2 cloves garlic
375 mL (1 3/4 cup, 12.5 oz) boiling water
1 small bunch cilantro, stems removed, chopped roughly (a generous handful)

Preheat the oven to 200 C/400 F.

Remove any excess skin and/or fat from the chicken with a sharp knife. Combine the lime zest with the coarse salt in order to make a seasoned rub. Massage the seasoned salt into the chicken on all sides, discarding the excess salt that falls off in the process. The tops of the chicken pieces should have a sparse but even coating of salt.

In a large (30cm/12") skillet or braising dish, lay the chicken pieces in a single layer, skin-side up. Place the dish in the oven and bake, uncovered, for 30 minutes, during which time you can prepare the other ingredients.

Finely dice the onion, and mince or press the garlic. De-seed the jalapeños, and finely dice one of them. Cut the remaining three jalapeños into rings and set aside until the final stages. Squeeze the juice from the lime. Rinse the rice under cool water until it runs clear.

After the chicken has cooked for 30 minutes, remove it from the oven, and place the skillet on a moderately hot burner. Use tongs or a spatula to transfer the chicken pieces to a clean plate. Into the juices left behind in the emptied skillet, add the onion, garlic, and finely diced jalapeño. Sauté for about two minutes, until the onion softens and turns translucent. Add the rice, and stir it around to coat the grains in the onion and chicken fat mixture. Turn the burner off. Add the lime juice and stir through. Add the coconut and the coconut milk and stir through. Add the boiling water (carefully), and stir though, using a spatula to smooth the rice into an even layer beneath the liquid.

Use tongs or a spatula to transfer the chicken pieces back to the skillet, arranging the pieces in a single layer on top of the rice. The tops of the chicken pieces should not be covered by the cooking liquid, but the sides may be a little until the rice starts absorbing the liquid.

Place the full pan back in the oven, uncovered, on the middle or upper middle rack, and bake for another 30 minutes. You may wish to check it after 20-25 minutes, to make sure it's not drying out, but unless your oven is hot, it should be fine.

Remove the skillet from the oven, and scatter sliced jalapeños and cilantro over top if you're serving the whole dish at the table.

Distribute the chicken to the individual diner's plates, and stir the jalapeños and cilantro through the rice. before serving the rice.


If you would like to make this dish entirely stovetop, that's also manageable, but requires a bit more hands-on labour (and the skin won't be crispy): Sear the seasoned chicken breast on both sides, cooking for a total of about 10 minutes, and set aside. Proceed as above, but reduce the boiling water to 295 mL (10 oz) and instead of placing the assembled dish in the oven, bring the liquid to a gentle simmer on the stovetop and turn the burner to its lowest setting. Cover the pan with a tight-fitting lid, and cook for 15 minutes. Turn the heat off and move the skillet to a cool burner or heatproof pad and let sit undisturbed without ever lifting its lid for another 15 minutes. Serve as above, adding the sliced pepper rings and the cilantro and stirring it through the rice.

May 10, 2018

Stuffed Turkish Peppers & Sultan's Chickpea Pilaff


The long, pointed, bright green peppers used extensively in Turkish cuisine have quite a number of excellent uses. They are mild enough to chop into salads (while still being more interesting a flavour than green bell pepper), but can be added to pilaffs, stews, casseroles, and pasta dishes with a certain wild abandon. They also bake up beautifully when stuffed.

A lot of stuffed pepper recipes are based on (or incorporate) rice, or some other grain into the stuffing mixture. These peppers are so narrow, though, that I decided to make a filling that was just seasoned meat - lean, to account for minimal shrinkage in the oven - and serve the rice on the side.

Stuffed Turkish Peppers

Preheat the oven to 200°C/400°F, with a rack in the middle.

8-10 pointed Turkish peppers (such as Charleston/Çarliston Biber)

Prepare a mixture of meat and seasonings...you could use pretty much any meatball recipe you like, though. This is the one I used:

500 grams lean ground beef
1 large egg, beaten
1/2 teaspoon kosher salt
1/2 teaspoon ground white pepper
1 teaspoon dried oregano
3 cloves garlic, pressed
1/2 cup parsley, divided

Wash the peppers and lay them on the cutting board. Slice off a strip along the top, going about halfway to two thirds of the way down each pepper, and use a spoon or paring knife to carefully remove as many of the seeds as possible. Take up about a tablespoon of the raw meatball mixture, and use your thumbs to push it into the hollow of each pepper pod, pressing the filling gently down into the pointed end as much as possible.


Lay the peppers in a shallow baking dish (or baking sheet with sides). Brush with a little canola oil to give them a sheen (optional).

I had more filling than peppers, so I simply made the remaining filling into some large meatballs, and placed them at the end of the tray full of peppers.

Bake the peppers, uncovered, for 30 minutes, and serve warm with yoghurt sauce, feta, and toasted pine nuts.


While the peppers are baking, you can make the pilaff and the yoghurt sauce (timing works best if you've already done the prep for the pilaff before putting the peppers in the oven, and toast the pine nuts):

Sultan's Chickpea Pilaff

Adapted from The Turkish Kitchen, by Ghillie Başan

Serves 4

200 grams (1 cup) basmati rice, washed
220 grams cooked chickpeas, rinsed (approximately 1 400 gram can, drained)
1 tablespoon butter
1 small onion, minced
300 mL (1.25 cups) chicken stock or broth (from concentrate is fine)
ground white pepper to taste

Rub the chickpeas and discard any skins. In a medium saucepan with a tight-fitting lid, melt the butter over medium heat. Add the minced onion, and stir and cook until translucent but not browned. Add the rice, and stir it about so that each grain gets some of the butter on it. Add the chickpeas, broth, and a bit of white pepper (a 1/4 teaspoon should do it). As soon as the mixture is bubbling, turn the heat to the lowest setting, put the lid on the pot, and let cook undisturbed (no peeking!) for 15 minutes. Then, still without lifting the lid, remove the pan to a cool burner (or completely off the stove on a heatproof pad) and leave undisturbed for another 15 minutes. Then you can open the lid and fluff the rice up to redistribute the chickpeas throughout the rice (they have a tendency to migrate to the top of the pot).

Yoghurt Sauce

This is the same sauce that I use for Çılbır

150 grams plain thick yoghurt
1 clove garlic, minced or pressed
1 tablespoon minced fresh parsley (or dill, or mint)
1/2 teaspoon olive oil
1/8 teaspoon kosher or coarse sea salt

Stir together in a small bowl.

Assemble however best you see fit.

These heat up beautifully the next day, but are also delicious cold or at room temperature.


November 12, 2017

Khichdi and Kheema


Khichdi (aka Khichri, and a number of other variations, खिचड़ी in Hindi) is a rice-and-pulse dish from India that is not only a vegetarian (vegan, in fact) staple, but also very likely the ur recipe for Kedgeree and possibly even Middle Eastern Koshary. It's been around for a long, long time, and is considered to be a very balanced meal on its own - even better, if you can serve it with condiments such as yoghurt or raita, chutney, or go all out for the famous Hyderabadi combination of khichdi, kheema, and khatta.

Kheema (aka keema, कीमा in Hindi) is essentially a simple, loose, ground meat gravy seasoned with accent vegetables and vigorous application of spices as pleases the cook. My kheema tends to vary quite wildly depending on what I have on hand, but is usually at least a bit spicy. Kheema is not generally by nature a vegetarian dish, but one could make it so by using the ground-meat substitute of your choice, or even simply finely minced vegetables. This one has a mixture of ground lamb and beef, as prepared by our local Turkish butcher. The recipe is below the recipe for the khichdi.

I didn't have the necessary sour ingredients on hand to make khatta, but we enjoyed the khichdi and kheema together.

There are different styles of Khichdi, ranging from the dry, pilau-like separate grains you see here to a more risotto-like dish, more of an extremely thick soup or congee than its drier pilau cousin. Because I was using a lentil that holds its shape very tenaciously, I decided to go with the drier style.

Khichdi can be made with any lentil, but this one is made with whole black urad dal - the same pulse that I use to make Kali Dal (black dal), and this dish is therefore Kali dal ki khichdi. Because the lentils give off a lot of dark colour when boiled, I discard the water used to boil the lentils, but if you don't mind a grey dish, you can certainly use the cooking water to also cook the rice.

Kali Dal Ki Khichdi

Serves 4

150 - 180 mL whole black urad dal, picked over and rinsed well
approximately 6 cups cooking water for the dal
1 teaspoon toasted cumin seeds
2 tablespoons minced fresh ginger
2 teaspoons oil or butter or ghee
1/2 teaspoon kosher or other coarse salt
1-3 dried red chilies, left whole OR 1 long fresh chili, seeded and chopped.
200 grams basmati rice
310 mL water for the rice, rinsed well

You don't need to soak the dal, but you can if you want to. You do need to wash them well, or your dish will be gritty.

In a moderately large pot, bring six cups (or so) of water to a boil. Add the well-rinsed dal, the cumin seeds, the chilies and the minced ginger, and let simmer gently for about 45 minutes, stirring from time to time. The water will be very dark and murky looking. If your dal is a bit old, or you're not convinced of its freshness (mine was rescued from the back of the cupboard), a small pinch of baking soda can be added to the water to encourage the dal to soften nicely as it cooks.

When the dal is tender, drain through a colander, and set briefly aside while you get the rice going: in a medium pot, bring the rice-cooking water and the well-rinsed rice to the barest of bubbles rising to the surface. Add the oil or butter or ghee, the salt, and the drained dal, stir through, and cover with a tight-fitting lid. Turn the heat immediately to the lowest setting, and cook undisturbed (no peeking!) for 15 minutes. Transfer the pot to a cold burner (or pot holder) without lifting the lid, and set the timer again for 15 minutes. When the timer goes, you may open the pot and fluff up your rice with a fork or rice paddle.


You'll notice that the dal have congregated in the top third of the dish, so give it a nice fold with a paddle or spatula to disperse them throughout the rice. If you want to serve it in a tidy shape, you can pack it into a small bowl or measuring cup and upend onto the plate or bowl. Otherwise, just spoon it into a bowl and enjoy - with or without accompaniments.


Plain yoghurt is a very common side, and if the khichdi is being eaten on its own, you may want to consider a tempering made from heating a little mustard oil (or butter or ghee) in a small pan, and adding some chili flakes, swirling them about until fragrant, before pouring over the khichdi. Because we were serving this with kheema, we didn't do that extra step.

* * * * *

A note on kheema vegetables: One of the most popular and traditional vegetables to add to kheema is green peas. If you're not using the peppers and/or tomatoes.


Simple Kheema

Serves 4

500 grams ground beef and lamb (both or either)
1 tablespoon butter or oil
1 tablespoon finely minced ginger
1 medium yellow onion, chopped (about a cup's worth)
2 cloves garlic, sliced
1 teaspoon toasted cumin seeds
1 teaspoon ground coriander seed
1/2 teaspoon ground cardamom
1/2 teaspoon ground black pepper
1/2 teaspoon kosher or other coarse salt
3-4 roma-type tomatoes, cored and seeded, sliced into strips
1-3 red or green hot peppers, cored and seeded, sliced into strips
1/2 teaspoon garam masala
Water, as needed
1 teaspoon cornstarch or 1 tablespoon flour as a thickener (optional)
Cilantro to garnish (optional)

In a large skillet, heat the butter (or oil) over medium-high heat, and when it has melted and foamed out, add the ground meat. Stir and cook the meat, breaking it up with your spoon as you go (it can be as fine or coarsely broken up as you like) until it is thoroughly browned (not just no-longer-pink, you want some golden, flavourful searing on about half of it). Add the salt and the spices (except the garam masala) and stir through again. Add the onions, garlic, and ginger, and continue to stir and fry until the onions are translucent.

If you want a thicker gravy, choose either the cornstarch or wheat flour option (see instructions below) add it now and simmer for about 15 minutes. If you want a thinner gravy, simply add an extra half cup of water now simmer for about 5 minutes.

Add the hot peppers and the tomatoes (if it looks like it needs more water to be a nice gravy texture, go ahead and add a little more), and cook a few minutes longer, stirring frequently, until the vegetables are just tender. Garnish with cilantro if you like.

Thickener Options:

Cornstarch: mix the teaspoon of cornstarch with a half-cup of room temperature or cold water, stir until smooth, and then add to the pan. Stir throughout, and watch it thicken the gravy as it comes up to a simmer.

Wheat flour: mix the tablespoon of flour with a cup of room temperature or cold water by shaking together in a tightly lidded cup. Pour the liquid into the pan and stir throughout, and watch it thicken the gravy as it comes up to a simmer.


August 20, 2017

Hainanese Chicken Rice


One of the quintessential dishes of Singaporean cuisine, Hainanese Chicken Rice is a bone-deep satisfying meal dished up everywhere from Hawker’s Markets to fancy restaurants. It is an excellent example of how ingredient repetition need not render a meal boring or feel repetitive - the ginger, sesame oil, and garlic are powerful flavours, but come across differently in each item on the finished plate.

This recipe serves 2-4 people (or more, if you double the rice), but in our house it is the start of a multi-meal whose leftovers evolve into two more dishes over the following days (see Multi-meal, at the bottom of this post).

Hainanese Chicken Rice

Adapted from Steamy Kitchen

Chicken
1 whole chicken (about 1.5 kg)
Fresh cool water to cover the chicken
2 teaspoons kosher salt plus extra for exfoliation (as described below)
5 cm chunk of fresh ginger, peeled and sliced
2 stalks green onions, cut into two-inch lengths
Basin of ice water
1 teaspoon toasted sesame oil (for after the chicken is cooked)

Rice
15 mL (1 tablespoon) chicken fat or canola oil
1 large clove garlic, minced or crushed
15 mL (1 tablespoon) minced fresh ginger
200 grams (1 cup) raw basmati rice, washed until the water runs clear
310 mL (1 1/4 cups) reserved chicken poaching broth
1/2 teaspoon toasted sesame oil
1 pinch kosher salt

Chile Sauce
15 mL (1 tablespoon) fresh lime juice
30 mL (2 tablespoons) reserved chicken poaching broth
10 mL (2 teaspoons) sugar
60 mL (4 tablespoons) Sriracha sauce
4 cloves garlic
30 mL (2 tablespoons) minced fresh ginger
a pinch of salt, to taste

To serve
Dark soy sauce (in a dish, or just the bottle)
Green onion, finely sliced on the bias
Cucumber, thinly sliced

First, you must exfoliate the chicken. Rinse the chicken inside and out and place on a clean plate. Use a small handful of kosher or pickling salt to gently massage the chicken all over, being careful not to tear the skin if possible. Rinse the salt away and stuff the chicken with the ginger slices and green onion pieces. Place the chicken in a large stockpot and add fresh cold water to cover (it’s okay if it doesn’t quite cover - the breast will still cook if it sticks up above the water level). Add salt. Cover and bring the pot just barely to a boil over high heat, then immediately turn the heat to low to keep a bare simmer, checking from time to time. Simmer for about 40 minutes (less for smaller chickens).

While the chicken simmers, get your mise en place in order for the chile sauce and the rice. That means, mince the ginger for both the rice and the sauce, peel the garlic and set aside, and wash, wash, wash the rice in cool water until it runs clear. Set the rice aside in a strainer to drain. You can put the sauce ingredients all (except for the broth) into a blender cup now, if you like.

Once the chicken is cooked through, turn off the heat and remove the pot from the burner. Carefully lift the chicken from the broth (I lift it by inserting a wooden spoon into the centre and tilting it up so that the juices run out of the cavity) and into a basin of ice water to cool. You will need the broth for the rice, sauce, and side bowl of soup. I like to have my basin in the sink, so that I can and add more fresh cold water over the chicken to help the skin achieve the firm, springy texture associated with this dish, and I like to change the cold water once as it rests. Let the chicken rest in the cold water while you start cooking the rice. Remove any aromatics (ginger, green onion) from the broth, and return the pot of broth to the stove to stay warm over low heat.

Rice: You rice should by now have been rinsed and drained and is resting nearby in a sieve. Heat the chicken fat or canola oil over medium-high heat in a medium saucepan. Add the ginger and the garlic and pinch of salt, and stir fry until fragrant but not coloured. Add the sesame oil and then drained rice and stir to coat each grain with the fat and seasonings.

If you’re cooking the rice on the stovetop, add the 310 mL of hot poaching broth to the rice and stir it through. Turn the heat to the lowest setting, and cover the pan with a tight fitting lid. Set the timer for 15 minutes, and when it rings remove the rice pot from the hot burner and, without lifting the lid, set it aside to rest somewhere for another 15 minutes. Fluff, and it's ready to serve.

If you’re cooking the rice in a rice cooker, use a spatula to scrape the rice/fat/seasoning mixture into the rice cooker, add the poaching broth, and then turn it on according to your rice cooker’s instructions.

While the rice is cooking, remove the chicken from its ice bath and pat dry with paper towels. Using your impeccably clean fingers, rub the outside of the chicken with the sesame oil, and let it stand until needed. Just before the rice is finished resting, carve the chicken for serving and arrange on plates, and then add the rice once it's ready. For a nice tidy dome of rice, pack it lightly into a measuring cup and overturn onto the plate. I find a 3/4-cup measure works perfectly, yielding 4 portions of rice from 200 grams (1 cup) of raw rice.

Chile Sauce: combine all chile sauce ingredients in a blender cup and process until smooth. Stick blenders work very well for this. The first time I made this, I didn’t have access to any mechanical means to puree it, so I simply finely chopped everything by hand. That also worked very nicely, but it was of course not a smooth sauce.

Soup: You should have several cups of the chicken-poaching broth available. Ladle into small bowls and garnish with some finely sliced green onion.

Serve the chicken and rice with cucumber slices, and a bowl of the soup on the side. Place the chile sauce and some dark soy sauce on the table for individuals to use at will.


Multi-meal

I mentioned at the start of this post that this is a multi-meal dish for our household of two (your mileage may vary, depending on your family size - for bigger families, you would want to have doubled the rice recipe above). This is what I do:

Finally, after you’ve eaten and had a little rest, strip the remaining chicken meat from the bones, and put in a container in the fridge. As for the bones, you can either discard them, or add them back into the soup pot and simmer them for another hour or so for a much stronger broth. Cool and strain the broth, and transfer to fridge/freezer friendly containers. Cool and refrigerate any leftover rice.

The next day, leftover rice and about half of the leftover chicken meat are converted into fried rice (this is an especially good use for any leftover skin!) with the addition of a little extra onion, ginger, garlic, beaten egg, low-sodium soy sauce, any any other vegetables you’ve got kicking around. (For fried rice technique, please see my post on fried rice, and adapt as necessary.) Serve with leftover chile sauce, if you have any.

The following day, the leftover broth (or some of it) is used to make congee, by adding some water, washed raw rice, and the remaining chicken meat (added at the very end). Serve with leftover chile sauce, if you have any.

Alternatively, you could stash all of the broth in the freezer and use that instead of water for the next time you want to make Hainanese Chicken Rice. Because, there will be a next time. If you have lots of broth, you can split the difference.

Three delicious meals from one master-meal.

July 29, 2017

Loco Moco


Loco Moco is Hawaiian comfort food suitable for breakfast, lunch, or dinner, and is such a hometown favourite that it appears everywhere from takeaway windows, to diners, to fine dining restaurants.

Four essential ingredients comprise the classic Loco Moco: white rice, ground meat patty, fried egg, and brown gravy. The number of patties and eggs is variable, but even the petite offering shown here, of a single patty and a single egg, makes for quite a substantial meal.

There are other variations, of course. Fried rice instead of rice, being one. The meat patty could be replace with fried spam, and there may or may not be mushrooms in the gravy. Some places ask if you want sautéed onions or not, but in this version they're already right in the gravy. Loco Moco often appears as an option on Hawaii's famous Plate Lunch, which pretty much guarantees a scoop of macaroni salad on the side. In Japan, where Loco Moco has migrated quite happily, it is often served with Tonkatsu sauce instead of brown gravy, which gives it an altogether different effect.


Serving the egg as the topmost layer is picture pretty, but most places drench the egg with extra gravy - sometimes so much so that the takeaway container threatens to overflow. It is big food. Generous food. Comfort food.

So here's how you make it:

Loco Moco

Serves 2-4

3-4 cups hot cooked long grain white rice
4 hamburger patties in brown gravy (or Salisbury Steaks with a little soy sauce spiking the gravy)
4 fried eggs

Divide the rice between the dishes (pasta bowls work really well for this). Top the rice with one or two hamburger patties and a big spoonful of gravy. Top the patties with the fried eggs, and ladle extra gravy over it all. Serve with soy sauce and/or hot sauce on the side.

This is also a great way to use up extra Salisbury steaks, if you have some in the fridge, but if you want to make the patties up from scratch, it can still be done up pretty quickly:

500 grams lean ground beef (or beef/pork mixture)
1/4 teaspoon kosher or coarse sea salt
1/2 teaspoon black pepper
1/2 teaspoon Worcestershire sauce
Pinch of ground cumin
Pinch of ground cayenne
1 shake of Tabasco pepper sauce
a bit of all-purpose flour to dust the patties
1 teaspoon butter or oil for frying

For the gravy:
1 medium onion, sliced pole-to pole
2 cloves garlic, minced or pressed
1/2 teaspoon Worcestershire sauce
1-2 teaspoons Low-Sodium Soy Sauce
3 cups beef broth (or stock from a prepared base, such as Better than Bouillon) - preferably low sodium
3 tablespoons all-purpose flour (shaken together with 125 mL (1/2 cup) cold water to make a slurry)

Put the rice on to cook first. While it cooks:

Mix together the meat and seasonings with a fork or your impeccably clean hands, and shape into four flat patties. Sprinkle the patties with flour on each side, and shake of any excess. Fry them in a large, hot skillet (in which you have melted the butter or heated the oil) over medium heat until well-browned on each side. Don't worry about cooking them through, they will finish cooking in the gravy.

Once the patties have been nicely browned, remove them to a plate while you make the gravy. To the emptied pan, add the onions and garlic, and stir them through, scraping up the fond on the bottom of the pan. Add the Worcestershire sauce, and soy sauce, and stir and cook until the onions turn translucent and start to get tender. If the pan is too dry, lower the heat a bit and add a tablespoon of water or so at a time until there's no danger of scorching.

Add the beef broth and stir through, being sure to scrape up the flavourful bits on the bottom of the pan. Make a slurry of the flour with the cold water to make a smooth, thick liquid, and add it to the skillet, stirring. Stir it all through until it is thoroughly integrated with the onions and stock. It will start to thicken the gravy immediately, but it will take about 20 minutes of cooking for the flour to cook through and lose its paste-like raw taste, so don't be impatient if it doesn't taste great right away. Return the patties to the sauce, lower the heat to it's lowest setting, and continue to stir periodically, until the gravy has a delicious meaty flavour. You can cover the pan if you like, but I don't usually find it necessary. If it gets too thick, add a little water to thin it to your preferred gravy consistency.

If your patties didn't brown very much, your gravy might be pale in colour. It should still taste good, though, but you can get a nicer colour by adding a few drops of dark soy sauce (not regular). It's on point for the dish flavour-wise, and it's a near miraculous gravy-browner.

When the rice is cooked and the patties and gravy are ready, fire up another skillet and fry up some eggs. Sunny side up is traditional, but over easy (or over hard) is fine if that's how you roll.

Layer the ingredients quickly and dive in.

April 08, 2017

Arancini: Italian Rice Balls


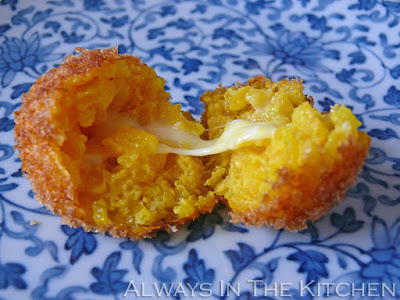
Arancini means "little oranges", and you can find them in many parts of Italy, often as a bar snack. They can be served hot, or at room temperature. It is a way of upcycling leftover risotto into a dish that feels wholly different, while still packing all the same satisfaction. These arancini were made using leftover Risotto alla Milanese, and filled with fresh buffalo Mozzarella. You can make this with pretty much any leftover risotto, although if there are any large featured ingredients, you will want to remove them and either dice them finely and add them back into the rice, or add them to the filling. You can use any melty cheese you have on hand.

I don't deep fry things very often, partly due to the mess, partly due to general anxiety about deep frying, but I'll make an exception for these. As a killer bonus, once these are made, you can reheat them for 15 minutes in a very hot oven a day later with no loss of quality! Can you say...party food? Look at this one -- it's a day old, reheated, and is still fantastic:


Added bonus: you can make them any size you like.

Arancini

About 6 large or 12-14 small

About 3 cups leftover risotto, such as Risotto alla Milanese
1 egg, beaten
100 grams fresh Mozzarella, such as buffalo
About a cup of panko or other dried breadcrumbs
Oil for deep frying

While the oil heats to 175°C / 370°F, loosen the risotto gently with a fork. Add the beaten egg, and stir very gently to thoroughly combine. Turn the mass of risotto out onto a cutting board, and divide into the number of arancini you want to make. I've made 6 larger ones and one smaller one. Dice the mozzarella (or other melting cheese, such as Provolone or Fontina, for example) into at least the same number of arancini you are making. Don't make the cheese cubes too huge, or you'll have trouble closing the rice around them.

Set a clean cutting board or plate as a receiving plate for the completed arancini. Then, pick up the risotto for the first ball, and flatten it in your hands into a rough disc. Place a piece of mozzarella (or two, if you find you've chopped them quite small) in the centre of the disc, and curl your fingers up to start to enclose it. Get your other hand in there to help close the rice completely around the cheese, and shape into a nice round ball. Roll the ball in the breadcrumbs. Set aside on the receiving plate, and repeat until all of the rice has been formed into arancini.


Wash your hands, which will be sticky and coated with egg/risotto goo. Prepare a receiving plate for the fried arancini by lining it with a few paper towels.

When the oil is ready for frying, lower one arancino (singular) into the oil, using a mesh skimmer or spider. Let it cook for about a minute before adding another. Do not have more than four of the larger ones in the pot at the time, or the temperature of the oil will drop too far, and the arancini will not fry as nicely. Let each arancino cook for about five or six minutes, turning them from time to time, and then retrieve from the oil with your spider, and place on the paper towel-lined plate. They should be golden-y, orange-y brown and incredibly tempting. Repeat until all the arancini are cooked, and then serve and devour.


Arancini are often served with a dipping sauce - often a simple basil and tomato pasta-type sauce, but these ones are so creamy they don't strictly need it.

I served these with a lentil soup made from the leftover braised beef shanks that had accompanied the original risotto.

April 01, 2017

Risotto alla Milanese


Risotto (alla) Milanese, also sometimes called Risotto Giallo Zafferano, is a luxurious dish. It is not cheap to make, nor is it vegetarian; alongside its famously expensive saffron, the other signature ingredients include bone marrow and meat stock. The risotto kits that one can find on supermarket shelves tend to include only the merest whisper of saffron (if at all) and rely on turmeric or other colorants for the vivid yellow colour. They may make a serviceable side dish of sorts, but you would be in for a disappointment if you expected it to live up to the magic of a traditional Risotto alla Milanese.

I've made saffron rice dishes before, and while I've always enjoyed the flavour, I'd never achieved the deep, dark golden hue that is one of the signatures of this, one of the most famous Italian dishes. It turns out, it very much matters no only what kind of saffron one uses, but also how fresh it is. After recently making a saffron risotto that was underwhelming in colour, texture, and flavour, I decided to set aside what I've learned making other risottos, and learn how to do this one in all of its traditional glory.

I had used up the last of my good Persian saffron in the previous batch. While that saffron was indeed top quality when I received it, I had been eking it out over a few years, and gradually the remaining strands had greatly diminished in both their pungency and the amount of colour they provided. So I bought a new tiny tube of beautiful, dark red threads, and used them generously. Note that not all saffron is created equal. Don't be deceived by "safflower saffron", Carthamus tinctorius AKA "American saffron" or "Mexican saffron" or even "Dyer's saffron" (it has colour, but no flavour). It's not even from the same type of plant as true saffron. The one you want is Crocus sativus.

One departure from other risottos that I've made is that this one has you boil the onions in wine before adding the rice. This made the onions virtually disappear into the dish, adding a depth of texture to the sauciness of the dish. I note that Claudia Roden's other The Food of Italy (so, not the region-by-region version from which the below recipe is adapted) has a slightly different recipe given for Risotto alla Milanese, with slightly different proportions of some ingredients and, more importantly, with the wine added after the rice, following the more classic risotto-building method. Undecided at first, I eventually chose to go with the unusual version, which turned out to be nothing short of glorious.

Risotto alla Milanese

Adapted from Claudia Roden's The Food of Italy: Region by Region

Serves 4

300 grams rice for risotto - eg. Arborio, Carnaroli, Vialone Nano
30 grams butter
30 grams beef or veal bone marrow
1 litre (4 cups) beef or veal stock, warm
125 mL dry white wine or dry white Vermouth
1 small onion, finely chopped
1/2 teaspoon coarse sea salt (only if your stock is not too salty)
60 grams freshly grated Parmigiano Reggiano cheese
3/4 teaspoon saffron threads
50 mL hot water (from a recently boiled kettle)

As always, risotto is best (and the cook less harried) when the mise en place, the advance preparation of all necessary ingredients, is done before actually starting to cook.

Risotto needs near constant attention, but it does not require continuous stirring, no matter what you might hear. A stir once per minute will suffice. If you overstir, especially if you are making a drier, non-soupy style, your rice will be half way to congee by the time you've added all your stock. So: stir frequently, and gently, but not continuously.

Chop your onion very finely (try to match the size of a grain of rice), grate your Parmesan, warm the stock in a small pot on the stove, and prepare the saffron infusion: in a small mug or measuring cup, pour the 50 mL hot water from a recently boiled kettle, and crush the saffron over it, letting the dark red dust fall into the hot water. You can crush the saffron with a spoon, a mortar and pestle, or simply use your fingertips. Let the saffron steep in the hot water, which will gradually turn bright yellow.

Melt the bone marrow in a medium-sized saucepan over medium heat. When it has all melted, add half the butter (a tablespoon) and let that melt, too. Next, add your very finely chopped onion, and let it sauté for a few minutes, and then add the white wine. I used dry Vermouth for the wine, which is my usual risotto practice, but you could also use a nice Pinot Grigio or Soave. Let the wine boil almost dry, until the mixture of fat, onions, and wine looks syrupy, and then add the rice. Stir the rice around well, to coat each of the grains with the viscous liquid. Stir in the salt.

Add a ladle of stock to the rice, and give it a few stirs. Let it simmer, lid off, until much of the liquid has evaporated, and then give it another stir, and another ladle of stock. Stir again, and let it be for a minute. Repeat this process, stirring about once per minute or as needed (if you need to stir more often, turn the heat down), until half of your stock is gone, about 12 - 15 minutes in. You may stir more than once between each addition, of course.

When half of your stock has gone in, add the saffron and its steeping liquid and stir it through, marvelling at the abrupt change of colour, and intense fragrance! I like to add a bit of stock to the emptied saffron cup, and swirl it about to make sure I get every last speck of saffron into the risotto. Continue with the stirring and the adding of stock as before, until all of the stock has been added and mostly absorbed, and the grains of rice are just on the verge of being tender. Turn off the heat, and stir in the remaining tablespoon of butter and the parmesan cheese. Partially cover with a cocked-lid and let it stand for a few minutes while you plate any other elements of your dinner (in case of the above, braised beef shank and cauliflower mornay), and then spoon the risotto onto the plate last. If you like a very wet style of risotto, you may wish to use a shallow bowl to serve, instead.


Should you be lucky enough to have any leftover, they make wonderful arancini (Italian rice balls). Coincidentally (cough cough), that is next week's recipe. Stay tuned!


Freezer Burritos (and website news)


Well, it looks like my older website for Always In The Kitchen has finally expired and been taken offline. Don't worry, this blog is still active, and I still have all of the recipes, so I'll begin adding them to the comments sections of various blog posts that formerly just contained the links.

In the meantime, if you find any dead links where the recipe has not yet been added into the comments at the bottom, please let me know. I plan to add all of them, but it could take a while, and any of the older recipes that didn't have a link on the blog will be getting a whole new blog post, like this one.

Freezer Burritos

These are a delicious make-ahead worthy of taking up space in your freezer, ready to be a tasty packed lunch or emergency dinner. The inclusion of rice makes them technically "Mission-style" but, as discussed below, these are highly customizable.

Total prep and cooking time: 45 minutes more or less, depending on how fast you are at filling and rolling.

1 cup (200 grams) uncooked rice
1 (425 gram) can* black beans
1 (525 gram) can* pinto or kidney beans
1 cup (250 mL) frozen corn kernels, rinsed in warm water, drained
1 cup (250 mL) jarred salsa
10 (12 inch) flour tortillas (make sure they’re flexible - warm them if necessary to make rolling easier)
250 grams Pepper Jack cheese, shredded (or cheddar)
2 tablespoons Tabasco sauce, or hot sauce of your choice
1 tablespoon ground chile powder
1 teaspoon ground cumin
1 teaspoon dried oregano leaves
1 cup chopped fresh cilantro (use parsley or green onions if you're cilantro-phobic)
1-2 minced jalapeño peppers

*Please note that the can-sizes are approximate, based on what was available in my area at the time this recipe was being developed. If your cans are a bit smaller or a bit larger, it will be fine.

Cook the rice in your usual fashion, adding some Mexican or Southwest Seasoning or extra chile powder (1 teaspoon, approximately) into the water. Allow to cool somewhat while you prepare the rest. Drain and rinse beans and corn. Add salsa, and toss to mix. Transfer to a large bowl, and mix in the rice and cheese and seasonings (spices, cilantro, and peppers). Mix very thoroughly. Taste and see if you need to add more spices or hot sauce. Divide the mixture evenly among the tortillas, and roll up. Wrap individually in plastic wrap, place into a large freezer bag, and freeze. Reheat covered, but unwrapped, in the microwave on high for about 3 minutes. Liberally apply extra hot sauce, such as Cholula (ie. a thicker sauce, rather than a thin one like Tabasco or Louisiana).

I usually plan to have these for dinner on the day that I make a batch. Instead of microwaving them, I spritz them lightly with canola oil and bake them on a cookie sheet, in a 400 F oven, or until the edges are crispy and golden. You can also pan-fry them in a bit of canola or peanut oil, using tongs to rotate them for even browning.

For a non-vegetarian version, substitute one of the cans of beans with ½ pound cooked ground beef (season well, and drain off any fat) or ground chicken or turkey for a leaner meaty version. It’s slightly more work, but very tasty.

I usually get 10 (sometimes more) burritos, depending on how big the tortillas are, how much I've tinkered with the filling, and how much of the filling I've eaten while rolling up the burritos.

These are of course highly customizable - just keep an eye on the volume of filling you're making. I've been known to add minced bell pepper, Mexican pickled onions (chopped), leftover mole sauce, leftover roast chicken, (I divide the shredded roast chicken between each burrito rather than mixing it into the filling). Leftover pulled pork would of course also work very nicely. I'm thinking right now that black bean and roasted butternut squash would be an excellent plant-based variation.

February 25, 2017

Black Beans & Rice with Sausage


This recipe takes inspiration from those dry packet mixes for black beans and rice, but using fresh ingredients and a lot less salt. It's a fairly quick meal to make, labour-wise (about 45 minutes, most of which is unattended cook time), and while there's a bit of chopping involved, there's not a lot of clean up: cutting board, knife, skillet, spatula, bowls, forks. It's easy, it's delicious, and it reheats well for lunch the next day.

If you want a more Cajun-y version, replace the seasonings listed below with a Cajun spice blend.

Vegetarians/Vegans could either replace the sausage with a similarly styled plant-based sausage, smoked tofu, or simply increase the amount of black beans.

Black Beans & Rice with Sausage

Serves 4

140 grams Cabanossi sausage (or Kolbassa)
2 medium stalks celery
1 medium onion
1 medium red or green bell pepper
1 teaspoon vegetable base (I use reduced sodium)
2 cups canned black beans, rinsed and drained
1 cup parboiled rice
2 clove garlic, minced
1/2 tablespoon olive oil
1/4 teaspoon celery salt
1/2 teaspoon white pepper
1/2 teaspoon ground cumin
1/4 teaspoon cayenne pepper (or to taste!)
2 dash Tabasco pepper sauce
1 3/4 cups water, from a recently boiled kettle
sliced green onions for garnish (optional)

Prepare the sausage by slicing it once lengthwise and then slice cross-wise into half-coin pieces. Prepare the vegetables by peeling or trimming as needed and dicing into thumbnail-sized chunks. I like to string my celery, if it's particularly tough. Mix the seasoning spices in a small bowl and set aside.

In a large skillet, sear the sausage slices, then push to the sides of the skillet and add the diced onion, garlic in the olive oil until it starts to turn translucent. Add the diced pepper, beans and spices, and stir through gently. Let cook, stirring, for about a minute, and then add the Tabasco sauce, rice, and 1 & 3/4 cups boiling water. Bring the mixture back up to a simmer, stirring, then immediately cover. Turn down the heat to a bare simmer and leave undisturbed (no peeking!) for 25 minutes. When it is done, stir through gently. Sprinkle with sliced green onions and serve.

February 04, 2017

Rice Noodle Rolls: Chee Cheong Fun (and two pan-fried variations)


If you have access to a good Asian grocery store, you might never need to make the noodles from scratch although it's not at all difficult - merely time consuming. Just buy a nice fresh package and proceed below to the serving suggestions. But if, for example, you live in a small European city that doesn't seem to have really figured out yet that Asian cuisines are in fact plural, I hope that you will find this useful.

The time consuming aspect of this recipe lies in the fact that the noodles can only be cooked one at a time, and this makes 13-14 noodle sheets (at least, using the size of pans I have), each of which take 6 - 7 minutes to steam. If you have a better steaming rig than I do, one with stackable layers, you might be able to reduce the time by quite a bit.

Fortunately, you can make these a day or two ahead of when you want to serve them, and just keep them in a tightly sealed container in the fridge.

Chee Cheong Fun (Chinese Rice Noodle Rolls)

175 grams pyramid dumpling rice flour blend (or 150 grams rice flour plus 25 grams tapioca flour)
2 tablespoons cornstarch
200 mL cold water
300 mL hot water (from a recently boiled kettle)
1/2 teaspoon coarse salt
1 tablespoon canola oil

Combine the flour(s) and cornstarch with the salt, and whisk in the cold water. When there are no more lumps, add the hot water, and whisk well, until thoroughly integrated. The batter will look way too thin and watery, but it’s fine. Add the oil and whisk again.

Let the batter rest for 20 to 30 minutes.

Set up your steamer, and two or three trays that you can use to shape the noodle sheets. I use foil trays, the same kind used for baking or take-out containers. Make sure the trays can lie flat in the steamer, so your noodles are even. Lightly oil the trays, using a pastry brush or similar. Prepare a cold water bath - something large enough to put your steaming trays in, such as a baking dish or larger aluminum pan. Prepare a plate for the finished rolls, by brushing it very, very lightly with oil.

Place the first tray in the steamer (with steam already rising) and (after stirring the batter well) add a very thin layer of batter to the tray. Make sure the bottom of the tray is just barely covered. Cover, and steam for 6 - 7 minutes, or until it looks set. Remove tray from steamer and place it in the cold water bath. Place the next tray in the steamer, and repeat, being sure to stir the batter vigorously before ladling into the tray (it will separate, otherwise).

Let the tray with the cooked noodle rest in the water bath for a minute or two, and then lift it out and use a spatula to free the sides and slowly, with the pan tilted toward you, use the spatula to peel the noodle sheet down from the top, bit by bit, causing it to roll into a tight cylinder. Remove the noodle roll to your resting plate. Brush lightly with oil, especially if you will not be using the rolls until later.

Repeat until all of the batter is used up. How many noodle rolls you get depends very much on how big your trays are, and how thick your noodles. Once they are at room temperature, you can refrigerate them to use later, or even the next day.

As you can imagine, at about seven minutes per noodle, it takes a while to cook all of the batter. Using trays that measure approximately 16x10 centimetres, I got 13 or 14 rolls, and it took over an hour and a half to complete the steaming, because I could only steam one tray at a time. If you have a multi-tiered steaming rig and can handle more trays at a time, that will speed up the process a lot.

Pan fried rice noodle rolls with XO sauce

In a large skillet, heat a tablespoon of peanut oil until very hot. While the oil is heating, slice the rice rolls into smaller pieces - from the 10 centimetre rolls I made, I cut the rolls into thirds, but you could also do halves or quarters. I cut them on an angle, to make them look pretty.

The amount of sauce here is for 7 noodle rolls (half a batch), so double it if you're going to fry up the whole amount.

Lay the noodle rolls pieces in the hot skillet, and let them sear lightly. Use a spatula or tongs to flip them over to get both sides. If you are frying all the noodles, maybe go through the searing stage in two batches, so to not overcrowd the pan and remove the finished ones to a holding plate while you fry the second batch.

It only takes a couple of minutes to sear the noodle rolls on each side. Use that time to slice some red chiles and green onion, and to make the finishing sauce:

1 teaspoon dark soy sauce
2 tablespoons less-sodium soy sauce
1/8 teaspoon sugar
1/2 teaspoon toasted sesame oil
1 clove garlic, pressed

When the noodle pieces have seared on both sides, add of the seared noodles back into the pan just before you add the sauce. Add the finishing sauce and the red chile slices, and gently stir and fry until the noodles have a glossy brown coat. Plate the noodles, and top with green onions and a nice spoonful of XO sauce. Serve immediately.

Pan fried rice noodle rolls with prawns and snow peas

To make a meal of it, simply add some prawns and snow peas. You can sear them either before or after searing the noodle rolls, making use of a holding plate, and then just add it all together into the skillet (or wok!) before you add the sauce.

Proceed as above. Serves 2.

January 07, 2017

Turkey Congee


Congee (also called jook in Cantonese, amongst many other names worldwide) is a rice porridge popular throughout Asia, and there are many different ways to have it. At its most basic, it is a blank canvas for your favourite flavours, whether you need it to be soothing and restorative, or something a little more lively. It is almost infinitely customizable to what you already might have available in your kitchen. It can be meat-based, or vegetarian, or vegan. Congee isn't always made from rice (millet, mung beans, barley, and sorghum are some of the other variations), but rice is by far and away the most common version. It is a popular any time of day - from breakfast to late night, post-pub snack. Every time I make congee, I remember how much I love it, and vow on the spot to make it more often.

This version came from my desire to make something with the strong turkey stock that I made from the bones of our Christmas turkey. Since I'm generally pretty well stocked for Asian condiments and garnish-ingredients, I was able to make this with what was on hand.

It does take a while to cook, but it's fairly low effort, even so: stir it every so often, and it takes care of itself.

Turkey Congee

Serves 2

100 grams (about 1/2 cup) long or short grain rice
1 litre (4 cups) water
250 mL (1 cup) strong turkey stock
1/2 - 3/4 teaspoon coarse salt
1 cup diced or shredded cooked turkey meat

Garnishes

1 clove of fresh garlic, finely slivered
1 inch fresh ginger, finely slivered
1/4 cup thinly sliced green onion
cilantro leaves
slices of red chile pepper
a few drops of sesame oil

You can garnish lightly or heavily, depending on what you have on hand:

Other typical congee garnishes might include:

Youtiao (Chinese doughnut/cruller)
hot chile oil
soy sauce (not too much, or it will overwhelm)
peanuts
pork floss
fried shallots/shallot oil
preserved duck egg
lettuce (stirred in at the end)
sliced mushrooms
preserved greens
...and many more (and that's not even counting featured ingredients, such as the turkey in this version.

Wash your rice well in cool water. Meanwhile, bring the litre of water listed in the recipe to a boil in a medium-large soup pot, and once it is boiling, add the stock and the rice. Reduce the heat to medium-low until the mixture is bubbling enthusiastically, but not at a rolling boil, cock a lid half-on the pot (to let steam escape, and set the timer for 20 minutes. Feel free to stir occasionally.

When the timer goes, give everything a good stir, making sure there's nothing stuck to the bottom of the pan. I like a wooden spoon for this. Taste the broth, and add the salt. Start with 1/2 teaspoon (especially if you are using a salty, commercial turkey stock, or will be adding soy sauce later), and add more later if needed. Stir well and leave it to cook, uncovered, this time, stirring occasionally, for another 20 minutes on the timer.

When the second timer goes, check on it again. It should be much thicker (and more likely to start sticking to the bottom of the pot), but still not completely at congee-texture. These things take time. Stir it really well, and put the timer on for another 20 minutes, uncovered. At this time, you can chop or shred the turkey meat and have it standing by, and you can start to prepare the other garnishes.

When the timer goes for the third time, add the turkey meat to the congee, and marvel at how much thicker it has gotten. If it is too thick, feel free to add a half-cup of water (or more, but add only a little at a time) until it reach the consistency you like. Let the mixture cook, stirring frequently for 15 - 20 minutes, and then ladle into bowls. Top with the garnishes of your choice, and devour.

The below picture shows the finished congee, just before the garnishes are added. You can see a little of the turkey peeking through, but you can also see how thick the porridge itself is.

September 25, 2016

Oyakodon: Japanese Chicken & Egg Rice Bowl


Oyakodon, or "parent-child rice bowl" (in reference to the use of both chicken and egg in the same dish) is a beloved Japanese comfort food. It is simple food, quickly and easily prepared, packed with protein and satisfaction. It is also cooked without any additional fat, which means it doesn't taste or feel heavy.

It can be a wetter or drier dish, but in all the different oyakodon I've eaten over the years, the biggest point of variation that I've encountered is the amount of onions used. But, like many recipes that are based on loose formulae, you can really make your own decision about the relative levels of pretty much all of the ingredients, so once you know the basic formula and general ingredients, you can make it however you like. I like a moderate amount of onions and I add fresh ginger to mine, which isn't exactly canon, but goes beautifully.

This dish can also be halved for a simple supper for one.

Oyakodon

2 servings

2 cups hot, cooked Japanese rice

1 uncooked chicken breast or 2 chicken thighs
1 small-to-medium yellow onion
3 coins of fresh ginger
2 eggs, lightly beaten
1-2 tablespoons less-sodium Japanese soy sauce
1 tablespoon mirin
2 tablespoons sake
1/2 teaspoon sugar
1 cup vegetable stock (you can also use dashi, kombu stock)
1 green onion
Togarashi pepper blend, to taste

Peel and halve the yellow onion, and slice thinly lengthwise. Stack the ginger coins, and slice them into thin slivers. Clean the green onion, and slice it thinly on a steep angle. Slice the chicken breast horizontally into two filets, and slice those crosswise into strips.

In a shallow skillet over moderate heat, heat the stock with the sugar, mirin, saki, and soy sauce. Add the sliced yellow onion and the ginger slices, and push them down into the broth. Once the onions are translucent and a little of the broth has cooked down, add the chicken strips, and push them down into the broth. Cook the chicken for about five to seven minutes or until just cooked through.

Add the beaten eggs in a thin stream, pouring them evenly around the chicken in the skillet, pop the lid on for about 30 seconds until the eggs are just set, during which time you can divide the rice between two bowls. Using a large serving spoon, slide the chicken, onions, and eggs out of the skillet overtop the rice. Pour a little or a lot of the broth around the edges of the bowl to bring extra flavour to the rice.

Top each bowl with green onion and a sprinkle of Togarashi, and serve (I also added some toasted sesame seeds).

Traditionally, the egg is added at the very last minute (into the individual bowls, even), and cooked solely by the heat of the broth, chicken and rice, but I prefer to let the eggs set a bit more. If you're not sure how safe your eggs are to consume raw, definitely cook them through.

August 10, 2016

International Bento: Guam - Chamorro Red Rice


It's a funny thing, but I've been making this for quite a number of years, thinking that it was Mexican red rice. It is not. I mean, it makes sense, because Mexican cuisine makes good use of achiote seeds, and that is what gives the rice that nice red colour. I'm not even sure at what point I made the decision to make this dish, but it was cobbled together out of solid rice pilaf theory and the vague knowledge of Mexican red rice being a real thing. Which, of course, it is. It's just not this.

So recently, I had an idle moment of wondering how far my red rice differed from classic Mexican versions (taking into account that there are probably a few variations), and was startled to discover that what I was making didn't even come that close. Amused at my assumptions, I did a bit more creative googling, and discovered that what we have been happily devouring for several years now, is in fact a Guamanian dish called Chamorro red rice. The name Chamorro denotes the indigenous people of Guam (the name Chamorro also applies to the indigenous people from the Northern Mariana Islands).

Unsurprisingly, there are quite a few different styles of this dish, too, including everything from bacon to peas. While many of the recipes use a very generous amount of oil, mine is more modest, meaning that the rice can go comfortably with a richer dish without feeling too heavy.

The biggest difference that I found between my recipe and most of the others available online, is that I grind the achiote seeds and use the resulting powder in the dish, rather than simply soaking them in water to colour the water, which is then used to flavour and colour the rice.

Chamorro Red Rice

Serves 4

200 grams parboiled rice
1/2 tablespoon peanut oil
1/2 small yellow onion, finely chopped
2 cloves of garlic, minced or crushed
1 heaping teaspoon annatto seeds, ground
1/4 teaspoon coarse sea salt
1/2 teaspoon ground cumin
375 mL water and 1 teaspoon vegetable base (or equivalent vegetable broth)

Heat the oil in a medium pot (one with a tight-fitting lid). Sauté the onion and garlic in the oil, and then add the ground annatto, cumin, and salt. Stir well, then add the rice and stir until the grains are evenly coated with oil.

Add the water and vegetable base (or broth), stir, and bring to a boil. Turn the heat to the lowest possible setting, and allow to cook gently for 15 minutes (covered). Then remove the pot from the heat (don't just turn the burner off) and let it sit for another 5 - 10 minutes before you lift the lid. Fluff with a fork and serve.

So what else is in the bento pictured above? Smokey roasted chicken thigh (bone removed post cooking) and corn seasoned with lime juice, salt, and ancho powder.

I think this dish goes particularly well with Margarita Chicken.

March 28, 2016

Hot-Smoked Salmon & Fennel Kedgeree


A few weeks ago, we received a care package that contained two tins of hot-smoked wild fish from my home province of British Columbia: one BC sockeye salmon, and one BC albacore tuna. I don't have a huge repertoire of fish recipes - if you check out the seafood tag, you'll see mostly prawns, with only a few non-crustacean offerings. So, I've been thinking quite a bit about what to make with this unexpected bounty. The last time I had smoked tuna, I made Smoked Tuna Noodle Skillet Dinner, and the only salmon recipe I've posted is Salmon Corn Chowder.

I decided to use the salmon first. I did a little research online, asked friends on Facebook for suggestions, and even deliberated reworking previous recipes to use fish, but I wanted to make something new and interesting. Finally I remembered Kedgeree, a dish that had always caught my fancy for not only its interesting name but its entire multicultural history. I knew that most Kedgeree recipes call for smoked haddock or sometimes smoked mackerel, but I reasoned that the flavours should also be compatible with hot-smoked sockeye salmon.

Kedgeree is an Anglo-Indian dish, broadly considered to be descended from the South Asian class of rice-and-legume dishes called Khichri (also spelled Khichdi, kitchiri or khichuri, amongst other spellings), whose other culinary offspring might include Egyptian Kushari. Like its parent, Kedgeree has a lot of built in variability - wet or dry, whether you use ghee or oil, curry powder or separately blended spices, what kind of smoked, flaked fish, whether to include raisins. I went with a somewhat drier style, constructed more like a fried rice than a biryani, rice porridge or paella.

This qualifies as a skillet dinner if you have leftover rice to use.

Hot-Smoked Salmon & Fennel Kedgeree

Serves 3 - 4
Total Prep & Cooking Time: 20 minutes (if starting with cooked rice)

3 cups cooked basmati rice, fluffed and cooled, grains separated
4 tablespoons butter, divided
1 small yellow onion, chopped finely
1 small fennel bulb, trimmed and finely sliced (fronds reserved)
4 cloves garlic, sliced
1 red chile, sliced
1 tablespoon Madras-type curry paste
1/2 teaspoon ground cumin
1/2 teaspoon ground coriander seed
1 170 gram tin of hot-smoked wild sockeye salmon
2 boiled eggs
Fresh cilantro leaves
Freshly ground black pepper
Juice of half a lemon

If you need to cook rice from scratch for this recipe, it takes about 1 cup / 200 grams raw basmati, cooked however you like to cook rice. For optimal length and separation of grains, soak the rice in the cooking water for an hour or so before cooking. Be sure to separate the cooled grains of rice with your fingers (or a fork) before adding to the skillet.

Prepare your vegetables. Open and drain the scant liquid from the tin of salmon. Peel the boiled eggs, and slice them lengthwise into quarters. Tear up the fronds of fennel and put them with the cilantro for garnish.

Melt 2 tablespoons of butter in a large, non-stick skillet. Once it has foamed out, add the chopped onion and sliced fennel, and stir and sauté until translucent and the onion is starting to brown at the edges.

Add the curry paste and cumin and coriander seed, and stir through. Add the sliced garlic, and continue to sauté for a couple of minutes. Add the remaining 2 tablespoons of butter and stir until it has melted. Add the rice and half the red chile slices, and stir fry until the rice grains are all well coated with the buttery spices.

Add the salmon, breaking it into large and small chunks with your fingers. Stir gently through the skillet, so it doesn't break down entirely (unless you like it that way). When the salmon has been integrated and warmed through, serve in shallow bowls, garnishing with the remaining chile slices, the quartered eggs, the fennel fronds, and the cilantro leaves.
Finally, squeeze a little fresh lemon juice over each bowl.

We served this with kalonji (nigella seed) studded roti, but this would also be excellent with a bowl of dal on the side (and would feed more people). If I had thought of it in time, I would have served a dollop of curried eggplant chutney, too.

Kedgeree can be eaten hot or cold, and it was reported that this one heated up very nicely in the microwave the next day.

September 13, 2015

Chanterelle Risotto


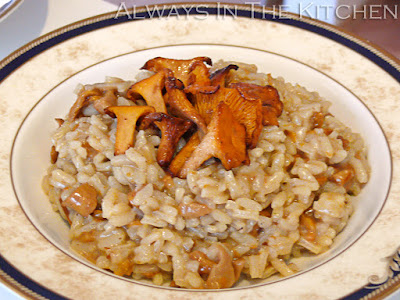
Late summer through fall is chanterelle season here in Germany. You will see market stalls piled high with Pfifferlinge, as they are called here, and you will see specials on the chalkboard of almost every restaurant: chanterelles with dumplings (especially a variety called Serviettenknödel), chanterelles with pasta, creamed chanterelles on toast, and of course, chanterelle risotto.

The secret to a nice mushroom risotto is not to overcook the mushrooms. I like to fry a few decorative ones in butter to set aside to use as a garnish, and then sauté the rest for the main risotto itself. By sautéing the mushrooms first, before anything else goes in the pot, it's easy to remove the lightly sautéed mushrooms to a plate to add back in later, so that they don't get that wrung-out squidgy quality that happens with overcooked mushrooms.

As always, everything that is not a feature ingredient in a risotto should be so finely chopped as to not exceed the size of a cooked grain of arborio.

Chanterelle Risotto

Serves 4

300 grams fresh chanterelle mushrooms
4 tablespoons salted butter, divided
2 shallots, finely minced (or small onions)
2 cloves of garlic, pressed or microplaned
220 grams risotto rice (I'm using Baldo here, but arborio is fine)
1/2 cup dry white vermouth (or dry white wine)
1/2 teaspoon coarse sea salt or Kosher salt
4 cups warm vegetable stock/broth (or mushroom stock)
juice of 1/2 lemon
1/2 cup freshly grated parmesan cheese

Clean your mushrooms and set aside the ones you want to use for garnish. Remove hard stem-ends from the rest, and roughly chop. Finely chop your shallots and press your garlic. Measure out everything else and have it standing at the ready.

In a large pot, such as a Dutch oven, heat 2 tablespoons of the butter and quickly fry the chanterelles reserved for garnish. Set aside, and then add the rest of the mushrooms to the pot. Sauté briefly, then set aside in a bowl until the risotto is almost finished.

In the same pot, add one more tablespoon of butter, and then add the shallots and garlic. Stir and sauté until slightly translucent, and then add the rice, stirring well to make sure none of the grains stick and burn. When the grains of rice are all coated with the butter and they start to catch at the bottom of the pan and a little golden colour starts creeping in to the bottom of the pan, add the vermouth (or white wine), all at once. Stir vigorously to make sure everything is scraped up from the bottom. Add the salt, and stir through.

The vermouth will disappear pretty quickly, so be prepared to start ladling stock into the rice. Use a small amount at first, just adding a little at a time, stirring well over medium heat, and waiting until most of the liquid has been absorbed before adding more.

When you are halfway through your stock, stir in the lemon juice. Continue to stir and add stock until you have no more liquid to add, and then return the reserved chopped mushrooms to the pot and gently stir through. Add the final tablespoon of butter, and stir through. Turn off the heat, cover the pan, and let stand for 5 minutes. Remove the lid and stir in the parmesan cheese. Spoon into shallow bowls and top with the reserved fried mushrooms, and maybe a little extra sprinkle of parmesan.

July 12, 2015

Chicken Plov — Chicken and Rice, Uzbek Style


I always associated plov with Russian cuisine -- partly because it has been adopted as the pilaf of choice for much of the former USSR, and partly because there were very few restaurants in my hometown (or, later, the city of Vancouver) featuring cuisine from Eastern Europe or Central Asia. Russian, you might be able to find in the city (or more likely, a blend of Russian and Ukrainian dishes), but not much luck trying to find restaurants featuring Georgian, Kyrgyz, or Uzbek food.

Plov, as it turns out, is ultimately a traditional Uzbek dish. By any other name, it might be palov, polov, or pilav, or perhaps more recognisably pilau, pulau, polow, pilaf, or almost any other spelling imaginable. It is considered a manly sort of dish to cook, the making of which can take on similar cultural overtones (sometimes similarly proprietary) to the idea of the masculine art of barbecue in North America. Traditional Uzbek plov is made with lamb (or mutton), which necessitates a long simmering time before the rice is added, to ensure that the lamb is tender and the connective tissues have all melted into an unctuous, satisfying texture. However, you can also make it with beef, and increasingly it is being made with chicken, whose speedy cooking time means the dish is on the table much, much faster. It is also easy and delicious, which are the only reasons that you need, to decide to make it.

Chicken Plov

Serves 4

400 grams boneless skinless chicken
1 head garlic plus 2 cloves
1 medium onion, finely diced
1 large or 2 medium carrots, grated
2-3 bay leaves
1 teaspoon ground cumin
1 teaspoon ground coriander seed
pinch ground turmeric
1/2 teaspoon white pepper
1/2 teaspoon coarse salt (optional)
1 tablespoon olive oil
1 tablespoon duck fat (or more olive oil)
200 grams long grain rice
2 cups (500 ml) heated chicken broth or stock
1 - 2 tablespoons vodka

Finely chop the onion and 2 cloves of garlic. Slice the chicken (thigh is best, breast is also fine) into bite-sized chunks. Peel (if necessary) and grate the carrot coarsely. You could julienne the carrot if you prefer. Remove the outer layers of paper from the head of garlic, leaving the head whole, but the cloves still encased in one layer of skin. Use a very sharp knife to slice off the tip of the head of garlic, and set the whole head aside (tips can be added to the onions and chopped garlic).

In a medium-large pot or wok (the one I used is probably a little too big for this amount of food, and would have been perfect for a double recipe), heat the olive oil over a medium heat until just shimmering. Add a third of the chicken in a single layer, and let sizzle for 30 seconds or so before you stir through once, push the cooked pieces to the outside edge, and add the next third of the chicken. Continue until all the chicken has been lightly seared on at least one side, and remove to a holding plate.

Into the emptied pot, add the duck fat, the onions and minced garlic, and the salt (if your broth or stock is quite salty, you might want to omit the salt). Sauté until the onions start to change colour, and then add the carrots. Continue to sauté, and add the bay leaves, turmeric, white pepper, ground cumin and coriander. Stir and cook for a few minutes, until the carrots are wilting down nicely. Deglaze by adding the vodka to the pot, and scraping up any flavourful bits that might be stuck to the bottom.

Return the chicken to the pot, along with any juices that have accumulated on the holding plate. Pour the uncooked rice evenly over the chicken, smoothing it flat, and then gently pour the hot broth/stock/water over the rice, being careful not to disrupt the surface any more than is necessary. Smooth the rice a little again, if you need to.

Take the prepared head of garlic and plunge it cut-side down into the rice, leaving the root-end sticking up just a little. As soon as the liquid is starting to bubble a little, cover the pot with a tight-fitting lid, turn the heat to the lowest possible setting, and let cook undisturbed (no peeking!) for 17 minutes. When 17 minutes is up, still without lifting the lid/peeking, turn the heat off completely, and remove the pot to a resting place (a pot holder, or an unheated burner) for another 17 minutes. This time, when the 17 minutes is up, you are ready to serve.

You can upend it onto a fancy platter, or you can simply stir it through and spoon it into shallow bowls.It should be moist and fragrant, but not overly wet. Remove the garlic first, and squeeze the tender, fragrant cloves of garlic out of their skins by putting pressure around the base, scattering the cloves over the rice or dividing them amongst serving dishes. Some preparations call for a whole head of garlic per person being served, but I'll leave that up to your discretion. I've served it here with Ukrainian pickled tomatoes.


Leftovers reheat beautifully.

May 13, 2015

Easy Weeknight Risotto Bolognese


This was inspired by Nigella Lawson's recipe for Risotto Bolognese from her book Kitchen, but to be honest, I didn't really follow it. I skimmed the ingredient list and directions and decided that it was more about the idea, the fact of combining two normally discrete dishes into a delicious juxtaposition, and then I just ran with that. Consequently, my ingredients, ratios and even my method ended up being quite different from hers.

The shortest possible version of this recipe goes something like this: Build a bolognese sauce, and then use that as a base to build a risotto on top of. That of course depends on the cook knowing what normally goes into both of those things, and otherwise being willing to take the rest on faith. Fortunately, that's me. This is a true skillet dinner, without the need to remove anything to a separate plate or pan at any point during the cooking process.

I won't claim that this is a really serious Bolognese (note the use of "Easy Weeknight" as a modifier), but it's a meaningful nod in the general direction, and for this dish, that's good enough for me. Although, if you happen to have some genuine Bolognese tucked away in your freezer that you want to use instead, go for it. It's not a lightning-fast dish to make - risotto takes time, after all, but it's very straight forward, and if you use a chop-and-drop method, it all comes together surprisingly quickly.

Easy Weeknight Risotto Bolognese

Serves 4

4 thin (or 2 thick) slices of bacon, finely chopped
1/2 tablespoon olive oil
1 small onion, very finely diced
2 cloves of garlic, crushed or minced
1 medium carrot, peeled and grated
400 grams minced beef/pork blend (or meatloaf mix)
2 teaspoons beef stock paste (such as Better Than Bouillon or Alnatura Rinderbrühe)
pinch dried oregano
big pinch dried basil
big pinch ground white pepper
1/2 cup whole milk
1/2 cup vermouth
2 tablespoons tomato paste
1 400 gram can of finely chopped tomatoes
1 cup arborio (or other suitable risotto rice)
4 cups hot water from a recently boiled kettle
Fresh basil, for finishing and garnish
Freshly grated parmesan

In a large heavy skillet, over medium-high heat, fry up the bacon until it is a bit crispy and releases its fat into the pan. Add the olive oil and stir through. Add the onion and garlic, and stir through. Stir and cook until the onion is thoroughly softened and translucent. Add the grated carrot, and stir through, cooking for about five minutes until wilted and starting to become tender, and the excess liquid has evaporated.

Add the minced meat and stir, breaking it up with a big wooden spoon as you go. Fry and stir until the meat is a little browned, and then add the stock paste, oregano, dried basil, white pepper, and the vermouth. Stir and scrape up the bottom of the skillet while until the vermouth has evaporated. Add the milk in two stages, stirring until mostly evaporated in each case. Add the tomato paste, and stir through. Add the chopped tomatoes and their juices and stir through.

Let the mixture get completely hot and bubbly, and then stir the rice in. Reduce the heat to medium. Add a bit of water from the kettle, and stir until the extra water is absorbed by the rice. Basically, at this stage you just keep repeating that, adding the water a bit at a time, stirring between additions until the water is mostly absorbed, until you've either used all the water, or the rice is cooked to your liking. The rice will slowly absorb not only the water but the juices from the sauce itself, the grains swelling to full size and taking on a creamy appearance. The combination of the carrots and the tomatoes will give the finished dish a uniquely orange-red tone, quite different from most meat/tomato based sauces, but it coats the rice grains beautifully.

When all of the water is absorbed and the rice grains are cooked to your satisfaction, spoon into shallow bowls and garnish with basil and freshly grated cheese. And maybe some garlic bread.

If you have leftovers of this, it reheats very nicely in a covered casserole in the oven (you will want to add in a bit of water, and poke some holes to allow speedier reheating), and I imagine it would reheat well in a microwave, too. If you must reheat it on the stovetop, try not to over-stir it. While it's stirred to death during the making, after it is fully cooked, cooled, and reheated again, it can get a bit mushy if you stir it too vigourously.