August 26, 2015

Chicken Tikka Masala


There are a lot of origin stories about Chicken Tikka Masala, and a lot of claims to ownership. As far as I can tell, there's no way to even verify which country the dish originated in, let alone the specific claimant.

Some folks will tell you that this is not a proper curry, but that is quite ridiculous. It may not be a historical dish, but it's in no way illegitimate because of that. It's delicious and acceptable and popular. At it's heart, it is derived from an Indian tandoori dish called Chicken Tikka - marinated chicken cooked in a tandoor (Indian clay oven), although according to Wikipedia, the Punjabi version is simply cooked over coals. The chicken is usually marinated in yoghurt and spices, and is typically cut into chunks and cooked on skewers. Where the masala bit comes in, is when you take a perfectly good (or maybe a little dry?) Chicken Tikka, and simmer it gently in a spiced tomato sauce, enriched with yoghurt at the end. There are, of course, many iterations, including one of the origin stories, which claims that an undiluted can of Campbell's Tomato Soup was the base of the sauce.

There is likely no place on earth where Chicken Tikka Masala is more popular than the UK, where it appears to be fast approaching (or even edging out) the traditional Sunday roast as most beloved national dish. You can get Chicken Tikka Masala pre-packaged sandwiches in the Tesco, which gives you an idea of the market penetration of the dish.

Versions of Chicken Tikka Masala that are made using commercial Tandoori paste often have a pink tone to the gravy and the outer surface of the chicken itself. Since that is derived using a food colouring that I don't usually have in my kitchen, I skipped it and simply went with a turmeric-forward spice mixture that is often used for Chicken Tikka. If yours must be pink, skips the spices listed below in favour of the commercial paste, and slather the chicken pieces liberally with it.

I don't have a tandoor oven, which is probably no surprise, nor do I have a kitchen set-up conducive to cooking with coals. This is my home kitchen version, adapted from many different sources, but this one from Palachinkablog in particular.

Chicken Tikka Masala

Serves 4

2 tablespoons ghee or vegetable oil, divided
400 grams boneless chicken, in chunks
2 tablespoons turmeric
2 tablespoons ground cumin
1 tablespoon cayenne
1 teaspoon ground coriander seed
1/2 teaspoon kosher salt
1 large onion, grated
4-5 cloves garlic, pressed
1 inch fresh ginger, grated
500 mL tomato passata (or unseasoned tomato purée)
1/2 teaspoon sugar (optional)
1 cup full-fat plain yoghurt
1 tablespoon cornstarch

As always with Indian food, prep your mise en place completely before you start cooking. Put your basmati rice on to soak in its cooking water, too. Start to cook the rice just before you start to cook the chicken (unless you are using a rice cooker, in which case, time it to be ready when the chicken is done - about a 35 minute total cook time).

Combine all of the dry spices except the salt, and toss the chicken pieces in the mixture until they are all nicely coated. Set aside. You can do this in the morning, or at any point during the day, but bring back up to room temperature before cooking.

In a large skillet or a dutch oven, heat half the oil or ghee very hot and sear the chicken in batches, without cooking through, and remove the chicken to a holding plate as you go. When all the chicken is seared, add the rest of the oil and the grated onion, pressed garlic, and grated ginger, and any accumulated juices therefrom. Stir and scrape the pan, add the salt, and continue sautéing the onion mixture for about 5 minutes or so until just tender. Turn down the heat to medium-low and add the passata, and stir and scrape to ensure that the bottom is free of any stuck-on bits. After a couple of minutes, taste the sauce. If it is a little bitter from the tomato addition, add the sugar. If not, just proceed.

Add the seared chicken (and any residual spices) into the sauce, and turn the heat to its lowest setting. Let the chicken simmer very gently for 15 - 20 minutes. Take the pan off the heat. Combine the yoghurt and cornstarch and stir until smooth. Add a bit of the tomato sauce to the yoghurt, and stir it in, before adding all of the yoghurt mixture into the dutch oven. Stir through, watching to colour lighten and turn orangey. Cover and let the residual heat cook the cornstarch for about five minutes - just enough time to fry up some Indian-spiced Cabbage on the side, or make a fresh chutney or maybe a grated carrot salad, since your grater is already out. Your rice should also be done (and waiting patiently). If you happen to have some cilantro on hand, that would make a very nice garnish.

August 03, 2015

Southern Spoon Bread


It has been a long time since I last made Southern Spoon Bread, which is an egregious oversight. This is one of the few recipes that I still have from my teen years, handwritten on a 3x5" index card, from when I realized that I should make my own copies of all of my favourite recipes. After making it today, I'm reminded how much I like it, and what an interesting option it can make to round out a dinner. Or a breakfast. Or a snack.

Southern Spoon Bread is a kind of cornbread, or a kind of baked polenta, or maybe a kind of soufflé; maybe it's all of these things.

It is leavened solely with beaten egg*, which gives it a moist, wobbly, delicate texture when it first comes out of the oven, as well as a soufflé's tendency to deflate almost immediately. Made without wheat flour, it is naturally gluten free (check your own cornmeal supply to verify, of course, if that's a concern), and it is so tender and soft that you need a big spoon to serve it up -- it won't hold its structural integrity well enough to slice in a more conventional manner.

Southern Spoon Bread

Serves 4 - 6

1 cup yellow cornmeal
1 3/4 cups water
1/2 teaspoon salt
2 teaspoons butter
1 cup milk
2 eggs, separated, whites beaten to soft peaks

Preheat your oven (rack in the middle slot) to 375 F / 180 C. Butter a 2 quart capacity shallow baking dish - I used a 7x11" Pyrex dish.

Separate your eggs, putting the whites into a large-enough bowl that you can use a whisk or mixer to beat them until they are soft peaks, and setting the yolks aside into a separate small bowl.

In a medium saucepan or cooking pot, heat the water over medium heat until just simmering. Add the cornmeal in a steady stream, whisking constantly, until smooth. Add the salt and continue to whisk and cook until the mixture becomes stiff and thick. Remove the pan from the heat, add the butter and roughly half of the milk, and continue to whisk until smooth.

Add the remaining milk to the egg yolks, and whisk until smooth, and then add the yolk/milk mixture to the cornmeal mixture, and whisk it in until the mixture is completely smooth and everything is integrated.

Add the beaten egg whites to the cornmeal mixture, and fold the mixture gently with a wide spatula until the egg whites are thoroughly incorporated without any clumps. Bake, uncovered, for 30-35 minutes, or until puffed up and golden on top.

Serve immediately, spooning the bread onto individual plates.

If you have any leftover spoon bread, once it cools and sets more firmly you can slice it and fry it up in a skillet. You can serve it for breakfast (with or without syrup) or dinner alongside your main course.

*My original recipe is hardcore Southern-style, and does not call for the eggs to be separated, simply beaten well. If you choose this method, you might want to bump your oven temperature up to 400 F/200 C to ensure it puffs up nicely.

July 18, 2015

Chickpea & Carrot Salad with Tahini Dressing


We're well into salad season. Every thought of actually cooking something when the temperature keeps spiking outside is accompanied by a shudder, and a look around for alternatives. Alternatives such as letting someone else do the cooking, perhaps, or maybe just preparing something that doesn't require heat.

This simple salad works really well as a dinner salad, or as a take-to-work/school lunch, takes very little time to prepare, and lets me continue my love affair with tahini unabated.

You could, of course, cook the chickpeas yourself, in which case do that however you like best. In the interests of a no-heat meal, however, this recipe is made with canned chickpeas (or, if you've got some home-cooked ones stashed in the freezer, by all means use those instead).

Chickpea & Carrot Salad with Tahini Dressing

Serves 2

1 400 gram can of chickpeas/garbanzo beans, drained and rinsed
50 grams of grated carrot (about 1 medium)
1 green onion, finely sliced
1 cup loose-packed cilantro, washed and roughly chopped

Tahini Dressing (only half needed for this recipe)

3 tablespoons tahini (stirred well)
1/2 teaspoon salt
Juice of half a lemon
1 clove garlic, pressed or pureed
1 tablespoon olive oil
cold water, if necessary, to made a thick salad-dressing consistency

This should all be pretty self-explanatory. In a large bowl, combine the salad ingredients (I hold the cilantro to the very end, though, and add it after the dressing).

In a small bowl, combine the dressing ingredients, mixing well with a fork (or one of those mini-whisks, if that's what you like). I didn't need to add water, here, but if you find your dressing is too thick or is clagging up (as often happens if you're down at the bottom of the tahini jar), add a little cold water, a tablespoon at a time, and stir until it becomes creamy again.

Add half the dressing to the chickpeas, carrots, and green onion, and stir through. Add the cilantro, and stir through again. Serve immediately, or transfer to a sealable container and chill until you're ready to eat.

If you happen to live near a Turkish bakery, or are feeling extra industrious and unafraid of baking during the heat, I highly recommend picking up a nice cheese or spinach gözleme (soft flatbread with baked-in filling) to have alongside this.

July 12, 2015

Chicken Plov — Chicken and Rice, Uzbek Style


I always associated plov with Russian cuisine -- partly because it has been adopted as the pilaf of choice for much of the former USSR, and partly because there were very few restaurants in my hometown (or, later, the city of Vancouver) featuring cuisine from Eastern Europe or Central Asia. Russian, you might be able to find in the city (or more likely, a blend of Russian and Ukrainian dishes), but not much luck trying to find restaurants featuring Georgian, Kyrgyz, or Uzbek food.

Plov, as it turns out, is ultimately a traditional Uzbek dish. By any other name, it might be palov, polov, or pilav, or perhaps more recognisably pilau, pulau, polow, pilaf, or almost any other spelling imaginable. It is considered a manly sort of dish to cook, the making of which can take on similar cultural overtones (sometimes similarly proprietary) to the idea of the masculine art of barbecue in North America. Traditional Uzbek plov is made with lamb (or mutton), which necessitates a long simmering time before the rice is added, to ensure that the lamb is tender and the connective tissues have all melted into an unctuous, satisfying texture. However, you can also make it with beef, and increasingly it is being made with chicken, whose speedy cooking time means the dish is on the table much, much faster. It is also easy and delicious, which are the only reasons that you need, to decide to make it.

Chicken Plov

Serves 4

400 grams boneless skinless chicken
1 head garlic plus 2 cloves
1 medium onion, finely diced
1 large or 2 medium carrots, grated
2-3 bay leaves
1 teaspoon ground cumin
1 teaspoon ground coriander seed
pinch ground turmeric
1/2 teaspoon white pepper
1/2 teaspoon coarse salt (optional)
1 tablespoon olive oil
1 tablespoon duck fat (or more olive oil)
200 grams long grain rice
2 cups (500 ml) heated chicken broth or stock
1 - 2 tablespoons vodka

Finely chop the onion and 2 cloves of garlic. Slice the chicken (thigh is best, breast is also fine) into bite-sized chunks. Peel (if necessary) and grate the carrot coarsely. You could julienne the carrot if you prefer. Remove the outer layers of paper from the head of garlic, leaving the head whole, but the cloves still encased in one layer of skin. Use a very sharp knife to slice off the tip of the head of garlic, and set the whole head aside (tips can be added to the onions and chopped garlic).

In a medium-large pot or wok (the one I used is probably a little too big for this amount of food, and would have been perfect for a double recipe), heat the olive oil over a medium heat until just shimmering. Add a third of the chicken in a single layer, and let sizzle for 30 seconds or so before you stir through once, push the cooked pieces to the outside edge, and add the next third of the chicken. Continue until all the chicken has been lightly seared on at least one side, and remove to a holding plate.

Into the emptied pot, add the duck fat, the onions and minced garlic, and the salt (if your broth or stock is quite salty, you might want to omit the salt). Sauté until the onions start to change colour, and then add the carrots. Continue to sauté, and add the bay leaves, turmeric, white pepper, ground cumin and coriander. Stir and cook for a few minutes, until the carrots are wilting down nicely. Deglaze by adding the vodka to the pot, and scraping up any flavourful bits that might be stuck to the bottom.

Return the chicken to the pot, along with any juices that have accumulated on the holding plate. Pour the uncooked rice evenly over the chicken, smoothing it flat, and then gently pour the hot broth/stock/water over the rice, being careful not to disrupt the surface any more than is necessary. Smooth the rice a little again, if you need to.

Take the prepared head of garlic and plunge it cut-side down into the rice, leaving the root-end sticking up just a little. As soon as the liquid is starting to bubble a little, cover the pot with a tight-fitting lid, turn the heat to the lowest possible setting, and let cook undisturbed (no peeking!) for 17 minutes. When 17 minutes is up, still without lifting the lid/peeking, turn the heat off completely, and remove the pot to a resting place (a pot holder, or an unheated burner) for another 17 minutes. This time, when the 17 minutes is up, you are ready to serve.

You can upend it onto a fancy platter, or you can simply stir it through and spoon it into shallow bowls.It should be moist and fragrant, but not overly wet. Remove the garlic first, and squeeze the tender, fragrant cloves of garlic out of their skins by putting pressure around the base, scattering the cloves over the rice or dividing them amongst serving dishes. Some preparations call for a whole head of garlic per person being served, but I'll leave that up to your discretion. I've served it here with Ukrainian pickled tomatoes.


Leftovers reheat beautifully.

June 25, 2015

Bacon, Egg, & Mustard Scones


Breakfast muffins and breakfast biscuits have become a very dependable item for casual and fast food restaurants, and I know a surprising number of people who make them at home. Me, for example. It's a pretty easy breakfast that one can make with a minimum of fuss, although items such as bacon will of course add to the dirty dish count. Sometimes, however, you might want the convenience of a homemade biscuit without the need for actually cooking anything right at that minute. If you have a stash of these charming, bite-sized scones - where the bacon and egg and already incorporated right into the dough - you're just that much closer to the grab-and-go breakfast of your dreams.

Okay, okay. These do not fully replace the kinds of biscuits (or English muffins) stuffed with freshly-fried or scrambled egg (plus cheese and/or bacon), which of course have a different character than these scones. But they're quite satisfying, and a nice change from sweet, fruit-studded scones if that's your usual fare.

These are adapted from the Australian Women's Weekly Home Library publication "Muffins, Scones & Breads". As with the Chocolate Guinness Cupcakes, the heavy lifting here was done by my friend James, while I stuck to my moderately autocratic, slightly bossy, kitchen maven routine.

Bacon, Egg, and Mustard Scones
Adapted from Australian Women's Weekly

Makes 16 - 20

4 rashers bacon, fried, drained and crumbled
335 grams cake flour
4 teaspoons baking powder
1/2 teaspoon baking soda
1/2 teaspoon salt
90 grams butter
2 hardboiled eggs, finely chopped
1/4 cup freshly grated parmesan, plus 2 tablespoons extra
3 tablespoons finely chopped fresh chives
1 tablespoon wholegrain Dijon mustard
1 cup (250 mL) whole milk

We made these in a cast iron skillet, which is pretty old school.

Preheat the oven to 450 F / 220 C. Warm your cast iron pan gently on the stovetop to take the chill of it (it should be a little warm, but not hot.

Sift together the flour, baking powder, baking soda, and salt. Cut in the butter with a pastry blender (or a fork, or two knives, as you see fit), until the bits of butter are no larger than the size of a small-ish green pea. Add the bacon, egg, Dijon, chives, and 1/4 cup of parmesan, and stir through with a fork, making sure everything is evenly distributed.

Make a well in the centre, and pour the milk in. Stir very rapidly with a fork until it all comes together. If it is too wet, add a bit more flour until it's not quite so sticky (a little bit sticky is okay). Turn it out onto the counter. Mix with your hands, until you can gently massage it into a thick, flat dough.

Use a biscuit cutter to cut out the individual pieces (do not twist the cutter, or you will inhibit the rise of the scone as it bakes - straight up and down is the way to go). Use a knife if necessary to loosen them from the counter so you can move them into the skillet, arranging them so that they're close to each other but not quite touching. You might need to do two batches, depending on the size of your skillet.

Brush the tops of the biscuits with a little milk (or cream - not listed above), and sprinkle with the remaining bits of grated parmesan. Bake in the preheated oven for about 15 minutes, or until tall and golden. Remove to a wire rack to cool.

Because these have meat in them, store them in the refrigerator (in a sealable bag or airtight container) after they've cooled completely. They're not a good item to hold at room temperature for long.

If you prefer them warm, pop a cooled one in the microwave for about 15 seconds.

June 15, 2015

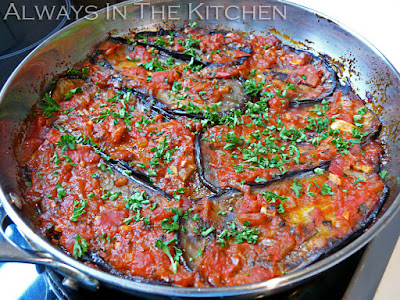
Imam Bayīldi - Turkish Eggplant Casserole


Traditional recipes for Imam Bayīldi involve stuffing hollowed out eggplants (or halved eggplants) with onions and spices, and braising them in a surfeit of best quality olive oil until tender. I've made some serious versions in the past, but they've always felt like a lot of work for something that is primarily a side dish to me (although I acknowledge that it makes a terrific main course for lunch). So, naturally, I was very excited to see this streamlined casserole version from Feed Me Phoebe.

The slightly scandalous name, which translates "The Priest Fainted" has entertaining stories as to why exactly, the Imam keeled over - everything from swooning at the deliciousness to fainting at the cost (or sheer amount) of the olive oil. Various other versions abound in the Eastern Mediterranean, varying the spices, or in some cases the vegetables. I assume that there are versions of this that date back to considerably before the introduction of the tomato, but it seems that the tomato-and-onion version is one of the most popular.

Imam Bayīldi

Serves 4

2 small (but not baby) eggplants
Kosher or coarse sea salt
Olive oil (about a third of a cup, total)
1 small yellow onion, finely diced
2 large garlic cloves, minced or pressed
1/4 teaspoon chile pepper flakes
Dash of cinnamon
Dash ground white pepper
400 mL canned diced tomatoes, with juices
1 tablespoon tomato paste
1/4 cup finely chopped fresh parsley, divided

Prepare the eggplants by removing the cap and slicing lengthwise into 1/2 centimetre thick slabs. If you cut them into coins, it's much harder to get even coverage of the pan without gaps, so lengthwise is by far the better way to go for this dish. Dissolve a generous tablespoon of salt in hot water, and then add cold water until you have about six cups in a large bowl. Add the eggplant slices and allow them to brine for 10 minutes, or up to 8 hours. Drain, rinse, and press the slices firmly with paper towels or fresh linen towels to dry them out.

In a medium skillet (this one is a 24 centimetre steel skillet), heat a tablespoon of olive oil over medium-high heat until it just shimmers. Tilt the pan to ensure the bottom of the pan is well coated. Have a receiving plate standing by. Fry the dried-off eggplant slices, in batches, with a little extra olive oil added between each batch, just until golden on each side - about one or two minutes per side. Remove them to the nearby plate as they finish to make room for the next pieces.

Preheat your oven to 180 C (350 F) with a rack in the middle.

When all the eggplant has been fried, start building the sauce in the same (now emptied) skillet. Start by adding a little more olive oil (this is the last addition of olive oil), and then add the onions and garlic. Add a pinch of salt (not much, especially if your canned tomatoes are salty) the chile flakes, the cinnamon, the white pepper, and half of the parsley. Sauté until translucent and tender, and then add the diced tomatoes and their juices, and the tomato paste. Cook altogether until it starts to resemble a sauce, about four or five more minutes. Then remove about 2/3 to 3/4 of the sauce to a nearby bowl, wipe down the edges of the skillet, and start layering the eggplant into the skillet, on top of the bit of sauce that should nicely coat the bottom of the pan. Alternate the layers of eggplant with the layers of tomato sauce, and try to stack the eggplant slices in so they cover the surface of the pan in a neat, jigsaw like fashion. Make sure the top layer is sauce (ideally a thin layer of sauce so you can admire the prettiness of the eggplant slices), and place it, covered, in the preheated oven. If I use small eggplants, I only get two layers from them, but that works nicely with the amount of sauce.

Bake covered for 25 minutes, and then remove the cover and bake for another 20 minutes. Remove and allow to cool somewhat before serving. Garnish with remaining parsley.

This dish is often served at room temperature or even chilled, so it makes a surprisingly good picnic dish (or take to work dish). Paired with a nice chickpea salad, it's a beautiful, satisfying lunch.

June 08, 2015

Ayam Pedas Asam - Indonesian Sour Spicy Chicken (and International Bento: Indonesian)


Although there is a version of this dish called Ayam Goreng Asam, Sour Fried Chicken, where the chicken is first fried in oil before the sauce is added to the pan, this one has zero added fat. This suggests to me that I can pair it with a richer side dish without the overall meal feeling heavy, but in this case I was in a hurry to use up some cauliflower, so I just roasted that with some curry powder (and a bit of oil) instead.

The butchers and supermarkets here don't offer boneless chicken thigh, for some reason, and it turns out I'm too lazy to bone them out myself, so I've made this with breast. Thigh would be juicier, of course, so if you can get it, go for it.

While this dish is essentially just a meat-and-gravy dish, I think that a bit of Asian eggplant would go beautifully with the other flavours here, so I may try that next time.

Ayam Pedas Asam

Serves 4

500 grams boneless chicken thigh or breast
2 lemongrass stalks
3 cloves garlic
1/3 cup tamarind concentrate (soaked, pulp squeezed & pureed, or prepared)
1/2 cup water
1 teaspoon kosher or coarse sea salt
2 teaspoons ground coriander seed
1/2 teaspoon turmeric
1 teaspoon palm sugar (or date sugar, or raw sugar)
1/2 teaspoon ground white pepper
3 star anise stars
3 Makrut lime leaves (fresh or frozen)
1-2 hot red chiles (such as Thai bird chiles), sliced or minced (or sambal oelek to taste)


Cut the chicken into large chunks, and set aside in a stain proof, non-reactive bowl.

Trim the ends of the lemongrass, and remove the outer tough layers. Slice one into thirds, and cut a vertical slit down to the core along their whole lengths,. Chop the other lemongrass up fairly finely, and put it in your blender or mortar.

If you are using a blender, add the garlic, salt, water, and sugar to the lemongrass, and blend until as smooth as possible. If you are using a mortar, grind the lemongrass with the salt. When mostly smooth, add the garlic, and continue until you have a smooth paste.

In a bowl, mix the lemongrass/garlic paste with the tamarind concentrate, coriander, turmeric, white pepper, chile(s), and anise stars. Scrape the mixture over the chicken, and stir well to thoroughly coat each piece. If you used the mortar method, add the water and sugar at this stage, too.

Let the chicken marinate for 20-30 minutes, or overnight, covered, in the fridge.

Place the chicken and marinade into a large skillet over medium heat, and add the lime leaves. Continue to heat until the liquid is quite bubbly, and then reduce the heat and let cook very gently, turning the chicken pieces occasionally, until cooked through, about 10-15 minutes.

If you still have a lot of liquid in the pan, remove the chicken pieces to a plate, and vigorously boil the sauce until it has thickened and reduced. Add the chicken pieces (and any accumulated liquid) back into the pan, turn the heat off, and gently stir around so that the thicker sauce now nicely coats each piece of chicken.

Serve over scented rice or basmati, with the vegetable side dish of your choice.


May 27, 2015

Orange Blintzes with Warm Strawberry Sauce


Blintzes, either sweet or savoury are ultimately a particular handling of the ever-so-versatile crêpe. They are a bit decadent and a little fiddly to make, but can be prepared a day in advance (or frozen, if you have the freezer space for it), and a wonderful item to look forward to - especially for breakfast or dessert. Their origin appears to be central and eastern European, with the Russians, Hungarians, and Poles (and maybe more) all laying claim (and infinite regional variations). They were popularized in North America by the Jewish population, where they are a holiday favourite (particularly for Shavuot) and are also a Shrove Tuesday classic for Christians.

Because this is meant to be a luxurious, festive dish, I am using my recipe for the egg-rich French-style crêpes, but after consulting a lot of references, I decided to go with what appears to be the standard method, namely cooking the crêpe itself only on one side until the top becomes somewhat dry, and using that as the inside surface of the wrapped blintz.

Living in Germany, quark is the natural cheese of choice for the filling, although ricotta would also work nicely. These are sweet, with both sugar and orange marmalade in the filling, but not too sweet. I've topped them with fresh strawberries that have been warmed in melted marmalade, but you do run the risk of the strawberry flavour dominating. The solution for that would be to use peeled mandarin slices instead of strawberries, so that the orange flavour stays consistent. We were pretty happy with the combination of flavours, although the orange was a little overwhelmed.

Orange Blintzes with Warm Strawberry Sauce

Makes 6 Blintzes

Wrapper

1/2 recipe egg-rich crêpes
butter for frying finished blintzes

Filling

250 grams quark
3 tablespoons cream cheese
2 tablespoons sugar
2 tablespoons orange marmalade
1/2 egg, beaten
zest of one orange (optional)

Sauce

2 tablespoons orange marmalade
2 tablespoons water (or one tablespoon water, one tablespoon lemon juice)
6-8 fresh strawberries, sliced

First thing: I have not lost my mind when I call for half an egg in the filling. A half-recipe of the crêpes calls for one and a half eggs, and the filling calls for half an egg. I simply beat two eggs until smooth, and then remove 2 tablespoons of beaten egg to use in the filling, reserving the remaining 1 1/2 eggs for the crêpe batter. Easy. Of course, if you decide to double the recipe, you can operate in terms of whole eggs.

You can make the filling ahead and store it in the fridge while the batter for the crêpes rests, and then cook all of the crêpes before you start filling them. You do want to make sure the crêpes have cooled at least to room temperature before filling, though, or the filling will start to melt and slide around, and the rolled-up blintz will be super floppy and hard to transfer to a plate or skillet; I know this from curse-laden experience. Let your crêpes cool! Spread them on a cooling rack until they're all cooked, and then start with the oldest to fill them. By the time you get to the last crêpe, it should be cool enough to handle without melting everything.

Cook the crêpes according to the recipe in the link, but only cooking on one side. As soon as the top of the crêpe is dry looking, remove the crêpe to a cooling rack and start the next one. The dry "top" side of the crêpe will be the inside of the finished blintz.

Fill the blintzes by piling a couple of tablespoons' worth of filling on the lower third of the cooled crêpe. Fold the bottom up just to cover the filling, and fold the sides in, envelope (or burrito) style. Continue to roll up until the blintz is a tidy package. It may take a few tries to get the shape the pleases you most - longer and thinner, or shorter and squarer. Your choice.

Move the filled blintzes to a tray or plate, cover with plastic wrap, and chill up to one day. At that point you could move the tray to the freezer until they are frozen solid, and then pile them carefully into a bag for longer-term storage. Or, you could fry them up right away.


You can make the sauce ahead, too, but it is best made just before you fry the blintzes. Melt the marmalade and water together and stir until smooth. Add the sliced strawberries (or orange segments) and stir gently until glossy and coated with the glaze. Turn off the heat.

Blintzes should be fried in butter, for the best flavour. They don't take very long, so make sure your attention is not needed elsewhere. If you're also making other items, or you're making a double batch, you can make the blintzes and keep them hot in a warm oven until you're ready to serve.


Heat a knob of butter in a large skillet over medium-high heat. When the butter has foamed out, start laying your blintzes in a single layer in the pan. I find my 12-inch skillet works very nicely for 6 blintzes at a time. As soon as the blintzes are golden and starting to crisp on the underside, carefully turn them over using a spatula or flipper - don't try to use tongs, because they are far too delicate. When both sides have browned nicely, transfer to the tray in the pre-warmed oven, or serve immediately.


Just like with crêpes, there are many ways to finish blintzes. If you've made the strawberry sauce, go ahead and spoon that over the plated blintzes, but you could also go with powdered sugar with-or-without a squeeze of fresh lemon juice, or a pile of mixed fruit on the side, for example. A few curls of orange zest would be beautiful on these - I would have absolutely done that, if I had had a fresh orange on hand.

Enjoy.

May 22, 2015

Papaya & Camembert Quesadillas


There used to be a restaurant called "Latin Quarter" on Vancouver's Commercial Drive. In its heyday it was renowned as a place with great live music (and dancing on Fridays and Saturdays), cheap pitchers of sangria, and a tasty latin and latin-fusion menu. We became familiar with it really only in its dying days, but there are a few menu items that we ordered over and over because they were so good.

There were three quesadillas on that menu: Shrimp & Cheese (I cannot precisely remember what kind of cheese, but it was a creamy white melting cheese, perhaps Edam), Brie & Mango, and Camembert & Papaya. They were all good, although the fruit ones were my favourites. They came served with a fresh tomato salsa, and while I was happy to eat them plain, the salsa did add a surprisingly nice dimension.

This recipe is so simple that it's really more of a serving suggestion. Realistically, you could just look at the title and decide to make it. The only tip that might not be intuitive is that the papaya should, ideally, be sliced into large, thin half-moons, to ensure it doesn't slide out of the quesadilla while you're trying to slice (or eat) it. I've tried it both ways, and this works best.

We served this with pan-seared cumin and ancho chicken breast alongside, but it could easily have been accompanied by some thick beans and guacamole for a vegetarian option. Or on its own, as a snack or appetizer.

Since the flour tortillas that I have found here in Germany have been the terrible pre-packaged kind with a shelf life of six months, I now make my own. Generally I plan to make a batch of 9 at some point during the weekend, and then use them as needed throughout the week (all at once for enchiladas, of course). Having the tortillas on hand already made this dinner a super fast weeknight option.

Camembert & Papaya Quesadillas

Per person:

2 6-inch flour tortillas
4-6 thin half-moon slices of papaya (enough to completely cover a tortilla)
4 thick slices of Camembert
a little cilantro (optional)
vegetable oil

Preheat your oven to 180 C / 350 F (especially if you need to make these in batches) with a baking sheet warming in the oven.

Preheat a heavy skillet (cast iron is ideal) over medium-high heat.

Brush the tortillas very lightly with oil on one side each. If you are doing multiple quesadillas, only brush them with oil just before you're going to cook each one, so they don't get soggy.

Place the first tortilla oil-side-down on the hot skillet. Let it crisp a little, and get golden spots on the underside, and remove from the pan and set aside. Repeat with the second tortilla, but after it has been in the pan for long enough to get a bit warm, lay out the slices of Camembert across the tortilla. When the cheese starts to melt, add the layer of papaya. If you're feeling cheese-crazy, you can add more cheese on top of the papaya. Peek at the bottom of the tortilla by slipping a spatula under the edge, and if it is nicely golden, add the first tortilla back as a "lid" (golden side up) and transfer the quesadilla to the tray in the warm oven. The cheese will continue to melt and the papaya will warm a little as you prepare the next quesadilla.

To serve, remove the quesadilla to a cutting board, and cross-chop into quarters. Serve with fresh salsa (if you have it) or hot sauce on the side. Cilantro garnish is totally optional, but does go nicely.

May 13, 2015

Easy Weeknight Risotto Bolognese


This was inspired by Nigella Lawson's recipe for Risotto Bolognese from her book Kitchen, but to be honest, I didn't really follow it. I skimmed the ingredient list and directions and decided that it was more about the idea, the fact of combining two normally discrete dishes into a delicious juxtaposition, and then I just ran with that. Consequently, my ingredients, ratios and even my method ended up being quite different from hers.

The shortest possible version of this recipe goes something like this: Build a bolognese sauce, and then use that as a base to build a risotto on top of. That of course depends on the cook knowing what normally goes into both of those things, and otherwise being willing to take the rest on faith. Fortunately, that's me. This is a true skillet dinner, without the need to remove anything to a separate plate or pan at any point during the cooking process.

I won't claim that this is a really serious Bolognese (note the use of "Easy Weeknight" as a modifier), but it's a meaningful nod in the general direction, and for this dish, that's good enough for me. Although, if you happen to have some genuine Bolognese tucked away in your freezer that you want to use instead, go for it. It's not a lightning-fast dish to make - risotto takes time, after all, but it's very straight forward, and if you use a chop-and-drop method, it all comes together surprisingly quickly.

Easy Weeknight Risotto Bolognese

Serves 4

4 thin (or 2 thick) slices of bacon, finely chopped
1/2 tablespoon olive oil
1 small onion, very finely diced
2 cloves of garlic, crushed or minced
1 medium carrot, peeled and grated
400 grams minced beef/pork blend (or meatloaf mix)
2 teaspoons beef stock paste (such as Better Than Bouillon or Alnatura Rinderbrühe)
pinch dried oregano
big pinch dried basil
big pinch ground white pepper
1/2 cup whole milk
1/2 cup vermouth
2 tablespoons tomato paste
1 400 gram can of finely chopped tomatoes
1 cup arborio (or other suitable risotto rice)
4 cups hot water from a recently boiled kettle
Fresh basil, for finishing and garnish
Freshly grated parmesan

In a large heavy skillet, over medium-high heat, fry up the bacon until it is a bit crispy and releases its fat into the pan. Add the olive oil and stir through. Add the onion and garlic, and stir through. Stir and cook until the onion is thoroughly softened and translucent. Add the grated carrot, and stir through, cooking for about five minutes until wilted and starting to become tender, and the excess liquid has evaporated.

Add the minced meat and stir, breaking it up with a big wooden spoon as you go. Fry and stir until the meat is a little browned, and then add the stock paste, oregano, dried basil, white pepper, and the vermouth. Stir and scrape up the bottom of the skillet while until the vermouth has evaporated. Add the milk in two stages, stirring until mostly evaporated in each case. Add the tomato paste, and stir through. Add the chopped tomatoes and their juices and stir through.

Let the mixture get completely hot and bubbly, and then stir the rice in. Reduce the heat to medium. Add a bit of water from the kettle, and stir until the extra water is absorbed by the rice. Basically, at this stage you just keep repeating that, adding the water a bit at a time, stirring between additions until the water is mostly absorbed, until you've either used all the water, or the rice is cooked to your liking. The rice will slowly absorb not only the water but the juices from the sauce itself, the grains swelling to full size and taking on a creamy appearance. The combination of the carrots and the tomatoes will give the finished dish a uniquely orange-red tone, quite different from most meat/tomato based sauces, but it coats the rice grains beautifully.

When all of the water is absorbed and the rice grains are cooked to your satisfaction, spoon into shallow bowls and garnish with basil and freshly grated cheese. And maybe some garlic bread.

If you have leftovers of this, it reheats very nicely in a covered casserole in the oven (you will want to add in a bit of water, and poke some holes to allow speedier reheating), and I imagine it would reheat well in a microwave, too. If you must reheat it on the stovetop, try not to over-stir it. While it's stirred to death during the making, after it is fully cooked, cooled, and reheated again, it can get a bit mushy if you stir it too vigourously.