November 22, 2008

Roast Pork Shoulder

There isn't much about the pig that I don't like, culinarily speaking. I'm a huge fan of pork tenderloin, which is about as low-maintenance a piece of meat as you can find - tender, lean, boneless, and I'm very fond of ham dinners, as well - preferably from a nice, country-cured red ham, but I'll take an Alton Brown-style city ham with gingerbread crust, too. However, while I do pork chops, tenderloin, ribs, ham, and all manner of sausage (and I've roasted a pork loin or two), I've never really tried my hand at the classic Roast Pork. I recently decided that it was high time I did.

If there is a culture that is pre-disposed towards expertise in the roasting of pork, it is Cuba. Roast pork sandwiches are a national dish, after all - either as "cubanos" or the smaller, snacktacular "medianoches". Where does the pork come from for these ubiquitous favourites? From a nice, seasoned roasted pork shoulder. The Cubans call it "pernil".

Start with a lesson from the best, I say!

I staggered back from the grocery store with a whopping (to me) 5.5 lb. boneless pork shoulder roast, and proceeded to do the following:

Cut some deep, short cuts into the roast (think shallow stabs with a pointy carving knife). Slather thoroughly with marinade, allow to rest, covered, at room temperature (but in a sealed environment, in this case my cold microwave) for three hours, then roast fatty-side up in a 350 F. oven for 3 hours (covered with tinfoil), uncover, remove juices to make gravy, and roast at 400 F. for another half-hour until dark golden brown. The internal temperature for those counting such things, was 170 F., which co-incidentally is the "pork/veal" setting on my probe thermometer. Allow to stand for fifteen minutes before roasting - which gives you more than enough time to make gravy.

And do, please do, bother to make gravy. A little roux, a little wine, about half of the juices from the pork, and a little water is all you need - no further seasoning required. Not only is it lovely on the black beans and rice that you should be serving with this, it makes an excellent medium for re-heating slices of pork for dinner the following day (assuming, of course, that it isn't all going to be et at once, or saved for cold sandwiches).

The pork was meltingly tender, thoroughly seasoned, and wonderfully flavourful - and possibly, even better the next day, re-heated in its gravy.

I should mention that classic pernil is made with a shoulder that is skin-on, to give a wonderful crackling, but that option was not available to me.

Here is the marinade:

4 cloves garlic
5 teaspoons kosher salt
1 tablespoon black peppercorns
1 handful fresh oregano leaves

All pounded to a smooth grey-green paste in the mortar & pestle, to which is then added: 2 tablespoons white wine vinegar, and 3 tablespoons vegetable oil.

This definitely requires an encore performance, and soon! Because it serves a lot of people, it would be perfect for a casual dinner gathering, so that might be just the thing.

October 11, 2008

Chocolate Peanut Butter Granola

I know that I may be getting a little bit repetitive. I'm guilty of kicks, jags, and culinary obsessions, and I make little effort to get over it. But, when faced with the need for more granola to make it through my workday mornings, I thought...why not add chocolate and peanut butter to it?

Oh, yeah.

Essentially, that's exactly what I did. I took the recipe for Pirate Granola, and used a half-cup of smooth organic peanut butter instead of a quarter-cup oil. Then I sprinkled it fairly liberally with Cocoa Camino's organic dark cocoa powder, and let it ride. My regular granola is a lot less sweet than most versions that I've tried, and since I didn't add extra sugar for this version, it's about as non-sweet as you can anywhere. My co-workers pronounced it suitable for sprinkling on yoghurt, but I just eat it by the handful, while I work.

When I was looking at various recipes for chocolate granola, I considered Nigella's. She suggests that raisins have no business in a chocolate granola, and having flouted her advice, I suspect she's actually right. When I make this again, in oh, say, three or four granola-cycles from now, I will omit the raisins. I may, in fact, opt for whole peanuts instead of my favourite almonds, just to heighten the whole peanut-factor. We shall see - my granola making does tend to be a bit mood-driven (not to mention what's-in-the-cupboard driven).

I did notice that this version of granola had more clusters than my Pirate Granola, which I suspect is a function of peanut butter's inherent stickiness. Clearly, more research is required.

September 27, 2008

Vegetarian Pizzas

I don't have any revelations about vegetarian pizza, really. I haven't found some new, hitherto undiscovered topping that requires me to shout from the rooftops. I've just been reminded that sometimes the simple things are really, really good.

The pizza above has those most classic of vegetarian pizza toppings: artichoke hearts, roasted red peppers, good black olives, and cheese (in this case, a nice Monterey Jack), and a slightly spicy, garlicky tomato sauce. I refrained from adding more and more and more toppings, which used to be my pizza downfall, and let the combined flavours hum along in harmony.

The pizza below, is a very, very simple pie based on my memories of post-nightclubbing slices devoured at a long-departed establishment that stayed open until 3:00am downtown. The deceptively simple pesto pizza. Really, all you need is a good, home-made crust (expired link removed, please see comments below for recipe), and a good, home-made pesto, and the cheese of your choice. No tomatoes. No chunky bits. Just you and the pesto and the crust. For cheese, I opted to use some of the Jack (as above), and some parmesan, which is simply a component of the pesto. You don't need a lot of cheese - and you will need to shore up the edges of your crust a little to avoid spill-age if your crusts get any oven-spring lift to them. Just smear the pesto on, sprinkle the cheese, and ignore the pang of sadness that you feel when the beautifully bright pesto turns dark, olivey green from the heat of the oven.

I've learned a thing or three about pizza crust, in the years that I've been, ahem, studying.

1) Don't add too much flour. A looser dough has better texture
2) It doesn't matter if you forget to add salt to the crust, just sprinkle a little on the dough before you add the toppings (or use salty toppings, like feta).
3) The longer and slower the rise, the better the crust - airy, chewy, complex and delicious.

The two pizzas above were made with a batch of dough that was stirred up just before heading out to meet some friends for drinks. I only used a small amount of yeast (1 teaspoon for a double batch of dough, whereas many recipes - including my master recipe - use up to a tablespoon per pie). Three hours, on the counter, later, the dough was well-risen, soft, pliable, and ready to be stretched into shape. I can actually toss pizza crust, but generally I just pat it back and forth in my hands, like a chapatti, until it is big and round, and then flop it on a cornmeal-lined pizza pan and finish pressing it out to the edge.

I'm definitely going to try the low-yeast, slow rise thing again - it has wonderful schedule flexibility potential, and I feel the urge to experiment a little. Next time, maybe some other classics: pepperoni mushroom, perhaps (always a favourite), spinach and feta, or my personal guilty-pleasure - the cheeseburger pizza.

September 11, 2008

A Soup For All Seasons: Borscht

I had just about given up on summer. Before this glorious September sneaked up on us, I was frantically soaking up as much sunshine and warmth as I could, trying to store it up for the depths of December, when I would most miss it. I started, as the weather started to turn to wet, to make soup.

Borscht is one of those dishes that engenders strong opinions in its adherents. Should it be beets alone, or with cabbage? Should there be meat stock, or should it be vegetarian? Carrots? Do you add wine, or just vinegar? Should it be hearty, a meal in itself, or a starter for cabbage rolls, pyrohy, and sausage? Should it be hot or cold? Chunky, or smooth? Truth is, you can serve it any way you like. Cold and pureed in the summer, hot and chunky in the autumn and winter, clear, spare and delicate in the spring. There isn't a season that doesn't have its borscht.

The funny thing is, most folks who acknowledge their love of a good bowl of borscht like the variations just fine...they simply may not consider them to be proper. You know, the grail borscht, the standard from which all others are merely delicious anomalies.

My favourite version comes from Diane Forley's lovely work Anatomy of a Dish which is required reading for the botanically inclined cook. I haven't altered it much at all, going with the full cup of red wine and full cup of red wine vinegar, but I've cut the sugar down to a lean 1 tablespoon, whilst she allows (gasp!) as much as 2/3 of a cup, which I think is the short train to crazyville. Beets, especially roasted ones, are quite sweet enough. However, she gets my big seal of approval for eliminating much of the tedium of borscht making - she doesn't grate or chop the raw beets. She roasts them, skin and all, and when they are done you can simply slip the skins right off. If you have roasted them a little more al dente, so to speak, you may need to grasp the roasted (and cooled) beet in a clean cloth, such as a washable jaycloth, and briskly rub to remove the skins. I do so under running cool water, which minimizes any potential mess. It is marvelously easy - and has less waste than using a vegetable peeler.

I also note that Forley suggests that this recipe serves 8. What she doesn't mention, is that this would be eight starving farmhands. If you're simply serving it as a generous appetizer, it would easily serve 20. It's a lot of soup. My freezer is now full of it, in fact. But, really, there's no sense in making a tiny pot of borscht. Go big, and dine off it for a couple of months.

Borscht
adapted from Anatomy of A Dish, by Diane Forley

Serves 8 (farmhands).

1½ lbs. baby beets, roasted, peeled and diced
2 onions, diced
2 celery stalks, diced
2 carrots, diced
¼ head red cabbage, sliced
2 tablespoons olive oil
4 cups chicken stock
4 cups water
1 cup red wine
1 cup red wine vinegar
1 tablespoon sugar
1 cinnamon stick
2 cloves
1 bay leaf
1 sprig of fresh thyme
1 waxy potato, diced (Forley recommends a russet, but I find them too mealy)

To roast the beets, seal them in a foil pouch with a spritz of olive oil, and roast at 400° F for approximately 1 hour, or until a knife slides easily into one. Remove, allow to cool for fifteen minutes, and rub the skins off under cool water. Dice and set aside.

In a large Dutch oven, sauté the onion, carrot, celery and cabbage in the olive oil with a little salt and pepper until vegetables soften and become translucent. Add the diced beets, stock, water, spices/seasonings, sugar, wine and wine vinegar. Bring to a gentle simmer and allow to cook for 15 minutes. Add the potato and allow to cook for another 15 minutes. Taste, re-season as necessary, and serve. If you're a fan of dill, sprinkle some over each bowl, but it certainly doesn't need it.

A note on dicing: beets do not shrink down, so dice them to the size you want to find in your spoon, when you are eating.

August 31, 2008

Last Rays of Sunshine (Paella with Tomatoes)

It has not been a stellar summer, here in the permanently damp Pacific Northwest. August, usually our go-to month for griping about the heat and languishing over drinks on patios about town, has been a disappointment most of the way through. So, now that the sun has come out again, however briefly, and given that it's the end of August, it seemed like a good idea to go for a dish that in itself evokes sun-drenched days and summer lassitude. I'm talking paella.

I have never made paella before. It's one of those dishes that seems a bit scary, all fraught with rules, and despite having spent a couple of weeks in Spain, I'm not as familiar with Spanish cuisine as I might be. It's not a well-represented style, around here. However, I do remember from my travels that I encountered many a diverse dish that all claimed to be a type of paella, which encouraged me that there are a variety of acceptable variations - and probably some devious restaurateurs who will call anything made with rice a paella to get some tourist dollars.

In the spirit of full disclosure, the dish that I made would probably properly be designed an "arroz" in Spain, because a) the pan it was made in (not a proper paella pan, simply a big ol' non-stick skillet) and b) much of the cooking time is spend in the oven. Not, therefore officially paella, even though its oven-time was uncovered, to allow the dish to roast, as opposed to steam.

The recipe I chose to take a whack at is none other than Mark Bittman's Paella with Tomatoes. It promised to be fairly quick and painless, and that is exactly what I was looking for. However, since I wasn't serving vegetarians, I decided to meat-it-up a little. My brief search for serrano ham was unfruitful, so I settled for thick-cut lean prosciutto, which I then cut into matchsticks (or rather, Palle cut into matchsticks, since cutting anything is hard for me these days), and rounded it out with a half-pound of large, raw prawns. I also added some sliced green olives (which had been stuffed with garlic, yum) because the flavours just seemed to go.

Other than that, I followed the linked-above recipe fairly closely. I added the matchsticks of ham with the onions, I tossed the sliced olives with the raw tomato wedges (heirloom tomatoes, an orange brandywine type and a green zebra), and I added the peeled prawns to the top of the pan when it had just seven minutes left to go in the oven. The only real divergence from the recipe methodology was to add the saffron to the warmed veggie stock, as opposed to simply plunking it in with the tomato paste.

I learned a few useful things:

One, I used too much saffron. My version of a large pinch may have been just a smidge too large. It didn't render it inedible, or even unenjoyable, but for future reference, a medium pinch would be better. There is a very slight bitterness to saffron, which becomes exacerbated when used in too-great a quantity. A little goes a long way.

Two, I should have tossed the shrimp with a little of the olive oil and maybe a dab of paprika, before adding them to the pan. While they were plump and delicious, they did sit on top looking a bit like an after-thought. A little pre-emptive anointing would have taken care of that beautifully. When I was in Spain, the prawns that arrived on a paella were inevitably in head-on fashion, but I wanted this to be simple to eat. If I had left the prawns at least in their shells, however, I could have added them with the tomato layer at the beginning of the oven time, and they would have integrated into the dish a bit more.

Three, while heirloom tomatoes make a very sexy salad, there's something unsettling about green tomatoes coming out of the oven. Not a huge objection, but I found myself thinking that red tomatoes might have been more beautiful.

Four, the quality of the olives counts. Enough said.

Five, the slightly caramelized roasted tomatoes were fantastic. I wouldn't dare try this with insipid supermarket orbs.

With all of those things in mind, it is really only a matter of time before I make this again, incorporating my new-found experience and, since it produces such a lot of food, maybe even for guests.

August 12, 2008

Gluten-Free Granola Bars

I'm taking advantage of the cooler weather today to make Pirate Granola, which I have already shown on this site, so I thought that I would share this picture that has been lurking around my hard drive, waiting for its chance.

After the success I had with the granola, I decided to take a whack at granola bars. Of course, I turned to trusty Alton Brown for help. His recipe on the Food Network website looked like a great place to start, so I did.

Making this dish gluten free was actually pretty easy, providing you can get "clean oats" which are certified gluten free. If not, you might want to try substituting quinoa flakes, but I haven't tried that yet. Alton's recipe called for wheat germ, for which I substituted besan, a gluten-free chickpea flour used in Indian cooking.

It made quite a lot of granola bars, actually. See the link above for the original recipe.

Granola Bars
Adapted from Alton Brown's recipe on Food Network

2 cups old-fashioned rolled oats
½ cup raw pumpkin seeds
1 cup sliced almonds
½ cup chickpea flour(besan)
½ cup honey
1 tablet of palm sugar (approximately ¼ cup packed dark brown sugar)
1 tablespoon unsalted butter, plus extra for pan
2 teaspoons vanilla extract
½ teaspoon kosher salt
6 ½ ounces (total) raisins and chopped dried apricots

Butter a 9 x 9-inch glass baking dish. Preheat the oven to 350° F.

Spread the oats, pumpkin seeds, almonds, and besan onto an edged baking sheet. Toast in the pre-heated oven for about 15 minutes, stirring occasionally.

Combine the honey, brown sugar, butter, extract and salt in a medium saucepan and place over medium heat. Cook until the sugar has completely dissolved.

Once the oat mixture is toasted, remove it from the oven and reduce the heat to 300 degrees F. Immediately add the hot oat mixture to the liquid mixture, add the dried fruit, and stir to combine. Turn mixture out into the prepared baking dish and press down (firmly, but not insanely firmly) to distribute the mixture evenly. Bake for 25 minutes. Remove from the oven and allow to cool completely.

You may need to lever the entire thing out of the baking dish with a spatula in order to cut it, that’s okay. Cut into squares and wrap well in waxed paper. Store in an airtight container in the fridge for up to a week, or freeze for a month.

July 27, 2008

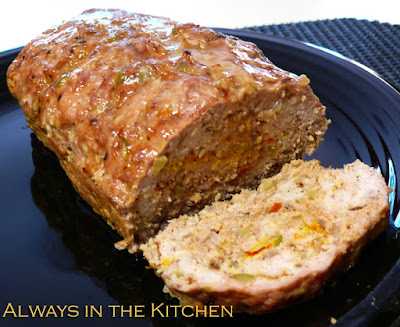
Spanish Meatloaf

I don't recall eating any meatloaf in Spain. I do recall albondigas, the wonderful little meatballs, which I mostly encountered as tapas in Barcelona. This is different. This was inspired by a rather successful (if you don't count me pretty much scorching the buns) dinner of Spanish-inspired pork burgers, the recipe for which was in Eating Well magazine. I greatly enjoyed the flavours of the finely chopped Manzanilla olives and the earthy saffron. It was as different (in a good way) a burger as I'd had in a very long time.

Since, a few days later, I still had a quantity of both sautéed onion rings and lemon-saffron mayonnaise left from the original dinner, I decided to redux the dinner. However, instead of the potato salad that I served with the burgers, I went with an orzo-chickpea salad with lemon dill dressing, and instead of fussing around with individual burgers, I made the whole thing into a meatloaf, so I could have leftover slices for sandwiches.

I was unable to find sufficiently lean ground pork on this particular shopping excursion, so I settled on half medium pork and half ground turkey, which also turned out to be pretty delicious. I also decided to actually add some saffron right into the meat mixture, which is what gives the little swirls of vibrant yellow that you can see in the photograph. The flecks of red are diced pimento. It worked very well: the flavours stayed true to the original recipe, the meatloaf was moist and tender - partly thanks to the well-minced sautéed onions.

It was fun, a little different, and definitely in the running for repeats. I may even decide to make them into little albondigas, and serve them as a party snack - with a little dipping sauce made from the lemon-saffron mayonnaise, on the side.

July 12, 2008

Salad Days Are Here Again (Sesame Peanut Noodles)

I love interesting salads, and summer seems to be the time when they really come out to play. I've made much of lentil salads, and couscous or quinoa salads, and of course the ever-beloved potato salads and pasta salads.

Sometimes a salad is really all you want for dinner, on hot, summer days, something light and refreshing and vegetably. There's a lot of ways to get your fix. Greek and Turkish chopped salads are always a good side dish for food cooked on the grill, or to add a civilized touch to a burger feast. The ingredients generally vary from cook to cook, based on individual preferences, and once you find the ways that speak to you, they become ingrained. It can be a challenge, sometimes, to accept someone else's version of something you love, but that's a whole different story.

The salad above is the Sesame Peanut Noodles from Nigella Express, from which I have already made a number of recipes, generally to good effect. This was no exception.

I had to fiddle a couple of things, because my peanut butter was a little on the dried-out side, so I needed to add a little more oil and a little warm water to sufficiently lubricate the ingredients into a sauce consistency. I also don't stock sweet chili sauce, so I simply used sambal oelek and a tiny drop of honey to balance its heat.

I also didn't blanche the vegetables, which may or may not have made a huge difference - I may try it that way next time, just to see what difference it really makes, but at the time I just wanted to get on with things. I did slice the peas, though, because I thought they would integrate better that way; I think I was right. I used fresh steam noodles from the grocer's, and cooked them as directed, since the already-cooked noodles looked a little too oily, for my tastes, and it worked just fine.

Finally, and you won't see it in the picture, because the photo is of the stash relegated to the fridge (it does indeed make rather a lot of food, this recipe) and I wanted it to be available for the vegetarian staying with us, I added some sliced chicken from a chicken breast that I quickly sauteed while everything else was going on. The chicken was a definite hit, and made the dish very much into a suppery sort of affair. I would do that again in a heartbeat, because I love the way the chicken soaks in the sauce, and the combination of the bright lime juice and vegetable flavours against the sultry back notes of toasted sesame oil and peanut.

The leftovers were lovely to take to work the following day, as promised. This is one for my permanent summer salad rotation. Joy!

June 26, 2008

Coconut Ginger Noodles (with extras)

I've been wanting a good Coconut Ginger Noodle recipe for some time. Variations abound online, but they often contain strange ingredients, such as tomato paste, or look like a coconut-y version of Pad Thai, which is not what I was looking for, albeit more or less in the same family. I've been tinkering for a while now, and I've figured out a pretty nice recipe that can be made as a simple side dish or gussied up with shrimp and vegetables to make a full-on meal. Aside from the tedious peeling of the shrimp, if you're making it as a main course, this is very quick to make! However, the wonderful texture of using raw shrimp more than makes up for the fifteen minutes of drudgery.

Coconut Ginger Noodles

250 grams dry rice stick noodles
400 ml. coconut milk
1/4 teaspoon ground ginger
2 medium cloves garlic, crushed
3 cm fresh ginger root, grated or minced
3 - 5 kafir lime leaves (dry or fresh)
1/4 teaspoon ground lemongrass
1 red bird chile (Thai chile)
salt to taste
juice of 1 lime
1 green onion, finely sliced
pinch cayenne pepper (optional, if you want it spicier)

Bring a large pot of water to boil and have it standing by for the noodles. Don't cook them yet.

In a large skillet, over high heat, add the coconut milk, the white part of the sliced green onion, the garlic, ginger root and powder, lime leaves, lemon grass and a good pinch of salt. simmer for 5 to 7 minutes, uncovered, and allow the liquid to reduce. Taste the sauce (carefully!) and add more salt if necessary. Turn heat to medium-low and allow to continue to simmer. Add a little water if it starts looking too thick.

Drop the rice sticks into the boiling water and allow to cook for 3 minutes. While it cooks, stir the lime juice into the coconut sauce. Taste the sauce , and add a little more ginger powder, and the optional cayenne, if you like. Drain the noodles in a colander, then rinse with cold water to stop the cooking process and cool them down. Add the noodles to the coconut sauce, turn off the heat, and stir through carefully so that all of the noodles are coated with the coconut sauce. Garnish with the green part of the sliced onion.

Extras to make it a meal:

Shrimp: peel 450 g. of raw shrimp (frozen works fine, just soak them in cool water for a few minutes to loosen them up). Add to the coconut sauce just as you drop the rice sticks into their pot of boiling water. Stir them until they are pink on all sides.

Snow peas & red peppers: julienne a red bell pepper, and cut a good handful of snow peas each once on the bias. Add to the sauce at the same time as the noodles, and stir/toss through. No pre-cooking or blanching required!

June 20, 2008

Scottish Oat Bread

It's not bread in the sandwichy-way, which may be immediately noticable from the photograph. Rather, it's bread in the tea-time way, or perhaps in the ginger way. That is to say, in some ways, it bears a resemblance in taste and texture to old-fashioned, cake-style gingerbread (as opposed to gingerbread cookies), except that it doesn't contain ginger. Although, of course, you could add some.

I am aware that I am rambling.

This recipe dates back at least to the 1970s, when my mother acquired it from a friend (who was not Scottish, it should perhaps be noted) and immediately adopted it as a favourite. It may not be, in fact, Scottish, in the same way that the salad toppings we know as Russian or French dressing are not really Russian or French. Perhaps the presence of oats, or the combination of oats and molasses (although Scottish cuisine is heavier on treacle, than molasses) leads to the association.

However, the fact I have yet to see any recipe from Scotland that appears similar (with the possible exception of Broonie), does not mean that it isn't really Scottish, either. What really raises my suspicions is the fact that there is no added fat of any kind. No lard, no butter, no oil... only the naturally occurring fat in the eggs and buttermilk/yoghurt, really. Which just does not seem very Scottish, to me. Perhaps one of my kind readers can shed some light on whether this recipe does owe its heritage to Scotland or thereabouts - I encourage you to do so, as I would really like to know.

So, without further meandering, here is my mother's recipe for Scottish Oat Bread. It makes two squat loaves, stores well in fridge or freezer (or countertop, even, for about a week if it's not too warm/humid), and it makes a very tasty breakfast when toasted and lightly spread with cream cheese.

Scottish Oat Bread

2 eggs
2/3 cup blackstrap molasses
1/2 cup brown sugar
2 cups buttermilk or yoghurt
2 teaspoons baking soda
3 cups stoneground whole wheat flour
1 teaspoon kosher salt
1 teaspoon baking powder
1/2 cup rolled oats
1/2 - 2 cups nuts or raisins (optional)

In a medium mixing bowl, beat together the eggs, molasses, sugar, and buttermilk. In another bowl, mix all of the dry ingredients - the flour, oatmeal, baking soda, baking powder, and salt. Dump the dry ingredients on top of the egg and molasses mixture, and stir gently with a wooden spoon or spatula, just to combine. About half way through the stirring, add the raisins or nuts, if you like.

Divide batter between two lightly greased or oil-spritzed regular-sized loaf pans. Bake at approximately 350 F. for 35 - 45 minutes, depending on your oven. A toothpick or cake tester should come out clean.

Serve fresh and warm with a little butter, or cold with cream cheese.