Showing posts with label Vegetarian. Show all posts

January 16, 2016

Preserved Lemon


We spent last Christmas in Marrakech, and returned with a reignited love of North African flavours. The single most notable ingredient in Moroccan cooking, from my perspective, is the generous use of preserved lemon that occurs in everything from tagines to tangia, couscous to zaalouk. It is a key component of many of the signature dishes of the region.

I've talked about the wonderful depth of flavour one can get with preserved lemon in my Lemon Risotto recipe. Historically, I've made an Indian version of preserved lemon, namely a modified Nimbu Ka Achar (not the sweet version), which has the additional flavourings of a smidge of cayenne and turmeric, giving the finished condiment a deeply burnished yellow appearance, and a lightly spicy fragrance from the additional seasonings.

Today, I decided to make a more classic version, because I've planned a lot of Moroccan recipes in the next few months. The lemons will take about a month to cure before I can use them, and will continue to get better and better after that.

Preserved Lemon

1 sealable 500 ml canning jar with a clean new seal

4 unwaxed lemons
3 tablespoons coarse salt

Wash the lemons really well. If you have the misfortune to have access to waxed lemons only, you can clean them thusly: In a colander, pour boiling water over them to heat/loosen the wax. Immediately place them in a cool vinegar water bath. One lemon at a time, rub the wax off using a scrub made of baking soda and coarse salt on a damp, clean kitchen cloth. Rub and scrub and rinse under cool water, until the skin squeaks (like tupperware) when you rub it. Dry well and set aside. Or, you can google for a different wax removal system that suits you.

Fill your clean canning jar with boiling water, and let it stand. Let some of the water run over the inside of the lid, too, so it's best to do this in a clean basin or handy kitchen pan.

On a clean cutting board, slice three of the lemons lengthwise into eighths. Traditionalists leave the lemons joined at one end, that is to say, not cutting the whole way through, but I find it's quite hard to fit them all into the jar that way. So, I do one the traditional way, and the others I just slice into eighths. Discard any seeds.

Empty the boiled water from your jar. Sprinkle a little of the coarse in the bottom, and start layering your lemon wedges and salt into the jar, using all of the salt. If you are doing traditional lemons, connected at one end, pack some of the salt between the slices and into the middle. The lemons should just nicely fill up a 500 ml jar. Finally, take your last lemon, and squeeze the juice out. Discard the empty husks, and pour the juice over the salted lemon slices, and seal the jar. The juice will not cover the lemons, but rather will fill about half-way, depending on how juicy your lemons are.

That's pretty much all the work. Put the jar on a counter where you will see it every day, and once per day turn it upside down and back again, to make sure all the lemon gets bathed in the juice. After about four weeks, you can move it to the fridge, and you don't have to turn it anymore. Over time, the lemons will start to break down a bit, releasing more juice into the jar, and dissolving some of the pulp.

To use, unseal the jar and use a clean fork to extract however many segments you need. Re-seal the jar, and return to the fridge. I've kept one as long as a year and a half, with no signs of deterioration. The combination of salt and the extremely acidic environment seem to keep it from growing mould or unfriendly bacteria. That being said, food safety, folks. If something does go wrong with yours, and it starts growing something or smelling funky (in a bad way, because it does smell a bit funky in a good way already), use your judgment. I've never had one go bad on me, but I'm not ruling it out.

29 days to go...

November 22, 2015

Cranberry Sauce with Orange & Sherry


It's that time of year again. Canadians have already had Thanksgiving, Americans are just revving their KitchenAid™ motors and/or checking travel schedules.

Cranberry sauce has a place on many of our holiday tables. In North America, wherever there is a roast turkey, cranberry sauce must not be far behind. For some folks, it's as easy as opening a can and upending the contents into a bowl, and for others, it takes a little more time, but really not by much. Plus, you can make it ahead. Freeze it, if you're really super organized (labeled, of course) or just store it in a sealed container in the fridge for a few days before the big event.

This version is made with a bit of orange juice instead of water, and a splash of sherry (optional) at the end. It takes about fifteen minutes to make. If you like your cranberry sauce sweet, go with the full amount of sugar. If you prefer it tart, use the lesser amount. If you're not sure...well, you can always add more sugar later.

Cranberry Sauce with Orange & Sherry

340 grams fresh or frozen whole cranberries
3/4 cup - 1 cup sugar
3/4 cup orange juice
1 cinnamon stick
zest of one clementine, thinly sliced
2 tablespoons dry sherry (optional)

If you are using fresh cranberries, rinse them in cold water, and discard any that are overripe (discoloured, already squishy), and pick out any bits of stem, if necessary. Drain.

In a large saucepan (do not be fooled into using a small one! You want high sides to keep hot sugar from splashing and burning you) over medium heat, dump the cranberries (fresh, frozen, or defrosted), sugar, cinnamon stick and orange juice into the pan. Using a long-handled wooden spoon, stir it about and let it come up to a simmer. Add the zest, stir through, and let the mixture bubble and spit for about ten minutes, until all of the cranberries have swollen up and split open, and then about five minutes longer, stirring periodically. Taste the mixture carefully, by spooning some onto a cold spoon, letting it cool down, and then tasting. If you want to add a bit more sugar, by now you should be able to tell. If you want more sugar, add it and cook for another five minutes, until fully dissolved.

Take the pan off the heat, and stir in the sherry. Let the mixture cool (it will thicken up a lot as it cools, and the natural pectin in the cranberries has a chance to set). When it has cooled down to your satisfaction, put it in a serving bowl and cover with plastic or a sealable fridge/freezer container, and store in the fridge until ready to serve (or ready to transfer to the freezer). It will set up very firmly, so you may wish to stir it about before serving.

If you prefer your cranberry sauce warm, you can reheat in a saucepan it over low heat, or in the microwave (in the appropriate kind of dish, partially covered, so rogue cranberries don't explode all over the interior).

There you have it: a glistening jewel on your holiday table, and absolutely fantastic on turkey sandwiches the next day.

October 24, 2015

Crumpets


I've always enjoyed making breads - pancakes, biscuits, tortillas, pizza crusts, sandwich loaves, challah, pita with self-forming pockets, crisp coiled flatbreads full of green onions...and of course, recently, bagels. I probably won't ever run out of new ones to try. The world is full of amazing bread.

This is the first time I've ever made crumpets, though. They are a quintessentially English bread that is cooked on a griddle or skillet rather than in the oven, and I can't find them easily in Germany. So, of course I decided to make my own, especially as they've been on my list for quite a while, now. There is, however, a surprising number of recipes to be had. I read a lot of them online, and combed through my cookbook collection for good measure. I wanted something that was easy, didn't take too long, and yet had the true characteristics of a ideal crumpet - airy, with a nice holey structure throughout and a tender middle. I ended up hybridizing several recipes to create the one below, with a hat-tip to the Tesco website for providing the starting point for the ratios.

You will need crumpet rings, or egg-poaching rings, or some other food-safe way of corralling your batter in the pan. The standard size is about 3 inches or 7 3/4 centimetres diameter.

Crumpets

Makes 8 - 10

1 teaspoon canola oil
225 grams (1 3/4 cups) all-purpose flour (Type 505 in Germany)
150 ml whole milk
150 ml water plus extra as needed
1 teaspoon dried yeast
1/2 teaspoon sugar
1/2 teaspoon coarse salt
50 ml warm water
1/2 teaspoon baking soda

Warm the milk and 150 ml water together until just pleasantly warm but not hot. While it heats, in a mixing bowl, combine the flour, yeast, sugar, and salt, and stir together well with a whisk to integrate and aerate the ingredients. Make a well in the centre, and pour in the warm milk-water mixture. Stir briskly with a whisk to get a smooth batter. It should be about the consistency of pancake batter, so if it is too thick, add another tablespoon or two of water to loosen it up.

Scrape down the sides and cover the mixing bowl with a clean kitchen towel, and put it someplace warm to rise. I use my oven, which I had turned on for a minute or two to warm up, and then shut off before using. Let the batter rise for 45 minutes.

Preheat a large nonstick skillet over medium heat. Spritz it with canola oil, or use a pastry brush to brush on a thin coating. Brush your crumpet rings lightly with oil, too.

While the pan is warming up, mix the warm water and baking soda together, then stir it quickly but thoroughly through the crumpet batter. The batter is kind of stretchy at this point.

When the pan is ready, add about three tablespoons of batter to each crumpet ring (I use a small ladle to scoop the batter), turn the heat down, and set your timer for 5 minutes. It might take as long as six or seven minutes, depending on how thick your batter and hot your pan is, so you need to watch them. Bubbles will start to form quite quickly, but you want to wait until they burst and become holes that stay visible, before removing the rings (using tongs or a glove, because they are hot!), and flipping the crumpets over.

Let the crumpets cook for about one minute on the second side, and then flip them over again and remove to a rack to cool.

Bag them and store them in the fridge once cooled.

They toast up beautifully for breakfast or afternoon tea - top them with a little butter, with or without jam, or a slice of good sharp cheese. You could also use them as a base for poached or fried eggs, of course. Perhaps even some sort of unholy breakfast sandwich. It's up to you.

October 13, 2015

Pumpkin Pie


Pumpkin pie represents such a beloved combination of flavours in North America that we're apparently even happy to consume it as a latte (okay, maybe not all of us), or (better still) beer.

It is also a staple long associated with harvest season feasts such as Thanksgiving and Hallowe'en - eminently sensible, since this is when pumpkins are ready for cooking. There's a lot of great options for pumpkin desserts - everything from flan to mousse, and that's not even counting the muffins, quick breads, and scones. My sister makes a fantastic pumpkin cheesecake, with a baked on sour cream topping, but that's a lot more advanced than this simple pie, which is just a single bottom crust and a filling that could best be described as mix-and-pour.

Somehow, though, pie remains the classic pumpkin dessert. This one is a little bit tangy from the crème fraîche, sweet (but not breathtakingly so), and not too dense. If you prefer mild spices, reduce the cinnamon to 1 teaspoon and the ginger to half a teaspoon. You can substitute ground cloves for the allspice, if you like.

Pumpkin Pie
Makes 1 pie

1 single pie-crust, unbaked
425 grams pumpkin puree (unsweetened, unseasoned)
3 large eggs
1/3 cup raw sugar
1/3 cup granulated sugar
200 grams crème fraîche
3 tablespoons dark rum
1 teaspoon cornstarch
1 1/2 teaspoons cinnamon
3/4 teaspoon ground ginger
1/2 teaspoon ground nutmeg
1/4 teaspoon ground allspice
1/8 teaspoon salt

Make your favourite single pie crusts recipe (or try the one shown here), and line a standard 23 cm pie-plate, folding and crimping the edges under if you like, or even simply pressing them gently with a fork against the top edge of the plate, if you want to go super simple.

Once the crust is in the pan, preheat your oven to 425 F / 225 C.

In a medium-large mixing bowl, beat the eggs until smooth (I use a whisk, but you could also use a food processor). Remove a tablespoon or two into a separate ramekin dish and set aside. Add the sugars to the mixing bowl, and beat until smooth. Dissolve the cornstarch in the rum, and add to the eggs and sugar, and stir through. Add the pureed pumpkin, the salt, and the spices, and stir until smooth. Finally, stir in the crème fraîche and mix until thoroughly combined. It will be a very pale orange at this stage, but it will darken up nicely as it cooks.

Put the pie pan on a baking sheet (or pizza pan) for easier handling. Use a pastry brush to paint the top edges of the crust with the reserved beaten egg. Pour any leftover egg into the pie filling, and stir it through.

Pour the thick pumpkin mixture into the unbaked pie shell, and give the pan a little jiggle to settle it evenly.

Move the pie (on its baking sheet) to a rack in the middle of the oven, and bake for 15 minutes. Lower the heat to 350 F / 180 C, and bake for another 45 minutes. The pie filling should look kind of rounded, glossy, darker than it was, and still a touch wet in the middle. The middle might even still jiggle a bit, which is okay - this pie must cool for a couple of hours before being cut, and it will continue to cook as it cools, and it will set up very nicely during that time.

Remove the pie from the oven and place on a cooling rack. As the pie cools, the surface will flatten out, losing the slightly domed look for a completely flat surface. Sometimes cracks will appear in the surface, but that's fine - doesn't change the flavour (and you can always fill them with whipped cream if you like).


Wait a minimum of two hours before slicing and serving. Excellent with a cup of coffee, or a glass of bourbon. If you like, feel free to add a little whipped cream (or a lot).

Cover leftovers well with plastic wrap and refrigerate for up to three days.

September 13, 2015

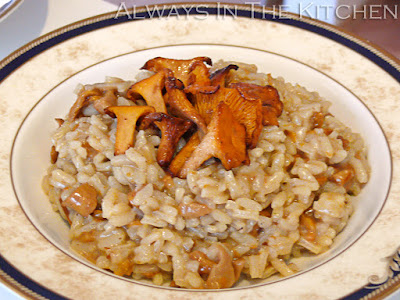
Chanterelle Risotto


Late summer through fall is chanterelle season here in Germany. You will see market stalls piled high with Pfifferlinge, as they are called here, and you will see specials on the chalkboard of almost every restaurant: chanterelles with dumplings (especially a variety called Serviettenknödel), chanterelles with pasta, creamed chanterelles on toast, and of course, chanterelle risotto.

The secret to a nice mushroom risotto is not to overcook the mushrooms. I like to fry a few decorative ones in butter to set aside to use as a garnish, and then sauté the rest for the main risotto itself. By sautéing the mushrooms first, before anything else goes in the pot, it's easy to remove the lightly sautéed mushrooms to a plate to add back in later, so that they don't get that wrung-out squidgy quality that happens with overcooked mushrooms.

As always, everything that is not a feature ingredient in a risotto should be so finely chopped as to not exceed the size of a cooked grain of arborio.

Chanterelle Risotto

Serves 4

300 grams fresh chanterelle mushrooms
4 tablespoons salted butter, divided
2 shallots, finely minced (or small onions)
2 cloves of garlic, pressed or microplaned
220 grams risotto rice (I'm using Baldo here, but arborio is fine)
1/2 cup dry white vermouth (or dry white wine)
1/2 teaspoon coarse sea salt or Kosher salt
4 cups warm vegetable stock/broth (or mushroom stock)
juice of 1/2 lemon
1/2 cup freshly grated parmesan cheese

Clean your mushrooms and set aside the ones you want to use for garnish. Remove hard stem-ends from the rest, and roughly chop. Finely chop your shallots and press your garlic. Measure out everything else and have it standing at the ready.

In a large pot, such as a Dutch oven, heat 2 tablespoons of the butter and quickly fry the chanterelles reserved for garnish. Set aside, and then add the rest of the mushrooms to the pot. Sauté briefly, then set aside in a bowl until the risotto is almost finished.

In the same pot, add one more tablespoon of butter, and then add the shallots and garlic. Stir and sauté until slightly translucent, and then add the rice, stirring well to make sure none of the grains stick and burn. When the grains of rice are all coated with the butter and they start to catch at the bottom of the pan and a little golden colour starts creeping in to the bottom of the pan, add the vermouth (or white wine), all at once. Stir vigorously to make sure everything is scraped up from the bottom. Add the salt, and stir through.

The vermouth will disappear pretty quickly, so be prepared to start ladling stock into the rice. Use a small amount at first, just adding a little at a time, stirring well over medium heat, and waiting until most of the liquid has been absorbed before adding more.

When you are halfway through your stock, stir in the lemon juice. Continue to stir and add stock until you have no more liquid to add, and then return the reserved chopped mushrooms to the pot and gently stir through. Add the final tablespoon of butter, and stir through. Turn off the heat, cover the pan, and let stand for 5 minutes. Remove the lid and stir in the parmesan cheese. Spoon into shallow bowls and top with the reserved fried mushrooms, and maybe a little extra sprinkle of parmesan.

August 03, 2015

Southern Spoon Bread


It has been a long time since I last made Southern Spoon Bread, which is an egregious oversight. This is one of the few recipes that I still have from my teen years, handwritten on a 3x5" index card, from when I realized that I should make my own copies of all of my favourite recipes. After making it today, I'm reminded how much I like it, and what an interesting option it can make to round out a dinner. Or a breakfast. Or a snack.

Southern Spoon Bread is a kind of cornbread, or a kind of baked polenta, or maybe a kind of soufflé; maybe it's all of these things.

It is leavened solely with beaten egg*, which gives it a moist, wobbly, delicate texture when it first comes out of the oven, as well as a soufflé's tendency to deflate almost immediately. Made without wheat flour, it is naturally gluten free (check your own cornmeal supply to verify, of course, if that's a concern), and it is so tender and soft that you need a big spoon to serve it up -- it won't hold its structural integrity well enough to slice in a more conventional manner.

Southern Spoon Bread

Serves 4 - 6

1 cup yellow cornmeal
1 3/4 cups water
1/2 teaspoon salt
2 teaspoons butter
1 cup milk
2 eggs, separated, whites beaten to soft peaks

Preheat your oven (rack in the middle slot) to 375 F / 180 C. Butter a 2 quart capacity shallow baking dish - I used a 7x11" Pyrex dish.

Separate your eggs, putting the whites into a large-enough bowl that you can use a whisk or mixer to beat them until they are soft peaks, and setting the yolks aside into a separate small bowl.

In a medium saucepan or cooking pot, heat the water over medium heat until just simmering. Add the cornmeal in a steady stream, whisking constantly, until smooth. Add the salt and continue to whisk and cook until the mixture becomes stiff and thick. Remove the pan from the heat, add the butter and roughly half of the milk, and continue to whisk until smooth.

Add the remaining milk to the egg yolks, and whisk until smooth, and then add the yolk/milk mixture to the cornmeal mixture, and whisk it in until the mixture is completely smooth and everything is integrated.

Add the beaten egg whites to the cornmeal mixture, and fold the mixture gently with a wide spatula until the egg whites are thoroughly incorporated without any clumps. Bake, uncovered, for 30-35 minutes, or until puffed up and golden on top.

Serve immediately, spooning the bread onto individual plates.

If you have any leftover spoon bread, once it cools and sets more firmly you can slice it and fry it up in a skillet. You can serve it for breakfast (with or without syrup) or dinner alongside your main course.

*My original recipe is hardcore Southern-style, and does not call for the eggs to be separated, simply beaten well. If you choose this method, you might want to bump your oven temperature up to 400 F/200 C to ensure it puffs up nicely.

July 18, 2015

Chickpea & Carrot Salad with Tahini Dressing


We're well into salad season. Every thought of actually cooking something when the temperature keeps spiking outside is accompanied by a shudder, and a look around for alternatives. Alternatives such as letting someone else do the cooking, perhaps, or maybe just preparing something that doesn't require heat.

This simple salad works really well as a dinner salad, or as a take-to-work/school lunch, takes very little time to prepare, and lets me continue my love affair with tahini unabated.

You could, of course, cook the chickpeas yourself, in which case do that however you like best. In the interests of a no-heat meal, however, this recipe is made with canned chickpeas (or, if you've got some home-cooked ones stashed in the freezer, by all means use those instead).

Chickpea & Carrot Salad with Tahini Dressing

Serves 2

1 400 gram can of chickpeas/garbanzo beans, drained and rinsed
50 grams of grated carrot (about 1 medium)
1 green onion, finely sliced
1 cup loose-packed cilantro, washed and roughly chopped

Tahini Dressing (only half needed for this recipe)

3 tablespoons tahini (stirred well)
1/2 teaspoon salt
Juice of half a lemon
1 clove garlic, pressed or pureed
1 tablespoon olive oil
cold water, if necessary, to made a thick salad-dressing consistency

This should all be pretty self-explanatory. In a large bowl, combine the salad ingredients (I hold the cilantro to the very end, though, and add it after the dressing).

In a small bowl, combine the dressing ingredients, mixing well with a fork (or one of those mini-whisks, if that's what you like). I didn't need to add water, here, but if you find your dressing is too thick or is clagging up (as often happens if you're down at the bottom of the tahini jar), add a little cold water, a tablespoon at a time, and stir until it becomes creamy again.

Add half the dressing to the chickpeas, carrots, and green onion, and stir through. Add the cilantro, and stir through again. Serve immediately, or transfer to a sealable container and chill until you're ready to eat.

If you happen to live near a Turkish bakery, or are feeling extra industrious and unafraid of baking during the heat, I highly recommend picking up a nice cheese or spinach gözleme (soft flatbread with baked-in filling) to have alongside this.

June 15, 2015

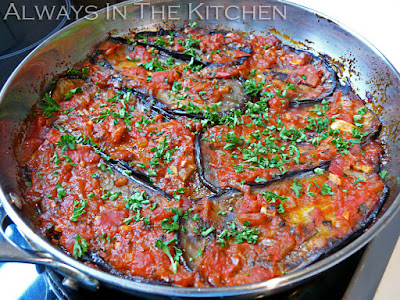
Imam Bayīldi - Turkish Eggplant Casserole


Traditional recipes for Imam Bayīldi involve stuffing hollowed out eggplants (or halved eggplants) with onions and spices, and braising them in a surfeit of best quality olive oil until tender. I've made some serious versions in the past, but they've always felt like a lot of work for something that is primarily a side dish to me (although I acknowledge that it makes a terrific main course for lunch). So, naturally, I was very excited to see this streamlined casserole version from Feed Me Phoebe.

The slightly scandalous name, which translates "The Priest Fainted" has entertaining stories as to why exactly, the Imam keeled over - everything from swooning at the deliciousness to fainting at the cost (or sheer amount) of the olive oil. Various other versions abound in the Eastern Mediterranean, varying the spices, or in some cases the vegetables. I assume that there are versions of this that date back to considerably before the introduction of the tomato, but it seems that the tomato-and-onion version is one of the most popular.

Imam Bayīldi

Serves 4

2 small (but not baby) eggplants
Kosher or coarse sea salt
Olive oil (about a third of a cup, total)
1 small yellow onion, finely diced
2 large garlic cloves, minced or pressed
1/4 teaspoon chile pepper flakes
Dash of cinnamon
Dash ground white pepper
400 mL canned diced tomatoes, with juices
1 tablespoon tomato paste
1/4 cup finely chopped fresh parsley, divided

Prepare the eggplants by removing the cap and slicing lengthwise into 1/2 centimetre thick slabs. If you cut them into coins, it's much harder to get even coverage of the pan without gaps, so lengthwise is by far the better way to go for this dish. Dissolve a generous tablespoon of salt in hot water, and then add cold water until you have about six cups in a large bowl. Add the eggplant slices and allow them to brine for 10 minutes, or up to 8 hours. Drain, rinse, and press the slices firmly with paper towels or fresh linen towels to dry them out.

In a medium skillet (this one is a 24 centimetre steel skillet), heat a tablespoon of olive oil over medium-high heat until it just shimmers. Tilt the pan to ensure the bottom of the pan is well coated. Have a receiving plate standing by. Fry the dried-off eggplant slices, in batches, with a little extra olive oil added between each batch, just until golden on each side - about one or two minutes per side. Remove them to the nearby plate as they finish to make room for the next pieces.

Preheat your oven to 180 C (350 F) with a rack in the middle.

When all the eggplant has been fried, start building the sauce in the same (now emptied) skillet. Start by adding a little more olive oil (this is the last addition of olive oil), and then add the onions and garlic. Add a pinch of salt (not much, especially if your canned tomatoes are salty) the chile flakes, the cinnamon, the white pepper, and half of the parsley. Sauté until translucent and tender, and then add the diced tomatoes and their juices, and the tomato paste. Cook altogether until it starts to resemble a sauce, about four or five more minutes. Then remove about 2/3 to 3/4 of the sauce to a nearby bowl, wipe down the edges of the skillet, and start layering the eggplant into the skillet, on top of the bit of sauce that should nicely coat the bottom of the pan. Alternate the layers of eggplant with the layers of tomato sauce, and try to stack the eggplant slices in so they cover the surface of the pan in a neat, jigsaw like fashion. Make sure the top layer is sauce (ideally a thin layer of sauce so you can admire the prettiness of the eggplant slices), and place it, covered, in the preheated oven. If I use small eggplants, I only get two layers from them, but that works nicely with the amount of sauce.

Bake covered for 25 minutes, and then remove the cover and bake for another 20 minutes. Remove and allow to cool somewhat before serving. Garnish with remaining parsley.

This dish is often served at room temperature or even chilled, so it makes a surprisingly good picnic dish (or take to work dish). Paired with a nice chickpea salad, it's a beautiful, satisfying lunch.

May 27, 2015

Orange Blintzes with Warm Strawberry Sauce


Blintzes, either sweet or savoury are ultimately a particular handling of the ever-so-versatile crêpe. They are a bit decadent and a little fiddly to make, but can be prepared a day in advance (or frozen, if you have the freezer space for it), and a wonderful item to look forward to - especially for breakfast or dessert. Their origin appears to be central and eastern European, with the Russians, Hungarians, and Poles (and maybe more) all laying claim (and infinite regional variations). They were popularized in North America by the Jewish population, where they are a holiday favourite (particularly for Shavuot) and are also a Shrove Tuesday classic for Christians.

Because this is meant to be a luxurious, festive dish, I am using my recipe for the egg-rich French-style crêpes, but after consulting a lot of references, I decided to go with what appears to be the standard method, namely cooking the crêpe itself only on one side until the top becomes somewhat dry, and using that as the inside surface of the wrapped blintz.

Living in Germany, quark is the natural cheese of choice for the filling, although ricotta would also work nicely. These are sweet, with both sugar and orange marmalade in the filling, but not too sweet. I've topped them with fresh strawberries that have been warmed in melted marmalade, but you do run the risk of the strawberry flavour dominating. The solution for that would be to use peeled mandarin slices instead of strawberries, so that the orange flavour stays consistent. We were pretty happy with the combination of flavours, although the orange was a little overwhelmed.

Orange Blintzes with Warm Strawberry Sauce

Makes 6 Blintzes

Wrapper

1/2 recipe egg-rich crêpes
butter for frying finished blintzes

Filling

250 grams quark
3 tablespoons cream cheese
2 tablespoons sugar
2 tablespoons orange marmalade
1/2 egg, beaten
zest of one orange (optional)

Sauce

2 tablespoons orange marmalade
2 tablespoons water (or one tablespoon water, one tablespoon lemon juice)
6-8 fresh strawberries, sliced

First thing: I have not lost my mind when I call for half an egg in the filling. A half-recipe of the crêpes calls for one and a half eggs, and the filling calls for half an egg. I simply beat two eggs until smooth, and then remove 2 tablespoons of beaten egg to use in the filling, reserving the remaining 1 1/2 eggs for the crêpe batter. Easy. Of course, if you decide to double the recipe, you can operate in terms of whole eggs.

You can make the filling ahead and store it in the fridge while the batter for the crêpes rests, and then cook all of the crêpes before you start filling them. You do want to make sure the crêpes have cooled at least to room temperature before filling, though, or the filling will start to melt and slide around, and the rolled-up blintz will be super floppy and hard to transfer to a plate or skillet; I know this from curse-laden experience. Let your crêpes cool! Spread them on a cooling rack until they're all cooked, and then start with the oldest to fill them. By the time you get to the last crêpe, it should be cool enough to handle without melting everything.

Cook the crêpes according to the recipe in the link, but only cooking on one side. As soon as the top of the crêpe is dry looking, remove the crêpe to a cooling rack and start the next one. The dry "top" side of the crêpe will be the inside of the finished blintz.

Fill the blintzes by piling a couple of tablespoons' worth of filling on the lower third of the cooled crêpe. Fold the bottom up just to cover the filling, and fold the sides in, envelope (or burrito) style. Continue to roll up until the blintz is a tidy package. It may take a few tries to get the shape the pleases you most - longer and thinner, or shorter and squarer. Your choice.

Move the filled blintzes to a tray or plate, cover with plastic wrap, and chill up to one day. At that point you could move the tray to the freezer until they are frozen solid, and then pile them carefully into a bag for longer-term storage. Or, you could fry them up right away.


You can make the sauce ahead, too, but it is best made just before you fry the blintzes. Melt the marmalade and water together and stir until smooth. Add the sliced strawberries (or orange segments) and stir gently until glossy and coated with the glaze. Turn off the heat.

Blintzes should be fried in butter, for the best flavour. They don't take very long, so make sure your attention is not needed elsewhere. If you're also making other items, or you're making a double batch, you can make the blintzes and keep them hot in a warm oven until you're ready to serve.


Heat a knob of butter in a large skillet over medium-high heat. When the butter has foamed out, start laying your blintzes in a single layer in the pan. I find my 12-inch skillet works very nicely for 6 blintzes at a time. As soon as the blintzes are golden and starting to crisp on the underside, carefully turn them over using a spatula or flipper - don't try to use tongs, because they are far too delicate. When both sides have browned nicely, transfer to the tray in the pre-warmed oven, or serve immediately.


Just like with crêpes, there are many ways to finish blintzes. If you've made the strawberry sauce, go ahead and spoon that over the plated blintzes, but you could also go with powdered sugar with-or-without a squeeze of fresh lemon juice, or a pile of mixed fruit on the side, for example. A few curls of orange zest would be beautiful on these - I would have absolutely done that, if I had had a fresh orange on hand.

Enjoy.

May 22, 2015

Papaya & Camembert Quesadillas


There used to be a restaurant called "Latin Quarter" on Vancouver's Commercial Drive. In its heyday it was renowned as a place with great live music (and dancing on Fridays and Saturdays), cheap pitchers of sangria, and a tasty latin and latin-fusion menu. We became familiar with it really only in its dying days, but there are a few menu items that we ordered over and over because they were so good.

There were three quesadillas on that menu: Shrimp & Cheese (I cannot precisely remember what kind of cheese, but it was a creamy white melting cheese, perhaps Edam), Brie & Mango, and Camembert & Papaya. They were all good, although the fruit ones were my favourites. They came served with a fresh tomato salsa, and while I was happy to eat them plain, the salsa did add a surprisingly nice dimension.

This recipe is so simple that it's really more of a serving suggestion. Realistically, you could just look at the title and decide to make it. The only tip that might not be intuitive is that the papaya should, ideally, be sliced into large, thin half-moons, to ensure it doesn't slide out of the quesadilla while you're trying to slice (or eat) it. I've tried it both ways, and this works best.

We served this with pan-seared cumin and ancho chicken breast alongside, but it could easily have been accompanied by some thick beans and guacamole for a vegetarian option. Or on its own, as a snack or appetizer.

Since the flour tortillas that I have found here in Germany have been the terrible pre-packaged kind with a shelf life of six months, I now make my own. Generally I plan to make a batch of 9 at some point during the weekend, and then use them as needed throughout the week (all at once for enchiladas, of course). Having the tortillas on hand already made this dinner a super fast weeknight option.

Camembert & Papaya Quesadillas

Per person:

2 6-inch flour tortillas
4-6 thin half-moon slices of papaya (enough to completely cover a tortilla)
4 thick slices of Camembert
a little cilantro (optional)
vegetable oil

Preheat your oven to 180 C / 350 F (especially if you need to make these in batches) with a baking sheet warming in the oven.

Preheat a heavy skillet (cast iron is ideal) over medium-high heat.

Brush the tortillas very lightly with oil on one side each. If you are doing multiple quesadillas, only brush them with oil just before you're going to cook each one, so they don't get soggy.

Place the first tortilla oil-side-down on the hot skillet. Let it crisp a little, and get golden spots on the underside, and remove from the pan and set aside. Repeat with the second tortilla, but after it has been in the pan for long enough to get a bit warm, lay out the slices of Camembert across the tortilla. When the cheese starts to melt, add the layer of papaya. If you're feeling cheese-crazy, you can add more cheese on top of the papaya. Peek at the bottom of the tortilla by slipping a spatula under the edge, and if it is nicely golden, add the first tortilla back as a "lid" (golden side up) and transfer the quesadilla to the tray in the warm oven. The cheese will continue to melt and the papaya will warm a little as you prepare the next quesadilla.

To serve, remove the quesadilla to a cutting board, and cross-chop into quarters. Serve with fresh salsa (if you have it) or hot sauce on the side. Cilantro garnish is totally optional, but does go nicely.

April 25, 2015

Barley & Tomato Risotto with Marinated Cheese


As you can see, I'm still very much enjoying the Jerusalem cookbook by Ottolenghi and Tamimi. This is, in fact, one of the recipes that leaped out at me while I was still leafing through the book in the store, so it's no surprise that it should make it onto the table as one of the first few recipes tried. We had this with the Kofta B'siniyah from the previous post on the first day, but the leftovers were reheated on their own for a nice vegetarian dinner with a green and leafy side salad to add a bit of fresh crunch.

Barley is a very hearty grain, which is to say that it is quite filling, and it usually takes about 40 minutes to cook (as does risotto, generally). It is not a true risotto, of course, as the liquid is added all at once, but the net effect is very similar.

I decided to use a seasoned Turkish cheese that I can easily get locally in place of the feta, and it went very nicely as a garnish. We had a slightly larger amount of cheese on the leftovers, since it was a main course at that point. It also meant that I could leave out the caraway from the original marinated cheese recipe, which I felt would be too strong for my tastes.

As an editorial comment, I think it could use much less passata next time - maybe 100 ml tops, but I've written the recipe here as we made it, with 300 ml. In that case, with less liquid going in, I would definitely keep an eye on the cooking process to make sure it didn't burn (and might give an extra 100 ml water at the start).

Barley & Tomato Risotto with Marinated Cheese

Adapted from Jerusalem

Serves 4

200 grams pearl barley
30 grams butter
4 tablespoons olive oil
2 stalks celery, finely diced
2 small shallots, finely diced
4 cloves garlic, minced
1/2 teaspoon coarse sea salt
1/2 teaspoon dried thyme leaf (or a few sprigs of fresh)
1/2 teaspoon smoked paprika
4 wide strips lime rind (the original calls for lemon)
1/4 teaspoon chile flakes
400 grams diced tomatoes
700 ml vegetables stock or broth
300 ml passata
200 grams seasoned feta-type cheese, crumbled
fresh oregano leaves (optional)

Rinse the barley well, and drain thoroughly.

In a large saucepan or dutch oven, melt the butter and 2 tablespoons olive oil together over medium heat until hot. Add the celery, shallots, and garlic, and sauté until tender. Add the barley and stir about well until the barley grains are glistening, and then add the rest of the ingredients, except the cheese, the fresh oregano leaves, and the remaining olive oil. Everything else, though, in the pot.

Bring it up to a gentle simmer, lower the heat, and cook for 40 - 45 minutes, stirring frequently, until the liquid is mostly absorbed except for a bit of sauciness, and the barley is tender.

While the barley is cooking, add the remaining olive oil to the cheese, and stir gently to combine.

Serve it up in a shallow bowl with a dollop of cheese (with the oil!) on top, and finish with a few fresh oregano leaves if you are using them.

Don't remove the citrus rind before serving - try to get one into each bowl. After the long cooking time, they become tender, aromatic, and delicious.

March 08, 2015

Roasted Vegetable Bowl with Tahini Dressing


This wonderfully veggie-packed, one-pan meal was inspired by a number of different online recipes, including Smitten Kitchen's Warm Butternut Squash and Chickpea Salad and also generally by the amount of reading I've been doing about tahini and the growing realization that I really, really like the flavour of sesame.

There's a bit of prep and chopping involved, but you can also do that part in advance and hold the prepared vegetables in the fridge for a day or two, ready to be seasoned and put in the oven. Doing the prep ahead of time makes this a reasonable dinner to make on a weeknight when you might be wanting something both easy and healthy. The above iteration was made using Hokkaido squash (aka Red Kuri), but butternut is also really nice (and a bit less intense).

You could probably describe this as "steam roasted", since there's a bit of liquid in the roasting pan, which hastens the process of the vegetables becoming tender. You could make this without that bit of liquid, also, simply omit the water from the instructions relating to the squash and cauliflower. You may, in that case, require a little longer of a roasting time (ten minutes or so).

Roasted Vegetable Bowl with Tahini Dressing

serves 3-4

1 small butternut squash or Red Kuri/Hokkaido squash
1/2 head cauliflower
400 grams cooked chickpeas (1 small can)
1/2 red onion
1 teaspoon ground cumin
1 teaspoon your favourite curry powder
coarse salt to taste
2 tablespoons olive oil, divided
toasted sesame seeds for garnish (not shown)

Tahini Dressing

3 tablespoons tahini
2 big cloves of garlic
3 tablespoons lemon juice
1 tablespoon of olive oil
big pinch of salt
Enough water to make a smooth sauce

Prepare the squash by cutting in half, removing the seeds/strings/guts, peeling, and dicing into bite-sized chunks. Store in the fridge in a bag or freezer-type carton if not using immediately.

Prepare the cauliflower by cutting into medium-small florets. Store in the fridge in a bag or freezer-type carton if not using immediately.

When you are ready to cook, turn your oven on to 400 F/ 200 C, with a rack in the middle. Get a large, open roasting pan prepared with a thin film of olive oil.

Place the cauliflower, cumin, a pinch of salt, a tablespoon of olive oil, and a tablespoon of water into a large bowl, and gently stir until the cauliflower is lightly coated with the oil/water/spice mixture. Carefully spread the cauliflower out on one side of the roasting pan. Pour any liquid in the bowl over top the cauliflower.

Rinse out the bowl, and place the squash chunks, curry powder, pinch of salt, a tablespoon of olive oil, and a tablespoon of water, and gently stir until the squash is coated. Spread the squash out on the other half of the roasting tray. Pour any liquid in the bowl over top the squash.

Roast the veggies for 20 minutes. You can prepare the chickpeas and onion while the vegetables are roasting:

- Drain and rinse the chickpeas
- Peel the red onion, and slice into short lengths (I slice thinly in one direction, and then cut into thirds, crosswise)

After the vegetables have roasted for the 20 minutes indicated above, scatter the chickpeas and red onion evenly over the cauliflower and the squash. Put the tray back into the oven and roast for another 10 - 15 minutes, or until the cauliflower pieces are tender, the chickpeas are heated through, and the sharp edge is off the onions.

Once everything is in the oven for that last 10 minutes or so, make up the dressing. Crush the garlic (or press, or pound with a mortar and pestle), and add it to the tahini. Add the lemon juice, the olive oil, and a good pinch of salt. Stir well. You will notice that the mixture starts to become thick and then appears to separate. Do not panic! Simply add cold water, one tablespoon at a time, as needed, stirring until the mixture become smooth and silky. Taste, and decide if you want to add more salt or lemon juice.

Once the vegetables are out of the oven, drizzle a third of the dressing over the pan, and gently stir to (partially) coat the vegetables with the dressing. Dish up into bowls, and drizzle with the remaining dressing. Scatter a few toasted sesame seeds over the top for texture and visual appeal (not shown, sadly).

Leftover reheat very nicely in the microwave.

March 01, 2015

Pasta & Cauliflower with Brown Butter and Sage


Sometimes really great dishes come simply out of the desire to avoid wasting food. I can't remember quite what I was cooking last week, but I do know that I turned my back on it for a moment, and the butter I was melting turned nutty and golden brown. Which was exactly what I didn't want. While inventing new curse-words, I poured the hot, browned butter off into a shell of tinfoil, wiped out the pan, and started again. Then later, when I was cleaning up, I looked at it and thought - there's got to be a use for that.

There's rather a lot of browned butter recipes flying around on the internet - everything from muffins to frosting to ice cream, but I wanted something simple - something I could do on a weeknight, when I get home at seven o'clock, starving and wanting easy answers. Pasta naturally sprang to mind.

Pasta with brown butter sauce (and sage) is a classic Italian dish. In my experience, it is almost always long noodles that are served this way, and that was my original plan, too. Then I realized that I had a half-head of cauliflower that was quietly aging in the crisper, and decided to go for a short, chunky pasta instead.

It's a pity you cannot see the sage in this - it seemed to mostly drift to the bottom of the skillet (probably because I shredded it), and what didn't hide beneath the pasta and roasted cauliflower, quickly got snowed under with a thick blanket of parmesan. If I had been less hungry, I might have arranged it more attractively, but nope.

This was a dish that used up leftover cauliflower (freshly roasted), accidental brown butter, and a weird pasta shape that I had already lurking in my refrigerator. The fact that it was also delicious made it into end-zone dance category.

I also served this with lamb cutlets (not pictured), because it seemed like a nice combination. They were delicious, but probably unnecessary. If I were serving this as a a vegetarian entree, I think I might add a few toasted pine nuts, as well, for heartiness (and delightful crunchiness).

Pasta & Cauliflower with Brown Butter and Sage

Serves 2

100 grams short pasta
2 tablespoons browned butter
1 small handful fresh sage leaves, in chiffonade
1/2 small head of cauliflower (freshly roasted with olive oil and a good pinch of salt)
parmesan cheese for finishing

Cut up the cauliflower until the pieces are just slightly chunkier than the pasta you are using. Toss well with a little olive oil and a big pinch of coarse salt, and roast at 400 F for 20 minutes or until tender when pierced with a fork (and ideally, golden brown where they touch the pan - a metal pan works best for this).

While the cauliflower is roasting, heat up the water to boil the pasta, and warm the browned butter (or, starting from scratch, brown the butter) in a medium skillet. Add the sage leaves to the butter once the pasta is almost cooked.

Cook the pasta to your preference (remembering to salt the water), and then, using a wire skimmer/spider spoon it into the brown butter and sage. Stir well. Add the roasted cauliflower to the pan, stirring gently but thoroughly to get everything coated with the browned butter. Dust thoroughly with freshly grated parmesan, and serve.

Leftovers reheated beautifully in a microwave.

February 15, 2015

Ful Medames


Ful Medames (also transliterated as Foul Mudammas, or Fuul Medammes, amongst other spellings), commonly referred to simply as Ful (pronounced "fool"), is a middle-eastern bean dish that deserves broader recognition in the western world. It is a popular breakfast dish in Egypt, but its reach extends easts through Saudi Arabia, north throughout the eastern Mediterranean countries, and south into the horn of Africa. It is cheap, filling, and delicious.

As can be expected from a dish that reaches through so many disparate cultures, there are countless iterations. The essentials appear to be fava beans, olive oil, cumin, and lemon juice, but there are variations that include any of (or a combination of) garlic, chopped onion, parsley, tahini, and even chopped tomatoes.

Ful is most commonly served with flatbread, which is used as a utensil to scoop up the beans. The type of flatbread used is going to vary by whichever culture you're in - the good news being that you can safely use whatever flatbread you've got on hand. I served mine with freshly made pita bread (because it was Sunday and I had no choice but to make it if I wanted it), but you could easily use lavash, Somalian canjeero, or heck, even tortillas or chapati. You can also spread it on toasted sandwich bread.

Ful is often served on its own, but equally often as part of a larger, tapas-style meal, especially at lunch or dinner.

While sometimes other beans are used to make Ful, depending on culture and geography, the fava appears to be dominant. Fava beans are a bit more intensely flavoured than chickpeas. They are quite earthy tasting, and therefore pair really well with cumin, and stand up very well under the pungency of fresh garlic and the sharpness of lemon.

You can store it in the fridge for a few days without ill effect, simply adding a little more water to loosen it up as you reheat it. I find that I can make a double batch on Sunday, and have it for breakfast for the rest of the week.

Ful Medames

Adapted from Serious Eats

Serves 2 - 4

2 cups cooked fava beans (or a 400 gram can)
1 tablespoon olive oil
2 small cloves garlic, lightly smashed
pinch of salt
1/2 tablespoon cumin seeds
juice of 1 lemon
1 1/2 tablespoons tahini
In a small skillet, toast your cumin seeds until fragrant, and then carefully pour them out onto a cutting board (or into a mortar).

Into the emptied, unwashed skillet add your beans (with their liquid if they're canned, otherwise with about 1/3 cup water) and heat over a medium flame.

On the cutting board, add your garlic cloves and a pinch of salt, and run your knife through a couple of times until the garlic is finely chopped (or, in a mortar, pound the garlic and cumin together until the garlic is a smooth paste). Scrape the garlic/cumin mixture into the beans, and stir through. If you like things spicy, feel free to add in a few chile flakes, too.

The beans should be gently bubbling away at this point. Once the garlic and cumin have been stirred around a few times, add the tahini and olive oil, stir through, and continue to cook, stirring. At this point, you can mash up some of the beans against the side of the skillet, to make a thicker gravy, or if your skillet is looking a bit dry, you can add a little more water to thin it out. Add a tablespoon or two of the lemon juice and stir through. Taste, and decide if it needs more salt (if you use canned beans, probably not, but if you cooked them up from dried, probably yes). Stir and mash the beans as needed until everything looks well heated and the texture is somewhere between baked beans and thick soup. I know, that's a lot of leeway, but you really do get to choose how thick or thin you want this to be. This shouldn't really take more than about five minutes total cooking time.

Pour/scrape the beans into a bowl. At this point, you can add any final finishing touches that you like (an extra drizzle of olive oil, Egyptian style, or a sprinkle of Aleppo pepper, Syrian style, for example, or maybe some carmelized onions, or some parsley).

Serve with warmed flatbread.

January 04, 2015

Cong You Bing: Chinese Scallion Pancakes (with bonus Scallion Pancake Duck Tostadas)


I learned about these lovely Chinese flatbreads while walking hurriedly through Vancouver's Chinatown, some years ago. The image of them being rolled out and fried, seen through a take-out restaurant window, stuck with me for quite a while and I regretted not stopping to try them. I eventually had to get some, of course, and became an immediate fan -- they were everything I wanted them to be: crisp, flaky, with a shimmer of sesame flavour and that satisfying mild green onion bite.

Here in my current location, a small city in Germany, good Chinese food is hard to come by. So, when the craving hit, I decided to learn how to make my own.

The first recipe I tried was for smaller, cocktail-sized ones, but had a dodgy methodology. They were tasty, but oddly fiddly and got oil everywhere. I ultimately decided to simply apply the proper technique for making the large ones, despite it meaning more work for me in terms of rolling, seasoning, coiling, and rolling again. While it did take a bit longer, the results were much better.

I'm sure that every fan of duck, and/or Chinese cuisines, is familiar with Peking Duck with Mandarin Pancakes. The pancakes in that case are soft crêpes, and comprise one of the traditional Peking duck courses. I enjoy them, but the overall dish is very soft, and often a little sweet for my taste. Instead, I imagined a version of Mexican Tostadas, but with duck and Chinese flavours, using the crispy, savoury, cocktail-sized Cong You Bing as a base. For the duck, I had leftover roasted duck meat, which we shredded and reheated - tossed with a combination of Hoisin sauce, sesame oil, golden mushroom sauce (you could use Oyster sauce instead) with a delicate hint of Sriracha (I would have preferred a Chinese-style chile oil, but had none to hand).

Top the freshly fried Cong You Bing with a little of the shredded duck, top with a bit more sliced scallion, and presto! Scallion Pancake Duck Tostadas. They were delicious, and they turned out exactly as I had pictured them (see photo below).

Cong You Bing

(Chinese Scallion Pancakes)

Makes: 2 large or 8 cocktail-sized pancakes

1 cup all-purpose flour (plus extra for rolling)
1/3 cup hot water

1-2 finely sliced scallions
1 tablespoon toasted sesame oil
coarse sea (or kosher) salt
1 tablespoon toasted sesame seeds

2 tablespoons peanut oil (for frying)

In a mixing bowl, add the hot water to the flour all at once, and stir rapidly with a wooden spoon until it turns into a soft, pliable dough (add more flour if necessary). Turn out onto a floured board/counter, and knead for about 10 minutes until smooth and silky feeling. Place it back in the (now cleaned and lightly oiled) bowl, and cover with a towel or plastic wrap and let it rest for half an hour. It will not rise - there's no yeast - but it does need to fully hydrate the flour.

When the dough has rested, turn it out onto a floured work surface, and divide into either two or eight. The instructions after that are the same for either size. Yes, of course you could do four. Divide the dough as you will.

Shape the dough pieces into disks. Working with one at a time, roll a disk out as thin as you can. Roll it up into a tube, as though for a jelly roll or cinnamon buns, and coil the tube into a tight spiral, tucking the end under. Mash it flat with your hand, and then roll out very thinly again. Brush a little sesame oil over the rolled out surface, sprinkle with a bit of salt and a few sesame seeds, and scatter scallions over the surface. Roll up into a long tube again, coil it tightly again, tucking the end under, mash it with your hand again, and then roll out gently until it is a pancake thickness (about half the diameter of the thinly rolled dough you started with). For the smaller sized ones, that's about palm-of-my-hand sized. Do not worry if some of the green onions poke through - they totally will and that's okay. Transfer to a side board, and repeat until you have completed each pancake.

Technically, the first "empty" roll-out is not entirely necessary, but it does add a bit of flakiness to the final flatbread. If you're impatient, or pressed for time, you can skip that one, and go straight to filling them.

Heat the peanut oil in a large skillet until shimmering. Add one, or up to four small, pancake(s) and fry, turning frequently, until golden and crisp on each side. Remove to a paper towel to drain, and repeat until finished. For the larger ones, slice them into quarters to serve.

Serve with a soy-based dipping sauce (example below) or use as delicious tostadas.


Dipping sauce

2 tablespoons low-sodium soy sauce
1 tablespoon rice vinegar
1/2 teaspoon toasted sesame oil
1 small clove garlic, pressed
pinch freshly grated ginger
1 large pinch chile flakes (or cracked Szechwan peppercorns)
small pinch ground white pepper

Or any favourite Chinese dipping sauce you like.


Enjoy!

December 27, 2014

Scalloped Potatoes


Scalloped potatoes are one of my favourite holiday side-dishes. They're quite cooperative - you can generally cook them at whatever temperature you are already using for your ham or turkey or other festive fare (simply adjust the time), and require little minding once they go into the oven. Classic, simple, and satisfying.

These are the antithesis of fast food - a slow-baking, satisfying dish that yields the unexpected dividend of being a terrific breakfast dish the next day - topped with a sunny-side or poached egg, or diced and turned into Spanish tortilla (in which case, add more garlic).

Made with milk rather than cream (but no less creamy), and with a nice sprinkle of cheese at the end, these are richer tasting than they really are. If you're having a large holiday feast with many dishes, you can easily get six servings out of this, and if you're having a pared-down holiday dinner, it serves four generously.

Scalloped Potatoes

The way my mother used to make them

Makes a 9x9 inch baking dish
Serves 4 - 6

1 kilogram half-waxy potatoes (such as Yukon Gold)
1 small onion, finely chopped
2 tablespoons all-purpose flour (approximately)
1 cup whole milk
1/2 cup coarsely grated parmesan cheese
Kosher or coarse sea salt
nutmeg

Prepare your 9x9 baking dish by lightly buttering or oiling it. Preheat your oven to 350-375 F if you don't have anything else already requiring a specific temperature.

Peel the potatoes and slice them thinly, but not quite paper thin (I disagree with the venerable Martha Stewart on that one). Peel and dice the onion. Place 1 tablespoon of flour in a very fine sieve and have it within easy reach.

Place a layer of potatoes in the baking dish, slightly overlapping the edges like fish scales. Sprinkle sparingly with salt, add about a third of the onions, and use the sieve to dust a small amount of the flour evenly over the entire dish. Repeat until you have run out of potatoes (no need to flour the final, top of the potatoes, though a further pinch of salt there is fine). You shouldn't need more flour for the layering stage than the initial tablespoon - go easy, to prevent the dish from becoming gluey.

Shake together the milk and the other tablespoon of flour, and pour it gently over the potatoes, making sure the whole top layer of potatoes gets wet with the milk. The milk should only come up about half way through the stack of potatoes - they should not be swimming in milk!

Cover the baking dish with foil, and place in the oven (I like to put a drip tray under it, in case the milk boils over) to bake for 45 minutes to one hour (test with a knife - it should slide easily through the potatoes with no resistance). If, due to the varied times and temperatures of your other dishes, your potatoes are done earlier than you need, simply remove them from the oven and hold them aside (still covered with foil) until about 15 minutes before you want to serve them (perfect resting time for a roast chicken, or duck, for example), before going on to the next step.

Remove the foil, and sprinkle evenly with the cheese. Sprinkle a delicate, tiny amount of nutmeg over the whole dish, and return, uncovered, to the oven to cook for another 15 minutes or until the top is lightly golden on the edges (or more deeply browned, if that's your preference).

Use a flipper-type spatula to loosen the edges, cut into portions, and serve.

November 22, 2014

Lentil, Mushroom, & Walnut Shepherd's Pie


One of the first German recipes that I made once I moved to Germany was Linseneintopf, a thick and hearty lentil stew, often served with sliced or whole sausages as one of the components. We were really taken with the original dish, but it has been nagging at me for some time that it would make a wonderful vegetarian (or vegan) main course as well.

Just for the sake of variety, I made this one into a Shepherd's Pie rather than making the potatoes simply part of the stew, but you could do it either way. This is the sort of hearty, vegetarian dish that shows it European heritage in its flavours, and is intensely satisfying to eat.

As this is a compound dish that is baked in the oven, I suspect German cooks would classify this as an Auflauf (casserole), rather than an Eintopf (one-pot stew).

Lentil, Mushroom, & Walnut Shepherd's Pie

Serves 4 (generously)

250 grams dry brown lentils
400 grams fresh mushrooms
1 cup toasted walnut pieces
1 medium onion, diced finely
2 cloves of garlic, minced
2 medium carrots, diced finely
3/4 cup celery, diced finely
1 tablespoon olive oil
2 bay leaves
pinch of marjoram
4 cups vegetable broth or water
pinch kosher salt
Black pepper

4 medium-sized potatoes, peeled
1/4 cup milk or non-dairy "milk"
1 tablespoon butter or mild-flavoured oil

To toast the walnuts pieces, spread them in a single layer on a baking sheet and bake at 350 F for about 10 minutes, or until fragrant. If the skins are too bitter, you can rub the warm walnut pieces with a towel, which will remove much of the skin. You can also toast walnuts on the stovetop in a dry skillet, but you need to watch them very carefully, and stir frequently, or they will burn. If you have walnut halves, chop them roughly.

Wipe the mushrooms clean, remove any gnarly bits or tough stems, and coarsely chop. I used a mixture of chanterelles and hedgehog mushrooms, because my farmers market is awesome, but you can use any fresh mushrooms you like -- to be honest, really fancy mushrooms may get a bit overwhelmed by the robust flavour of this dish.

Wash and pick over the lentils. In a dutch oven, heat the olive oil over medium-high heat. Saute the onion, celery and carrot briefly. When onion turns translucent, add the garlic, bay leaves, marjoram (you can substitute oregano if need be) and pinch of salt. If you are using water instead of broth, increase the salt to a half teaspoon.

Add the chopped mushrooms, and stir through. When the mushrooms start to give off a little liquid, add the walnuts, and stir through again.

Add the (washed, drained) lentils, the broth (or water), and bring to a low simmer. Cover and simmer gently for 20 minutes, or until nicely thickened. Taste, adjust for salt, and if necessary, add a small pinch of sugar to balance the flavours. If it tastes a little flat (for example, if your lentils were a bit old, this can happen) you may wish to add a teaspoon of red wine vinegar, to brighten it up and provide a little acidity. Finish with with freshly ground black pepper.

While the lentils simmer, make your mashed potatoes. Boil or steam your potatoes until tender, and drain. Keep the potatoes in the same, hot pan, and break them up with a spoon (or the edge of your masher) so that excess moisture can evaporate. That's advice from Julia Child, folks, and ever since I adopted it, my mashed potatoes have had a more awesome texture. Add the butter (or oil) and milk (or "milk") and mash until smooth.

Dollop the mashed potatoes carefully over the lentil stew, and smooth the top down (or crenellate it with a fork, whatever you like). Brush the top with a little extra butter or oil if you like it to be a bit crusty on top. You could also sprinkle it with a bit of paprika. Bake the stew at 350 F for about 20 minutes, or until the top is golden and inviting. Use a large serving spoon to dish into serving bowls or plates.

Leftovers heat up fairly well in the microwave, or in an oven-proof dish in a regular oven.

November 15, 2014

Grilled Cheddar & Mango Chutney Sandwich


It is my understanding that every food blogger must at some point commit a post to a cheese sandwich. This is one of my favourites.

Okay, okay, it's not really grilled, it's panfried in a skillet. We called these "toasted cheese sandwiches" when I was a kid. You could absolutely grill it, though.

In my mind, I invented this recipe, a natural outgrowth of my favourite childhood cheddar-and-pickle relish (non-grilled) sandwiches, but honestly I was not at all surprised to discover that plenty of other people had already invented it. It's a winning combination and, if not original, utterly delicious and well deserving of widespread enjoyment.

You make it exactly as you think you do:

Grilled Cheddar & Mango Chutney Sandwich

2 slices sandwich-type bread
Sufficient aged cheddar cheese to cover at least one of the bread slices
Sufficient mango chutney (I prefer the spicy version) to cover (thinly) one of the bread slices
butter

You may wish to finely chop any extra-large pieces of mango in your chutney, for ease of eating.

Assemble the sandwich exactly how you'd expect by spreading one of the slices of bread with chutney, covering the chutney with cheese, covering the cheese with the other slice of bread. Butter the outside slices of bread, and fry the sandwich over medium-high heat until golden, then (carefully) flip and repeat.

Serve with soup. Again from my childhood, a Simple Tomato Soup (recipe in the comments below) is a clear winner. But might I also suggest a Mulligatawny, or Brown Lentil & Tomato Soup?

October 22, 2014

Breakfast at Home: Rösti (Swiss and German Hashbrowns)


Rösti are essentially a Swiss version of hashbrowns, specific to the German-speaking part of Switzerland, and differentiated geographically by an imaginary border called the Röstigraben ("rösti ditch") from its French-speaking and Italian-speaking neighbours.

Rheinisch Germany seems to enjoy rösti most often at lunchtime. These are often called Tellerrösti ("plate rösti") and are almost the size of the plate that they arrive on. To make it a complete meal, the rösti usually has various toppings: ham, mushrooms, and/or cheese are popular choices. Where cheese is added, they're usually popped under the broiler for a few minutes to melt it into bubbly goodness.

If rösti seem a bit similar to latkes or other potato pancakes (especially the smaller ones, or ones that are made with a ragged edge), indeed they are. However, there are some telling differences. The primary discrepancy is that latkes normally call for egg, and often flour as a binder, making it more of a fritter, whereas rösti rely solely on the starch in the potato to hold them together. Here in Germany there is something of an analogue for that, too, which is the deep-fried Reibekuchen (also called Kartoffelpuffer). These potato and onion fritters served with smooth applesauce or ketchup, are popular local festival fare. Not quite a latke, not quite a pakora.

There appears to be much disagreement about the perfect rösti recipe: what kind of potato to use, floury or starchy? Start with raw, par-boiled, or fully cooked potatoes? Should you add onion? Can you add tiny cubes of ham? Do you fry it it butter or oil or pork fat or duck fat? Should you leave the edges natural (ie: ragged) or should you pat them into place, or use a swirling motion with the pan to round the edges out naturally? Pan fry, or shallow fry?

The good news is that the lack of a definitive recipe means that you can lean toward your own preferences, without feeling like you're doing it wrong. And if anyone tells you otherwise, they can make their own rösti.

That being said, I like to use cold, fully cooked potatoes for my rösti, for three reasons: 1) I don't have to squeeze liquid out of the raw potato shreds; 2) the potato shreds are easier to compress into a cohesive mass; and 3) the cooking time is shorter. I just make sure to boil a few extra potatoes the night before.

Rösti

Makes 1 (6-inch rösti)
Total Prep & Cooking time: 15 minutes

1 medium* potato, such as Yukon Gold, cooked and cooled completely (overnight in the fridge is great)
large pinch kosher salt
1 - 2 tablespoons grated onion (optional)
1/2 - 1 tablespoon butter (duck fat is also nice, if you have it)

The potato can have the peel on or off, it's entirely up to you.

In an 8" skillet, melt the butter over medium-high heat. Meanwhile, dry your potato well with paper towel, and grate it on a medium-large-holed grater onto a cutting board. If you are adding onions, grate them separately.

When the butter is hot, add the potato strands all at once into the pan, and spread them about loosely and evenly. Sprinkle with salt, and add any onions (you can also use finely sliced green onion here).

Using a spatula, pat the potato mass into a nice, rounded shape, pressing down from time to time to ensure good contact with the bottom. Do not "stir" the potatoes. You want the ones touching the bottom of the pan to crisp up and get beautifully golden, and that takes a little time. If you have a lot of potato, it will be a thicker cake, and may take a little longer.

Continue to press the potato cake from time to time, both around the edges and across the top, to compact the potatoes into a cohesive cake. Use firm, but gentle pressure - you don't want to mash the potato strands, but you do want them to hold together. Check the temperature and make sure that the potatoes are sizzling, but not burning. Reduce the heat, if necessary.

When the bottom has developed a golden brown and delicious crust (this takes about 5 to 7 minutes, I find), you are ready to flip it over. Use the widest turning spatula that you have and move fast, if you're confident. If you're not confident, or if despite your best efforts, the potato isn't holding together as nicely as you would like, slide the rösti out of the skillet onto a plate. Cover the rösti with an inverted plate, and flip it over so the crisp bottom side is now on top. Slide the rösti back into the skillet with the crisp side up, and continue to cook for about another five minutes. The thicker the rösti, the longer it takes to cook through, especially if you're adding raw ingredients into the mix.

Slide the rösti onto your plate and you're ready to go - add a layer of ham and cheese and give it a quick broil, or top it with poached eggs and hollandaise for a fantastic breakfast.

You can make your rösti quite large, with multiple potatoes, in which case the inverted-plate method of flipping it over is pretty much essential. The finished rösti can then be sliced into wedges or quarters, as you like. For a thick rösti, you might consider finishing it in the oven, especially if you have eggs to poach or hollandaise to stir.

I realize that none of the above tells you how to pronounce "rösti", and the pronunciation itself is somewhat regional. The tricky bits are the ö which is pronounced somewhere between the "o" in 'dog' and the "oo" in 'good'. The s is pronounced "sh". So... rushti is not that far off, while still not being all that close. I'm sorry.


*How big is a "medium" potato? I use one about the size of my fist, but your mileage (and your fist) may vary. That's about 200 grams raw weight.

October 15, 2014

Roasted Vegetable Salad with Yoghurt & Lime Dressing


Composed salads like this one are dead easy to figure out without a recipe, so consider the ingredients I've chosen as a mere guideline for your own favourite roasted vegetables and flavours. I like to season one or two of the roasted vegetables each a little differently, to add depth and warmth to the flavours. As a bonus, if you make a big batch they make a wonderful side dish for dinner the night before, which means you get to be virtuous by using up leftovers to make this tasty salad.

I've chosen cheese, nuts, and (optional) egg to boost the protein and give staying power to this salad, but you could definitely omit the egg, sub out the cheese, and go vegan with chickpeas, or maybe marinated tofu. The egg in the ingredient list is purely optional and is not shown here, but was included in the version of this salad that my husband took to work. He also topped everything with a squirt of Sriracha sauce, so there you go.

Beyond the selection of vegetables and accompaniments, the dressing is what brings this sort of salad together. In Germany, yoghurt-based dressings are very popular, so I've been experimenting with them more than usual. This one is Yoghurt & Lime dressing, and we liked it so much that it's sure to appear again very soon. For vegans, I'd switch the dressing for something sesame or tahini based.

Always In The Kitchen Roasted Vegetable Salad

Base:
Romaine Lettuce, raw, coarsely chopped

Vegetable Rows:
Purple Cabbage (raw, thinly sliced)
Roasted Butternut Squash (seasoned with cayenne)
Roasted cauliflower (seasoned with cumin or curry powder)
Roasted Beets, diced

Accompaniments:
Feta
Walnut halves, toasted
hard boiled egg, sliced (optional, not shown)

To roast the squash and cauliflower, I cut them into bite-sized pieces, toss with a mixture of a little water, a little olive oil, some kosher salt, and the seasoning of choice. Toss thoroughly, then tip out into a roasting pan in a single layer (include a tablespoon or two of the oil/water liquid), and roasted at about 425 F for 20 to 30 minutes, as needed. I prefer not to mix the vegetables before roasting, but your mileage may vary. For the beets, I top-and-tail them, quarter them, and wrap them, skins on, in a package made of aluminum foil with a pinch of salt and a teaspoon of olive oil. I roast them for about an hour, or until easily pierced with a fork. Remove them from the foil (carefully! That steam is hot!) and the skins should rub right off with a paper towel (or clean j-cloth). Then simply dice them to the size you want. You can also use Orange Flower Glazed Beets instead, if you're lucky enough to have some leftover.

Yoghurt & Lime Dressing

Makes 3 servings

150 grams plain yoghurt
1 large clove garlic, pressed/minced
⅛ teaspoon kosher salt
⅛ teaspoon white pepper
zest of one lime

Combine in a small bowl and beat with a fork until well integrated. Taste, and adjust for salt and garlic, as desired.

Place the lettuce in a bowl, and arrange the roasted vegetables, raw cabbage, and whichever accompaniments you choose in rows over the lettuce. Drizzle generously with dressing. Eat as is, or toss first, if you want the dressing more evenly distributed.

Add a drizzle of Sriracha, if that sounds good to you.