Showing posts with label Palle cooks. Show all posts

July 06, 2014

Smoked Duck Étouffée with Artichokes


I love Cajun food, which probably comes as no surprise to those of you who know how often I use chiles (and how many, and how hot) in my cooking. That said, there is a wealth of Cajun and Creole dishes that are not hot at all. They are often intensely flavourful without necessarily using loads of chile peppers.

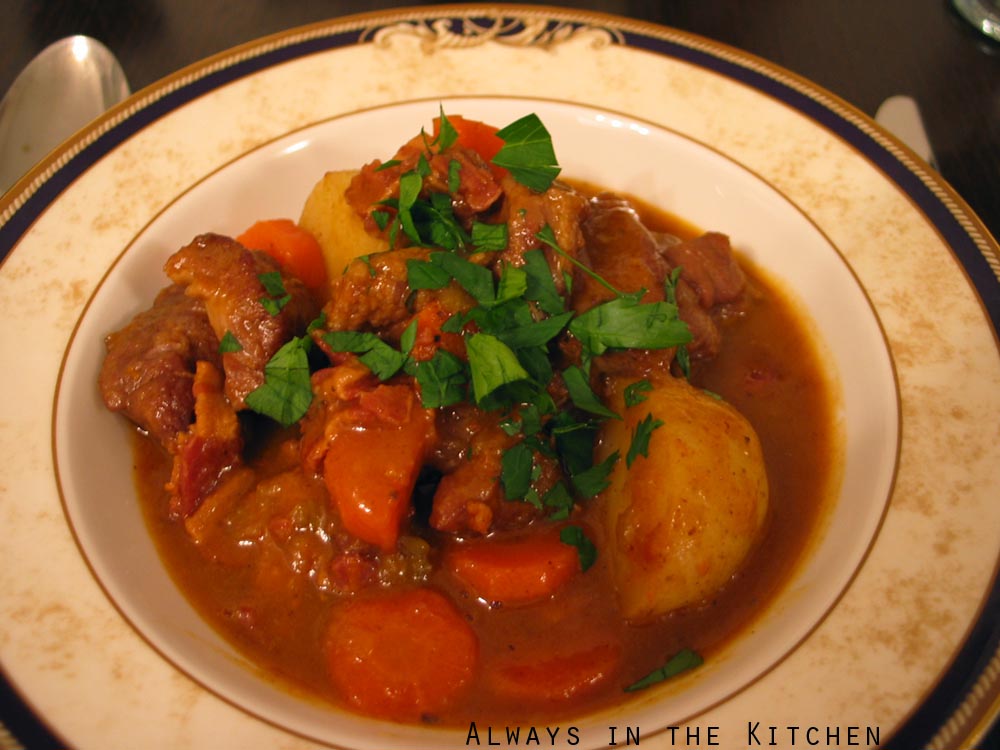
This dish is one of those. The combination of a caramel-coloured roux, smoked duck breast, and artichoke hearts, along with the Cajun trinity of onion, celery, and green bell pepper and typical Cajun herbs and spices makes this Étouffée recipe decadent, richly flavoured, and incredibly satisfying, and is a unique dish in its own right rather than simply replacing seafood with duck in a Shrimp or Crawfish Étouffée. It does have the tiniest bit of cayenne in it, and you could add a drop or two of Tabasco sauce if you insist, but this recipe doesn't even remotely qualify as spicy.

Do not mess around when you are making your roux. It takes a bit of time, and patience, and stirring - generally around 25 minutes of stirring, but it's easy to do and your patience will be rewarded. Make sure you have completed all of your mise en place before you begin the roux. You can cook the rice separately during the simmering stage, which only requires intermittent stirring.

If you do not have access to duck fat to make your roux, use lard. If you cannot source duck stock, a strong brown poultry stock (such as roasted-bone chicken stock) will do, but do note that without duck fat and duck stock in this dish, you will be reducing the luxurious duck flavour significantly. If you've never made roux before, here are some links you might want to check out: Making Roux Step by Step (Allrecipes), and Master the Art of Making Roux (The Daily South). Making a roux is not difficult, but it must be done correctly -- no shortcuts or cowboy moves until you've mastered the basics -- at which time you'll understand why cowboy moves simply shouldn't be applied to roux.

Smoked Duck Étouffée with Artichokes
Adapted from Cajun-Creole Cooking by Terry Thompson-Anderson
Serves 4

Roux
1/2 cup duck fat
1/2 cup flour

Étouffée
1 large yellow onion, diced
1 medium green bell pepper, diced
1 stalk celery, diced
4 large garlic cloves, minced/crushed
600 grams smoked duck breast, diced (largish)
1/4 teaspoon ground cayenne
1/2 teaspoon dried thyme
1/3 teaspoon dried marjoram
1/4 teaspoon dried sage
1/4 teaspoon ground black pepper
dash Tabasco sauce (optional)
1 cup duck stock (room temperature)
3-4 canned artichoke hearts, cut into sixths
2 green onions
handful flat-leaf parsley, chopped

Before you begin, prepare all ingredients so that they are ready to add to the dish. If your duck breast is skin-on, remove the skin and set aside for another dish - perhaps turn it into cracklings to garnish a pasta or an omelette or risotto, or tuck it into the freezer until you know what you want to do with smoked duck skin. Measure out your spices (they can all go into a single mise dish).

In a large Dutch oven, prepare your roux by melting the duck fat over high heat and add all of the flour at once (you can use all-purpose flour or cake flour). Whisk like mad for about a minute, to make sure you don't get any lumps. Then reduce the heat, change your whisk to a spatula, and stir over medium-low heat until it is all smooth and gently bubbling. Continue to stir relentlessly, regularly scraping the entire surface of the bottom of the pot, for about 25 - 35 minutes, or until the roux passes "peanut butter" (light brown) colour and moves on to "caramel" (medium-brown). The darker the roux, the easier it is to burn it, so be increasingly vigilant as you go along. Once the roux begins to darken, the process accelerates: you need to pay attention.

As soon as the roux reaches the right colour, add your onion, bell pepper, and celery (the "Cajun trinity") and the garlic, and cook, stirring frequently, for about 10 minutes, or until they have started to soften. You don't need to turn the heat up - it's plenty hot already.

Add the spices (note there is no added salt in the recipe - there's quite enough from the smoked duck and the duck stock). Stir the spices through and allow to cook for a couple of minutes before adding the diced duck breast. If you are adding Tabasco sauce, add it now.

Add the duck breast, and stir until it is thoroughly coated with the roux.

Pour in the duck stock in a steady stream, stirring constantly, until it is all integrated. Reduce the heat to the lowest setting, cover, and let simmer for 30 minutes, stirring occasionally. At this time, you can put your rice on to cook. We've used parboiled rice here, but long grain white or brown rice would also be fine.

At the end of the simmering time, add the artichoke heart pieces, the green onions, and the parsley, and cook for a further 5 or 10 minutes. Taste the Étouffée and add salt if needed (you probably won't need any, but it's good to check). When the artichoke heart pieces are heated through, you're ready to serve.

To serve, place about 3/4 cup rice in the middle of individual serving bowls, and spoon the Étouffée in around the rice. I like to use a round measuring cup (lightly buttered) to shape the rice --just pack the rice into the cup and turn it over into the middle of each bowl-- but it's certainly not necessary.

October 08, 2013

Venetian Chicken Livers - Fegato di Pollo alla Veneziano


So! We've found a place to live, and will be moving in on November 1. My kitchen should be arriving shortly thereafter, and I am anxiously awaiting the opportunity to cook once again. Seriously, boiling eggs in an electric kettle may technically count as cooking, but crikey! What I wouldn't give for a simple skillet dinner right now...

In the interim, I've found a couple of photos in my archive from dishes we cooked earlier this summer, and so I plan to trickle those out until I'm cooking again. This one is from late June.

I apparently need to get more iron into my diet. I do take iron supplements - as much as my poor system can handle, but it's not enough to correct the serious deficit that I'm running, so I am finding ways to squeeze more red meats and offal into my diet. Yes, I know that there are plenty of vegetable sources of iron (I'm eating those too); I simply need all the iron I can get.

Liver is a rich source of easily absorbed iron, even poultry liver, so it seemed obvious to me that we should take a crack at a classic Venetian recipe for chicken livers with fettuccine. My husband was the cook this time, and I was the lucky person who simply had to show up and eat. This dish comes together very quickly, so make sure your prep is done before you start cooking.

Venetian Chicken Livers - Fegato di Pollo alla Veneziano
Adapted from Claudia Roden's Food of Italy

Serves 2

Fresh fettucini (2 servings)
225 grams fresh chicken livers, cleaned and sliced into medium-large chunks
1 - 2 shallots, sliced pole-to-pole into strips
2 cloves garlic, finely sliced
2 tablespoons butter
1 tablespoon olive oil
¼ teaspoon kosher salt
pinch white pepper
3 tablespoons red (or dry white) wine (approximately)
¼ cup freshly shredded parmesan cheese
2 tablespoons freshly chopped parsley

Prepare the pot with water for the pasta, and get it ready to drop the pasta (fresh pasta only takes about three minutes to cook). If you must use dry pasta, obviously start the pasta first, and adjust the timing accordingly. Warm some pasta bowls and have them standing by.

Clean and slice the livers, removing any grotty bits of sinew or connective tissue, and set aside. Slice the shallot(s) and garlic and set aside.

In a large skillet, heat the butter and the olive oil over medium-high heat until the butter foams and subsides, and then add the livers in a single layer. Sprinkle with the salt and white pepper, let them sear briefly to get a tiny bit of colour on them (about a minute). During that minute, drop your pasta into the boiling water, and make sure there's a colander or sieve ready to receive it. Give the livers a quick stir to flip them over, and push them to the outer edge of the skillet. Add the shallot strips and garlic into the bare centre of the skillet (you can add another bit of olive oil if it looks dry). Sauté briefly, and then gently stir the livers through the onion mixture. Add the wine (or a splash of vermouth) to deglaze and create a bit of a pan sauce, scraping up the bottom of the skillet. Continue to cook gently until the pasta is ready (in the other pot), and then turn off the heat under the livers.

Drain the pasta and portion into the warmed pasta bowls. Spoon the livers mixture over the pasta, being sure to pour any collected juices from the pan over each serving, and top with parmesan and parsley. Enjoy with a nice glass of wine.

If I recall correctly we utterly failed to remember to add the garlic, but it wasn't missed so it's clearly an optional ingredient (a Venetian may disagree with me). I do think that the next time I make this I might top it with a lemon gremolata, rather than just the parmesan and parsley, because I think it would beautifully - the sharpness of the lemon zest and raw garlic cutting through the richness of the dish. I'll be sure to report if that's the case.

July 01, 2013

Turkey Enchilada Casserole

Happy Canada Day, everyone! Now, "enchilada" may not be the most Canadian thing you've ever heard of, but we do seem to enjoy a good casserole, and we love adopting other cuisines into our own. This is a very tasty recipe that takes a bit of time to put together, but is very satisfying.


This is Palle's recipe. It is at its best when eaten fresh, but can be packed for lunch the next day. It can also be frozen, but the texture suffers a bit on re-heating (the tortillas are softer). In that case, add a healthy dose of salsa, or a Mexican-style hot sauce, such as Cholula to pep it back up again.

Turkey Enchilada Casserole

Serves 6 - 8

1 teaspoon or so of lard or oil
1/2 medium onion, finely chopped
675 grams ground turkey meat
2 cloves garlic, crushed
1/2 teaspoon Mexican oregano
1/2 teaspoon ground cumin
5 cups red enchilada sauce (see below)
salt
425 grams corn tortillas (12 to 16, depending on size)
1 cup soft goat cheese (or feta), crumbled
1 cup cheddar, shredded
cilantro

Heat the lard or oil. Add onions and fry over high heat. Add turkey, garlic, oregano, and cumin until turkey is crumbly and no longer pink, about 4 minutes. Stir in one cup of the enchilada sauce. Add salt to taste.

Cut tortillas in half, if they are large (even if they are small, you may wish to cut some of them in half to ensure good coverage of the casserole dish). Spray or brush a shallow 3-quart casserole dish with a little oil. Dip the tortillas into the enchilada sauce just before they are added to the casserole, but don't dip them faster than you are layering them into the dish, or they may get soggy and fragile. Using tongs greatly speeds up the dipping/layering process.

Arrange one fourth of the tortilla halves evenly over the bottom of the casserole, overlapping to ensure coverage. Sprinkle a fourth of the cheese evenly over the tortillas, then top with a third of the turkey mixture and a cup of the enchilada sauce, spreading until level.

Repeat to make two more layers of tortillas, cheese, turkey mixture, and sauce. Top with another layer of tortillas, sauce and cheese.

Bake at 425° until the cheese is melted and the casserole is hot in the center, 18 to 20 minutes (30 minutes if you are starting with a made-ahead, chilled sauce). Serve with a sprinkle of chopped cilantro.

Note: the number of tortillas you need will depend on the size of your casserole, and the size of the tortillas. Likewise, you may need more or less cheese.

Red Enchilada Sauce

Makes 5 cups

4-6 large dried chilies (such as ancho, pasilla, guajillo)
1 small onion chopped into 4 chunks
4 garlic cloves
6 Roma tomatoes
1 teaspoon Mexican oregano
1 teaspoon ground cumin
salt
brown sugar

You can use any dried Mexican chilies, but ancho is my preferred chili for this. As always, a blend of two or three chilies is best. Toast the chilies in a dry pan over medium heat until fragrant and turning colour (most chilies will turn red), but before they smoke too much. Keep turning the chilies so they do not burn. Put the toasted chilies in a bowl of water, and let them soak for about 15 minutes. When soft, tear off the stems and pull out the seeds.

Toast the onion and garlic in a dry pan over medium heat until there is a good amount of black on the outside, turning occasionally. Remove, then toast the tomatoes in the pan over medium heat until they blacken, turning occasionally. Always blacken the tomatoes last as they tend to burst and so add moisten to the pan.

Bring six cups of water to a boil in a saucepan and add all of the chilies, onion, and garlic. Reduce the heat and simmer for fifteen minutes, uncovered. The chilies will float to the top, so push them under from time to time.

Transfer the tomatoes, the oregano, cumin, and the saucepan with all its contents (including the water, but add the water after you've started pureeing) into a food processor. Blend until the mixture is very smooth. Be careful because the mixture is very hot.

Return the contents of the food processor back to the pan by forcing the mixture through a strainer with the back of a spoon to remove the bits of chili and tomato skin that remain. Don’t skip this step as it greatly improves the texture of the finished sauce.

Heat the strained enchilada sauce and simmer for 15 minutes to blend the flavors and reduce it a little. Taste, and add salt and sugar as needed. Sugar will balance out the acridity of the chilies, but add a little at a time, as it shouldn’t take too much.

October 08, 2010

International Bento (France): Terrine


It's bento time again! This time, in the manner of a fairly classic French picnic.

Palle made this terrine from veal and pork, lining the exterior with swirls of pancetta, although I rather tragically failed to show off the pretty edge to the slice when I was packing my bento (although you can see it in the photo below). Clearly I need more practice in making the bento show off the attractiveness of the ingredients. To be fair, it was a hasty assembly, and upon review I should have put the piccalilli relish (in the small container) into an even smaller cup and wedged it in with the lentils, which only come half-way up the side of their section of the container.

The lentils were braised in wine (and, I believe some chicken stock), and contain finely diced onion, celery and carrot (sauteed in olive oil), as well as some seasonings that I do not quite recall (again, Palle made this dish, along with the Piccalilli, which used cornichons as a foundation), but may have included both bayleaves and fresh thyme. They were excellent hot for dinner on the first night, and equally good cold the next day in my picnic.

Finally, one of my favourite-ever crunchy vegetables, the radish. No fancy carvings into roses or toadstools today, just a rushed quartering and cramming them into the bento.

This is one of the few bentos which I actually ate at cool-room temperature. Most of what I take in my bentos is refrigerated, and then removed to microwave-safe crockery to be re-heated, but this particular bento really didn't need re-heating at all. Perfect for taking one's lunch to the park, or the library steps, instead of staying cooped up in the office.

Note the wine below - while a nice Côtes du Rhone was the perfect accompaniment to the dinner the night before, I only drink wine at work for special occasions, such as when the boss is buying lunch, so just water for me for this bento!

March 14, 2009

Mexican Chickpea Salad

It may not seem like salad weather to everyone out there, with the sudden, aggressive return of sub-zero temperatures. The poor cherry trees are obviously trying to be on time with the pink blossoms, but winter's grim determination to keep a grip on us is thwarting their best efforts.

However, this may be when we need salad the most - especially those of us who recently returned from sunnier climes, and can hardly believe the rude shock of snow on the ground in March, for crying out loud. Best of all, this salad gives double value with the freshness of the spinach and the heartiness of the chickpeas, making it a good transitional salad/side dish for, oh say, a lovely achiote-rubbed pork tenderloin (which I failed to photograph, sorry).

This recipe was engineered by Palle, who has been researching traditional Yucatecan food since we returned from Mexico. Some tweaks and substitutions were necessary - for example, classically the salad would be made with chaya, an indigenous Mexican plant that is used for everything from stuffing chicken to being pureed into a sweet, lime-juice based cold beverage. Without access to chaya, he opted for baby spinach. I note that apparently chaya is toxic when raw, so I imagine that this recipe would be made with chaya leaves that had been simmered properly, first. Not under that restriction, we went with raw for the spinach.

Mexican Chickpea Salad

19 ounce can chickpeas, drained and rinsed
2 tablespoons chopped fresh cilantro
¼ cup diced red onion

Dressing #1
2 tablespoons olive oil
2 tablespoons fresh lime juice
¼ teaspoon finely grated lime zest
¾ teaspoon ground cumin
pinch of cayenne (or other hot) pepper
salt and freshly ground black pepper to taste
4 cups baby spinach leaves (or prepared chaya, if available)

Dressing #2:
3 tablespoons plain yogurt
1 tablespoons fresh lime juice
½ teaspoon finely grated lime zest
¼ teaspoon honey

In a medium bowl, combine chickpeas, cilantro and onion.

In a small bowl, whisk together the oil, lime juice and zest, cumin, cayenne, salt and black pepper. Pour the dressing over the chickpea mixture and toss to coat evenly.

In another small bowl, stir together the yogurt, lime juice and zest, and honey.

Serve the chickpea salad over a bed of spinach leaves. Top with a drizzle of the yogurt dressing.

I'm pleased to report that any leftovers can be mixed all together and are equally delicious the next day. Also worth noting, the yogurt dressing on its own would make a delicious veggie dip, or even as a drizzle for kebabs, or in a nice pita sandwich stuffed with grilled things.

September 24, 2007

Dzik

I'm always intrigued when I am exploring another cuisine, and I find that there is a common use of an ingredient that I do not associate with that culture. In Mexican cookery, I would never have guessed (based on the restaurants in my neck of the woods) that radishes play a frequent supporting role.

Likewise, I was not expecting to find such a thing as a cold beef salad, although when I did, it didn't surprise me at all that it was full of spicy habanero chiles. Palle, who has been to the Yucatan, fell in love with this dish, but didn't know what it was called until we saw it being made on a television show. Recipe now accessible, he wanted to make it right away. So he did.

The dish is called Dzik, and is also known more generically as Yucatecan salpicón de res. The recipe is from Rick Bayless's Mexico, One Plate at a Time (season 5). Because it is served cold, it is perfect summer food, and while summer is definitely on the way out, here in the Pacific Northwest, we squeezed in one last summery dinner.

The avocado should be sprinkled over the Dzik, but Palle doesn't like avocado as much as I do, so we left it on the side. Also, the Dzik should be resting on top of a bed of lettuce, but we didn't quite get around to doing that, although the presentation would be nicer. Thick, spicy black beans, hand-chopped fresh salsa cruda, and corn tortillas rounded it all out, and we enjoyed every little bit of it.

Next time, I think we will simmer the meat a little longer, to make it even more tender, and chop the red onion a little finer. Other than that - I wouldn't change a thing. Full of tangy lime juice, zippy habanero peppers, fresh crunchy radishes, and (for me) creamy avocado, it was tasty and satisfying, and definitely on the "let's make again" list.

I may not be able to wait until next summer.

June 24, 2007

Palle Tackles Pasta

As strange as it may seem, given that he has cooked braised rabbit, Provençal daube, merguez sausage, an assortment of chilis and even his own hot sauce, this is Palle's first Italian pasta dish.

In what has become his usual research style, working without a recipe, he contemplated some favourite Italian flavours, and came up with prosciutto and radicchio. After that, some online surfing led him to asparagus, flat leafed parsley, garlic, and olive oil, as well as some simple preparation methods, and he set about making dinner.

When I came home from work, he was setting up his mise, something at which he is far more meticulous than I tend to be, measuring out some fettuccine, lining up balsamic vinegar and chile oil, and the rest of his ingredients, and all that was required of me was to stay out of the way. It's always lovely to come home from work to a home-cooked dinner that seems to appear like magic on the table. This one was delicious.

Palle has gone from King of the Stirfry (pretty much the only thing he had really cooked from scratch when I met him) to someone capable of either following an attractive recipe or hybridizing his own to good effect. Now that he's not working 18 hour days, he has more time and inclination to cook. In this new kitchen of ours, we might just both be always in the kitchen. Fortunately, it's a pretty big kitchen.

March 17, 2007

Palle Makes Merguez

I'd been eyeing the recipe since I first unwrapped the book: Marcus Samuelsson's The Soul of a New Cuisine. The recipe? Merguez meatballs, which I've mentioned were on the hit-list before.

While the first dish to be made from the book was Chicken-Peanut Stew, I knew it wouldn't be too long before the meatballs would be on the table. What took me by surprise was the fact that I wasn't the one to make them. I bought the ingredients, and got started in the kitchen, but Palle came to help me out, and ended up doing all of the actual meatball creation and cooking, while I busied myself making rice and a somewhat less-spicy version of Spicy Carrot Coins. Why less spicy? Welll, because I wanted the spices in the merguez to shine through, and I didn't want too much cross-flavour contamination.

The meatballs were a resounding hit - the deliciousness of spiced lamb sausage, in super-easy meatball form...why hadn't I thought of this before? No fussing around with casings or extruding devices, just quick, simple and delicious. The recipe also made quite a lot of them. These are no demure soup-style meatballs, they're great, bloody golfballs, and densely meaty without any fillers. No problem, though - some were cooked up for dinner, some were frozen (raw) for a super-easy dinner at a later date, and some were flattened into thin patties for a home-version of that ever-so-famous english muffin based breakfast sandwich (more on that later).

At the end of the day, I'm glad that I scaled back on the heat of the carrot dish, because the merguez were not as spicy as I had anticipated. Neither were they quite as fiery-red as a merguez generally should be (in my mind, anyway). Simple enough to fix - next time I'll increase the harissa and the paprika, and both little quirks will be easily fixed.

I do wonder, though - plenty of the recipes in the book call for habanero peppers, without all the usual ensuing hand-wringing about how dangerous they are to work with. It made me think that the recipes wouldn't be dimmed-down for western palates, but now I'm not so sure. Certainly, the spicing seemed light when I examined the recipe, but I decided to go with the precise instructions. Merguez isn't usually the hottest sausage around, but I would like it to be a little bit peppier than our first go at this recipe. Next time...

April 18, 2006

Easter Dinner - Cooking together


Much as I like ham, which was my family's traditional Easter dinner when I was growing up, I confess that these days I find myself leaning more towards the Australian tradition of lamb to celebrate the Spring. Of course, the Australian tradition usually involves roasting a great big leg of it, which presents much the same problem as a ham does in a household of two-plus-cat: too much leftover.

When one is not tied to unwavering expectations, however, one can feel free to walk on the wild side and do something completely different. So, with remarkably little discussion required, Palle & I settled on a lamb Daube Provençal as our dinner of choice.

Now, a daube is essentially a meat stew, and this one certainly was stewed for quite some time. 90 minutes, to be exact. Fortunately we had lunched well and further fortified ourselves with snacks in the afternoon before we got to cooking. Palle took point, and I took prep, so the dish is really his execution of the Daube Provençal from Anthony Bourdain's Les Halles Cookbook - his third recipe from that book.

So, Palle handled the batch-browning while I chopped, poured and wrangled the mise en place at kibitzed at him about raising or lowering the flame, when to add certain ingredients, and whatever else I could think of. He is always patient with my sometimes never-ending stream of chatter and general kitchen bossiness, and happy to let someone else do the prep for a change, I think.

More often than not it is he who helps me in the kitchen, deftly retrieving things from the fridge or freezer, opening, peeling, slicing, chopping endless amounts of mushrooms and peppers, which are among our most frequent fliers. I enjoy it when he steps out from behind the cutting board and cooks, which would probably happen more frequently if he had more reasonable work hours.

My contribution to the night's dinner was a pear and ginger cheesecake (from the latest issue of Eating Well) for which - alas! there are no pictures. It was quite nice, but the ginger flavour outshone the pear. Of course, if you choose to drink a little Poire William with it, you probably wouldn't notice...

March 10, 2006

Palle's Jerk Chicken

Finally, at long last for those who commented and emailed:
The following post is Palle's - I'm merely the conduit. My own notes are at the end.

Jamaican Jerk Chicken

Makes 4 Servings

½ cup white vinegar
zest and juice from 4 limes
¼ cup canola oil
5 scallions, trimmed and coarsely chopped
4 cloves garlic, coarsely chopped
2 inch piece of ginger, coarsely chopped
4 fresh habanero (scotch bonnet) chilis, coarsely chopped and seeds removed *
2 tablespoons ground allspice
2 tablespoons ground dried thyme
1 tablespoon ground cinnamon
1 tablespoon sugar
1 teaspoon ground black pepper
1 teaspoon salt
1 teaspoon ground cayenne pepper
3 pounds chicken, cut into 8 pieces
  1. Combine the vinegar, lime juice, lime zest, canola oil, scallions, garlic, ginger, chilis, allspice, thyme, cinnamon, sugar, pepper, salt and cayenne. Using a blender, or food processor, blend into a medium puree (not too smooth – this is isn’t French cuisine). I find I get better results if I keep dry and wet ingredients apart until just before it is time to blend. It will seem like a lot of allspice and thyme, but for Jerk it is correct.
  2. Place chicken in a medium bowl or other container.
  3. Pour marinade over chicken. Turn pieces well to ensure even coating and all pieces are covered.
  4. Cover and refrigerate for at least 1 hour. Fours hours to overnight is preferable. Turn occasionally.
  5. Heat the oven to 350 F°.
  6. Place the chicken covered by marinade in a pyrex baking dish. Cook for 45 minutes.
  7. Eat.**

* A note on habaneros. If you can’t get fresh habaneros you may be out of luck. Other chilis do not make an acceptable substitute. You may make a yummy sauce, but it won’t be Jerk. Habaneros have a singular, irreproducible flavor. You may be able to get away with dried – but I’ve never tried. For a milder jerk use 3 habaneros, with pith and seeds removed. For a medium jerk use three or four peppers with about half of the pith removed, and all seeds removed. For hotter jerk leave in all the pith and leave in a few seeds.

** Resist the urge to add cilantro. Jerk goes well with rice, rice and beans, sweet potatoes or coleslaw.


Dawna's notes:

While the recipe calls for the more traditional bone-in chicken, we usually make it boneless - thighs and halved breasts - and reduce the cooking time to 35 minutes.

I have yet to be involved in the process of making this dish. My job here is strictly sides (and occasionally inventory). I am currently strongly hinting that this would be excellent with pork tenderloin, and I think that might be the next version.

February 26, 2006

Of Jerks and Yams

I should really let Palle write most of this entry, as it features his signature dish - a five star, five-alarm, tangy, fierce, and delicious jerk chicken. He makes the sauce from scratch - no pre-mixed seasonings or ready-pour fixings. It's just the man, the knife, and the blender and ingredients such as fresh limes, green onions, a boatload of allspice, and the all-important habanero peppers. He has been perfecting the dish for a while - trying it out on willing, yet oh-so-unsuspecting friends, tweaking the amounts of vinegar and ginger root, and coming to the understanding that the end product is irretrievably linked to the quality (and heat) of the peppers.

I know that there are other things that one can "jerk" in the kitchen. Pork is quite popular down in the islands, and I suspect that a pork tenderloin baked in jerk sauce would be a real winner. Goat and lamb are also obvious choices - lamb being a little bit easier to source in my neighbourhood. Somehow, to this point, we have only managed to jerk chicken. In its defence, it is an outstanding combination - very much a classic dish.

It is a funny thing - a twitch, if you will - where it is virtually impossible for me to throw out leftover sauces. I scrape them into little plastic containers and stack them in the fridge for future use. Way back when I checked out Food Ninja's Jamaican Beef Patties, the sauce that I bumped mine up with was leftover jerk sauce that had been carefully hoarded against such an eventual need. I've also used leftover jerk sauce variously to add kick to bean dishes and casseroles and, quite memorably, as a pasta sauce. The pasta sauce worked so well, in fact, with only a little cream added to mitigate the heat, that tonight's leftovers will likely meet the same fate later this week. This time, however, there is a little chicken left over, too, which will make for quite a splendid re-working. All I really need to do is pick a pasta shape.

I'm surprised that we haven't used pasta as a side dish for jerk before, actually. We tend to rely heavily on a rotation of side dishes that might include several of: rice, cuban-style black beans (or replace both of those with Jamaican Style Rice & Beans), cole slaw, ceviche, and yams.


I have never had a bad instinct, when it comes to yams - well, those yams which are actually orange-fleshed sweet-potatoes, that is. I've been happy to eat them prepared pretty much any way they are presented to me, but it is only recently that I have added them to my repertoire with any real frequency. They were predominantly a holiday item at our table, baked and served with brown sugar and black pepper, and I have always been happy to eat them.

A culinary epiphany on Christmas day a few years ago led me to the creation of a holiday yam dish that was quite fresh and different from those that I had eaten before: I baked the peeled, cubed yams in mixed-citrus juice with whole spices - cinnamon, star anise, cloves, and allspice. They were tasty, and a pleasant change from the more sugary ones I was accustomed too. They became a Christmas tradition for us.

Over the last few years, I have ventured out more and more as I seek to find ways to make my meals not only healthier, but more delicious than ever before. I started adding yams to soups and curries, and was quite pleased with the results. I started sprinkling baked yam halves with ground cumin, salt and black pepper instead of sugar or butter, and this became a low-fuss favourite. Last year began my fascination with oven-baked yam fries, which has intensified now that I'm eating less white potatoes than I used to. It is amazing, what a little cumin seed and chili powder can do for a simple baked yam.

Today, I had another aberrant thought. Last week, while attending a gala dinner at a museum, I was served a tasty little tapas dish of fig-stuffed pork tenderloin over maple yam puree. As a still somewhat new yam enthusiast, I was delighted at the idea. The pork was tender and juicy, and nicely accented by the figs. The yam puree, however, was not up to snuff. It was grainy and fibrous, and leaked water into the bottom of the plate. The strong maple flavour sharpened the sweetness of a vegetable that does not need help in the sweetness department. It was, all in all, a disappointment.

So, since Palle was making jerk chicken for dinner, and since some sort of yam is a favourite accompaniment to jerk chicken, I set about re-inventing the yam puree. Nothing sweet was to be added, I told myself, and something has to be done about the texture.

I peeled and diced the yams and set them to steam and become soft enough to mash. A little chopped garlic sauteed in a tiny amount of butter was prepared on the side and topped liberally with ground cumin and left to infuse while the roots finished cooking - which didn't take long. I drained the tender cubes of yam and scraped the garlicky, cuminy butter into them, and set about vigorously mashing. Despite having chopped up the yam in its raw state, there were still disconcerting fibers. I finished the flavouring with a couple of tablespoons of coconut cream powder, and added just a little water to the pot. Still a bit grainy, still leaking a bit of water. I stared at the immersion blender for a moment, shrugged off the possibility that it would completely destroy the dish by rupturing too many starch molecues, and put it in motion. Immediately, the graininess disappeared and the liquid integrated into a smooth, velvety, luscious puree. I had found the answer. I only wish I had made more. Guess what we're having next time there's a jerk in our kitchen?