Showing posts with label Mexican. Show all posts

March 05, 2019

Black Bean Soup


This is based on a Mayan recipe for a very simple black bean soup with big, striking flavours. It is easy to cook the beans the day before, and start from there. It is quite filling as a main dish, but half-sized portions make a terrific starter. The soup shown in the picture above includes finely diced ham, which is a purely optional add-in to a recipe that is otherwise completely plant-based.

Black Bean Soup

Serves 4

1 cup dried black beans (no need to soak)
water to cover beans
5 cups water (extra) or stock of your choice
2 tablespoons canola or corn oil
1 onion, finely chopped
2 cloves garlic, chopped or pressed
1 teaspoon dried pequin (aka piquín) chiles, crushed
1 medium or large tomato, peeled, seeded & diced
1/2 teaspoon dried epazote
1/2 teaspoon cumin
1/4 cup dry sherry
salt
Freshly ground black pepper
cilantro to garnish

Part 1 - Cook the beans

Rinse the beans well - you don't want grit or dust in your finished dish. Also give them a quick look-over to make sure there aren't any cunningly disguised little rocks in there - sometimes you find little tiny stones or other debris in dried beans.

Cover the rinsed beans with fresh water, up to about 5 centimetres above the beans. Bring to a gentle simmer and cook until the beans are quite tender, stirring occasionally. This can take as little as an hour or as long as two or two and a half hours, depending on how old your beans are. Play it by ear, but don't let the beans boil hard, or they will split and turn quite mushy. Most of the time, I find that dried black beans are ready in just one hour. Once the beans are tender, you can add a little salt - if you will be using stock in the second part, make sure you don't over-salt at this stage. You can also skip salt entirely until Part 2 and then adjust to taste. Note that if you have hard water (or beans of dubious age), a scant pinch of baking soda added to the water when you begin to cook the beans will help soften them more quickly. You can make the beans a day ahead, and then proceed from this point when you want to serve them. If you will be making the soup at a later date, allow the beans to cool and then refrigerate in their cooking liquid. Once they are completely cold, you can freeze them if you like.

Part 2 - Make the soup

If you are making the soup straight away after cooking the beans, you can prepare and sauté the vegetables while the beans simmer in Part 1 above. 

Remove two thirds of the beans to a blender or food processor and puree. If you have an immersion blender, you can certainly use it right in the pot, but in that case you will want to remove about a third of the whole beans before pureeing (they will be stirred back in later, after the vegetables are added).

In a medium frying pan, preheated over medium heat, heat the oil and sauté the finely chopped onion, chopped garlic, and the pequin chiles until the onion is soft. Add the prepared diced tomato, epazote and cumin and stir until well blended. Add the onion mixture to the black bean purée and purée the mixture again until as smooth as possible. Combine the whole beans and the puréed mixture in the soup pot and add the five cups of extra water (or stock) and simmer gently, stirring frequently until the soup thickens and its components integrate. This takes only about five to ten minutes, in my experience.

If you want an even heartier soup, you could at this point add smoked tofu, diced ham, or diced chicken, as you wish, and simmer gently to heat the new additions through, stirring frequently. Remove any thick stems from the epazote that might have escaped the food processor. Add the sherry and stir through. Taste the soup and add more salt if needed, and it's ready to serve. Add cilantro to individual servings, or substitute finely sliced green onion if preferred.

I like to serve this with crispy baked flour tortilla-crackers, and sometimes a drizzle of contrasting hot sauce to add brightness. You can also top the soup with a scoop of salsa (preferably not cold from the fridge).

The soup also freezes very well, as do the cooked beans from Part 1.

June 24, 2017

Hobak Bokkeum: Korean Stir-fried Zucchini (Zucchini Banchan)


Those of you who saw last week's post of Korean-Mexican Braised Short Ribs are (hopefully) already looking forward to this recipe, which was the highlight banchan (반찬, side dish) of the meal, and quickly earned itself a repeat performance and a permanent spot on The List. It's very quick to prepare and delicious both hot and cold, so even if you don't have time or space to do it right before serving, you can happily make it in advance. I...may have eaten some straight from the refrigerator at some point during the night. Yeah. So.

Hobak Bokkeum (호박 볶음, Korean Stir-fried Zucchini)

Adapted from Herbivoracious

1 tablespoon toasted sesame oil
1 small zucchini (about 300 grams), diced small
1/4 teaspoon Kosher salt
1 teaspoon chipotle gochujang (or regular gochujang)
2 tablespoons fresh ginger, grated or very finely minced
1 teaspoon toasted black sesame seeds

Heat the sesame oil in a small skillet over high heat. When it shimmers, add everything but the black sesame seeds. Stir fry until tender-crisp with lightly browned bits, which only takes a minute or two. Scrape into a small bowl and sprinkle liberally with black sesame seeds (you could, of course, substitute well-toasted white sesame seeds). Serve warm or chilled.

The second time I made this dish it was for our follow-up dinner with the braised short rib meat. Still playing with the Korean-Mexican fusion theme, we had tacos.


Verdict? Delicious!

Freshly made corn tortillas (I can't buy them ready-made in this town), shredded short rib meat (mixed with the thinly sliced braised mushrooms), zucchini banchan, sliced fresh jalapeños, and freshly made Yucatecan-style quick pickled red onions. And, of course, a little extra chipotle gochujang to top each taco.


For an all-veggie version of these tacos, you could swap out the braised short rib for braised tofu, or maybe all shiitake (braised without meat stock, of course) and/or Mexican (or Cuban) thick seasoned black beans.

June 17, 2017

Korean-Mexican Braised Short Ribs (and Bibimbap)


My first experience of Korean-Mexican fusion was a Korean Taco Truck in Vancouver a few years back. Almost immediately, curiosity overwhelmed confusion and I decided that this was something I really needed to try. So, I bellied up to the window and got myself an order of mixed tacos - Galbi (short rib) and Bulgogi (shredded beef). On the plate, it's easy to see why these two amazing cuisines can come together so deliciously, despite the huge geographical distance and cultural differences.

Since that first unexpected demonstration of fusion that really works, the combination of Korean and Mexican has shown up again and again, and it seems to get tastier each time. And then I received a package from some friends in Australia, which included a bottle of Chipotle Gochujang sauce from their local restaurant, Hispanic Mechanic.

Gochujang is an essential ingredient in Korean cuisine; a spicy, fermented chilli paste that is used either on its own and as a base for other sauces. The spiciness of this condiment predates New World peppers, with the heat in those earlier versions being likely provided by sancho (Zanthoxylum piperitum) and black pepper, although chillies have been used since at least the early 1600s. This particular fusion iteration relied on chipotle, a smoked, dried jalapeño pepper, and is more the texture of a thick Mexican-style hot sauce.

Now, I'm not gonna lie, the first date the sauce had in our house was with some pork neck steaks in a presentation that skewed neither east nor west (but was delicious), but after gawking at the Hispanic Mechanic menu, I was determined to hunt down some beef spare ribs. I wasn't able to find the thin, flanken cut that would be closer to what is used in a traditional Korean Galbi recipe, so I opted for braising rather than grilling - Galbijjim (갈비찜, Galbi Jjim, or Kalbi Jjim), more or less, rather than grilled Galbi. I'm looking forward to trying this sauce with pulled chicken, too.

Korean-Mexican Braised Short Ribs

1 kg Short ribs, browned in 1 Tablespoon peanut oil
5 fresh large shiitake, sliced in half (stems removed)
1/4 cup less sodium soy sauce
1/4 cup sake
2 Tablespoons chipotle gochujang
1/2 teaspoon sesame oil
1/2 tablespoon honey
3 scallions
4 cloves garlic
2 cups beef or veal broth
1 inch ginger, chopped
3 red chiles, deseeded

Braise 3 hours in an oven preheated to 170°C (340°F), remove the meat from bone, shred, mix with some braising liquid. There may be some fatty bits, and you don't want to wholly discard those. Chop up some of it and mix it in with the meat and braising liquid. If you have a lot of fat, you won't want to use it all or it will be too rich. Thinly slice the shiitake mushrooms and set aside as a separate item.

And what did we do with this marvellous, meltingly tender and unctuous short rib meat? We made Bibimbap, of course.


Bibimbap (비빔밥) is Korean for "mixed rice" and is generally made by adding various toppings to a base of one of a number of different rice varieties. It is often served in a (very hot) heated stone bowl, but not always. There is a tremendous variation from one bibimbap to the next, as it is infinitely customizable depending on what toppings are available and/or selected, from all vegetarian, to a mixture of meat and vegetables, to raw egg (or egg yolk) added at the last minute (usually in the hot stone bowl versions). There is a wonderful array of different flavours and textures to enjoy.

For our Bibimbap, I went with plain, white, medium-grain rice, the shredded short rib meat and braised shiitake mushrooms, ginger-soy braised cabbage, sesame carrot, and an absolutely fantastic zucchini bokkeum (볶음, stir fry) that is good hot or cold and makes a terrific banchan (반찬, side dish). It will get its own post very soon (I note that banchan are normally served in the middle of the table, for diners to help themselves, but I couldn't resist putting it right in the bowl for the picture). Final garnish was shredded green onion, although if I'd had them at the time, I would have added Mexican pickled red onion. In fact, we made tacos from the remaining short rib meat a couple of days later, for which I whipped up a batch of the pickled onions expressly.

While there are an assortment of different sauces used as the finishing touch on a bowl of bibimbap (including, for example ssamjang, sesame sauce, citrus-soy, and a variety of spicy options, often based on gochujang) we went with more of the chipotle gochujang, which amplified the flavours used in the braising liquid.

May 22, 2015

Papaya & Camembert Quesadillas


There used to be a restaurant called "Latin Quarter" on Vancouver's Commercial Drive. In its heyday it was renowned as a place with great live music (and dancing on Fridays and Saturdays), cheap pitchers of sangria, and a tasty latin and latin-fusion menu. We became familiar with it really only in its dying days, but there are a few menu items that we ordered over and over because they were so good.

There were three quesadillas on that menu: Shrimp & Cheese (I cannot precisely remember what kind of cheese, but it was a creamy white melting cheese, perhaps Edam), Brie & Mango, and Camembert & Papaya. They were all good, although the fruit ones were my favourites. They came served with a fresh tomato salsa, and while I was happy to eat them plain, the salsa did add a surprisingly nice dimension.

This recipe is so simple that it's really more of a serving suggestion. Realistically, you could just look at the title and decide to make it. The only tip that might not be intuitive is that the papaya should, ideally, be sliced into large, thin half-moons, to ensure it doesn't slide out of the quesadilla while you're trying to slice (or eat) it. I've tried it both ways, and this works best.

We served this with pan-seared cumin and ancho chicken breast alongside, but it could easily have been accompanied by some thick beans and guacamole for a vegetarian option. Or on its own, as a snack or appetizer.

Since the flour tortillas that I have found here in Germany have been the terrible pre-packaged kind with a shelf life of six months, I now make my own. Generally I plan to make a batch of 9 at some point during the weekend, and then use them as needed throughout the week (all at once for enchiladas, of course). Having the tortillas on hand already made this dinner a super fast weeknight option.

Camembert & Papaya Quesadillas

Per person:

2 6-inch flour tortillas
4-6 thin half-moon slices of papaya (enough to completely cover a tortilla)
4 thick slices of Camembert
a little cilantro (optional)
vegetable oil

Preheat your oven to 180 C / 350 F (especially if you need to make these in batches) with a baking sheet warming in the oven.

Preheat a heavy skillet (cast iron is ideal) over medium-high heat.

Brush the tortillas very lightly with oil on one side each. If you are doing multiple quesadillas, only brush them with oil just before you're going to cook each one, so they don't get soggy.

Place the first tortilla oil-side-down on the hot skillet. Let it crisp a little, and get golden spots on the underside, and remove from the pan and set aside. Repeat with the second tortilla, but after it has been in the pan for long enough to get a bit warm, lay out the slices of Camembert across the tortilla. When the cheese starts to melt, add the layer of papaya. If you're feeling cheese-crazy, you can add more cheese on top of the papaya. Peek at the bottom of the tortilla by slipping a spatula under the edge, and if it is nicely golden, add the first tortilla back as a "lid" (golden side up) and transfer the quesadilla to the tray in the warm oven. The cheese will continue to melt and the papaya will warm a little as you prepare the next quesadilla.

To serve, remove the quesadilla to a cutting board, and cross-chop into quarters. Serve with fresh salsa (if you have it) or hot sauce on the side. Cilantro garnish is totally optional, but does go nicely.

August 01, 2013

Breakfast at Home: Huevos en Cenotes


This is too good an idea not to try, especially if you find you need to use up a bunch of corn tortillas. For smaller families, those packages of 50 small corn tortillas can take a while to go through. Sure, there's the tacos, and enchilada casseroles, and other classics like migas, or chilaquiles. But this...this is a keeper. It's easy enough to do on a weekday, if you're just doing up one quickly for yourself, and it's a hearty, filling breakfast that will carry you through your morning.

I made a couple of minor tweaks to the Pioneer Woman original recipe that in spired this, the most significant being a tiny pinch of cheese between the layers of tortillas, which acts as an anchor to keep the bits from sliding around as you flip them. If you're feeling really feisty, tuck a little minced chile into the cheese mixture between the layers of tortillas. Another minor difference is that I use four tortillas per stack, because I generally stock large eggs in my kitchen. Of course, multiply these instructions by however many people are at your table.

Huevo En Cenote

adapted from Pioneer Woman's "Huevo In The Hole" recipe

Serves 1

4 corn tortillas (4" size)
1 egg
1/4 cup grated cheese, such as Edam (or Cheddar, or Jack, or Mozzarella)
1/2 tablespoon butter or corn oil (or similar, for frying)
freshly chopped cilantro and green onion (optional garnish)
Fresh Salsa (or hot sauce) to serve

Cut out the centre of the tortillas (I used a biscuit cutter, so I had to do them one at a time). Put the middles aside for another use - mini tortilla chips perhaps? Layer the tortilla rings with tiny pinches of cheese (too much, and it will run out the sides and be a bit messy). Preheat a smallish skillet over medium-high heat. Melt a bit of butter right in the area that you're going to place the stack, let it melt and foam out, and then add the tortilla stack. Swirl the stack around a bit (while holding it down firmly) to make sure that the bottom layer of tortilla all gets a little bit of butter on it. Crack an egg into the hole in the stack, and let cook until it is set on the bottom, and starting to turn opaque in the middle. Adjust the heat down to medium, so the tortillas get crisp rather than burned.


When you judge that the egg is about half way cooked through, slide a spatula underneath the stack and flip it over. As with pancakes, a quick, confident, controlled motion is best, but the cheese melted between the tortilla layers does help hold things together.

Once the egg is cooked to your satisfaction, plate and serve. I recommend using a sharp knife to slice through the firm layers of crispy and soft tortillas.


Garnish however you like. Hot sauce, avocado, fresh salsa, cilantro, pickled red onion, bacon, more cheese...really, it's customizable to the nth degree.

This is every good as bit as you suspect it might be.

July 01, 2013

Turkey Enchilada Casserole

Happy Canada Day, everyone! Now, "enchilada" may not be the most Canadian thing you've ever heard of, but we do seem to enjoy a good casserole, and we love adopting other cuisines into our own. This is a very tasty recipe that takes a bit of time to put together, but is very satisfying.


This is Palle's recipe. It is at its best when eaten fresh, but can be packed for lunch the next day. It can also be frozen, but the texture suffers a bit on re-heating (the tortillas are softer). In that case, add a healthy dose of salsa, or a Mexican-style hot sauce, such as Cholula to pep it back up again.

Turkey Enchilada Casserole

Serves 6 - 8

1 teaspoon or so of lard or oil
1/2 medium onion, finely chopped
675 grams ground turkey meat
2 cloves garlic, crushed
1/2 teaspoon Mexican oregano
1/2 teaspoon ground cumin
5 cups red enchilada sauce (see below)
salt
425 grams corn tortillas (12 to 16, depending on size)
1 cup soft goat cheese (or feta), crumbled
1 cup cheddar, shredded
cilantro

Heat the lard or oil. Add onions and fry over high heat. Add turkey, garlic, oregano, and cumin until turkey is crumbly and no longer pink, about 4 minutes. Stir in one cup of the enchilada sauce. Add salt to taste.

Cut tortillas in half, if they are large (even if they are small, you may wish to cut some of them in half to ensure good coverage of the casserole dish). Spray or brush a shallow 3-quart casserole dish with a little oil. Dip the tortillas into the enchilada sauce just before they are added to the casserole, but don't dip them faster than you are layering them into the dish, or they may get soggy and fragile. Using tongs greatly speeds up the dipping/layering process.

Arrange one fourth of the tortilla halves evenly over the bottom of the casserole, overlapping to ensure coverage. Sprinkle a fourth of the cheese evenly over the tortillas, then top with a third of the turkey mixture and a cup of the enchilada sauce, spreading until level.

Repeat to make two more layers of tortillas, cheese, turkey mixture, and sauce. Top with another layer of tortillas, sauce and cheese.

Bake at 425° until the cheese is melted and the casserole is hot in the center, 18 to 20 minutes (30 minutes if you are starting with a made-ahead, chilled sauce). Serve with a sprinkle of chopped cilantro.

Note: the number of tortillas you need will depend on the size of your casserole, and the size of the tortillas. Likewise, you may need more or less cheese.

Red Enchilada Sauce

Makes 5 cups

4-6 large dried chilies (such as ancho, pasilla, guajillo)
1 small onion chopped into 4 chunks
4 garlic cloves
6 Roma tomatoes
1 teaspoon Mexican oregano
1 teaspoon ground cumin
salt
brown sugar

You can use any dried Mexican chilies, but ancho is my preferred chili for this. As always, a blend of two or three chilies is best. Toast the chilies in a dry pan over medium heat until fragrant and turning colour (most chilies will turn red), but before they smoke too much. Keep turning the chilies so they do not burn. Put the toasted chilies in a bowl of water, and let them soak for about 15 minutes. When soft, tear off the stems and pull out the seeds.

Toast the onion and garlic in a dry pan over medium heat until there is a good amount of black on the outside, turning occasionally. Remove, then toast the tomatoes in the pan over medium heat until they blacken, turning occasionally. Always blacken the tomatoes last as they tend to burst and so add moisten to the pan.

Bring six cups of water to a boil in a saucepan and add all of the chilies, onion, and garlic. Reduce the heat and simmer for fifteen minutes, uncovered. The chilies will float to the top, so push them under from time to time.

Transfer the tomatoes, the oregano, cumin, and the saucepan with all its contents (including the water, but add the water after you've started pureeing) into a food processor. Blend until the mixture is very smooth. Be careful because the mixture is very hot.

Return the contents of the food processor back to the pan by forcing the mixture through a strainer with the back of a spoon to remove the bits of chili and tomato skin that remain. Don’t skip this step as it greatly improves the texture of the finished sauce.

Heat the strained enchilada sauce and simmer for 15 minutes to blend the flavors and reduce it a little. Taste, and add salt and sugar as needed. Sugar will balance out the acridity of the chilies, but add a little at a time, as it shouldn’t take too much.

December 30, 2011

Margarita Chicken


This is a great little recipe, which I've only slightly adapted from Cook This! Not That!, and really mostly in terms of adding a few more beans (the two to three tablespoons in the original recipe hardly seemed adequate for a serving), and a side dish of simple red rice.

Now, while the recipe shows you how to easily doctor up a can of black beans (drain, add cumin, heat, add lime juice), if you happen to have some left over Spicy Thick Black Beans, simply use two cups of those, instead - you won't be doing any damage for the extra onion, garlic and pepper in the mix.

Margarita Chicken
Adapted from "Cook This! Not That!"
by David Zinczenko and Matt Goulding


Serves 4

Bean Bed
2 cups of black beans, drained
1/2 teaspoon ground cumin
juice from one lime

Chicken
1/2 tablespoon olive oil
4 boneless, skinless chicken breasts (about 4 oz. each)
1 cup salsa verde (warmed up, ideally)
1 cup grated Oaxaca cheese
Salt & Pepper as desired
cilantro, for garnish

If you are serving this dish with rice, get it started right away, and you should be able to easily do the rest in the time it takes the rice to cook (unless you're using instant rice, which I can't recommend). A tasty, simple version of red rice is to just add minced onion and a good sprinkle of ground annatto seed, cumin, and a pinch of salt to your regular steamed rice recipe.

Preheat your oven to 450 F, with the oven rack set to the middle. Heat the drained beans in a small saucepan, with the cumin, until thoroughly heated. Add the lime juice and stir through. Turn heat to low (or off), cover and hold until needed. Preheat your salsa in a small saucepan or in a cup in the microwave.

Salt and pepper your chicken lightly on both sides, and sear in a pre-heated skillet until deep golden brown on the first side - about 3 or 4 minutes - then flip over. As it sears on the second side, for another three minutes or so, gently spoon a little salsa verde over each chicken breast, spreading it with the spoon to just reach the edges of the chicken. Sprinkle with grated cheese, and then place uncovered in the oven for about five minutes, or until the chicken is cooked through and the cheese is bubbling.

To serve, spoon a quarter of the beans onto a luncheon-sized plate, and carefully place a chicken breast atop. Garnish with freshly chopped cilantro. Add the red rice to the side of the plate, and a couple of slices of avocado, and serve with lime wedges on the side for extra lime goodness. Leftovers work beautifully for lunch - I recommend slicing the chicken breast before stashing it away in the fridge, so it can reheat evenly (and more quickly!). I also deeply suspect that any leftovers, should you be so lucky, would make fantastic burritos. I intend to double the recipe next time, and find out.

The original recipe clocked in, according to the author, at 330 calories per serving. increasing the black beans to 1/2 a cup per serving, and adding a modest amount of red rice (3/4 cup of cooked rice) and even adding a quarter of avocado, raises the meal total to a mere (approximate) 525 calories for the whole meal (roughly 24% of those calories from fat) - absolutely still qualifying as a terrific, healthy dinner.

Quite a few of the other recipes from the book (and its companion publications) are available over at Men's Health.

July 31, 2011

Mango Chile Lime Paletas


Unlike the rest of North America, Summer still hasn't really arrived in Vancouver. We get occasional days where it feels like Summer is actually here, but for the most part, we are having cooler than usual temperatures, frequent rain, and even more frequently, cloud cover. Today has started off with cloud cover, and will apparently become at least partially sunny, with a whopping 21 degrees by later today.

Yesterday, however, was the real deal. Hot, sunny, and gorgeous blue skies. Perfect for a day of taking in the local festival in the park, going to the Farmer's Market (early, because I'm no fool), and lounging around on a patio eating barbeque. Also, a perfect day for Mexican popsicles, or paletas.

Paletas are essentially frozen fruit bars. They are easy to make, and they put to shame any sort of frozen juice on a stick that seems to be the mainstay of the homemade popsicle above this latitude.

Mango Chile Lime Paletas

2 medium to large Ataulfo mangos
2 tablespoons agave syrup/nectar (or honey)
1 Lime (juice only) - use two if your limes aren't very juicy)
1/4 teaspoon Cayenne Pepper
1/4 cup cold water

Peel, pit & dice the mangos. In a blender or food processor (I use my mini-prep bowl that came with my immersion blender), add all of the ingredients and blend until perfectly smoothly pureed. Add a little more water if you need to. Pour into popsicle molds and freeze for a minimum of 3 hours.

I am currently thinking about experimenting with adding coconut milk, because I think that would be awesome. If successful, a report will follow...

June 09, 2011

Quick Pickled Red Onions


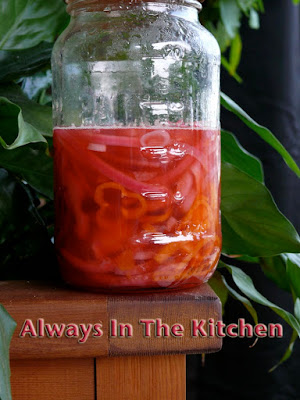
I fell in love with these in Mexico. They came with tacos, on tortas, with meltingly tender cochinita pibil, and elegantly draped over poc chuc. It seems, in fact, to be an essential condiment in the Yucatan, nearly as ever-present as the fiery fresh green salsas (oh, if only we had a source for fresh green habaneros, here).

We discovered just how easy it is to make this dish last summer, just in time for our friend Rodney's barbeque. We got rained on a little that evening, since it is Vancouver, after all, and the weather delights in being contrary, but we had some wonderful food. Our grillable of the evening was a red recado-rubbed pork tenderloin and some buns to make ad hoc tortas. And the onions, of course: a great massive jar of them.

The recipe comes from Daniel Hoyer's lovely book "Mayan Cuisine". The first time we made it, we followed the recipe as slavishly as possible, to wonderful results. The most recent batch was adjusted based on both past experience (there is rather too much red onion mass for the amount of liquid, although that may be partly due to the vagueness of calling for three "large" onions). I also had some orange habaneros in dire need of using, so I sliced one up. All in all, I was really pleased with the pantry-ready version that I put together based on Mr. Hoyer's more traditionally authentic recipe.

Pickled Red Onions & Habaneros
adapted from Mayan Cuisine, by Daniel Hoyer

1 cup apple cider vinegar
Juice of one lime
Juice of one orange, plus water to make 1/2 cup (if needed)
1 clove garlic, quartered part-way through
1 teaspoon allspice berries
2 teaspoons black pepppercorns
4 cloves
1 2" stick cinnamon
4 bay leaves
2 tablespoons palm sugar
1 tablespoon kosher salt
2 cups finely sliced red onion
1 to 2 sliced, deseeded habaneros

Pack the onions, garlic and habaneros in a clean glass canning jar (sterilized would be best, otherwise, microwave half-full of water for a couple of minutes, and then carefully empty).

Bring the rest of the ingredients to a boil in a saucepan, and allow to simmer (covered, to prevent volume reduction) for seven minutes. Pour the hot liquid, spices and all, over the onions, making sure that all of the onions are covered with liquid. Cover loosely, and allow to cool until room temperature, then cap tightly and refrigerate. As they cool, the onions and the liquid slowly turn a bright, festive pink. They will be ready to eat in a few hours. Use up within a few weeks.

Please note that this is a "fresh pickle", and not a preserved pickle. While the acidity and salt should help slow down any unfriendly biological growth in your refrigerated pickles, it is not designed for long storage. Please look up canning safety information if you wish to put up these pickles in a pantry shelf-stable manner.

These also made a super topping for a veggie burger recipe that I'm working on (hopefully more on that soon), and a pretty good hotdog garnish, too.

July 25, 2010

Mexican Bento


My worldwide bento lunch theme continues with Mexico.

The crumbly meat mixture is in fact picadillo, a ground meat filling used to stuff into things - peppers, tortillas, empanadas, etc. I made this one using the recipe from Elizabeth Lambert Ortiz's slim volume The Mexican Kitchen. It consists of fried up ground beef, onions and garlic, finely chopped green apple, tomatoes, pickled serrano peppers, raisins, cinnamon, ground cumin and black pepper. You can pretty much add as much of each ingredient as you want - I used one apple per one pound of meat, and just a small handful of raisins. It's very customizable. There is often a garnish of sliced almonds fried in butter, but I didn't have any, so I left mine plain, and stirred in a little cilantro instead.

The vegetably dish is the unimaginatively titled Green Lima Beans in Sauce (from the same book). I'm thinking of calling it ¡Hola Frijoles! It is delicious, and this coming from someone who was none-too-certain about the whole Lima Bean thing until very recently. I used frozen baby limas, and chucked them into a shallow sauce pan with a little water, a chopped onion, some garlic, and some tinned diced tomatoes. I added some chopped fresh jalapeños and stirred in a whole lot of cilantro. I cooked them, stirring frequently, until the water had evaporated and the tomatoes smudged down into a chunky sauce, which took about twenty minutes.

I was expecting a dish that was palatable but unremarkable (I restrained myself from adding cumin), but I had woefully underestimated the recipe. The flavour of the finished dish was surprisingly complex, and very, very Mexican tasting. It was an outstanding vegetable dish that stood up well to the rest of the meal, was good hot and cold, and re-heated beautifully for my bento the next day. (FYI, I do not heat food directly in my bento container, I use proper dishes. It's not safe to microwave the brand of bento boxes that I use.) I would recommend it to anyone, and especially to vegetarians wanting an interesting taco or tostada filling.

Finally, up at the top, you can see the edges of some homemade corn tortillas (recipe nominally also from the same book, except that I added a little lard, and a pinch of salt). I don't have a tortilla press, so I use my heavy, cast-iron frying pan to flatten them out, and that seems to work pretty well. I keep a small rolling pin on had to give them a quick go-over if they seem to need it, but usually they're fine.

More bentos to come...French, North American, (of course) Japanese, and many more! I'm in a zone.

July 05, 2009

Tortillas, carnitas and salsa, oh my!

For Canada Day, we went out for British pub food. For America Day, we stayed in and made Mexican food. It seemed strangely appropriate.I really like Mexican food. There's even (finally) a few places in town where you can get the good stuff, if you know where to look. Don't get me wrong, I like Tex-Mex and Cali-Mex quite a bit, too, but real Mexican food is in a class of its own, and is pretty darn amazing.

I've been meaning to try making flour tortillas for some time. I had made corn tortillas once before, to intermediate success (I didn't have a tortilla press, and ended up using my cast iron frying pan to squish them flat), but I hadn't ventured into the realm of flour tortillas. This weekend, I decided that it was time.


I had bookmarked a Tortilla recipe on Orangette some time ago, and so I dusted it off (so to speak) and got going. I don't generally use vegetable shortening, but I would have used lard...except that I was fresh out. Lard is incredibly hard to source in my neighbourhood, so after a quick attempt to secure some, I decided to use the duck fat that I had standing by in the freezer. They turned out surprisingly well, and were as e asy as Molly (Orangette) suggested they would be. I think that next time, I might use a little less fat, as my other tortilla recipes are a bit leaner, and these ones were (deliciously) quite rich.

So, with a pile of fresh tortillas soon to be had, I needed to come up with a game plan for what to serve them with. I considered making tacos al pastor, since I have some fresh pineapple in the fridge, but lacked some of the other ingredients. I settled on carnitas, and chose David Lebovitz's recipe as my guideline. I note that I removed the cinnamon stick about half-way through the cooking process, because I didn't want it to overwhelm. It takes a while to make, but I was planning to be in the house attending to other matters most of the afternoon, so it worked out pretty well, timing wise.


For salsa, we went with a simple green salsa of garlic, cilantro, serrano chiles, and lime juice, with
just a touch of salt. Quick blitz in the mini-prep, and it was good to go, and hot as hell. You can find the inspiration for the green salsa in Brandon's comment on the Tortillas recipe link.
Finally, I figured a salad was in order. I combined roughly equal amounts of diced red pepper, radishes and avocado with corn kernels, a sprinkling of cilantro and the juice of a lime. A little salt was added at the table, to keep it from sogging out the dish, and to allow for individual tastes. It was remarkably good, and I intend to remember it the next time I'm wanting a salad for a potluck or picnic or barbeque-type event. Or, you know, the next time I'm making Mexican food.

To top things off, we had a little cocktail called the Capitan, which is essentially a Manhattan made with Pisco instead of bourbon. Lovely, really.

The very end of the evening, when we were lying around in a carnitas-induced coma, we dragged out the tiny bottle of Xtabentun, a fermented honey and anise liqueur that we brought back from our trip to the Yucatan in February. If only we had checked our baggage, we could have brought back more...

March 14, 2009

Mexican Chickpea Salad

It may not seem like salad weather to everyone out there, with the sudden, aggressive return of sub-zero temperatures. The poor cherry trees are obviously trying to be on time with the pink blossoms, but winter's grim determination to keep a grip on us is thwarting their best efforts.

However, this may be when we need salad the most - especially those of us who recently returned from sunnier climes, and can hardly believe the rude shock of snow on the ground in March, for crying out loud. Best of all, this salad gives double value with the freshness of the spinach and the heartiness of the chickpeas, making it a good transitional salad/side dish for, oh say, a lovely achiote-rubbed pork tenderloin (which I failed to photograph, sorry).

This recipe was engineered by Palle, who has been researching traditional Yucatecan food since we returned from Mexico. Some tweaks and substitutions were necessary - for example, classically the salad would be made with chaya, an indigenous Mexican plant that is used for everything from stuffing chicken to being pureed into a sweet, lime-juice based cold beverage. Without access to chaya, he opted for baby spinach. I note that apparently chaya is toxic when raw, so I imagine that this recipe would be made with chaya leaves that had been simmered properly, first. Not under that restriction, we went with raw for the spinach.

Mexican Chickpea Salad

19 ounce can chickpeas, drained and rinsed
2 tablespoons chopped fresh cilantro
¼ cup diced red onion

Dressing #1
2 tablespoons olive oil
2 tablespoons fresh lime juice
¼ teaspoon finely grated lime zest
¾ teaspoon ground cumin
pinch of cayenne (or other hot) pepper
salt and freshly ground black pepper to taste
4 cups baby spinach leaves (or prepared chaya, if available)

Dressing #2:
3 tablespoons plain yogurt
1 tablespoons fresh lime juice
½ teaspoon finely grated lime zest
¼ teaspoon honey

In a medium bowl, combine chickpeas, cilantro and onion.

In a small bowl, whisk together the oil, lime juice and zest, cumin, cayenne, salt and black pepper. Pour the dressing over the chickpea mixture and toss to coat evenly.

In another small bowl, stir together the yogurt, lime juice and zest, and honey.

Serve the chickpea salad over a bed of spinach leaves. Top with a drizzle of the yogurt dressing.

I'm pleased to report that any leftovers can be mixed all together and are equally delicious the next day. Also worth noting, the yogurt dressing on its own would make a delicious veggie dip, or even as a drizzle for kebabs, or in a nice pita sandwich stuffed with grilled things.

September 24, 2007

Dzik

I'm always intrigued when I am exploring another cuisine, and I find that there is a common use of an ingredient that I do not associate with that culture. In Mexican cookery, I would never have guessed (based on the restaurants in my neck of the woods) that radishes play a frequent supporting role.

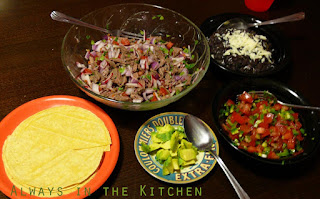
Likewise, I was not expecting to find such a thing as a cold beef salad, although when I did, it didn't surprise me at all that it was full of spicy habanero chiles. Palle, who has been to the Yucatan, fell in love with this dish, but didn't know what it was called until we saw it being made on a television show. Recipe now accessible, he wanted to make it right away. So he did.

The dish is called Dzik, and is also known more generically as Yucatecan salpicón de res. The recipe is from Rick Bayless's Mexico, One Plate at a Time (season 5). Because it is served cold, it is perfect summer food, and while summer is definitely on the way out, here in the Pacific Northwest, we squeezed in one last summery dinner.

The avocado should be sprinkled over the Dzik, but Palle doesn't like avocado as much as I do, so we left it on the side. Also, the Dzik should be resting on top of a bed of lettuce, but we didn't quite get around to doing that, although the presentation would be nicer. Thick, spicy black beans, hand-chopped fresh salsa cruda, and corn tortillas rounded it all out, and we enjoyed every little bit of it.

Next time, I think we will simmer the meat a little longer, to make it even more tender, and chop the red onion a little finer. Other than that - I wouldn't change a thing. Full of tangy lime juice, zippy habanero peppers, fresh crunchy radishes, and (for me) creamy avocado, it was tasty and satisfying, and definitely on the "let's make again" list.

I may not be able to wait until next summer.

May 05, 2006

Cinco de Mayo (Red Adobo of Pork and also Black Bean Soup)

Last year, I had a Cinco de Mayo party; this year, I am not so organized. Cinco de Mayo commemorates the victory of the drastically outnumbered Mexicans over the Napoleonic army at The Battle Of Puebla in 1862. Although it is primarily a regional holiday in the state of Puebla, it has some recognition throughout Mexico, and in many American cities, too. It is not Mexico's Independence Day (September 16), but it is a celebration in a similar spirit.

While it may not be Mexico's Independence Day, it holds great significance in the establishment of a national identity for many Mexicans, and as such is perfectly in keeping with my interest in the food of cultural celebrations.

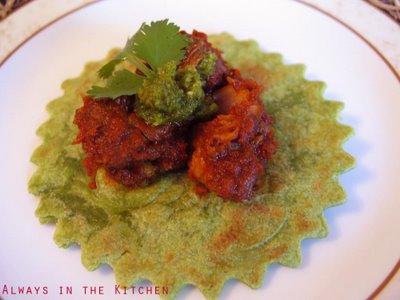
While I may not have managed any particular arrangments for this year, I have been cooking a lot of Mexican food lately, including Mayan-style black bean soup and these adorable little tostadas made of Mexican adobo of pork shoulder, some awesome spinach tortillas made by a local factory (you can actually taste the spinach!), a some feisty green salsa using Brandon's recipe (of Orangette-fame). The pork shoulder took an impressive three hours of simmering in first water and then a brick-coloured adobo sauce made with pureed ancho chiles, onions, garlic, and surprisingly minimal dried spices, such as cumin and oregano. This is all about the chiles, but it is not a particularly hot dish. Anchos are, as Bobby Flay likes to say, "like spicy raisins." There's an underlying sweetness that sets off the mild heat of the pepper, and contrasts beautifully in this recipe against the vinegar-edge of the adobo.

I'm already on the record as saying that miniature = cute, and these are no exception. The first night I served them, we left the tortillas soft (but warm) and adorned them with sliced peppers and a smear of refried beans, and the second night, I crisped the tortillas in a cast iron frying pan until blistered with gold and served them with just the salsa and a little cilantro. The tortillas are about a finger's-length in diameter, making these just a few quick bites each. You could make even tinier ones, just one bite each, and I probably would if I were serving them as party snacks. In fact, I might just have to have a party so that I can do so!

Red Adobo of Pork
(Adobo Rojo de Cerdo)
adapted from the excellent New Complete Book of Mexican Cooking by Elisabeth Lambert Ortiz

7 ancho chilies, toasted, de-stemmed and de-seeded, torn into pieces and covered with warm water
3 lbs. boneless pork shoulder, cut into one-inch cubes
1 onion, peeled, halved, and stuck with 2 cloves
1 onion, peeled and diced
3 cloves of garlic, chopped
1/2 teaspoon ground oregano
1/2 teaspoon ground cumin
black pepper
1/2 teaspoon sugar
398 ml./14 0z. canned, diced tomatoes
1/4 cup cider vinegar
1 tablespoon lard, bacon drippings or corn oil
Salt
Black pepper

Start with the pork. In a heavy dutch oven, place the pork and the clove-stuck onion with enough lightly salted water to just cover. Bring to a simmer, reduce the heat to a very gentle heat, and cook (covered) for 2 hours. The meat will be very tender. In the final hour of the meat simmering, start the prep for the sauce.

Let the peppers rest in their warm bath for 20 - 30 minutes, until thoroughly soft. Remove the peppers from their water and place them in a food processor, along with the chopped onion, garlic, cumin, oregano, sugar and tomatoes. Process until you have a fairly smooth, heavy puree. In a heavy skillet, heat the lard, and add the puree. Saute the mixture over a lowheat, stirring constantly, for about five minutes.

When the pork has finished simmering, remove the pork pieces from the liquid, which has become a lovely pork-stock. Strain the stock, and reserve one cup. Freeze the rest for the next time you want to make black bean soup.

Thin the ancho mixture with the reserved pork stock, and transfer the mixture to your now-empty dutch oven. Add the pork back to the pot, add the vinegar, and stir well. Simmer uncovered over low to medium-low heat. The sauce will finish cooking and become quite thick. Taste the sauce, and add salt and black pepper as needed.

Serves 6. Leftovers make awesome burritos with beans, grated cheese, and salsa.

December 06, 2005

Don't Let Anyone Tell You...

Don't let anyone tell you that you can't make quesadillas out of leftover aloo gobi. Because you totally can.

I used to make pizza out of anything leftover. My mother used to conceal leftovers in scrambled eggs. Now, I make quesadillas. A little cheese to act as culinary glue, a little Sriracha sauce, and dinner was good to go!