Showing posts with label Vegan (or veganizable). Show all posts

December 31, 2016

Holiday Yams (Sweet Potatoes)


For some reason, in Canada (and in parts of the USA) we called orange-fleshed sweet potatoes (Convolvulaceae) "yams" even though they have no relationship to the true yam (Dioscoreaceae). Technically, this dish should be Holiday Sweet Potatoes, but so far the change hasn't really stuck. I am apparently a prisoner of my childhood lexicon.

I dreamed this recipe up years ago, and we've had it for Christmas dinner every single year since, whether we're having turkey, ham, duck, goose, or anything else. You can cook them in the oven with the other dishes, if you have room, but you could also cook them on the stove-top if that works better for you.

Holiday Yams

Serves 4

2 medium orange-fleshed sweet potatoes
1 cup orange juice (or a mixtured of citrus juices)
4 slices fresh ginger root, peeled
1-2 star anise stars
1 cinnamon stick
4 whole cloves
4 green cardamon pods
small pinch of salt (optional)

Peel and dice the sweet potatoes. You can cut them into larger, stew-sized chunks, or smaller dice, however you prefer. You should have about 4 cups' worth of cubes.

Pour the orange juice over the cubes, and tuck the spices around them, being sure to submerge the spices into the juice, so that the flavour is carried throughout.

Cover the pan and bake until tender - the timing will depend on the oven temperature, so if you've got other items in the oven that require a specific temp, you'll need to work around that. For small dice, such as the one you see here, 40-45 minutes at 325°F/170°C should suffice, but if your oven is hotter, it could take as little as 30 minutes (you'll need to check).

Drain the orange juice or use a slotted spoon to remove the cubes of sweet potato from the juice and remove the spices (I leave the ginger in) to serve. If you have leftovers, they can be stored as-is in a refrigerator container, and gently reheated on the stovetop either in fresh orange juice, a little water (steaming), or fried in a little oil or butter.

December 03, 2016

Chocolate Cherry Bombs: No-Bake Chocolate Drop Cookies


My mother called these "Summer Cookies" because you could make a batch on the hottest day of the year without turning the oven on, but they are equally delicious in colder months (and set up faster, too). These are dense, chewy, sweet little bombs. You can of course vary the fruits as you like. We made these with just raisins when I was a kid, but I really like dried cherries (sweet or sour cherries) either instead or in addition. Dried cranberries would also be delicious.

This would be an excellent recipe to make for a cookie exchange, because it makes a large batch that takes very little time. Oh, and everyone seems to love them, even if they are skeptical at first glance.

This batch is vegan, as I made it for a dietarily-mixed workplace function, but you could replace the coconut oil with butter, and the oatmeal cream for milk to get my mother's original version. The recipe can be halved or doubled to meet your needs.

Note: Because the salt grains are large and added with the dry ingredients, they don't dissolve quite as much as they might otherwise. This means that you'll get an occasional extra little crystalline crunch as you bite into the the cookie, with a burst of extra flavour. I think it's a lovely feature, but if you prefer to have that salty bite less prominent, simply use half the amount of fine grain salt, or add it to the chocolate mixture while it is on the stove so it has the chance to dissolve.

Chocolate Cherry Bombs

Makes about 6 dozen small ones

1 litre (4 cups) raw (or brown) sugar
250 mL (1 cup) cocoa powder
125 grams coconut oil (or butter)
225 mL oat milk (or dairy milk)
1/2 teaspoon vanilla extract
1.5 litres (6 cups) rolled oats (thick cut, not instant)
125 mL (1/2 cup) dried shredded coconut (unsweetened)
125 mL (1/2 cup) raisins
250 mL (1 cup) dried sweet or sour cherries
1/2 teaspoon coarse sea salt or Kosher salt

In a large saucepan or dutch oven over medium heat, heat the sugar, cocoa powder, coconut oil (or butter), and milk. Let the mixture cook and bubble for about 3 minutes, stirring well.

In a second bowl, combine the dry items: oats, coconut, raisins, cherries, and salt.

Remove the chocolate mixture from the heat, and stir in the vanilla extract. Then add all of the dry mixture, and stir vigorously with a sturdy wooden spoon until there are no more dry patches and everything is thoroughly integrated.

Use a small disher or a tablespoon to drop cookies onto parchment, waxed paper, or foil lined trays (ideally, something that fits in your fridge or freezer if it's hot out). They don't expand, so you can pack them quite closely. You can make them any size you like, but because they're so sweet and intense, I make them quite small. You can always have more than one.

Let the cookies harden for an hour or so before serving (it might take longer in warm weather, unless you refrigerate them). You can store them in a waxed-paper lined tin in the cupboard or fridge.


November 23, 2016

Moroccan Eggplant Salad/Dip: Zaalouk


One of my favourite dishes from Marrakech was an eggplant salad called Zaalouk (also spelled Zalook, amongst other variations). Moroccan cuisine is very big on salads, both raw and cooked, and this is a particularly popular one. Although you can find zaalouks made from other vegetables than eggplant, it does seem to be the one most commonly seen in the wild. Sometimes it simply showed up unannounced alongside whatever tagine I had ordered, and sometimes I selected it (along with one or two other options), from a menu. Every time it was a little bit different, and every time it was delicious.

It's pretty easy to make although it does take a bit of time, but since it is usually served either cold or at room temperature, you can make it in advance. The preparatory stages up to frying the eggplant are pretty much the same as the Turkish Eggplant Casserole that I was raving about last summer (and still make often), and it's not impossible that both dishes are related to the Afghani dish Burani Bonjon. It's flavour profile is quite different from Baba Ghanoush, the eggplant dip/spread that North Americans seem most familiar with these days, but it can fulfill a similar role.

This recipe was adapted from Fleur d'Oranger, Masala & Co's traditional recipe. I made mine a bit coarser, because that was the way I usually received it in Marrakech, but really you can make it as coarse or as smooth as you like. This makes a small batch, but can be easily doubled.

Eggplant (Aubergine) Zaalouk

Serves 2 - 4

1 medium, firm eggplant
Kosher or coarse sea salt
Olive oil (about a quarter of a cup, total)
1 small yellow onion, finely diced
1 cup canned diced tomatoes with juices
1 tablespoon tomato paste
1/2 tablespoon (sweet) paprika
1/2 teaspoon pimentón de la vera (or other smoked paprika)
1 1/2 teaspoons ground cumin
small handful cilantro leaves (optional)

Prepare the eggplant by removing the cap and slicing lengthwise into 1/2 centimetre thick slabs. Dissolve a generous tablespoon of salt in hot water, and then add cold water until you have about six cups in a large bowl. Add the eggplant slices and allow them to brine for 10 minutes, or up to 8 hours (cover them with a plate or otherwise keep them submerged in the brine as much as possible). Drain, rinse, and press the slices firmly with paper towels or fresh linen towels to dry them out.

In a large skillet, heat a tablespoon of olive oil over medium-high heat until it just shimmers. Tilt the pan to ensure the bottom of the pan is well coated. Have a receiving plate standing by. Brush the first few (dried, pressed) slices of eggplant with olive oil, and fry them in batches, repeating with a little extra olive oil added between each batch, until golden on each side and very soft - about three minutes per side, depending on your heat level. Remove them to the nearby plate as they finish to make room for the next pieces.


Into the empty skillet, heat a bit more olive oil, and add the diced onion and sauté until soft and translucent. Add a good pinch of salt, and stir through. Add the tomato paste and stir through. Add the spices and the tomatoes with their juices, and stir through, lowering the heat to medium-low, and continuing to stir, scraping the bottom of the pan clear as you go. Cook and stir for about another five minutes. If you want to add a hot chile pepper or even just a pinch of pepper flakes, now is the time to do that.

Place the fried eggplant on a clean cutting board, and chop roughly. Add the eggplant back into the skillet, along with any accumulated juices/olive oil that might cling to the cutting board or plate. Add the cilantro, if using. Stir everything together and continue to cook, breaking up pieces and mashing lightly with your spoon or spatula. If it looks too dry, add a bit more olive oil.

When everything is nice and tender and any excess water has evaporated, about 10 minutes if you fried your eggplants thoroughly, remove from the heat and scrape into a serving bowl (taste-test a piece of eggplant to make sure it's cooked through with no hint of raw flavour). If you prefer a smoother dip, you can blitz it quickly in a mini-prep or with a stick blender or even vigorous use of a potato masher. Add a tiny drizzle of olive oil to the top, and set aside to cool. Cover with plastic wrap and refrigerate if not using within an hour or so.

Excellent on flatbreads or crackers, or on any plate-side. I tend to use it almost like a chutney, dolloping it onto my plate alongside other dishes.

October 03, 2016

Gingered Plum Crisp


Apple Crisp is one of my favourite homemade desserts. It's good enough to serve to company, yet still relaxed enough for any casual supper. Even better, if there is any leftover, you can easily enjoy it the next day for breakfast. Fruit, oats, right? Practically health food.

This is not Apple Crisp, of course, but it follows the same principles of preparation: pile your fruit into a baking dish, sprinkle with sugar, add a crumbly layer of oat streusel, and bake. The biggest difference between this and my Apple Crisp, in fact, aside from the use of plums instead of apples, is the spicing. Oh, and this one's vegan. Don't worry, though, you can always replace the coconut oil with butter, if that's how you roll. The coconut oil gives it a delicately tropical note that is very pleasant with the ginger and the plums. You could also accentuate that aspect by adding a tablespoon of grated unsweetened coconut to the oat mixture.

I made one larger baking dish (16-centimetre round baking dish, not pictured), and these two little gem-sized (perfect for bento, might I add) to take to work to share with a colleague. I forgot to take any pictures of the larger one, but here are the little bitty ones.

Gingered Plum Crisp

Fruit Layer
500 grams prune plums
1 tablespoon raw sugar
1 inch fresh ginger root, coarsley grated

Crisp Layer
1/2 cup all-purpose flour
1/2 cup rolled oats
1/2 cup raw sugar
1/4 teaspoon kosher salt
1 teaspoon ground ginger
1/2 teaspoon ground coriander seed
3 tablespoons solid-state coconut oil

Wash the plums and slice them in halves to remove the pits. Chop them into small bite-sized chunks (not too small, or they will lose too much texture). Toss with sugar and ginger, and put them evenly into an baking dish. They should come up about three quarters of the height of the dish. If you are using silicone cup moulds, put them on a tray or inside another baking dish for stability. Fill them 3/4 high, too.

In a medium mixing bowl, combine the dry ingredients of the topping with a fork. Add the coconut oil last, and stir very thoroughly with a fork or pastry blender to ensure that the oat mixture gets thoroughly coated. There should be very little dry and no floury-looking bits, so keep stirring until it all comes together. If you absolutely have to, add another tablespoon of oil (you shouldn't need to). If you press a bit of the topping between your fingers, it should clump together in a crumbly sort of way.

Scrape the topping out of the bowl onto the fruit. Spread it out to evenly cover all of the plums, and press lightly with your fingers to help create a surface-crust when it bakes. Don't press too hard, or you'll compact the topping and it will be a bit tough. Note that you can fill your dish right up to the edge, since it will "settle" a little as it bakes. If your plums are very juicy, they might bubble up a bit over top of the oat mixture in places. This is fine, if not quite as tidy looking.

Bake uncovered at 375 F/190 C for 40 minutes (25 for the little ones), or until the topping has taken on a dark golden hue and has sunk down in the dish slightly. It might be a bit darker on the edges - that's okay. Allow to cool at least a few minutes before serving (but it is plenty delicious at room temperature, or chilled, too). Serve on its own, or with a topping of your choice. Whipped coconut milk, perhaps?


Adorable, aren't they? Just perfect for dessert, breakfast, bento, or a tea-time treat.

August 10, 2016

International Bento: Guam - Chamorro Red Rice


It's a funny thing, but I've been making this for quite a number of years, thinking that it was Mexican red rice. It is not. I mean, it makes sense, because Mexican cuisine makes good use of achiote seeds, and that is what gives the rice that nice red colour. I'm not even sure at what point I made the decision to make this dish, but it was cobbled together out of solid rice pilaf theory and the vague knowledge of Mexican red rice being a real thing. Which, of course, it is. It's just not this.

So recently, I had an idle moment of wondering how far my red rice differed from classic Mexican versions (taking into account that there are probably a few variations), and was startled to discover that what I was making didn't even come that close. Amused at my assumptions, I did a bit more creative googling, and discovered that what we have been happily devouring for several years now, is in fact a Guamanian dish called Chamorro red rice. The name Chamorro denotes the indigenous people of Guam (the name Chamorro also applies to the indigenous people from the Northern Mariana Islands).

Unsurprisingly, there are quite a few different styles of this dish, too, including everything from bacon to peas. While many of the recipes use a very generous amount of oil, mine is more modest, meaning that the rice can go comfortably with a richer dish without feeling too heavy.

The biggest difference that I found between my recipe and most of the others available online, is that I grind the achiote seeds and use the resulting powder in the dish, rather than simply soaking them in water to colour the water, which is then used to flavour and colour the rice.

Chamorro Red Rice

Serves 4

200 grams parboiled rice
1/2 tablespoon peanut oil
1/2 small yellow onion, finely chopped
2 cloves of garlic, minced or crushed
1 heaping teaspoon annatto seeds, ground
1/4 teaspoon coarse sea salt
1/2 teaspoon ground cumin
375 mL water and 1 teaspoon vegetable base (or equivalent vegetable broth)

Heat the oil in a medium pot (one with a tight-fitting lid). Sauté the onion and garlic in the oil, and then add the ground annatto, cumin, and salt. Stir well, then add the rice and stir until the grains are evenly coated with oil.

Add the water and vegetable base (or broth), stir, and bring to a boil. Turn the heat to the lowest possible setting, and allow to cook gently for 15 minutes (covered). Then remove the pot from the heat (don't just turn the burner off) and let it sit for another 5 - 10 minutes before you lift the lid. Fluff with a fork and serve.

So what else is in the bento pictured above? Smokey roasted chicken thigh (bone removed post cooking) and corn seasoned with lime juice, salt, and ancho powder.

I think this dish goes particularly well with Margarita Chicken.

July 03, 2016

Harira


I continue to be inspired by my vacation in Marrakech last year, and as you can see I have many more Moroccan recipes still to explore.

Harira is a traditional soup from Morocco, and while it is enjoyed year-round as an appetizer or light meal, it gains particular significance during Ramadan, for many households being a significant dish for iftar, the traditional meal that breaks the daily fasting during that month. Its recipes are as varied as the households they come from, but generally are all based on a combination of tomatoes, legumes, a starch such as rice or pasta, green herbs, and spices. Meat is an optional component, but used in fairly small quantities as it is not the focus of the soup. I've used lamb in this version, because we have such an excellent supplier of good quality lamb that I cook with it as often as I can, but beef or chicken could be used instead or the meat could be omitted entirely. For a meatless, vegan harira, I would double the amount of lentils, and possibly also increase the amount of chickpeas.

The soup is thick and hearty, and always served with bread. As part of iftar, it might also be accompanied by dates, hard boiled eggs, small savoury pastries, even homemade pizza. Iftar is served just after sundown, and although it is Ramadan right now, we are not Muslim so we enjoyed the harira at our usual dinnertime.


This version of harira is pretty close to the one I first tried at the market restaurants that spring up every evening in Jemaa El Fna, the main square of Marrakech. It is adapted from MarocMama's recipe.

Harira with Lamb

Makes 7-8 cups

1 medium yellow onion
4 cloves garlic
5 large roma tomatoes
225 grams lamb, diced small (optional)
1 cup chopped parsley
1/2 cup chopped cilantro
4 tablespoons tomato paste
1 tablespoon olive oil
3/4 teaspoon salt
1 1/2 teaspoons black pepper
1 tablespoon sweet paprika
1 tablespoon turmeric
1 small pinch saffron, crushed between fingers (optional)
400 grams cooked chickpeas
1/4 cup dry green or brown lentils (washed)
30 grams spaghettini or other thin pasta (broken into short lengths)
1/2 cup unbleached all-purpose flour
5 cups water

Prepare your mise en place: roughly chop the onion and garlic together, and the tomatoes and herbs each separately.

In a food processor, puree the onion and garlic until smooth (a tablespoon of water may help this process).

In a Dutch oven, heat the olive oil over medium heat. Add the onion/garlic puree, and stir and cook for a few minutes. Increase the heat slightly, and add the meat, if using. Stir and cook the meat until it has lost its raw look on all sides.

Add the tomatoes to your now-empty food processor and quickly puree. Add the pureed tomatoes, tomato paste, chopped herbs, salt and the spices, and stir well. Add four of the five cups of water, and bring up to a simmer. Add the washed lentils and chickpeas, and stir through. Reduce the heat to a bare simmer, and let cook for an hour, to let the lamb get tender. This can be reduced to 30 minutes if you aren't using the meat - long enough for the lentils to get tender.

While the soup is simmering, whisk together until smooth the remaining cup of water with the flour. Let it stand while the soup cooks, so that the flour fully hydrates.

When the lentils are cooked and the lamb has had some time to get tender, add the broken pasta and stir through. Then, stirring constantly, add the flour/water mixture in a thin, steady stream. The soup will start to thicken very rapidly, but keep stirring it until all of the flour mixture has been added. This is a very thick soup. Cook and stir for another 20 minutes, to allow enough time for the raw taste of the flour to cook out, and for the pasta to cook. You will need to keep the burner on its lowest heat and stir the soup regularly, to prevent the scorching. Serve as an appetizer or whole meal, with bread and any other accompaniments you like.


June 25, 2016

Moroccan Orange Slices with Orange Flower syrup


This is an incredibly refreshing dessert, particularly after a rich meal, or a meal eaten late at night. It could also be a nice finish to an elegant breakfast. Best of all, it's quick and easy. The trickiest bit is peeling the oranges, and you'll probably master that pretty quickly.

Also, if you bought orange flower water ages ago for a recipe where you used a mere teaspoon, and the bottle has just been sitting in your cupboard ever since, here's a fantastic use for it.

Moroccan Orange Slices in Flower Water

Serves 2 - 4

2 large navel oranges
1/4 cup orange flower water
1/4 cup sugar
Ground cinnamon (to taste)
Mint sprigs

Start by making a simple syrup from the orange flower water and the sugar. Bring it to a simmer, and cook it for about five minutes over low heat. Put it aside to cool. This makes twice as much syrup as you need, so you can put the rest in a small jar or bottle in the fridge until next time (or for pancakes), once you're done here.

Using a good, sharp knife, cut the top and the bottom from the orange. Don't hack the whole top end off, just take enough off the top of it until you're through the pith and can see the top of each section of orange. Stand the orange on end, and position your knife at an angle where the pith meets the flesh of the orange, with the blade facing down and angled out. Gently but firmly saw downwards to remove a strip peel-and-pith off of the orange. Re-angle your blade as you go to follow the shape of the orange. If you lose a bit of orange, that's okay. Turn the orange a quarter turn, and repeat cutting the strip away. Do this twice more, until each "side" of the orange has a strip of peel removed. Then you should be able to remove the remaining peel in four more slices (plus maybe an extra one or two to get little bits of pith that stayed behind). Turn the orange upside down, and remove any bits of pith that stuck to the bottom side. There always seems to be a few. Then, turn your naked orange onto it's side, and cut it into rounds about a centimetre thick. Repeat with the other orange. It's so much easier the second time!

Arrange the orange slices on plates, however you like. I like to remove the centre bit of core-pith, but that's up to you, and if the centres of the slices are a bit fibrous, you can use an apple corer or a sharp knife to remove those bits. Drizzle a tablespoon of syrup over each orange, and sprinkle with cinnamon. Garnish freely with fresh mint, and you're done.


I note that when we finished the orange, we mushed the mint leaves around in the syrup, and ate them too. Urp.

March 13, 2016

Moroccan Shredded Carrot Salad with Lemon Dressing


As I mentioned in the post on Preserved Lemons, we went to Marrakech last December. It is all still in my head, especially the flavours and sounds and scents of the markets and street food, and I am continue to investigate recipes for dishes that we experienced, as well as those that I regret missing the opportunity to experience.

This carrot salad is modelled after the one that was served to us upon arrival in our riad. As we were scheduled to arrive quite late in the evening, our host offered us the option of booking a dinner so that we could relax and enjoy our first evening, without struggling out into a very unfamiliar sort of place late at night after a day of travel. We gratefully accepted, and were sent a menu to pre-order from. The dinner included a choice of three salads from a list of about seven choices, one two-person tagine from a half-dozen compelling possibilities, and a dessert from again, a handful of options. Bread was of course served automatically on the side (Morocco likes to have bread of some sort at every meal) and wine was also available, despite the riad's owners/operators being muslim themselves.

One of the salads we chose was a shredded carrot with lemon, which arrived neatly domed on a plate. I remarked on how finely grated the carrot was, and how wet the dish overall appeared, as we dug into it. We were delighted with the intensity of the lemon flavour, and it automatically went into my mental "make this!" file. While Morocco is famous for its use of preserved lemon, this recipe uses fresh lemon juice only.

Moroccan Shredded Carrot Salad with Lemon Dressing

Serves 4

3 large or 4 medium carrots
2 tablespoons cilantro or parsley leaves
1 large mint leaf
4 tablespoons fresh lemon juice
4 tablespoons extra virgin olive oil
1/4 teaspoon of salt
1/4 teaspoon sugar (honey would also be fine)
1 clove of garlic, crushed
1/8 teaspoon ground cumin
1/8 teaspoon sweet paprika

Peel and finely shred the carrots, and put them in a non-reactive bowl (note that the carrot juice might stain plastic, so best use a glass or ceramic bowl). I used the fine side of a big box grater to do the shredding, which takes a while. If you have a mandoline or other fancy slicer, do whatever gets you the finest possible cut without turning utterly to mush.

Finely chop the cilantro (or parsley) and mint leaf, and stir through the carrot shreds until well distributed.

In a small bowl, whisk together the lemon juice with the olive oil, salt, sugar, garlic, cumin, and paprika. Taste the dressing and add more salt if needed. Pour the dressing over the grated carrots, stir well to combine, cover and refrigerate for at least two hours, to give the carrots time to soak up the flavours.

Spoon onto plates, or pack into a teacup or measuring cup (or small bowl) to make a tidy presentation. The juices from the salad may seep out from the edges quite a bit, so be prepared to blot the plate if you want to keep it clean. In the riad, this was served Moroccan style, meaning one each salad was served on a separate plate, from which we served ourselves, rather than the individual portion you see here.

January 16, 2016

Preserved Lemon


We spent last Christmas in Marrakech, and returned with a reignited love of North African flavours. The single most notable ingredient in Moroccan cooking, from my perspective, is the generous use of preserved lemon that occurs in everything from tagines to tangia, couscous to zaalouk. It is a key component of many of the signature dishes of the region.

I've talked about the wonderful depth of flavour one can get with preserved lemon in my Lemon Risotto recipe. Historically, I've made an Indian version of preserved lemon, namely a modified Nimbu Ka Achar (not the sweet version), which has the additional flavourings of a smidge of cayenne and turmeric, giving the finished condiment a deeply burnished yellow appearance, and a lightly spicy fragrance from the additional seasonings.

Today, I decided to make a more classic version, because I've planned a lot of Moroccan recipes in the next few months. The lemons will take about a month to cure before I can use them, and will continue to get better and better after that.

Preserved Lemon

1 sealable 500 ml canning jar with a clean new seal

4 unwaxed lemons
3 tablespoons coarse salt

Wash the lemons really well. If you have the misfortune to have access to waxed lemons only, you can clean them thusly: In a colander, pour boiling water over them to heat/loosen the wax. Immediately place them in a cool vinegar water bath. One lemon at a time, rub the wax off using a scrub made of baking soda and coarse salt on a damp, clean kitchen cloth. Rub and scrub and rinse under cool water, until the skin squeaks (like tupperware) when you rub it. Dry well and set aside. Or, you can google for a different wax removal system that suits you.

Fill your clean canning jar with boiling water, and let it stand. Let some of the water run over the inside of the lid, too, so it's best to do this in a clean basin or handy kitchen pan.

On a clean cutting board, slice three of the lemons lengthwise into eighths. Traditionalists leave the lemons joined at one end, that is to say, not cutting the whole way through, but I find it's quite hard to fit them all into the jar that way. So, I do one the traditional way, and the others I just slice into eighths. Discard any seeds.

Empty the boiled water from your jar. Sprinkle a little of the coarse in the bottom, and start layering your lemon wedges and salt into the jar, using all of the salt. If you are doing traditional lemons, connected at one end, pack some of the salt between the slices and into the middle. The lemons should just nicely fill up a 500 ml jar. Finally, take your last lemon, and squeeze the juice out. Discard the empty husks, and pour the juice over the salted lemon slices, and seal the jar. The juice will not cover the lemons, but rather will fill about half-way, depending on how juicy your lemons are.

That's pretty much all the work. Put the jar on a counter where you will see it every day, and once per day turn it upside down and back again, to make sure all the lemon gets bathed in the juice. After about four weeks, you can move it to the fridge, and you don't have to turn it anymore. Over time, the lemons will start to break down a bit, releasing more juice into the jar, and dissolving some of the pulp.

To use, unseal the jar and use a clean fork to extract however many segments you need. Re-seal the jar, and return to the fridge. I've kept one as long as a year and a half, with no signs of deterioration. The combination of salt and the extremely acidic environment seem to keep it from growing mould or unfriendly bacteria. That being said, food safety, folks. If something does go wrong with yours, and it starts growing something or smelling funky (in a bad way, because it does smell a bit funky in a good way already), use your judgment. I've never had one go bad on me, but I'm not ruling it out.

29 days to go...

November 22, 2015

Cranberry Sauce with Orange & Sherry


It's that time of year again. Canadians have already had Thanksgiving, Americans are just revving their KitchenAid™ motors and/or checking travel schedules.

Cranberry sauce has a place on many of our holiday tables. In North America, wherever there is a roast turkey, cranberry sauce must not be far behind. For some folks, it's as easy as opening a can and upending the contents into a bowl, and for others, it takes a little more time, but really not by much. Plus, you can make it ahead. Freeze it, if you're really super organized (labeled, of course) or just store it in a sealed container in the fridge for a few days before the big event.

This version is made with a bit of orange juice instead of water, and a splash of sherry (optional) at the end. It takes about fifteen minutes to make. If you like your cranberry sauce sweet, go with the full amount of sugar. If you prefer it tart, use the lesser amount. If you're not sure...well, you can always add more sugar later.

Cranberry Sauce with Orange & Sherry

340 grams fresh or frozen whole cranberries
3/4 cup - 1 cup sugar
3/4 cup orange juice
1 cinnamon stick
zest of one clementine, thinly sliced
2 tablespoons dry sherry (optional)

If you are using fresh cranberries, rinse them in cold water, and discard any that are overripe (discoloured, already squishy), and pick out any bits of stem, if necessary. Drain.

In a large saucepan (do not be fooled into using a small one! You want high sides to keep hot sugar from splashing and burning you) over medium heat, dump the cranberries (fresh, frozen, or defrosted), sugar, cinnamon stick and orange juice into the pan. Using a long-handled wooden spoon, stir it about and let it come up to a simmer. Add the zest, stir through, and let the mixture bubble and spit for about ten minutes, until all of the cranberries have swollen up and split open, and then about five minutes longer, stirring periodically. Taste the mixture carefully, by spooning some onto a cold spoon, letting it cool down, and then tasting. If you want to add a bit more sugar, by now you should be able to tell. If you want more sugar, add it and cook for another five minutes, until fully dissolved.

Take the pan off the heat, and stir in the sherry. Let the mixture cool (it will thicken up a lot as it cools, and the natural pectin in the cranberries has a chance to set). When it has cooled down to your satisfaction, put it in a serving bowl and cover with plastic or a sealable fridge/freezer container, and store in the fridge until ready to serve (or ready to transfer to the freezer). It will set up very firmly, so you may wish to stir it about before serving.

If you prefer your cranberry sauce warm, you can reheat in a saucepan it over low heat, or in the microwave (in the appropriate kind of dish, partially covered, so rogue cranberries don't explode all over the interior).

There you have it: a glistening jewel on your holiday table, and absolutely fantastic on turkey sandwiches the next day.

July 18, 2015

Chickpea & Carrot Salad with Tahini Dressing


We're well into salad season. Every thought of actually cooking something when the temperature keeps spiking outside is accompanied by a shudder, and a look around for alternatives. Alternatives such as letting someone else do the cooking, perhaps, or maybe just preparing something that doesn't require heat.

This simple salad works really well as a dinner salad, or as a take-to-work/school lunch, takes very little time to prepare, and lets me continue my love affair with tahini unabated.

You could, of course, cook the chickpeas yourself, in which case do that however you like best. In the interests of a no-heat meal, however, this recipe is made with canned chickpeas (or, if you've got some home-cooked ones stashed in the freezer, by all means use those instead).

Chickpea & Carrot Salad with Tahini Dressing

Serves 2

1 400 gram can of chickpeas/garbanzo beans, drained and rinsed
50 grams of grated carrot (about 1 medium)
1 green onion, finely sliced
1 cup loose-packed cilantro, washed and roughly chopped

Tahini Dressing (only half needed for this recipe)

3 tablespoons tahini (stirred well)
1/2 teaspoon salt
Juice of half a lemon
1 clove garlic, pressed or pureed
1 tablespoon olive oil
cold water, if necessary, to made a thick salad-dressing consistency

This should all be pretty self-explanatory. In a large bowl, combine the salad ingredients (I hold the cilantro to the very end, though, and add it after the dressing).

In a small bowl, combine the dressing ingredients, mixing well with a fork (or one of those mini-whisks, if that's what you like). I didn't need to add water, here, but if you find your dressing is too thick or is clagging up (as often happens if you're down at the bottom of the tahini jar), add a little cold water, a tablespoon at a time, and stir until it becomes creamy again.

Add half the dressing to the chickpeas, carrots, and green onion, and stir through. Add the cilantro, and stir through again. Serve immediately, or transfer to a sealable container and chill until you're ready to eat.

If you happen to live near a Turkish bakery, or are feeling extra industrious and unafraid of baking during the heat, I highly recommend picking up a nice cheese or spinach gözleme (soft flatbread with baked-in filling) to have alongside this.

June 15, 2015

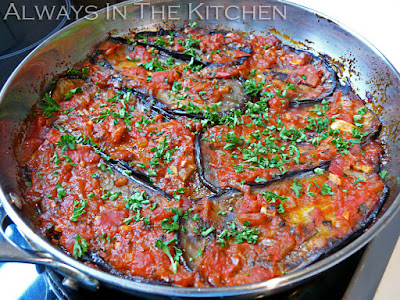
Imam Bayīldi - Turkish Eggplant Casserole


Traditional recipes for Imam Bayīldi involve stuffing hollowed out eggplants (or halved eggplants) with onions and spices, and braising them in a surfeit of best quality olive oil until tender. I've made some serious versions in the past, but they've always felt like a lot of work for something that is primarily a side dish to me (although I acknowledge that it makes a terrific main course for lunch). So, naturally, I was very excited to see this streamlined casserole version from Feed Me Phoebe.

The slightly scandalous name, which translates "The Priest Fainted" has entertaining stories as to why exactly, the Imam keeled over - everything from swooning at the deliciousness to fainting at the cost (or sheer amount) of the olive oil. Various other versions abound in the Eastern Mediterranean, varying the spices, or in some cases the vegetables. I assume that there are versions of this that date back to considerably before the introduction of the tomato, but it seems that the tomato-and-onion version is one of the most popular.

Imam Bayīldi

Serves 4

2 small (but not baby) eggplants
Kosher or coarse sea salt
Olive oil (about a third of a cup, total)
1 small yellow onion, finely diced
2 large garlic cloves, minced or pressed
1/4 teaspoon chile pepper flakes
Dash of cinnamon
Dash ground white pepper
400 mL canned diced tomatoes, with juices
1 tablespoon tomato paste
1/4 cup finely chopped fresh parsley, divided

Prepare the eggplants by removing the cap and slicing lengthwise into 1/2 centimetre thick slabs. If you cut them into coins, it's much harder to get even coverage of the pan without gaps, so lengthwise is by far the better way to go for this dish. Dissolve a generous tablespoon of salt in hot water, and then add cold water until you have about six cups in a large bowl. Add the eggplant slices and allow them to brine for 10 minutes, or up to 8 hours. Drain, rinse, and press the slices firmly with paper towels or fresh linen towels to dry them out.

In a medium skillet (this one is a 24 centimetre steel skillet), heat a tablespoon of olive oil over medium-high heat until it just shimmers. Tilt the pan to ensure the bottom of the pan is well coated. Have a receiving plate standing by. Fry the dried-off eggplant slices, in batches, with a little extra olive oil added between each batch, just until golden on each side - about one or two minutes per side. Remove them to the nearby plate as they finish to make room for the next pieces.

Preheat your oven to 180 C (350 F) with a rack in the middle.

When all the eggplant has been fried, start building the sauce in the same (now emptied) skillet. Start by adding a little more olive oil (this is the last addition of olive oil), and then add the onions and garlic. Add a pinch of salt (not much, especially if your canned tomatoes are salty) the chile flakes, the cinnamon, the white pepper, and half of the parsley. Sauté until translucent and tender, and then add the diced tomatoes and their juices, and the tomato paste. Cook altogether until it starts to resemble a sauce, about four or five more minutes. Then remove about 2/3 to 3/4 of the sauce to a nearby bowl, wipe down the edges of the skillet, and start layering the eggplant into the skillet, on top of the bit of sauce that should nicely coat the bottom of the pan. Alternate the layers of eggplant with the layers of tomato sauce, and try to stack the eggplant slices in so they cover the surface of the pan in a neat, jigsaw like fashion. Make sure the top layer is sauce (ideally a thin layer of sauce so you can admire the prettiness of the eggplant slices), and place it, covered, in the preheated oven. If I use small eggplants, I only get two layers from them, but that works nicely with the amount of sauce.

Bake covered for 25 minutes, and then remove the cover and bake for another 20 minutes. Remove and allow to cool somewhat before serving. Garnish with remaining parsley.

This dish is often served at room temperature or even chilled, so it makes a surprisingly good picnic dish (or take to work dish). Paired with a nice chickpea salad, it's a beautiful, satisfying lunch.

March 08, 2015

Roasted Vegetable Bowl with Tahini Dressing


This wonderfully veggie-packed, one-pan meal was inspired by a number of different online recipes, including Smitten Kitchen's Warm Butternut Squash and Chickpea Salad and also generally by the amount of reading I've been doing about tahini and the growing realization that I really, really like the flavour of sesame.

There's a bit of prep and chopping involved, but you can also do that part in advance and hold the prepared vegetables in the fridge for a day or two, ready to be seasoned and put in the oven. Doing the prep ahead of time makes this a reasonable dinner to make on a weeknight when you might be wanting something both easy and healthy. The above iteration was made using Hokkaido squash (aka Red Kuri), but butternut is also really nice (and a bit less intense).

You could probably describe this as "steam roasted", since there's a bit of liquid in the roasting pan, which hastens the process of the vegetables becoming tender. You could make this without that bit of liquid, also, simply omit the water from the instructions relating to the squash and cauliflower. You may, in that case, require a little longer of a roasting time (ten minutes or so).

Roasted Vegetable Bowl with Tahini Dressing

serves 3-4

1 small butternut squash or Red Kuri/Hokkaido squash
1/2 head cauliflower
400 grams cooked chickpeas (1 small can)
1/2 red onion
1 teaspoon ground cumin
1 teaspoon your favourite curry powder
coarse salt to taste
2 tablespoons olive oil, divided
toasted sesame seeds for garnish (not shown)

Tahini Dressing

3 tablespoons tahini
2 big cloves of garlic
3 tablespoons lemon juice
1 tablespoon of olive oil
big pinch of salt
Enough water to make a smooth sauce

Prepare the squash by cutting in half, removing the seeds/strings/guts, peeling, and dicing into bite-sized chunks. Store in the fridge in a bag or freezer-type carton if not using immediately.

Prepare the cauliflower by cutting into medium-small florets. Store in the fridge in a bag or freezer-type carton if not using immediately.

When you are ready to cook, turn your oven on to 400 F/ 200 C, with a rack in the middle. Get a large, open roasting pan prepared with a thin film of olive oil.

Place the cauliflower, cumin, a pinch of salt, a tablespoon of olive oil, and a tablespoon of water into a large bowl, and gently stir until the cauliflower is lightly coated with the oil/water/spice mixture. Carefully spread the cauliflower out on one side of the roasting pan. Pour any liquid in the bowl over top the cauliflower.

Rinse out the bowl, and place the squash chunks, curry powder, pinch of salt, a tablespoon of olive oil, and a tablespoon of water, and gently stir until the squash is coated. Spread the squash out on the other half of the roasting tray. Pour any liquid in the bowl over top the squash.

Roast the veggies for 20 minutes. You can prepare the chickpeas and onion while the vegetables are roasting:

- Drain and rinse the chickpeas
- Peel the red onion, and slice into short lengths (I slice thinly in one direction, and then cut into thirds, crosswise)

After the vegetables have roasted for the 20 minutes indicated above, scatter the chickpeas and red onion evenly over the cauliflower and the squash. Put the tray back into the oven and roast for another 10 - 15 minutes, or until the cauliflower pieces are tender, the chickpeas are heated through, and the sharp edge is off the onions.

Once everything is in the oven for that last 10 minutes or so, make up the dressing. Crush the garlic (or press, or pound with a mortar and pestle), and add it to the tahini. Add the lemon juice, the olive oil, and a good pinch of salt. Stir well. You will notice that the mixture starts to become thick and then appears to separate. Do not panic! Simply add cold water, one tablespoon at a time, as needed, stirring until the mixture become smooth and silky. Taste, and decide if you want to add more salt or lemon juice.

Once the vegetables are out of the oven, drizzle a third of the dressing over the pan, and gently stir to (partially) coat the vegetables with the dressing. Dish up into bowls, and drizzle with the remaining dressing. Scatter a few toasted sesame seeds over the top for texture and visual appeal (not shown, sadly).

Leftover reheat very nicely in the microwave.

February 15, 2015

Ful Medames


Ful Medames (also transliterated as Foul Mudammas, or Fuul Medammes, amongst other spellings), commonly referred to simply as Ful (pronounced "fool"), is a middle-eastern bean dish that deserves broader recognition in the western world. It is a popular breakfast dish in Egypt, but its reach extends easts through Saudi Arabia, north throughout the eastern Mediterranean countries, and south into the horn of Africa. It is cheap, filling, and delicious.

As can be expected from a dish that reaches through so many disparate cultures, there are countless iterations. The essentials appear to be fava beans, olive oil, cumin, and lemon juice, but there are variations that include any of (or a combination of) garlic, chopped onion, parsley, tahini, and even chopped tomatoes.

Ful is most commonly served with flatbread, which is used as a utensil to scoop up the beans. The type of flatbread used is going to vary by whichever culture you're in - the good news being that you can safely use whatever flatbread you've got on hand. I served mine with freshly made pita bread (because it was Sunday and I had no choice but to make it if I wanted it), but you could easily use lavash, Somalian canjeero, or heck, even tortillas or chapati. You can also spread it on toasted sandwich bread.

Ful is often served on its own, but equally often as part of a larger, tapas-style meal, especially at lunch or dinner.

While sometimes other beans are used to make Ful, depending on culture and geography, the fava appears to be dominant. Fava beans are a bit more intensely flavoured than chickpeas. They are quite earthy tasting, and therefore pair really well with cumin, and stand up very well under the pungency of fresh garlic and the sharpness of lemon.

You can store it in the fridge for a few days without ill effect, simply adding a little more water to loosen it up as you reheat it. I find that I can make a double batch on Sunday, and have it for breakfast for the rest of the week.

Ful Medames

Adapted from Serious Eats

Serves 2 - 4

2 cups cooked fava beans (or a 400 gram can)
1 tablespoon olive oil
2 small cloves garlic, lightly smashed
pinch of salt
1/2 tablespoon cumin seeds
juice of 1 lemon
1 1/2 tablespoons tahini
In a small skillet, toast your cumin seeds until fragrant, and then carefully pour them out onto a cutting board (or into a mortar).

Into the emptied, unwashed skillet add your beans (with their liquid if they're canned, otherwise with about 1/3 cup water) and heat over a medium flame.

On the cutting board, add your garlic cloves and a pinch of salt, and run your knife through a couple of times until the garlic is finely chopped (or, in a mortar, pound the garlic and cumin together until the garlic is a smooth paste). Scrape the garlic/cumin mixture into the beans, and stir through. If you like things spicy, feel free to add in a few chile flakes, too.

The beans should be gently bubbling away at this point. Once the garlic and cumin have been stirred around a few times, add the tahini and olive oil, stir through, and continue to cook, stirring. At this point, you can mash up some of the beans against the side of the skillet, to make a thicker gravy, or if your skillet is looking a bit dry, you can add a little more water to thin it out. Add a tablespoon or two of the lemon juice and stir through. Taste, and decide if it needs more salt (if you use canned beans, probably not, but if you cooked them up from dried, probably yes). Stir and mash the beans as needed until everything looks well heated and the texture is somewhere between baked beans and thick soup. I know, that's a lot of leeway, but you really do get to choose how thick or thin you want this to be. This shouldn't really take more than about five minutes total cooking time.

Pour/scrape the beans into a bowl. At this point, you can add any final finishing touches that you like (an extra drizzle of olive oil, Egyptian style, or a sprinkle of Aleppo pepper, Syrian style, for example, or maybe some carmelized onions, or some parsley).

Serve with warmed flatbread.

February 07, 2015

Prawn & Pumpkin Risotto


This is the traditional Hallowe'en dinner in our household, but really, you can make it all winter long when the winter squashes are cheap and plentiful. I've used a butternut squash here, but you could of course use any cooking pumpkin with firm, dense flesh (acorn or muscat squash might not be at their best here, because they would likely turn to mush with all the stirring). The final colour of the dish will depend greatly on which squash you decided to use, but usually ranges from an intense yellow to a vibrant orange.

For the shrimp, please check out this Oceanwise resource page for prawns/shrimp if you need help making an informed choice about sustainable harvesting.

If you're vegetarian/vegan, or just not a fan of seafood, you can omit the prawns and still have a beautiful, delicious side dish. Either way, don't drown in in cheese at the end - it really doesn't want or need it.

Prawn & Pumpkin Risotto

Serves 4

4 cups diced-small pumpkin or winter squash
250 grams risotto rice (arborio, carnaroli, or similar)
1 small onion, finely diced
4 cloves of garlic, minced or pressed
4 cups vegetable broth
1/2 cup white vermouth or dry white wine
2 tablespoons olive oil or butter
1 1/2 tablespoons tomato paste
1/2 teaspoon coarse sea salt
1/4 teaspoon ground white pepper
250 grams raw prawns or large shrimp (frozen is fine)
Hot water from a recently boiled kettle (just in case)

If you've read my other risotto recipes, you will know that I am extremely particular about the size of ingredients in my risotto. My theory is, broadly, if it's not a featured ingredient, it should be no bigger than a (cooked) grain of the rice that you are using. Basically, onions, I'm looking at you. Because the squash and prawns are features, they get to be bigger, but I do find having a small dice for the pumpkin here makes a more visually and texturally pleasing choice.

First step, as always, is get your mise en place ready: Peel, clean, and dice your pumpkin, and set aside. If you have a little less pumpkin than 4 cups, it's still fine, although 4 cups gives the best result. Finely dice your onion, and mince your garlic. Warm up your broth and keep it on a low flame on the stove, so it's ready to be ladled into the rice. Clean the shrimp, removing shells (if necessary) and veins. If frozen, rinse them in a sieve under cold running water until they are mostly defrosted. Basically, get all ingredients prepared, measured, and standing by, because you get no further time to prep once you've started cooking. Be sure to boil a kettle, and have the hot water standing by in case you need it later.

In a large saucepan, heat the butter or olive oil over medium heat until quite hot, and then add the shrimp and quickly sauté them until they just barely change colour. Remove to a nearby plate/bowl to add into the risotto later.

In the same saucepan, without cleaning it, add the onion and garlic, and sauté just until the onion begins to turn translucent. Add the salt and white pepper, and stir through.

Next, add the rice and stir well, to get a nice, thin coating of fat on the rice grains. Add the tomato paste, and stir through until it is completely integrated and there are no streaks of red running through the rice. Add the diced squash, and stir it through gently. (You can also reverse the order of adding the rice vs. the squash, no biggie as long as everything is nicely coated in the end. I find it easier to add the tomato paste before adding the squash, though, to get it evenly distributed.)

Add all of the wine/vermouth at once, and stir, carefully scraping up the bottom of the pot so that nothing sticks. Lower the heat to medium-low, and begin to add the warm vegetable broth, one ladleful at a time, stirring gently but pretty much constantly in between each addition until the liquid has been absorbed before adding more. It should take about 25 - 35 minutes to add all of the liquid, and that variable is based on how hot your burner is.

If you get to the end of your broth and find that the rice is not quite cooked enough to your taste, add a little of the hot water from your recently boiled kettle, and continue until the texture is just right - a little bite to the rice, but not crunchy. Next time, you might want to lower the heat a bit more.

When the rice is ready, stir the prawns gently into the risotto. If you want an especially luxurious dish, add in another tablespoon of butter or olive oil, but it's not strictly necessary. Cover the risotto, and remove from the heat. Let stand for five minutes, and then spoon into shallow bowls and serve. Feel free to add a garnish of parsley if you like, but steer clear of the parmesan.

January 04, 2015

Cong You Bing: Chinese Scallion Pancakes (with bonus Scallion Pancake Duck Tostadas)


I learned about these lovely Chinese flatbreads while walking hurriedly through Vancouver's Chinatown, some years ago. The image of them being rolled out and fried, seen through a take-out restaurant window, stuck with me for quite a while and I regretted not stopping to try them. I eventually had to get some, of course, and became an immediate fan -- they were everything I wanted them to be: crisp, flaky, with a shimmer of sesame flavour and that satisfying mild green onion bite.

Here in my current location, a small city in Germany, good Chinese food is hard to come by. So, when the craving hit, I decided to learn how to make my own.

The first recipe I tried was for smaller, cocktail-sized ones, but had a dodgy methodology. They were tasty, but oddly fiddly and got oil everywhere. I ultimately decided to simply apply the proper technique for making the large ones, despite it meaning more work for me in terms of rolling, seasoning, coiling, and rolling again. While it did take a bit longer, the results were much better.

I'm sure that every fan of duck, and/or Chinese cuisines, is familiar with Peking Duck with Mandarin Pancakes. The pancakes in that case are soft crêpes, and comprise one of the traditional Peking duck courses. I enjoy them, but the overall dish is very soft, and often a little sweet for my taste. Instead, I imagined a version of Mexican Tostadas, but with duck and Chinese flavours, using the crispy, savoury, cocktail-sized Cong You Bing as a base. For the duck, I had leftover roasted duck meat, which we shredded and reheated - tossed with a combination of Hoisin sauce, sesame oil, golden mushroom sauce (you could use Oyster sauce instead) with a delicate hint of Sriracha (I would have preferred a Chinese-style chile oil, but had none to hand).

Top the freshly fried Cong You Bing with a little of the shredded duck, top with a bit more sliced scallion, and presto! Scallion Pancake Duck Tostadas. They were delicious, and they turned out exactly as I had pictured them (see photo below).

Cong You Bing

(Chinese Scallion Pancakes)

Makes: 2 large or 8 cocktail-sized pancakes

1 cup all-purpose flour (plus extra for rolling)
1/3 cup hot water

1-2 finely sliced scallions
1 tablespoon toasted sesame oil
coarse sea (or kosher) salt
1 tablespoon toasted sesame seeds

2 tablespoons peanut oil (for frying)

In a mixing bowl, add the hot water to the flour all at once, and stir rapidly with a wooden spoon until it turns into a soft, pliable dough (add more flour if necessary). Turn out onto a floured board/counter, and knead for about 10 minutes until smooth and silky feeling. Place it back in the (now cleaned and lightly oiled) bowl, and cover with a towel or plastic wrap and let it rest for half an hour. It will not rise - there's no yeast - but it does need to fully hydrate the flour.

When the dough has rested, turn it out onto a floured work surface, and divide into either two or eight. The instructions after that are the same for either size. Yes, of course you could do four. Divide the dough as you will.

Shape the dough pieces into disks. Working with one at a time, roll a disk out as thin as you can. Roll it up into a tube, as though for a jelly roll or cinnamon buns, and coil the tube into a tight spiral, tucking the end under. Mash it flat with your hand, and then roll out very thinly again. Brush a little sesame oil over the rolled out surface, sprinkle with a bit of salt and a few sesame seeds, and scatter scallions over the surface. Roll up into a long tube again, coil it tightly again, tucking the end under, mash it with your hand again, and then roll out gently until it is a pancake thickness (about half the diameter of the thinly rolled dough you started with). For the smaller sized ones, that's about palm-of-my-hand sized. Do not worry if some of the green onions poke through - they totally will and that's okay. Transfer to a side board, and repeat until you have completed each pancake.

Technically, the first "empty" roll-out is not entirely necessary, but it does add a bit of flakiness to the final flatbread. If you're impatient, or pressed for time, you can skip that one, and go straight to filling them.

Heat the peanut oil in a large skillet until shimmering. Add one, or up to four small, pancake(s) and fry, turning frequently, until golden and crisp on each side. Remove to a paper towel to drain, and repeat until finished. For the larger ones, slice them into quarters to serve.

Serve with a soy-based dipping sauce (example below) or use as delicious tostadas.


Dipping sauce

2 tablespoons low-sodium soy sauce
1 tablespoon rice vinegar
1/2 teaspoon toasted sesame oil
1 small clove garlic, pressed
pinch freshly grated ginger
1 large pinch chile flakes (or cracked Szechwan peppercorns)
small pinch ground white pepper

Or any favourite Chinese dipping sauce you like.


Enjoy!

November 22, 2014

Lentil, Mushroom, & Walnut Shepherd's Pie


One of the first German recipes that I made once I moved to Germany was Linseneintopf, a thick and hearty lentil stew, often served with sliced or whole sausages as one of the components. We were really taken with the original dish, but it has been nagging at me for some time that it would make a wonderful vegetarian (or vegan) main course as well.

Just for the sake of variety, I made this one into a Shepherd's Pie rather than making the potatoes simply part of the stew, but you could do it either way. This is the sort of hearty, vegetarian dish that shows it European heritage in its flavours, and is intensely satisfying to eat.

As this is a compound dish that is baked in the oven, I suspect German cooks would classify this as an Auflauf (casserole), rather than an Eintopf (one-pot stew).

Lentil, Mushroom, & Walnut Shepherd's Pie

Serves 4 (generously)

250 grams dry brown lentils
400 grams fresh mushrooms
1 cup toasted walnut pieces
1 medium onion, diced finely
2 cloves of garlic, minced
2 medium carrots, diced finely
3/4 cup celery, diced finely
1 tablespoon olive oil
2 bay leaves
pinch of marjoram
4 cups vegetable broth or water
pinch kosher salt
Black pepper

4 medium-sized potatoes, peeled
1/4 cup milk or non-dairy "milk"
1 tablespoon butter or mild-flavoured oil

To toast the walnuts pieces, spread them in a single layer on a baking sheet and bake at 350 F for about 10 minutes, or until fragrant. If the skins are too bitter, you can rub the warm walnut pieces with a towel, which will remove much of the skin. You can also toast walnuts on the stovetop in a dry skillet, but you need to watch them very carefully, and stir frequently, or they will burn. If you have walnut halves, chop them roughly.

Wipe the mushrooms clean, remove any gnarly bits or tough stems, and coarsely chop. I used a mixture of chanterelles and hedgehog mushrooms, because my farmers market is awesome, but you can use any fresh mushrooms you like -- to be honest, really fancy mushrooms may get a bit overwhelmed by the robust flavour of this dish.

Wash and pick over the lentils. In a dutch oven, heat the olive oil over medium-high heat. Saute the onion, celery and carrot briefly. When onion turns translucent, add the garlic, bay leaves, marjoram (you can substitute oregano if need be) and pinch of salt. If you are using water instead of broth, increase the salt to a half teaspoon.

Add the chopped mushrooms, and stir through. When the mushrooms start to give off a little liquid, add the walnuts, and stir through again.

Add the (washed, drained) lentils, the broth (or water), and bring to a low simmer. Cover and simmer gently for 20 minutes, or until nicely thickened. Taste, adjust for salt, and if necessary, add a small pinch of sugar to balance the flavours. If it tastes a little flat (for example, if your lentils were a bit old, this can happen) you may wish to add a teaspoon of red wine vinegar, to brighten it up and provide a little acidity. Finish with with freshly ground black pepper.

While the lentils simmer, make your mashed potatoes. Boil or steam your potatoes until tender, and drain. Keep the potatoes in the same, hot pan, and break them up with a spoon (or the edge of your masher) so that excess moisture can evaporate. That's advice from Julia Child, folks, and ever since I adopted it, my mashed potatoes have had a more awesome texture. Add the butter (or oil) and milk (or "milk") and mash until smooth.

Dollop the mashed potatoes carefully over the lentil stew, and smooth the top down (or crenellate it with a fork, whatever you like). Brush the top with a little extra butter or oil if you like it to be a bit crusty on top. You could also sprinkle it with a bit of paprika. Bake the stew at 350 F for about 20 minutes, or until the top is golden and inviting. Use a large serving spoon to dish into serving bowls or plates.

Leftovers heat up fairly well in the microwave, or in an oven-proof dish in a regular oven.

October 15, 2014

Roasted Vegetable Salad with Yoghurt & Lime Dressing


Composed salads like this one are dead easy to figure out without a recipe, so consider the ingredients I've chosen as a mere guideline for your own favourite roasted vegetables and flavours. I like to season one or two of the roasted vegetables each a little differently, to add depth and warmth to the flavours. As a bonus, if you make a big batch they make a wonderful side dish for dinner the night before, which means you get to be virtuous by using up leftovers to make this tasty salad.

I've chosen cheese, nuts, and (optional) egg to boost the protein and give staying power to this salad, but you could definitely omit the egg, sub out the cheese, and go vegan with chickpeas, or maybe marinated tofu. The egg in the ingredient list is purely optional and is not shown here, but was included in the version of this salad that my husband took to work. He also topped everything with a squirt of Sriracha sauce, so there you go.

Beyond the selection of vegetables and accompaniments, the dressing is what brings this sort of salad together. In Germany, yoghurt-based dressings are very popular, so I've been experimenting with them more than usual. This one is Yoghurt & Lime dressing, and we liked it so much that it's sure to appear again very soon. For vegans, I'd switch the dressing for something sesame or tahini based.

Always In The Kitchen Roasted Vegetable Salad

Base:
Romaine Lettuce, raw, coarsely chopped

Vegetable Rows:
Purple Cabbage (raw, thinly sliced)
Roasted Butternut Squash (seasoned with cayenne)
Roasted cauliflower (seasoned with cumin or curry powder)
Roasted Beets, diced

Accompaniments:
Feta
Walnut halves, toasted
hard boiled egg, sliced (optional, not shown)

To roast the squash and cauliflower, I cut them into bite-sized pieces, toss with a mixture of a little water, a little olive oil, some kosher salt, and the seasoning of choice. Toss thoroughly, then tip out into a roasting pan in a single layer (include a tablespoon or two of the oil/water liquid), and roasted at about 425 F for 20 to 30 minutes, as needed. I prefer not to mix the vegetables before roasting, but your mileage may vary. For the beets, I top-and-tail them, quarter them, and wrap them, skins on, in a package made of aluminum foil with a pinch of salt and a teaspoon of olive oil. I roast them for about an hour, or until easily pierced with a fork. Remove them from the foil (carefully! That steam is hot!) and the skins should rub right off with a paper towel (or clean j-cloth). Then simply dice them to the size you want. You can also use Orange Flower Glazed Beets instead, if you're lucky enough to have some leftover.

Yoghurt & Lime Dressing

Makes 3 servings

150 grams plain yoghurt
1 large clove garlic, pressed/minced
⅛ teaspoon kosher salt
⅛ teaspoon white pepper
zest of one lime

Combine in a small bowl and beat with a fork until well integrated. Taste, and adjust for salt and garlic, as desired.

Place the lettuce in a bowl, and arrange the roasted vegetables, raw cabbage, and whichever accompaniments you choose in rows over the lettuce. Drizzle generously with dressing. Eat as is, or toss first, if you want the dressing more evenly distributed.

Add a drizzle of Sriracha, if that sounds good to you.

September 14, 2014

Rotkohl, or German Red Cabbage


Germans have three names for one vegetable: Rotkraut, Blaukraut, and Rotkohl all mean red cabbage, and just to make matters even more confusing, all also mean the prepared dish of finely sliced red cabbage, simmered in a tangy vinegar-enhanced sauce. Around our little section of the Rhine, the term is almost always Rotkohl to mean the simmered side-dish.

Cabbage is very popular in Germany. Here it is fermented into sauerkraut, marinated in salads, and simmered into rotkohl as one of the most ubiquitous side dish of autumnal and winter menus. The portions are also enormous, which makes sure you get your daily dose of fibre. It is commonly served alongside Sauerbraten (pot roast), Spießbraten (roast pork), Rouladen (beef wrapped around pickles), roast goose (especially at Christmas time), or roast duck. In fact, it may be the go-to side dish for anything with the word "roast" (or equivalent) in the title.

I've published a recipe for red cabbage with apples before, a leaner, lighter version that is juicy, but doesn't exactly have the kind of gravy that you get here in Germany. You may remember seeing it show up next to leg of rabbit on my Hasenpfeffer post, or alongside Danish-ish meatballs.

There are a lot of variations - some with a combination of red wine and vegetable stock, some with water, some with duck or pork stock, and varying amounts of fat from the lean to the spectacularly rich. Some versions have tiny pork cubes in them, which seems like overkill but in Germany, any addition of pork is considered "just enough". This version is fairly close to the ones available in restaurants here, although the gravy is often thickened even further using flour* instead of cornstarch. It makes a big batch, but it also freezes very well.

Klassischer Rotkohl (Classic Red Cabbage)

Serves 4-6

750 grams fresh red cabbage
2 medium onions
2 tablespoons butter (or lard, or duck fat, or oil)
1/2 teaspoon kosher salt
dash of white pepper
3 tablespoons red currant jelly
2 bay leaves
3 juniper berries
3 clove buds
500 ml vegetable stock
1 large cooking apple (eg. Boskop)
2 teaspoons cornstarch
2 tablespoons red wine vinegar

Clean the cabbage, removing the stalk and tough outer leaves. Cut the cabbage into quarters and slice each quarter into fine strips. Peel the onions and finely dice.

Heat 1 tablespoon butter, sauté onions until translucent, add the cabbage and sauté 5 minutes more. Season with salt, pepper and red currant jelly, and stir through.

Add the Juniper berries, bay leaves and vegetable stock, and continue to cook on medium-low heat (covered), for 10 minutes. Meanwhile, peel, core and dice the apple. Add the apple to the pan and cook for a further 20 minutes.

Combine the red wine vinegar with the cornstarch, stirring until smooth, and then stir it into the cabbage mixture and bring to a boil. Once thickened, stir in the other tablespoon of butter. Taste and adjust as needed for salt, pepper, and vinegar, and serve.

*If you decide to thicken with flour instead, you will want to add it with the vegetable stock, to allow the flour sufficient time to cook out its raw taste. Simply combine two tablespoons of flour with enough of the (cold or room temperature) vegetable stock before adding it to the dish. In this case, add the red wine vinegar on its own, at the end.


June 19, 2014

Rheinischer Kartoffelsalat (Rhineland-Style German Potato Salad)


Summer weather has arrived in Rheinland-Pfalz, and with it many restaurants have switched over to their summer menus. Oh, not to worry, you can still get the heartiest of hearty items (Sauerbraten, Rinderrouladen, Goulash, etc.), but the seasonal offerings have definitely shifted. This includes a fundamental shift in the lunchtime menus from fried potatoes (that is, bratkartoffeln) on the side, to potato salad.

I was a pleased and surprised, here in the heart of sweetened mayonnaise country, to discover that most of the potato salads in this region are marinated in a vinaigrette as opposed to a creamy dressing. What didn't surprise me, however, is the lack of crumbled bacon in the salads. Oh, a lot of them have pork in them, but it's ham. Tiny, tiny cubes of fried ham. Also, not every potato salad, even the Rheinisch ones, contains pork - although plenty of them do. But it is definitely not the crumbled bacon, or even bacon bits, that so often comes with the "German Potato Salad" label in Canada. I chose to make this one vegetarian, simply because I was serving it as part of a duo alongside a sausage and cheese salad, and decided that my meat requirements were being well met already.

At its most plain, this potato salad omits the radishes, and at its most fancy (known as Bunter (colourful) Kartoffelsalat) it will have not only the radishes, but also a sparse inclusion of red and/or yellow bell pepper pieces, and possibly fresh cucumber to go alongside the pickles. The fun thing about salads is that it's very easy to customise them to your personal tastes. So, by all means, feel free to add the extra vegetables. Or tiny cubes of fried ham. This ham-free version is vegan.

Rheinischer Kartoffelsalat
Rhineland-Style German Potato Salad

Serves 4 - 6

2 kilos waxy potatoes
1/2 medium yellow onion
4 cornishon-style pickles
4 large radishes

200 millilitres vegetable stock or broth
1/4 cup white wine vinegar
1 tablespoon hot mustard
1/2 teaspoon kosher or coarse sea salt
white pepper to taste
1/4 cup parsley (and/or fresh dill)

Boil and peel the potatoes in whichever order you choose. Allow them to cool, and then cut them into slices. Some of those slices will break up a bit - that's supposed to happen, and if it doesn't happen now, it probably will when the remaining ingredients are stirred in. Put the potatoes in a bowl with a bit of extra room (to allow you to stir).

In a small saucepan, heat the vegetable stock or broth (or heat up some water and add vegetable base as is appropriate). Add the vinegar, mustard, salt and white pepper, and whisk to partially integrate. Finely dice the onions, and add them to the stock, simmering very briefly - not for more than about two minutes. Pour the onion-stock mixture over the potatoes, and stir through. Allow to cool at room temperature for about 15 minutes, then stir in the parsley. Cover and place in the fridge. Let the potatoes soak up the liquid for at least an hour or two, then thinly slice and add the cornishons and radishes, and any of the optional additional ingredients that you like. Taste, and add a little extra vinegar if you like (places around here serve it extremely tart, which is very refreshing in hot weather) and more salt if needed. Allow the salad to chill again, covered, for about half an hour, and serve. If you like, you can garnish with wedges of hard-boiled egg or tomato. I like to do a final pass with freshly ground black pepper to serve.

Coming soon: Swiss-style Sausage Salad (Update: Now posted!)