Showing posts with label Comfort Food. Show all posts

April 04, 2013

Yorkshire Puddings


Yorkshire puddings are essentially a simple popover that has been flavoured with the drippings of the roast that they are made to accompany. They are airy, eggy, and made a perfect vessel to drunkenly cradle a gravy payload, half of which seeps slowly into the rest of your plate (and, if you're lucky), particularly your potatoes.

The batter is remarkably like crêpe batter. The only difference, really, is that instead of putting any fat in the batter, you place it in the cups of the popover/muffin tin before adding the batter. Well, and they're cooked in a very, very hot oven, as opposed to over a medium-ish flame on the stovetop. But enough about crêpes.

Yorkshire puddings are also somewhat terrifying for a lot of cooks - not because they're difficult, but because they require precise adherence to the rules, or they will come out as sad, dense little muffin-pucks. Some cooks claim that it's best to make the batter a bit ahead and let it rest - something about rehydrating the flour, I think - and I always do, simply for convenience. Here are the rules that make all the difference:

1) Preheat the empty popover or muffin tin. Preheat the hell out of it. I like to put mine into the oven 15 minutes before the roast is due to come out, and then leave it in when I crank the temperature up so that it will be ready to cook the popovers. That baby is hot! If you omit this step, all is lost. Have a dinner roll instead.

2) Preheat the fat. Once the roast is out of the oven, whether you are using roast drippings for a proper pud, or vegetable oil, or some leftover chicken fat that you've got stashed in the freezer (looks at ceiling, whistles to self), get the fat into the blazing hot pan...and put the pan back in the oven, for at least a few minutes, and put the overhead fan on high. If you omit this step, the pan and fat will not be hot enough, and all is lost. Have a dinner roll instead.

3) Add the batter quickly to the hot fat in the cups. Use a pouring jug with a spoon drip-catcher for maximum efficiency (actually, true maximum efficiency suggests that you would have your batter standing by in a squeeze bottle with a large bore opening, but unless you have such a pancake dispenser sort of setup, a jug with a lip (such as a big measuring cup) is your best bet). If you omit this step, the pan will cool down too much, and all is lost. Have a dinner roll instead.

4) Get the tin back into the oven pronto! Do not open the oven door until the puds are cooked - or at least 15 minutes have gone by. If you omit this step, all is lost. Have a dinner roll instead.

5) Marvel at how beautifully risen and crazy tall your popovers are, and serve right away.

A note about using vegetable oil instead of drippings or schmaltz - for the love of dinner, please use something with a really high smoke point, or you will fill your kitchen with acrid burnt-fat smell, and...and all is lost. Have a dinner roll instead.

So...here's the recipe. I really do measure the flour by weight, but if you don't, it's approximately a scant cup of sifted flour)

Yorkshire Puddings

Makes 12 regular-muffin sized

115 grams flour
3 eggs
285 mL 1% milk
1/8 teaspoon kosher salt
3 tablespoons fat (roast dripping, schmaltz, or high-smoke-point oil)

Whisk the eggs, flour, salt, and milk together until smooth to make your batter. Pour the batter into a jug, and let it sit for 30 minutes before you use it.

See the critical steps listed above, or this abbreviated version: Turn your oven up to 475F, and place a dry 12 cup muffin tray in the oven to heat up for at least 5 minutes (or however long it takes the oven to get up to that temperature).

Place 1 teaspoon of fat in each muffin hole, and put the tray back into the oven and heat until fat is very hot, at least another 5 minutes.

Extract the muffin tin and carefully (and quickly!) pour the batter into fat in the muffin cups - only half-fill each cup. This bit kind of looks gross, because the fat swirls all around the batter. That's fine; it's supposed to.

Close the door and cook for 15 minutes without opening the oven door, reduce heat to 350 F and bake for another 5 - 10 minutes, or until golden.


If you have leftover puds, try them for breakfast, gently re-heated and filled with jam, or cheese, or even scrambled eggs! If the exterior is a little squidgy from sitting overnight, blot well with paper towels before heating/filling. They lose their crispness, but they are still delicious.

October 14, 2012

Smothered Perogy Skillet Dinner

Aaaaand this is barely a recipe, I know, but the rain has finally started here, and this easy, tasty dish feels oh-so-autumnal. Essentially, this is just a tweaked version of my all-purpose smothering sauce (mostly used for pork chops) re-purposed for perogies. For the hardcore and badass, or (badcore and hardass), make your own perogies (and wieners!) from scratch. Feel better? And then send me a picture, please! You can substitute kielbasa/kobasa for the european wieners if you like.

Smothered Perogy Skillet Dinner
Serves two greedy people

3 European wieners, sliced into chunky coins
18 bite-sized perogies, any filling you like (I used potato/cheddar/onion)
1 cup diced onion
1 tablespoon butter
3/4 cup Mediterranee yoghurt (plain)
1 teaspoon dijon mustard
2 tablespoons unbleached flour
3/4 to 1 cup chicken or mushroom stock/broth (at room temperature)

Saute the onions in the butter in a large skillet. Add the wieners and stir and saute until they pick up some colour. Lay the perogies (still frozen is fine) in a single layer throughout the pan.

Combine the yoghurt, mustard, flour, and stock (whisking really well) in a measuring cup, blending until smooth. Pour the sauce over the perogies and wieners, turn the heat to low (or move to an oven at 325F) and cook (covered) for 25 minutes. Stirring occasionally if you are going the stovetop route helps you keep an eye on the liquid level - if it's thickening too much, and not looking "saucy", just add a little water, a couple of tablespoons at a time, and stir it through. Fork-test a perogy (they should be tender), and dish up with plenty of black pepper.

We served this with a big tossed salad chock full of vegetables, to compensate for the lack thereof in the recipe.

Not a fan of wieners OR kielbasa? Fat slices of mushroom would be a great vegetarian switch-out.

September 23, 2012

Autumn's here: Cabbage Rolls


Cabbage rolls are one of those quintessential comfort foods for anyone with even a passing relationship to the cuisines of northern or eastern Europe, and of course the middle east, central asia, and the eastern mediterranean regions also have stuffed leaf and vegetable dishes with considerable similarities. Did I leave anyone out? Probably. (Sorry.) Stuffing food with other food and wrapping it up, whether you start with dough or a leaf, just seems to be a universal development in almost every cuisine.

If someone tells me that he or she is making cabbage rolls, my first question is "Oooh, what kind?" - closely followed by offers of help eating up any pesky leftovers, of course. In western Canada we tend to favour either the Ukrainian or Polish styles most of all, and the ones I've made here are a sort of unholy hybrid of every cabbage roll that I've ever found to be delicious. These ones are made with meat (beef, specifically) and rice, but there are plenty of options for vegetarian/vegan fillings (I would suggest a rice/walnut/mushroom blend, for starters).

A lot of recipes will suggest that you braise the cabbage rolls in tomato soup. Those of you who have been reading my blog for a while already know that I shy away from tinned soup as an ingredient for my casseroles and such, and I am not recommending tins of soup here, either. Rather, I humbly suggest my very own Simple Tomato Soup recipe (expired link removed, please see recipe in the comments section below), made exactly as listed. It comes together really quickly, and you can also make it a day ahead (or stash some in the freezer, and simply thaw it out when you are ready to make cabbage rolls). One recipe of Simple Tomato Soup is perfect for one tray of 12 large cabbage rolls.

I recommend savoy cabbage, which is easier to peel without tearing the leaves.

Cabbage Rolls

Makes 12 rolls
Total Prep & Cooking Time: 3 - 4 hours

1 Savoy cabbage, whole
500 grams lean ground beef
1/2 onion, very finely minced
2 cloves garlic, pressed
1 tablespoon tomato paste
1 tablespoon water
100 grams (1/2 cup) long grain rice (uncooked)
3/4 cup water
1 teaspoon mushroom base (optional)
1/4 teaspoon salt
2 tablespoons minced parsley
1 egg, beaten
1/4 teaspoon black pepper
1/2 teaspoon smoked paprika (to finish)

1 recipe Simple Tomato Soup, made as directed in the comments section below. You could also use a thin, tomato-based pasta sauce, or even simply use beef, chicken, mushroom, or veggie broth, and serve the rolls "dry" with sour cream. You will need about four cups of soup/braising liquid.

Prepare the soup, or, if defrosting, heat the soup until it is serving temperature.

In a small saucepan, bring water and mushroom base to a boil. Add the rice and stir quickly with a fork. Reduce heat, cover and simmer 10 minutes, then turn off and leave for another 10 minutes. The rice will be slightly underdone - chalky. That's perfect. Combine with the onions and garlic, and let the mixture cool a bit while you deal with the cabbage.

Cut the cabbage deeply, all the way around the core (about half an inch out from the core knob). Peel the outermost leaves, starting from the base of the cabbage, gently pushing up until the leaves come free. You can do this step a day ahead, and loosely bag and refrigerate the leaves (they will take up a lot of room). You will want 12 good, big, whole leaves, plus a couple of spares.

Trim the leaves by shaving down the thick central spine with a paring knife, and cut a small, thumb-tip sized v-shape at the base of each leaf to remove the toughest bit.

Bring a large saucepan of unsalted water to a boil. Add cabbage leaves and cook for 2 to 4 minutes or until softened, and drain. You can also soften the cabbage leaves by dipping them in water and microwaving them, 2 at a time, for about 60 seconds.

In a medium mixing bowl, combine the raw beef (broken into tiny bits), cooked rice mixture, egg, salt and pepper, and parsley, along with 1 tablespoon of tomato paste combined with one tablespoon of water. Mix thoroughly, using your impeccably clean hands, until everything is nicely integrated.

Prepare a 9x13" baking dish by ladling about half a cup of the tomato soup into the bottom of the dish, and swirling it to cover the bottom thinly. Some folks like to chop up the core of the cabbage, along with any leftover leaves, and put that in the bottom, too, as a bed for the cabbage rolls. This is a great way to use up the rest of the cabbage, as well as making sure you get plenty of veggies in your dinner.

Divide the beef mixture into 12 portions, and roll them up: this bit is awesome, but messy: Dip the softened cabbage leaves in the tomato soup/sauce, and microwave them, two at a time, again (unless they are completely floppy) for about 30 seconds. This tomato-dipping of the leaves is optional, but very flavourful.

Lay a limp, tomato-y cabbage leaf on your plate or cutting board, and add a portion of the meat to the lower third of the leaf. Flip the bottom (stem edge) up and over, bringing the points of the "v" closed so that it makes a tight package. Hold that with one hand, while you tuck the sides in (as if you were making a burrito, or an envelope), and then finish rolling up the leaf. A little practice, and this isn't as difficult as it might sound.

Place each roll, seam side down, in the prepared baking dish. You should get two rows of six, filling the pan. Pour the tomato sauce (or any other braising liquid of your choice) gently and evenly over each roll, using all of the soup, cover with tinfoil, and place in a cold oven. Set the oven to 325 F, and set the timer for 2 hours. Remove foil, and sprinkle with smoked paprika before serving.

Serve with sour cream (or plain yoghurt), mixed with a little dill. Perogies (pierogies), naturally, make a fantastic side dish, but so do plain boiled potatoes, or roasted carrots. Obviously, if you need to hurry the process up a bit, set the oven to temperature before you start rolling up the cabbage leaves, and bake for 90 minutes.

These freeze excellently, as well. Make your own ready-meals!

For the curious, here's a picture of the cabbage rolls just before they go into the oven (see how perky the cabbage still is!):

September 20, 2012

Meatballs & Polenta

Technically, not new recipes, simply a serving suggestion: the meatballs are my all-beef Italian-seasoned version of these meatballs here, and the polenta is my all-purpose polenta recipe which you previously saw when I was making polenta fries. This is just how easy it can be to get a good dinner on the table, when you have a stash treasures, such as meatballs, in your freezer (I haven't tried freezing polenta, but I imagine the texture would suffer). We had a tossed salad on the side, but you could add any extra vegetable you like to round out the meal (roasted fennel, anyone?)

The meatballs are somewhat smaller than usual, about half the size indicated in the linked recipe, as they were originally made up as part of a big batch designated for meatball subs, and I find slightly smaller meatballs are preferable in that context (so that you can have more of them, of course). I used a two-tablespoon disher (60 mL, or 1/8 cup) per meatball, and baked them in my usual fashion. Leftovers were briefly frozen on a baking sheet, and then tipped into a freezer bag for storage for another day.

The polenta recipe is particularly unchanged, simply necessitating that you pour it into individual serving bowls as soon as it is cooked, and serve it hot. The texture is a little bit like mashed potatoes - the creamy, finely whipped restaurant style, that is. If you have extra polenta (the recipe makes four servings, served in this manner), you can simply pour it into a baking dish or other small container, and let it set up to make fries (or simply re-heat and eat) at a later date. It would work wonderfully in a bento, although I didn't think of that in time to deal with the leftovers in such a way - I simply plunked slab of cooled polenta on top of the remaining meatballs in sauce, in a standard plastic container.

For the tomato sauce, you can use any one you like, of course. This was, again, a "freezer treasure" - the sauce leftover from making the same meatball subs. Essentially, a simple combination of a little onion and garlic sauteed in olive oil, a 398 mL tin of high-quality diced tomatoes (don't you hate opening a tin and finding it full of stem ends?), fresh oregano and basil, and a little simmering time. Your mileage may vary, of course. A few chile flakes wouldn't be amiss, either.

Reheating the meatballs in the tomato sauce saves time and dishes. Adding a little extra fresh basil as you reheat gives a little lift to the sauce, and makes you forget that you're essentially just eating up leftovers. This can happen almost untended while you stir up the polenta.

Parmesan, of course, is the natural finisher. Mozzarella would also be good, or any grating/melting cheese you fancy.

Now, for those of you following the "convertible to vegan" tag, I haven't completely lost my mind! Here's the fix: Instead of meatballs, use roasted cauliflower chunks, and simply toss them in the sauce for a few minutes before ladling onto the polenta. And as for the polenta, with its pesky sour cream and parmesan? Omit those ingredients in favour of a little silken tofu (beaten well until creamy) and a bit of prepared vegan shredded cheese-substitute. You may need to adjust the salt to your taste, depending on the brand you use. Change the chicken broth to vegetable broth (or just use water, as I sometimes do), and presto: converted to vegan.

August 19, 2012

International Bento (China): Chicken wings bento


My last post reminded me that I've really fallen down on posting my bentos, so here's another one: Chinese-inspired chicken wings ("Beijing Wings" from Cook This, Not That!), pork fried rice, and baby bok choy with spicy vinaigrette.

The pork fried rice is much like pork fried rice anywhere - a bit of egg, a bit of bbq pork from a Chinese butcher, some onion, leftover plain long grain rice. There's an art to a great fried rice, but this one was just a quick, cobble-together: tasty, but not truly a classic of its kind.

The bok choy in vinaigrette did not enjoy waiting in the fridge until morning, and it looks as though I may have over-steamed it, too, as it's usually a bit brighter green. The vinaigrette is a mixture of soy sauce, rice vinegar, sesame oil, sambal oeklek, minced ginger, and minced garlic. I don't use measurements when I make this up, but I don't use much oil. It's more like a dipping sauce than a real vinaigrette, but it goes beautifully on steamed or stir-fried bok choy, gai lan, or other strong greens.

The wings are fairly simple to make, and are baked instead of fried, so, theoretically a bit healthier for you, even though the skin's still on.

Beijing Wings
Adapted from Cook This, Not That!

Serves 3 - 4

1 kilo chicken wings, jointed (freeze the tips for making stock)
1/3 cup low sodium soy sauce
3 tablespoons brown sugar (or honey)
4 cloves of garlic, minced
2 tablespoons freshly grated ginger
2 tablespoons butter
2 tablespoons Sriracha
1 - 2 tablespoons fresh lime juice (half a lime)
toasted sesame seeds
1 green onion, sliced

Combine the soy sauce, sugar, garlic, and ginger in a large glass or ceramic bowl. Add the wing sections (you can also buy just paddles or drumettes) and stir them around until they are well coated. Cover the container with its lid or plastic wrap, and refrigerate for at least an hour, four or eight hours being better (ideally, do this after breakfast to be ready for dinner).

Preheat the oven to 450F, and line a baking sheet with foil. Spray the baking sheet with a thin layer of canola spray (or brush lightly with peanut oil). Drain the wings from the marinade (discard the marinade). Lay out the wings in a single layer on the foil, and bake for about 15 minutes. The skin should start to get crispy. Turn the wings over and bake for another 5 to 10 minutes.

In a large skillet, melt the butter and Sriracha, stirring to combine. Remove the wings from the oven, and quickly add them to the skillet. Toss the chicken around in the hot sauce, and saute for a couple of minutes. Remove the chicken to a platter, and garnish with sesame seeds and thinly sliced green onion.

July 29, 2012

Breakfast at home: Breakfast Dog!

Okay, okay. Not a recipe, more of a serving suggestion, really, but in the spirit of the recent spate of breakfast-at-home posts, I couldn't really resist.

Here we have basic bakery hotdog buns filled with European wieners, scrambled eggs, grated aged cheddar, and green onions. You could use ketchup, be we chose sriracha for a little extra kick. Of course, you could tweak the contents to your heart's delight.

For optimal results, I suggest gently steaming (or microwaving) the buns briefly just before filling, which makes them tender and pliable enough to grip all of the fillings.

This was embarrassingly delicious. I would make it again in a heartbeat, if I had the buns and wieners at hand.

July 02, 2012

Breakfast at home: Biscuits & Gravy

One of my favourite breakfast foods from the USA is biscuits and gravy. Not a lot of places up here offer it, and of those that do, well, they tend to do it fairly badly - gluey, gloppy stuff, usually without much in the way of sausage meat, sometimes with unanticipated and unwanted alternative seasonings. This is a pity, because anyone ordering biscuits and gravy is not likely to want to be surprised by avant garde seasonings - certainly not without warning.

Biscuits and gravy is a hot, filling breakfast, it's also comfort food at its finest. It doesn't need to be lethally rich, either, especially if you're serving alongside eggs. Easy on the fat - there's plenty of flavour to go around.

I like the name "Sawmill Gravy", but while most people seem to accept pretty much any white sausage gravy as "sawmill", I understand that name belongs more properly to the lumbercamp style of gravy, conditions of which necessitated the use of tinned, evaporated milk. I've also heard "cream gravy", but since I use milk, I'll just stick with "White Sausage Gravy". It's pretty simple, and very delicious.

Make up biscuits according to whatever biscuit bible you adhere to, and make the gravy while they bake up in the oven.

White Sausage Gravy
Serves 4

225-340 grams pork breakfast sausage
3 tablespoons unbleached flour
2 1/2 cups milk (I use 1%)
sprinkle granulated onion
black pepper to taste

Remove casings (if any) from the sausage and break it up into little chunks (chop it with a chef's knife, if you like). In a large skillet, over medium heat, cook and stir the sausage until it's turned the lightest shade of gold, and rendered its fat out. Continue to break down the sausage pieces as you go. Modern sausage can be quite lean, but if you have richer sausage, spoon out all but about a tablespoon. If your sausage was quite plain, you may want to add a tiny pinch each of leaf oregano or marjoram, ground sage, and ground thyme but don't go overboard. The pork should be the star of this show.

Sprinkle the flour over the sausage, and stir it through, scraping the bottom of the pan, until it starts to turn light butterscotch in colour. Then, while stirring constantly, add the milk a little at a time, working the sauce to keep it smooth and lump free. If free-handing makes you nervous, switch to a whisk. Don't pause in moving your spatula or whisk until at least half the milk is incorporated, and then you'll have a little more leeway.

Once all of the milk is in, continue to cook over medium low, so that everything is bubbling gently until the sauce is thickened. Sprinkle the granulated onion over, stir it through, and then taste for salt. I never add extra salt, because there's enough in the sausage, but your mileage may vary, as they say. Grind some black pepper over the pan, turn the heat to low, and continue to stir occasionally. Give it a final taste to adjust the seasonings, split your hot biscuits open, spoon the gravy over, and serve right away. A little extra pepper on top never hurts, either.


June 16, 2012

Chicken Pot Pie, Biscuit Top


I love chicken pot pie. I don't love it when it comes with too many peas, or a leathery, greasy pastry top, but if it has a quality pastry (which hasn't been allowed to get soggy), or better still, a biscuit topping, then it has got to be right up there with my favourite comfort foods.

It's also pretty easy, really. You make a creamy stew with chicken and vegetables of your choice, add the top, and pop it into the oven for a good 25 to 30 minutes on high heat, and voila! What could be better?

Well, I suppose it could be healthier than some of the versions out there, but there's loads of tricks to make the filling lower in fat, and if you use a slightly thinner layer of (lean) biscuit or scone dough over the top, you're setting your setting yourself up nicely to have a guilt-free wallow in a delicious dinner. Or lunch. Or supper. Whatever you want to call it, really.

The biscuit pie methodology works pretty much the same for any filling. Beef stew, chicken stew, vegetable stew - pretty much anything that can take the hit of being in a hot oven for half an hour makes a great biscuit pie. And, if you're the sort of cook who likes convenience and buys packets of biscuits instead of making your own, well, that works too. So really, it's all about the filling.

I like my chicken (or turkey, or pheasant) pies to be creamy, and I like to use kernel corn instead of peas. I also like to have uses for leftover roast chicken, although, to be fair, I have plenty of those already (but another is always welcome). The pie at the top of this post came about after eyeing the recipe in the Cook This, Not That! Kitchen Survival Guide, which I've posted about before. For example, in my last post, Gyoza Stir-Fry. I've made some minor seasoning changes to suit myself, and of course the use of biscuit instead of puff pastry is not from CTNT's receipe.

Chicken Pot Pie, with a Biscuit Crust
Serves 4

1 tablespoon butter
2 cups pearl onions (recipe calls for frozen, which I couldn't find, so I used fresh)
2 medium carrots, diced
2 garlic cloves
2 cups sliced cremini mushrooms
1 cup frozen corn kernels
meat from 2 roasted chicken legs with thighs, skinless, diced
1/4 cup flour
1 teaspoon chicken base (Better than Bouillon)
1 1/2 cups water
1 cup 1% Milk
1/4 cup half & half
1 bay leaf
1/8 teaspoon ground thyme
1/2 teaspoon mustard seeds

Make up the water and chicken base into a hot broth. Rinse corn kernels with hot water, in a sieve, so they drain instantly, and set aside.

Heat the butter in large skillet over med heat. When melted, add the onions, carrots and garlic. Cook until onions are translucent and carrots begin to soften, about 5 minutes. Add the bay leaf, thyme, and mustard seeds, and stir well. Add the mushrooms and cook, stirring occasionally for another 5 minutes. Stir in the chicken and the flour, using a silicone spatula or wooden spoon to stir well, so that veggies and meat are evenly coated with flour.

Slowly pour the warm broth in, either using whisk to help avoid clumping, or stirring well with your spoon/spatula while you pour. Once the broth is incorporated, and the sauce is smooth, add the milk (does not need to be warmed, but can be) and simmer for 10-15 minutes or until the sauce is thickened. Stir in corn. Season with salt and pepper, as needed.

Mix up your biscuit dough and roll out to fit the top of the casserole dish you will be using. Slice the biscuit into quarters, or leave it as one big sheet (if so, use a fork to poke some steam-release holes).

Heat over to 400 F. Pour chicken into a 1 1/2 quart casserole dish, and cover with the biscuit dough. Bake uncovered for 20-25 minutes until golden brown. If your casserole is really full, place a tray under to catch any drips, or you will need to spend some of your evening cleaning your oven floor!

May 21, 2012

Meatball Macaroni with Chipotle

This dish brings together two things I adore: meatballs, and pasta. I did not grow up with spaghetti and meatballs, although I was aware of the dish as a matter of cultural immersion. Our spaghetti was always a baked affair, made in a deep pot (using soy noodles, although I didn't learn that was abnormal until I was older), and slabbed with cheese for the last few minutes in the oven. That dish is one of the first things that I learned how to cook, in fact, and I still have the laboriously written out recipe card from noting down each step as I watched my mother in the kitchen. There was plenty of beef in the recipe, but no meatballs.

Most of the pasta dishes I make these days are not baked (although there are certainly some exceptions). My macaroni and cheese is strictly stovetop, and I'm a big fan of vegetable-strewn fresh pasta using raw (or barely cooked) ingredients as an ad hoc sauce. Meatballs, on the other hand, are almost always baked. It frees you up to do other things (make a salad, drink some wine, whatever you want to do) and it guarantees beautifully round shape to the finished meatballs. So, if I am going to have meatballs with my pasta, I suppose it was a no-brainer to combine cooking methods, eventually.

Essentially, it's a two stage process. Mix up the meatballs of your choice, such as the always-popular-at-our-house Pork & Turkey Meatballs (also used to make meatloaf) and space them out in a larger-than necessary casserole dish to bake. While the meatballs are baking, mix up the pasta. In this case, I went with a Chipotle Macaroni Casserole dish that I hadn't made in a while, although I've tinkered with the settings thusly:

Chipotle Macaroni

Serves 4-6 (with meatballs)
Total Prep & Cooking time: 60 minutes

1 onion, finely minced
2 roasted red peppers
1 teaspoon chipotle powder
1-2 tablespoons unbleached flour
2 cloves of garlic, minced or crushed
2 chipotle chiles in adobo sauce
1-2 tablespoons tomato paste
1 teaspoon cumin
1/2 teaspoon oregano leaves
398 mL canned diced tomatoes
1 cup milk (1% is fine)
1 cup ricotta cheese
1 egg
3 cups grated tasty cheese
2 cups uncooked macaroni, small shells, ditali, or similarly sized pasta

Sautee an onion with a couple of roasted red peppers (rinsed, seeded, and diced), until the onion is softened slightly. Sprinkle with chipotle powder and a little flour (about a tablespoon or two) and stir in some minced garlic, and minced or pureed chipotle in adobo sauce, along with some cumin and oregano.

When the mixture starts to stick, add a 398 ml / 14 oz. can of diced tomatoes with their juice, and stir well until thick and bubbly. Add a little water if it's sticking, to loosen it up. Next, combine a cup of milk with a cup of ricotta mixed well with a beaten egg, and beat until smooth. Add to the tomato mixture and stir well. Add the tomato paste and stir again. Reduce heat to low and continue to stir until everything is well integrated. Mix in a couple of handfuls of cheese - Pepper Jack and edam went in here - and turn off heat. Taste the sauce and adjust for salt and pepper, and hot sauce (chipotle or ancho are best here).

Stir in hot, cooked pasta - approximately 4 cups of cooked macaroni or its equivalent, such as the ditali shown here. Spoon the pasta over the cooked meatballs in the casserole dish. Top with a little more cheese and bake at 350 F for about 20 minutes to half an hour, or until bubbling and browned.

April 19, 2012

Pork & Turkey Meatloaf

If you're thinking that you've seen this combination of meats from me before, you're right: Pork & Turkey Meatballs is the exact same recipe, so check it out if you would like to make this. The only change is that you're making one big meatball, so to speak, and it takes longer to cook.

I use lean ground turkey thigh and lean ground pork, and cut the meatloaf into 12 slices, effectively making each slice the same food value as one of the meatballs (approximately 133 calories* per slice, if you're counting). It makes a great dinner centrepiece, and the leftovers make predictably delicious sandwiches. In fact, I urge you to make a grilled cheese sandwich in which a very thin slice of this meatloaf is placed between layers of cheese; you will doubtless eat it dangerously fast, if my experience is anything to go by.

For cooking the meatloaf, preheat your oven to 350 F, and shape the meat mixture into a loaf with your hands before placing it gently into a loaf-pan. Bake the meatloaf, uncovered, for 45 minutes. Paint with a little soy sauce or worcestershire sauce, bump up the temperature to 400 F, and bake for another 15 minutes. Carefully remove the meatloaf from the pan (I use two flipper-type spatulas, one on each end) to a warmed plate or a cutting board.

I recommend letting the meatloaf stand for ten minutes when it comes out of the oven before slicing, for optimum slice cohesion. You can tent it with foil if you're worried that it will cool down too much. Slice only what you need right away, and let the rest continue to cool until dinner's over. Then slice the rest, and store how you wish. You'll find the completely cooled meatloaf slices much more neatly and tidily than the first ones.

One of the great things I discovered about this recipe is that it freezes incredibly well. We had a few slices left over after the dinner that you see above, and the aforementioned sandwiches, and I wrapped the slices all together in plastic wrap, which I then bagged up in a freezer bag with the air squeezed out. Two weeks later, we hauled out the bag, defrosted it, reheated the slices on medium power in the microwave, and had a yummy dinner that took very little effort. Somehow, that sort of thing always makes me feel like I'm getting away with something.

What kind of sides you serve with meatloaf is entirely up to your preference. I don't usually go for mashed potatoes, because I don't put a sauce or gravy on the meatloaf. In the picture above, the potato-half you see is a very simple twice-baked potato, wherein the insides of a baked potato were scraped out and mixed with a little monterey jack or edam cheese, some smoked paprika, and a dollop of sour cream. The filling was smoothed back into the baked potato shell, and briefly broiled, topped with a tiny bit more sour cream, and some green onion. You could also go with a nice rice pilaf, or even macaroni and cheese, a creamy orzo side dish, or even french fries. The other side, broccoli, is a no-brainer in our household. Need a veggie? How about broccoli?! We eat a lot of it, either plain steamed with a pinch of kosher salt, or drizzled with a little toasted sesame oil (especially for an Asian-flavoured dinner). In asparagus season, that makes a great choice too, but any veggie side will do: crisp green salad, corn on-or-off the cob, green beans, spicy carrot coins...even green peas, if that's your thing (but I'll pass, frankly). And the end of the day, you know what you like; serve it with this meatloaf.


*calorie information from an online calculator, the accuracy of which I cannot vouch for.

April 14, 2012

Pasta Alla Mizithra

This pasta dish is almost blindingly simple, to the point of being a little...incomplete, shall we say, on its own. But oh, how tasty! I recommend pairing it with a big, colourful Greek salad, and a nice glass of wine. The salad will take longer to make than this dish.

For those of you whose only experience with mizithra is the Spaghetti with browned butter and mizithra at The Spaghetti Factory (where it is one of the tastier items on offer, as I recall), you can make this dish so easily and quickly at home that there's no need to order it out; you just need to get your hands on the cheese itself. Mizithra can be had by the chunk, or pre-grated. The pre-grated stuff is usually so fluffy and finely textured that it disappears entirely into the pasta, instead of giving you the delightful little flecks that you get when you grate it yourself. I recommend buying a small chunk, and grating it yourself, so you can get the size of shavings you prefer.

Pasta Alla Mizithra
Serves 4

250 grams long pasta of your choice (such as the linguine shown here)
1/4 cup butter
60 grams grated mizithra cheese

Melt the butter slowly (ie, over a low temperature) in a skillet or saucepan. Once the foaming stops, and the butter has melted, allow the colour to darken to a dark gold. Do not stir or disturb the sediment in the pan. Once the colour is dark gold/light brown, remove the pan from the heat. If you like a very clear browned butter, carefully pour the liquid off of the solids (and discard the solids), but I confess I like the toastiness of leaving the solids in. You can do all this while the water boils for the pasta.

Cook the pasta and drain. Toss the pasta thoroughly with the browned butter, making sure every strand is coated.

In a large serving bowl, spritz a little olive oil, then sprinkle 1/4 of the grated cheese. Layer three more times with buttered pasta and grated cheese, ending with cheese. Present at table, and toss gently while serving up portions. Finish with parsley, if you like a bit of green, and lots of black pepper.

You can see how a nice, bright vegetable salad will perk this right up. If you want to go into butter overload territory, add garlic bread on the side, too. A glass of wine will cut the richness of butter and cheese nicely. I recommend a crisp white, or a lighter bodied red - such as sangiovese, gamay noir, or cabernet franc, for example.

The portions indicated here are smaller than you'd get at a restaurant, but that's because I usually serve modest portions of pasta, in the Italian model (although I don't usually serve it as a first course for a larger meal). It's an approach that particularly makes sense for a rich dish, such as this one. If you want the "big pasta experience", I guess this would serve two people, by North American standard serving sizes.

Enjoy!


March 17, 2012

Vegetarian Lasagna


For a while, it seemed like the default vegetarian option at any pre-set or group menu at restaurants in this town was vegetarian lasagna. Not being vegetarian myself, I had more options to choose from, but I recall sitting next to any number of folks who would fork disdainfully through their entrees muttering about the general lack of anything resembling a vegetable other than tomato (in sauce form) and perhaps a sliced mushroom (if they were lucky), or mushy cube of something indeterminate, and which might have once been zucchini, or possibly bell pepper. Mostly, they were bland and unimaginative, as far as I could determine from the reactions. I avoided the dish at all costs, personally, because I never, not even once, heard anyone say that it was delicious.

But really, there are so many reasons that vegetarian lasagna could be fantastic, that I became determined to work one out. This is the vegetarian recipe that has been my staple for the past 15 years.

Notes: The idea of grated zucchini and chopped mushrooms standing in for ground meat comes from from Anne Lindsay's Lighthearted Everyday Cooking. The idea of roasted fennel comes from the now-defunct Cafe S'il Vous Plait on Robson Street (although, I'm not sure they roasted it). Mixing the cheese and egg with the spinach is a tip I stole from my sister. The rest is pretty much classic!

Vegetarian Lasagna

Serves: 8
Total prep & cooking time: 2 to 2 1/2 hours, depending on your level of organization

1 tablespoon olive oil, divided
1 foot-long zucchini, grated
500 grams mushrooms, button or cremini
1 large onion, finely chopped
3 cloves of garlic, minced
796 mL canned diced tomatoes (no sodium added)
2 cups tomato sauce (no or low sodium)
1 fennel bulb, thinly sliced
200 grams mixed wild mushrooms
2 tablespoons tomato paste
2 cups part-skim ricotta or 1% cottage cheese
300 grams chopped frozen spinach, thawed
1 egg
pinch grated nutmeg
9 lasagna noodles (or equivalent fresh noodles)
200 grams mozzarella, grated
1/2 cup parmesan, freshly grated
1/4 teaspoon kosher salt
1/4 teaspoon white pepper
pinch of chile flakes
1 teaspoon fennel seed
1/2 teaspoon oregano leaves (less, if using powdered)
1 teaspoon dried basil leaves (or 1/4 cup fresh)

Pre-heat the oven to 400℉. Spritz a 9x13" glass baking dish lightly with cooking spray, or rub lightly with canola oil. Toss the sliced fennel bulb with 1/2 tablespoon of olive oil and a tablespoon of water, and add a pinch of salt. Roast uncovered in the oven for about 30 minutes, until the fennel is completely tender. Remove from oven, scoop the fennel onto a plate or bowl, and set the oily pan aside to build the lasagna in, later. Start heating your water to boil the noodles.

In the meantime In a medium bowl, combine the ricotta, the spinach (squeeze out excess water first), the egg, and the nutmeg, and mix thoroughly with a fork.

Prepare the wild mushrooms by cleaning, removing any woody stems, and slicing into large, recognizable pieces.

Use a food processor or mini-prep to finely chop (pulse) the button mushrooms until the pieces are mostly roughly the size of green lentils. In a large skillet, heat the remaining olive oil, and begin to saute the onions and garlic. Feel free to deglaze with a little splash of water or wine as you go, to keep them from sticking. Once the onions are starting to turn translucent, add the grated zucchini, and the chopped mushrooms. Stir and saute until the vegetables are tender, and any excess liquid has evaporated. Add the wild mushrooms, and stir them through. Add the salt, white pepper, chile flakes, fennel seed, and oregano, and continue to stir and saute. When the herbs are all nicely integrated in, add the diced tomatoes with their juices, the tomato paste, the tomato sauce (except for about a half-cup), and, if the mixture instantly looks too thick, a half-cup to a cup of water. Add the basil, and let the sauce cook gently, covered, over low heat, while you boil up the noodles.

Get the noodles going, and drain in a colander once just barely tender. Lay the noodles out on a cutting board or sheet, if you want to keep them from sticking to each other.

Layering time!

In your oily 9x13" baking dish, put down the reserved bit of tomato sauce, and spread it out to cover the bottom of the dish. Add three noodles to cover the sauce, and then add 1/3 of the simmered vegetable sauce, spreading it out evenly. Next, add all of the roasted fennel bulb, spreading it out into a nice even layer. Add half of the mozzarella cheese, sprinkling it over the fennel. Lay down the next three noodles. Lay down half of the remaining vegetable sauce, spreading it nice and evenly. Add the ricotta cheese and spinach mixture, carefully spooning it around the dish, and then using the back of the spoon to smooth it all into a layer. Top with the last three noodles, and the last of the sauce. Cover the top of the dish with the remaining mozzarella and the parmesan. If you like a little green, you can throw some chopped parsley in there, too.

Cover the dish with foil (spray the underside lightly with canola oil or rub it with olive oil first) and bake for 40 minutes, or until bubbling and hot. Remove from the oven and let it stand, uncovered, for about 10 minutes before you cut it, to make sure that it serves up nicely, and doesn't just slide apart. You can use that time to knock together a salad, or some garlic bread or something.

Enjoy with a nice glass of wine, and the comfort of knowing that you will eat well for days to come.

Does it take a while? Yeah. But, you can make it in advance for a dinner party, and it freezes well, too.

I'm currently contemplating a version that includes some coarsely/medium-ly chopped chickpeas somewhere in the mix, but I'm undecided if I should add them to the vegetable sauce or the cheese-and-spinach layer. I'll report back, once I've taken a crack at it.

August 27, 2011

Cajun Jambalaya with Okra

I am a huge fan of jambalaya, and it's something I almost always make at home, rather than order out. That is solely because I live on the west coast of Canada, where "jambalaya" usually involves pasta instead of rice, and seldom has sufficient seasoning - either in type or quantity, and shockingly often includes cream. When I was in New Orleans, I took great delight in sampling the extensive varieties of jambalaya available - each with a different ratio of ingredients (including seasoning), a different degree of sauciness, and a different notion as to how much one person could/should eat at lunch. Each one was a definitive jambalaya, in its own right.

Jambalaya is such a wonderfully versatile dish, that more's the pity that so few places up here get it right, and by "right" I mean an acceptable variant of the classic forms (Cajun or Creole), which is most emphatically not merely sausage and bell peppers tossed with pasta. Jambalaya needs to be a one-pot dish, rice based, and incorporating the seasonings of the Cajun or Creole variety. The rest - the protein(s), the wet/dry ratio, the choice of featured vegetables, these are all up to the cook. It can be cooked in a deep pot or a skillet, depending on how much you are making at a time.

I have been leaning toward brown, or Cajun-style jambalayas, lately, which tend not to be tomato based. This variation was conceived because I had picked up a bag of lovely looking fresh okra from the market, and needed something to make with it. As it happened, I also had some ham and a couple of chicken thighs that needed using, so, in fine ad hoc style, into the pot they went. My basic methodology is essentially the same as I previously wrote about, but tweaked to incorporate the okra.

Jambalaya with Okra
Serves 4

1 tablespoon vegetable oil
1 large onion, diced
2 medium stalks celery, diced
1 medium green bell pepper, diced
1 cup orange (or red) bell pepper, diced
2 jalapeño peppers, diced
1 1/2 cups okra, sliced
8 oz ham steak, diced
175 g boneless skinless chicken thighs (about 2), diced
3 cloves garlic, minced/crushed
3 cups chicken broth or stock
1 cup parboiled rice
1 teaspoon red Tabasco sauce
1/2 teaspoon cayenne pepper
Salt-free Cajun spice blend (to taste - start with a tablespoon)

Heat a large cast iron frying pan well over high heat. Add oil, and tilt pan to coat bottom. Add ham cubes and sautée until they start to take on a bit of colour. Add cubed chicken, and stir well, but don't allow chicken to brown. Add the onion, celery, green pepper and jalapeño, and stir.

Cook until the onion turns nicely translucent, then add the garlic, Tabasco sauce, and spices. Stir well. Stir in the orange/red bell pepper pieces and the okra until thoroughly combined.

Stir in the (uncooked) rice, making sure that each grain gets well coated by the juices in the pan. Add the chicken stock/broth and stir again, making sure that the rice grains are all submerged. Bring up to a gentle simmer.

Turn heat to very low, cover pan, and cook for 25 minutes, stirring gently once at the ten minute mark. If it seems a little dry, you may wish to add a bit more water at this point, too. If you want to go crazy and add some raw shrimp, this is also the time to do it, at the ten (or, for small shrimp, fifteen) minute mark. Garnish with a little sliced green onion, if you like, and lots of black pepper. Pass the hot sauce.

Obviously, you can switch out the proteins however you like best: smoked sausage, turkey or duck meat, rabbit, venison sausage, shrimp, oysters, alligator, crawfish, or the classic, tasso (spiced ham) for serious points. You can increase or decrease the meat(s) and the amount of vegetables, depending on your taste or what you need to use up - this is a great way to use up extra bell peppers that might be lurking in your fridge.

August 19, 2011

Ham Rotini Casserole

This is one of those dishes that grew out of a sudden desire for a creamy pasta, which is actually a pretty common occurrence in my household. In this case, there was also a coincidental need to use up some yoghurt. For some reason, ham seemed to be the perfect thing to tie it all together, since I wasn't feeling particularly in a stroganoff-y mood. Originally there were supposed to be mushrooms, as well (some creminis which also needed using up), but I completely forgot about them until I was putting the pan into the oven, and it was simply too late.

The sauce is very creamy, and a little cheesy without feeling like a cheese pasta, perhaps because the yoghurt gives it a little tanginess that cuts through the richness. While this is no health food item, with salty ham and rich yoghurt, it is still better for you than most big ol' plates of pasta at a casual restaurant, so that's some additional comfort for a comfort food dinner.

Ham Rotini Casserole
Serves 4

200 grams rotini
125 grams boneless cooked ham, diced
1 2/3 cups 1% Milk
2 tablespoons butter
1/8 cup unbleached flour
1 teaspoon chicken base (such as Better than Bouillon)
2 garlic cloves
1/2 cup shredded Parmesan Cheese
1 cup plain, thick yoghurt (such as Liberte Mediterranee)

Preheat oven to 400 degrees F (230 degrees C). Bring a pot of water to boil and cook the rotini according to the package directions (until it is just a little underdone).

In a large skillet, melt butter and stir in flour until smooth. Gradually add milk, bouillon paste, salt, garlic, and pepper. Stir all together and bring to a gentle simmer, stirring until thick and bubbly. Reduce heat; add ham cubes, cheese and yoghurt. Stir until cheese is melted. Add the drained pasta, and stir through to combine. Bake in the preheated oven for 10 to 15 minutes or until heated through.

Optional topping: Melt 1 tablespoon of butter in saucepan and stir in breadcrumbs and some finely chopped parsley. Sprinkle crumb mixture over casserole before baking. I was totally going to do that, but then (again) completely forgot. Seems to have been my day for forgetting things.

I debated trying to shoe-horn some vegetable matter into the casserole, but in the end decided that it really wanted to be a very simple sort of dish rather than a one pot meal (as fond of those as I am). I decided in the end to make a tossed green salad with rather a lot of chopped veggies in it - cucumbers, bell peppers, radishes, tomatoes, etc., partly to make up for the indulgence of the pasta, but mostly to give dinner a little freshness and crunchiness, both things that don't exactly go with the creamy hammy territory.

This dish was immediately voted "into the book", about two bites into dinner. The next time I've got some yoghurt to use up, I'll definitely be thinking of this one.

August 15, 2011

Meatballs: Pork & Turkey edition

I wasn't originally planning to post these, I just wanted some meatballs. However, after they turned out rather well (Palle suggested that they are the best meatballs I've ever made), and since I did kind of scribble down the proportions as I was going along, and since it turns out they are equally delicious cold (hello, bento!), I decided to share them.

I don't make meatballs or meatloaf very often, but I do like them rather a lot, as a main course unto themselves, as part of a pasta dish, as a little protein add-on to a salady sort of meal, or as a sandwich filling. Not to mention the "on a little toothpick" hors d'oeurves application.

The meatball matrix is pretty simple: ground meat(s) of your choice, seasoning, binder, corrector, and featured ingredient (if any). These meatballs are half lean ground pork and half ground turkey breast (hence the pale colour, in case you were wondering), seasoned with salt and pepper, fresh garlic, whole fennel seed, fresh parsley, and ground oregano, bound with egg, corrected with panko, and featuring finely chopped roasted red peppers and green onions.

As with hamburger and meatloaf making, one of the keys to great texture is to avoid over-mixing or over-compressing of the meat, and that means that the best tool for the job is your impeccably clean fingers. Don't be afraid to get right in there - you will have much better distribution of ingredients that way. I am also a fan of putting everything but the meat into a mixing bowl, giving it a bit of a stir with a fork (to break up the egg), and then separating the ground meat into little clumps with my fingers and dropping the bits on top of the rest of the mixture. Once all of the meat is aerated and added to the bowl, I get my fingers in there and toss it like a salad, to avoid the aforementioned over-compression. Once everything is nicely combined, I begin shaping the meatballs. This method works wonderfully for any time you are mixing ground meats.

Pork & Turkey Meatballs
Makes 12 large meatballs

450 grams lean ground turkey
375 grams ground pork
1 large egg
1 whole roasted red pepper (such as Piquillos)
1/2 teaspoon kosher salt
1 teaspoon dried oregano
3 cloves garlic
1 teaspoon fennel seed
1 teaspoon dried basil
1/2 cup minced parsley
1/2 cup panko-style bread crumbs
1/2 teaspoon ground white pepper
1 teaspoon Worcestershire sauce

Combine all of the ingredients as described in the paragraph above, separating the meat into chunks, and then mixing in the rest of the components. Fry up a tiny nub of meat until cooked through, and taste to see if you need to adjust the ingredients - more salt or fennel seed, for example. Correct the seasoning as needed.

Place, spaced out, in a 9x13" glass baking dish. Sprinkle each ball with a little Worcestershire sauce. Bake at 400 F for 40 minutes - they should be just golden brown. Use a spoon to trim any "spill" of liquid into the pan, as you lift them out, once they are cooked through. If you want a slightly browner meatball, you may wish to brush them with a little soy sauce half way through, but note that this does add a bit of extra saltiness, too. Low sodium soy sauce might be your best choice, there.

You can fry these up on the stovetop, too, of course, although the meat mixture is quite moist, and you are likely to get misshapen meatballs for your extra effort. I highly recommend the baking/roasting method - the balls keep their shape, and you can spend the time that you would have been tending to the meatballs to do something else.

As mentioned above, these are great hot (for example, beside a nice polenta, or a potato-and-vegetable salad, or cold, in your bento (beside...a potato-and-vegetable salad, perhaps...)
If you're planning to make a meatball sandwich, you'll want to have a little sauce, I'm guessing. If you have a stash of leftover sauce in the freezer, this is a great use for it. Otherwise, you can either make a simple sauce from scratch, or purchase one. Warm the sauce together with the meatballs, if you are starting with cold, pre-cooked meatballs. You may want to toast up the bun, too, to add to structural integrity of the sandwich, given how damp even a thick tomato sauce can be. If you want to make your bread garlic bread, I'm certainly all in favour of that. I tend to use Portuguese buns, because I can get good ones in my neighbourhood.
These ones don't really look cooked, but they are - they're from the same batch as the bento shown above.. This is a flaw in the lighting/photography rather than the meatballs themselves, though. Of course, pork and turkey are very light-coloured meats, and I didn't do the extra browning step.

January 16, 2011

Hamburger Stroganoff Skillet Dinner


First things first: this is, obviously, not a true stroganoff, nor is it pretending to be one. Instead, it's a quick weeknight dinner that only uses one pan and doesn't take a whole lot of time. Bonus points that it is made from ingredients that I'm likely to have on hand. Even better, it has a surprisingly modest caloric payload, which (according to an online recipe calculator) is approximately 400 calories per serving, somewhere in the vicinity of 1 1/2 to 2 cups. Add some fresh steamed veggies for a side dish, and you're licking the plate (and patting your satisfied belly) for under 500 calories. This dish is, I presume, what Hamburger Helper wants to be. Only better, I think, and with less sodium, which means it doesn't send you desperately, repeatedly to your water glass until your insides slosh when you walk. Comfort food!

Hamburger Stroganoff Skillet Dinner

Serves 4

450 grams extra lean ground beef
1/4 teaspoon Kosher salt
1/2 teaspoon black pepper
1/4 teaspoon dry mustard
1 cup finely diced onions
2-3 cloves garlic, minced
200 g broad/wide egg noodles
1 1/2 teaspoons Better than Bouillon Beef Base (or substitute beef broth for the boiling water below)
3/4 cup plain Greek yogurt (I use Liberte's 0% fat)
2 cups sliced mushrooms of your choice
2 tablespoons unbleached flour
1 1/2 cups boiling water
1/2 cup cold water
1 teaspoon Worcestershire sauce
1/2 tsp cornstarch

In a 12" non-stick skillet, fry the beef, stirring occasionally until well browned. Sprinkle the dry mustard and the salt over the meat and stir again. Add the onions and garlic, cooking and stirring until softened and a bit translucent. Add mushrooms to skillet, and a splash of water to make sure nothing sticks. Add the noodles, beef base, Worcestershire sauce, and boiling water, stir well and bring to a simmer. Shake the half cup of cold water in a lidded container with the flour, until smooth. Add to the skillet and stir well until thoroughly incorporated and gravy starts to thicken up, and then cook over medium heat until noodles are half-done (about 5 minutes). Combine yogurt with cornstarch (so it doesn't break and curdle) in a small bowl and beat with a spoon or whisk until perfectly smooth. Add yogurt mixture to skillet. Cook stirring until mixture thickens to a creamy coating and the noodles are fully cooked.

A crisp salad would be another lovely way to round this out.

October 25, 2006

Rainy day food

When the rain begins, and the weather starts to cool, my mind wanders inevitably to sausages. Particularly, I must confess, the wonderful specialty sausages from Oyama Sausage down at Granville Island Market. I never know exactly what they will have available, each day, although there are certainly some frequent flyers, but I know that there will be a variety of fresh and cured sausages that will include, but not be limited to chicken, pork, lamb, beef, and a variety of game meats. Perhaps my favourite is the venison and blueberry, although competition is steep, and the chourice sitting in my freezer right now is looking mighty attractive. They don't use fillers (unless, as with black pudding, it is an essential part of the recipe), and they don't use more fat than is needful. Every sausage that I have had from there has been outright delicious. Sausage need neither be unhealthful nor frightening in the making, famous sayings notwithstanding.

Bangers and mash, that great classic comfort foods of British cookery, is one of the most straight-forward way to enjoy a good sausage, and I certainly do. I also borrow scraps from other european cuisines, though. Sausage with lentils and red wine, as the Italians would do. Cassoulet, as the French are prone to just about get into fist-fights over. Grilled beside a heap of red cabbage and apples, and buttery egg noodles, which would go down well in Germany or Scandinavia.

These are just beginnings. The possibilities, when you are starting with a good sausage, are just about endless. Breakfast hashes, stuffed into a good bun for lunch, or cut into coins and tossed with pasta for dinner. Jambalaya. Paella. Assorted casseroles and composed dishes. Heck, a nice, plump pork sausage next to a big bowl of homemade baked beans would be just fine, thanks.

A bit of onion, a bit of mushroom, and, as above, you have the beginnings of a sausage and gravy dinner that can feature any side dishes you like: scalloped potatoes, steamed broccoli, giant pile of coleslaw... really, whatever is in the fridge will likely go well with sausage.

When the weather starts to cool and the days are starting to grey with rain, this is what I want on my plate.

There are warm-weather sausage dishes, too, of course

March 06, 2006

Beef Barley Soup


It's a fortifying soup. Rich without being fatty, filling thanks to the chunks of tender beef and the plump grains of barley, not to mention the slightly exotic and ever-so-suggestively boozy shiitake mushrooms. This, my tongue informs me, is what soup is supposed to taste like. It isn't just a catch-all of leftovers shunted into a pot full of water or stock, it's a precision-strike in the kitchen, each ingredient calibrated to bring a specific characteristic to the party.

I am gradually shifting most of my eating patterns towards foods with a lower glycemic index - loosely, this means foods with "staying power" - that don't instantly get converted into glucose the moment they hit my stomach. I should note that I am not categorically shunning any food or category of food, but that I am making an effort to eat thoughtfully in such a way that my blood glucose levels achieve a kind of Tao - an even-keel instead of the sugar spikes and crashes that can be problematic with my particular health concerns. This means that I am increasing my use of the foods that achieve the slower digestion that will benefit me. One of the big players is barley.

I confess that it has been a while since I made anything with barley. I don't have anything against it, in fact I quite like the flavour, but to me it has never been anything other than soup or stew. I had a risotto made from barley and lamb broth at a restaurant in Scotland, and it was quite delicious - really almost more of a stew, but isn't that what risotto is? A kind of particularly creamy, luscious rice stew?

I thought I would start of small, though. A nice pot of the good old beef barley soup, perfect in the iffy weather of not-quite-spring. My mother made a lovely version using leftover roast beef, but since she was "cooking from her head" there was never any recipe written down. I decided to turn to the experts - Cook's Illustrated. I plugged the words Beef Barley Soup into their search engine, and it spat out the issue that contained the recipe - February 1998. From there, it was an easy saunter over to the bookshelf to extract the right slim volume (I am very proud to own every single issue of Cooks Illustrated magazine) and turn to the right page.


Here is my version of their recipe - although I used the considerable shortcut of the entirely servicable Pacific brand beef broth. I only made a half-recipe, since I only had one litre of broth, but next time I make this I will make at least a whole recipe - gosh, maybe even a double! It's that good, people. I tweaked the recipe here and there for other reasons, too, but as you can tell I'm very happy with the result. The following recipe is for the quantity that I made:

Beef Barley Soup
Adapted from Cooks Illustrated

1 lb. bottom blade steak, cubed into stew-sized pieces, lightly salted
1/2 cup white vermouth
1 litre beef broth (I used Pacific brand, and was quite happy with it)
1 tablespoon canola oil
1 stalk celery, de-strung and finely diced
1 med onion, finely diced
2 cloves garlic, minced
2 carrots, peeled and cut into quarter-coins
6 large shiitake mushrooms, stem removed, sliced into half-slices
1/4 tsp powdered thyme
1 tablespoon tomato paste
1/4 cup pearl barley
1/4 cup parsley, chopped
salt
pepper
2 tablespoons dry sherry to finish

Preheat oven to 350 F. Preheat cast iron skillet on stove top.

In a dry, preheated cast iron skillet, sear the beef in batches until all pieces have a good, dark golden brown on at least two sides. Do not cook all the way through. Remove each piece as it is ready to your empty soup pot. Deglaze the skillet with the vermouth, and pour over the beef pieces. Add all of the beef broth, and place soup pot, covered, in the oven. Let the meat and broth stew together for an hour and a half. Toward the end of the stewing time, start prepping the rest.

In your skillet, heat the oil and saute the onion, celery, carrots, and mushrooms. If the mixture is too dry, deglaze slightly with a little water or vermouth. Continue to saute until onions are translucent and celery is tender. Add the garlic, thyme, and tomato paste, again with a little water if necessary to prevent sticking.

Remove soup pot from oven, and scoop out the pieces of beef to a cutting board. Chop the beef to soup-sized pieces and return to soup pot, along with vegetable mixture and barley. Simmer on the stovetop for about 40 minutes, or until barley is fully cooked and tender. Adjust for salt and pepper, add the chopped parsley and stir through. Remove from heat and stir in dry sherry. Serve with a nice hearty bread for a surprisingly filling dinner.

Serves 2 - 4, depending on what else you're serving and how greedy/hungry people are.

December 06, 2005

Don't Let Anyone Tell You...

Don't let anyone tell you that you can't make quesadillas out of leftover aloo gobi. Because you totally can.

I used to make pizza out of anything leftover. My mother used to conceal leftovers in scrambled eggs. Now, I make quesadillas. A little cheese to act as culinary glue, a little Sriracha sauce, and dinner was good to go!

September 25, 2005

Autumn's Here

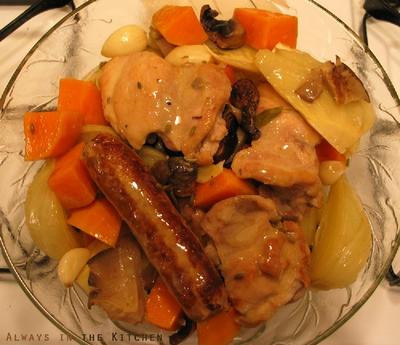
Autumn is undoubtedly here. There is a chill in the air, although it has been blessedly sunny so far, and the wind is starting to rattle the gradually baring branches of the trees. Everything is starting to turn to shades of gold and umber. It's time to take out the comforting, hearty foods of the harvest, to turn on the oven and glory in the warmth of the kitchen instead of the oppressive, hot slog of summer. One of my favourite things to make at this time of year is Braised Chicken & Fennel. It doesn't need the same length of time in the oven as beef or pork ribs, but it is full of slow-cooked deliciousness and rich autumn flavours.


I particularly like using sweet potatoes in this dish - the colour gives a little pop to the soothingly pale fennel and garlic cloves, although regular potato (or even carrots) works as well. The fennel becomes very tender here - a melting sort of subtly, brought into sharp focus with a scattering of fennel seeds. The sauce is not thick, but provides a creamy gravy to ladle over each plate, or to mush around a piece of warm, crusty bread.

While I gladly welcome the change to my favourite season, I'm a teensy bit reluctant to let go of summer entirely. Since pizza, to me, is a year-round endeavour, it seemed as good a dish as any to enjoy in these still-sunny last days of September.

I am playing constantly with my crust recipe - walking the thin line between crispy and chewy, hoping for spring in the crumb and a satisfying firmness that will stand up to the toppings - in this case a spicy tomato sauce, some hot Italian sausage (left over from the Braise) and a generous amount of finely chopped green pepper.

All is well in the changing of the seasons.