October 13, 2015

Pumpkin Pie


Pumpkin pie represents such a beloved combination of flavours in North America that we're apparently even happy to consume it as a latte (okay, maybe not all of us), or (better still) beer.

It is also a staple long associated with harvest season feasts such as Thanksgiving and Hallowe'en - eminently sensible, since this is when pumpkins are ready for cooking. There's a lot of great options for pumpkin desserts - everything from flan to mousse, and that's not even counting the muffins, quick breads, and scones. My sister makes a fantastic pumpkin cheesecake, with a baked on sour cream topping, but that's a lot more advanced than this simple pie, which is just a single bottom crust and a filling that could best be described as mix-and-pour.

Somehow, though, pie remains the classic pumpkin dessert. This one is a little bit tangy from the crème fraîche, sweet (but not breathtakingly so), and not too dense. If you prefer mild spices, reduce the cinnamon to 1 teaspoon and the ginger to half a teaspoon. You can substitute ground cloves for the allspice, if you like.

Pumpkin Pie
Makes 1 pie

1 single pie-crust, unbaked
425 grams pumpkin puree (unsweetened, unseasoned)
3 large eggs
1/3 cup raw sugar
1/3 cup granulated sugar
200 grams crème fraîche
3 tablespoons dark rum
1 teaspoon cornstarch
1 1/2 teaspoons cinnamon
3/4 teaspoon ground ginger
1/2 teaspoon ground nutmeg
1/4 teaspoon ground allspice
1/8 teaspoon salt

Make your favourite single pie crusts recipe (or try the one shown here), and line a standard 23 cm pie-plate, folding and crimping the edges under if you like, or even simply pressing them gently with a fork against the top edge of the plate, if you want to go super simple.

Once the crust is in the pan, preheat your oven to 425 F / 225 C.

In a medium-large mixing bowl, beat the eggs until smooth (I use a whisk, but you could also use a food processor). Remove a tablespoon or two into a separate ramekin dish and set aside. Add the sugars to the mixing bowl, and beat until smooth. Dissolve the cornstarch in the rum, and add to the eggs and sugar, and stir through. Add the pureed pumpkin, the salt, and the spices, and stir until smooth. Finally, stir in the crème fraîche and mix until thoroughly combined. It will be a very pale orange at this stage, but it will darken up nicely as it cooks.

Put the pie pan on a baking sheet (or pizza pan) for easier handling. Use a pastry brush to paint the top edges of the crust with the reserved beaten egg. Pour any leftover egg into the pie filling, and stir it through.

Pour the thick pumpkin mixture into the unbaked pie shell, and give the pan a little jiggle to settle it evenly.

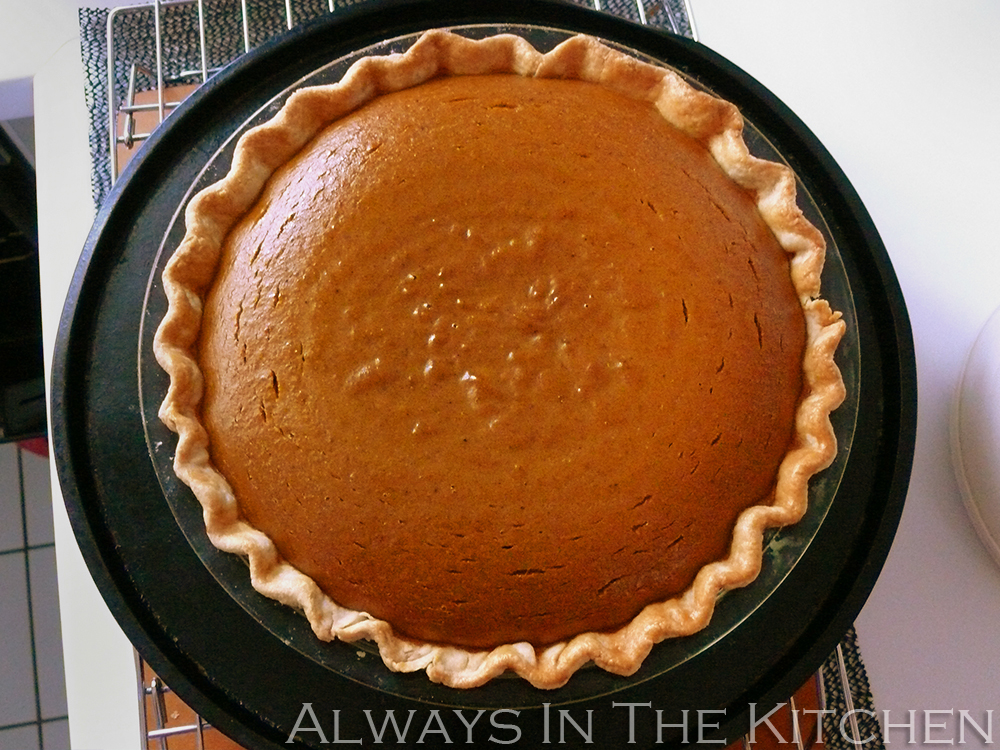
Move the pie (on its baking sheet) to a rack in the middle of the oven, and bake for 15 minutes. Lower the heat to 350 F / 180 C, and bake for another 45 minutes. The pie filling should look kind of rounded, glossy, darker than it was, and still a touch wet in the middle. The middle might even still jiggle a bit, which is okay - this pie must cool for a couple of hours before being cut, and it will continue to cook as it cools, and it will set up very nicely during that time.

Remove the pie from the oven and place on a cooling rack. As the pie cools, the surface will flatten out, losing the slightly domed look for a completely flat surface. Sometimes cracks will appear in the surface, but that's fine - doesn't change the flavour (and you can always fill them with whipped cream if you like).


Wait a minimum of two hours before slicing and serving. Excellent with a cup of coffee, or a glass of bourbon. If you like, feel free to add a little whipped cream (or a lot).

Cover leftovers well with plastic wrap and refrigerate for up to three days.

September 20, 2015

Lye Water Bagels


Bagels always sounded like a lot of work. First you have to make the dough, then let it rise, shape, boil (!), and finally bake. And then there's the lye water, which is a separate sort of anxiety on its own. Lye is caustic and requires careful, safety-forward handling, which raises a additional barrier to being motivated enough to begin.

Happily, although there are lengthy-process recipes out there, you can absolutely make delicious bagels in only a couple of hours. I started these after breakfast, and we ate them for lunch.

I scoured around the internet for recipes, and finally hybridized the likely-looking ones into the recipe below. These are made partially with high-gluten flour, but you could as easily use only white bread flour instead. The extra gluten in bread flour helps these bagels develop their trade-mark chewiness.

These are somewhere between the aesthetics of New York style bagels and Montreal style. I make no claims to authenticity, so if you're a style hard-liner, this recipe may not be for you. If you happily eat any kind of bagel you encounter, I hope you'll give this one a try.

Lye Water Bagels

Makes 8 medium-large bagels

300 mL water, heated to wrist-warm
1/2 tablespoon honey
20 grams raw sugar
7 grams active dry yeast
10 grams salt
200 grams high-gluten or bread flour (such as German flour type 1050)
200 - 300 grams all purpose flour

For boiling:
1 tablespoon lye water* (I get mine from an Asian supermarket)
12 cups water

For baking:
Cornmeal as needed
egg wash (optional)

This dough will be a very firm one, and I caution you not to all all of the flour at once, lest you make it too firm. I was a little careless myself, and added a bit more flour than I should have. The end result was that I had a tough time shaping my bagels, and one of the hand-looped ones came apart during boiling (it was still delicious).

Pre-warm the oven so that the dough will have a nice warm place to rise.

Into a large mixing bowl, dissolve the honey and sugar in the warm water. If the water is a bit hot, let it cool until it's pleasantly warm but not hot against the wrist. Sprinkle the yeast over the sweet water, and wait until it proves itself by foaming up and smelling yeasty.

Add the 200 grams of high-gluten (or bread flour) and the salt, and beat vigorously with a wooden spoon until it is nice and smooth. Add 200 grams of the all-purpose flour, and stir it in, turning it out onto the work surface eventually, to knead it all in. If needed, add the remaining 100 grams flour a little at a time until you have a stiff dough.

Knead the stiff dough for 10 minutes, either by hand or with a very sturdy stand-mixer. If you are kneading by hand and are having a tough time, clean your hands thoroughly and oil them before continuing to knead. After ten minutes, smooth the dough into a compact ball and return it to the mixing bowl, which you have cleaned and lightly oiled. Roll the dough around in the bowl so that the surface of the dough picks up some of the oil. Cover the bowl loosely with plastic wrap, and let sit until the dough has doubled in size - about an hour.

Preheat the oven to 450 Fahrenheit, with a rack in the middle slot.

In a large pot (I used my Dutch oven) on the stove, heat the 12 cups of water until boiling, and then add the lye water just before you add the bagels.

While the water is heating, shape your bagels. Squeeze the excess air out of the dough, and then divide into 8 equally sized (more or less) pieces. You can shape your bagels by making a dough rope (or "snake") and looping it into a ring by wrapping it around your hand, pressing the ends together very firmly, or by making a smooth ball of dough and then forcing your thumb through the centre, gradually expanding the hole until the desired doughnut-shape is achieved. I tried both, but found the second method a bit easier than the first.


Prepare a plate or wooden cutting board with a thin layer of cornmeal. Also prepare a baking sheet with a thin layer of cornmeal for the oven stage.

When the water is boiling, add the lye water, and then immediately add 2 or 3 bagels, carefully, by hand, and time them for one minute. After the minute, turn the bagels over, and boil for one more minute. Use a spider-tool to remove the bagels from the water, onto the cornmeal-covered cutting board. Add the next bagels into the water and start the timer again.


If you want toppings on your bagels - poppy seeds, or sesame seeds, or whatever - now is the time. Brush the tops of the just-boiled bagels with an egg wash, and press them upside-down into a plate of seeds/toppings. Place the bagels topping-side-up on the baking sheet.

Move all the boiled bagels onto the baking sheet, cornmeal-side down. Bake at 450 F for 10 minutes, or until nicely browned. Allow to cool for at least 15-20 minutes before eating.


We had ours with cream cheese, of course, and a heavy grinding of black pepper.


Once completely cool, bag up and store as you would any freshly baked bread.

*I should note that I may use more lye water next time, as I couldn't find a reliable guide to how much lye water to add to my boiling water. Most instructions assume you will be using a dry form of lye, which is more concentrated. A higher concentration of lye should make for a somewhat darker colour on the finished bagel.

September 13, 2015

Chanterelle Risotto


Late summer through fall is chanterelle season here in Germany. You will see market stalls piled high with Pfifferlinge, as they are called here, and you will see specials on the chalkboard of almost every restaurant: chanterelles with dumplings (especially a variety called Serviettenknödel), chanterelles with pasta, creamed chanterelles on toast, and of course, chanterelle risotto.

The secret to a nice mushroom risotto is not to overcook the mushrooms. I like to fry a few decorative ones in butter to set aside to use as a garnish, and then sauté the rest for the main risotto itself. By sautéing the mushrooms first, before anything else goes in the pot, it's easy to remove the lightly sautéed mushrooms to a plate to add back in later, so that they don't get that wrung-out squidgy quality that happens with overcooked mushrooms.

As always, everything that is not a feature ingredient in a risotto should be so finely chopped as to not exceed the size of a cooked grain of arborio.

Chanterelle Risotto

Serves 4

300 grams fresh chanterelle mushrooms
4 tablespoons salted butter, divided
2 shallots, finely minced (or small onions)
2 cloves of garlic, pressed or microplaned
220 grams risotto rice (I'm using Baldo here, but arborio is fine)
1/2 cup dry white vermouth (or dry white wine)
1/2 teaspoon coarse sea salt or Kosher salt
4 cups warm vegetable stock/broth (or mushroom stock)
juice of 1/2 lemon
1/2 cup freshly grated parmesan cheese

Clean your mushrooms and set aside the ones you want to use for garnish. Remove hard stem-ends from the rest, and roughly chop. Finely chop your shallots and press your garlic. Measure out everything else and have it standing at the ready.

In a large pot, such as a Dutch oven, heat 2 tablespoons of the butter and quickly fry the chanterelles reserved for garnish. Set aside, and then add the rest of the mushrooms to the pot. Sauté briefly, then set aside in a bowl until the risotto is almost finished.

In the same pot, add one more tablespoon of butter, and then add the shallots and garlic. Stir and sauté until slightly translucent, and then add the rice, stirring well to make sure none of the grains stick and burn. When the grains of rice are all coated with the butter and they start to catch at the bottom of the pan and a little golden colour starts creeping in to the bottom of the pan, add the vermouth (or white wine), all at once. Stir vigorously to make sure everything is scraped up from the bottom. Add the salt, and stir through.

The vermouth will disappear pretty quickly, so be prepared to start ladling stock into the rice. Use a small amount at first, just adding a little at a time, stirring well over medium heat, and waiting until most of the liquid has been absorbed before adding more.

When you are halfway through your stock, stir in the lemon juice. Continue to stir and add stock until you have no more liquid to add, and then return the reserved chopped mushrooms to the pot and gently stir through. Add the final tablespoon of butter, and stir through. Turn off the heat, cover the pan, and let stand for 5 minutes. Remove the lid and stir in the parmesan cheese. Spoon into shallow bowls and top with the reserved fried mushrooms, and maybe a little extra sprinkle of parmesan.

August 26, 2015

Chicken Tikka Masala


There are a lot of origin stories about Chicken Tikka Masala, and a lot of claims to ownership. As far as I can tell, there's no way to even verify which country the dish originated in, let alone the specific claimant.

Some folks will tell you that this is not a proper curry, but that is quite ridiculous. It may not be a historical dish, but it's in no way illegitimate because of that. It's delicious and acceptable and popular. At it's heart, it is derived from an Indian tandoori dish called Chicken Tikka - marinated chicken cooked in a tandoor (Indian clay oven), although according to Wikipedia, the Punjabi version is simply cooked over coals. The chicken is usually marinated in yoghurt and spices, and is typically cut into chunks and cooked on skewers. Where the masala bit comes in, is when you take a perfectly good (or maybe a little dry?) Chicken Tikka, and simmer it gently in a spiced tomato sauce, enriched with yoghurt at the end. There are, of course, many iterations, including one of the origin stories, which claims that an undiluted can of Campbell's Tomato Soup was the base of the sauce.

There is likely no place on earth where Chicken Tikka Masala is more popular than the UK, where it appears to be fast approaching (or even edging out) the traditional Sunday roast as most beloved national dish. You can get Chicken Tikka Masala pre-packaged sandwiches in the Tesco, which gives you an idea of the market penetration of the dish.

Versions of Chicken Tikka Masala that are made using commercial Tandoori paste often have a pink tone to the gravy and the outer surface of the chicken itself. Since that is derived using a food colouring that I don't usually have in my kitchen, I skipped it and simply went with a turmeric-forward spice mixture that is often used for Chicken Tikka. If yours must be pink, skips the spices listed below in favour of the commercial paste, and slather the chicken pieces liberally with it.

I don't have a tandoor oven, which is probably no surprise, nor do I have a kitchen set-up conducive to cooking with coals. This is my home kitchen version, adapted from many different sources, but this one from Palachinkablog in particular.

Chicken Tikka Masala

Serves 4

2 tablespoons ghee or vegetable oil, divided
400 grams boneless chicken, in chunks
2 tablespoons turmeric
2 tablespoons ground cumin
1 tablespoon cayenne
1 teaspoon ground coriander seed
1/2 teaspoon kosher salt
1 large onion, grated
4-5 cloves garlic, pressed
1 inch fresh ginger, grated
500 mL tomato passata (or unseasoned tomato purée)
1/2 teaspoon sugar (optional)
1 cup full-fat plain yoghurt
1 tablespoon cornstarch

As always with Indian food, prep your mise en place completely before you start cooking. Put your basmati rice on to soak in its cooking water, too. Start to cook the rice just before you start to cook the chicken (unless you are using a rice cooker, in which case, time it to be ready when the chicken is done - about a 35 minute total cook time).

Combine all of the dry spices except the salt, and toss the chicken pieces in the mixture until they are all nicely coated. Set aside. You can do this in the morning, or at any point during the day, but bring back up to room temperature before cooking.

In a large skillet or a dutch oven, heat half the oil or ghee very hot and sear the chicken in batches, without cooking through, and remove the chicken to a holding plate as you go. When all the chicken is seared, add the rest of the oil and the grated onion, pressed garlic, and grated ginger, and any accumulated juices therefrom. Stir and scrape the pan, add the salt, and continue sautéing the onion mixture for about 5 minutes or so until just tender. Turn down the heat to medium-low and add the passata, and stir and scrape to ensure that the bottom is free of any stuck-on bits. After a couple of minutes, taste the sauce. If it is a little bitter from the tomato addition, add the sugar. If not, just proceed.

Add the seared chicken (and any residual spices) into the sauce, and turn the heat to its lowest setting. Let the chicken simmer very gently for 15 - 20 minutes. Take the pan off the heat. Combine the yoghurt and cornstarch and stir until smooth. Add a bit of the tomato sauce to the yoghurt, and stir it in, before adding all of the yoghurt mixture into the dutch oven. Stir through, watching to colour lighten and turn orangey. Cover and let the residual heat cook the cornstarch for about five minutes - just enough time to fry up some Indian-spiced Cabbage on the side, or make a fresh chutney or maybe a grated carrot salad, since your grater is already out. Your rice should also be done (and waiting patiently). If you happen to have some cilantro on hand, that would make a very nice garnish.