December 30, 2018

Jalapeño Cheddar Cornbread - small batch


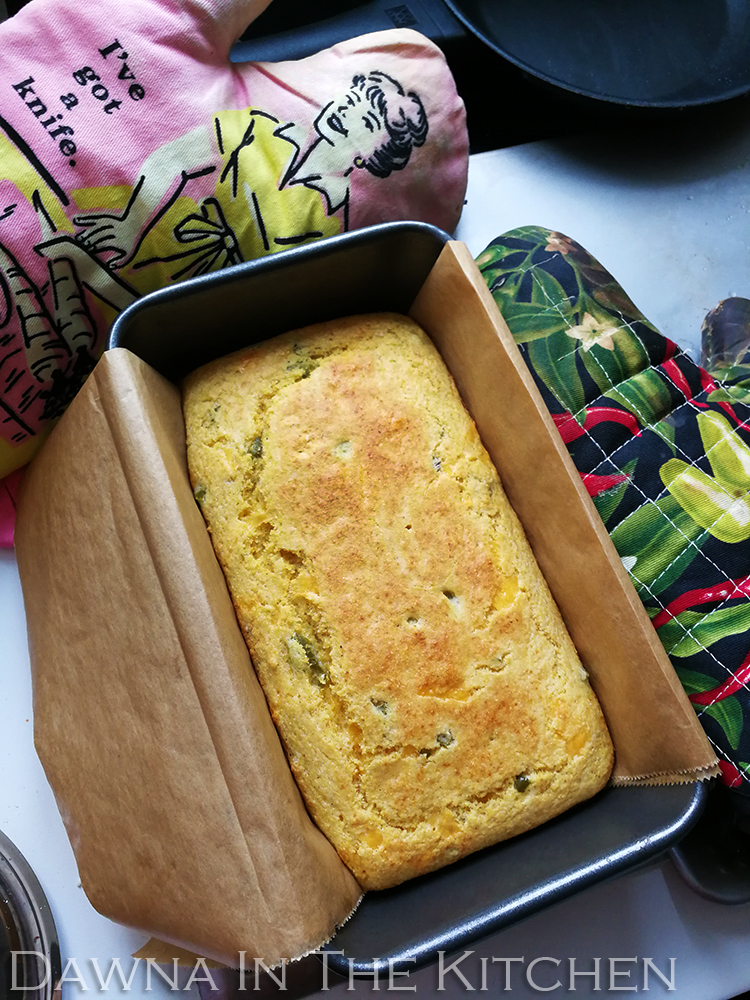
Sometimes, you don't need a big batch. Sometimes, you just need a half-pan of cornbread. That's when a wide 12.5cm/5" wide loaf pan is the perfect size. Excellent news, however, for those who do want a bigger batch — when you're feeding a crowd, or have an adequate freezer — this recipe doubles beautifully into a 23cm/9" square baking pan.

What kind of cornbread is this? Well, I'd place it in the Soul Food category of Southern cornbread, as it has a little sugar and some flour (unlike other Southern cornbreads, which are all cornmeal and completely unsweetened), but is not sweet tasting (unlike Northern cornbread), and uses buttermilk rather than sweet milk. But your mileage may vary, and I am not an authority on Soul Food.

Naturally, you don't need the jalapeños or the cheddar if you don't fancy them - this cornbread is just as good straight up.

Jalapeño Cheddar Cornbread (Small Batch)

125 mL (1/2 cup) all-purpose flour
125 mL (1/2 cup) cornmeal (white, yellow, or blue)
1 teaspoon sugar
1 teaspoon baking powder
1/2 teaspoon baking soda
3/4 teaspoons kosher salt
30 mL (1/8 cup or 2 tablespoons) canola oil (or melted butter, or bacon fat)
1 egg, lightly beaten
175 mL (3/4 cup) buttermilk

Optional extras: any or a combination of:
60 mL (1/4 cup) finely chopped pickled jalapeño peppers
60 mL (1/4 cup) shredded cheddar or pepper jack
pinch of ground cumin seed
60 mL (1/4 cup) corn kernels

Preheat oven to 220°C/425°F with a rack in the middle or lower middle slot. 

Lightly spray with canola oil, or grease lightly or line with baking parchment, a 5 inch wide loaf pan.

Mix all of the dry ingredients in a medium mixing bowl. In another bowl, beat the egg lightly, and add the buttermilk and oil. Pour the wet ingredients into the dry ingredients (and add any optional extras) and stir rapidly with a fork just until moistened through, with no dry streaks. Do not attempt to remove every last little lump! Pour the batter into the prepared pan and bake for 20 minutes (25-30 for a double batch in a square pan), or until the top starts to turn golden brown. Test with a skewer or tooth-pick to ensure it is cooked through (the toothpick should come out clean). Allow to cool for 5-10 minutes before slicing.

PS: You can also drop dollops of raw batter on top of hot, thick, gently simmering chile con carne (or sin carne, of course, or indeed any thick stew) to make cornmeal dumplings. Cover, and let cook gently for 15 minutes without lifting the lid. The dumplings won't brown, of course, but they will be delicious.

December 16, 2018

Lamb & Okra Stew (Persian Inspired)


I didn't experience Persian cuisine until I was an adult, and took to it immediately. The deeply flavourful, slow-cooked stews and luscious pilaffs made me want to immediately start incorporating recipes into my repertoire, and I've been gradually adding them ever since.

This particular lamb and okra stew came from researching which flavours would have dominated some of the common stews before the introduction of tomatoes, which have been thoroughly adopted into many dishes. The intense flavour of dried limes/lemons was the obvious answer, in combination with the typical fragrant and nuanced blends of spices. This recipe does contain potatoes, optionally, which is also an introduced ingredient, but otherwise draws on some of the most traditional flavours of its region.

Go ahead and use fresh okra if you like, but try to get the small ones.

Persian Inspired Lamb and Okra Stew
(Khoresht e Baamieh)

Serves 4

500 grams stewing lamb, diced
1.5 tablespoons canola or olive oil, divided
2 medium yellow onions, finely diced
5 cloves garlic, minced or pressed
1 teaspoon turmeric
1/4 teaspoon ground cumin
1/8 teaspoon cinnamon
1/4 teaspoon paprika
1/2 teaspoon coarse salt
1/2 teaspoon black pepper
2 - 3 cups water/vegetable broth/light stock
3-4 dried limes
400 grams frozen petit okra
200 grams waxy nugget potatoes, halved or quartered (optional)
2 branches rosemary
2 tablespoons chopped dill to garnish (alternatively sumac)

In a medium-large soup pot over medium heat, heat one tablespoon of the canola oil and add the onion and garlic. Stir and sauté until the onion is translucent and just starts to stick to the bottom of the pan, and then add the lamb. Sprinkle with salt, pepper, turmeric, cumin, paprika, and cinnamon (if using), and continue to sauté until the lamb colours slightly. Add the water, and bring to a simmer. Add a couple of dried limes if you like, hammered open. Reduce the heat and cover, and then simmer for an hour and a half, until the lamb is tender.

Rinse the okra and set aside. In a separate skillet, heat the remaining half tablespoon of oil until it shimmers, and then add the okra into the hot skillet. Stir fry the okra until they are bright green (add an extra pinch of salt as you fry them), about 3 minutes. Pour the okra into the stew, and add a bit of lemon juice or sumac, especially if you are not using dried limes. Stir through, cover the pot, and reduce the heat to low. Simmer for about 45 minutes, until all of the flavours permeate the okra.

Serve with plain rice or flatbread.

It reheats very well, in fact it's even better the next day. Freezer friendly, if properly sealed.

December 09, 2018

Ginger Snaps


These are classic cookies - suitable for the holidays, with their fancy spices, but down-home enough that you can make them anytime. Plus, they're adorably, perfectly round cookies, which makes you feel like you've mastered something tricky. I use plain granulated sugar throughout the year, but during the holidays, red sanding sugar (or green, or silver, or gold...) feels suitably fancy. Do as you please!

My original recipe had only the cryptic instructions "Mix and bake for 10 minutes at 350" and assumed that I would know the rest. Frankly, I'm a little surprised it bothered telling me I had to mix the ingredients, since it was making a lot of other assumptions. Here's a teensy bit more detail:

Ginger Snaps

Makes 40 - 50 cookies, depending on size

2 cups all purpose flour
2 teaspoons baking soda
1/2 teaspoon salt
2/3 cup canola oil
1 cup sugar
1 egg
1/3 cup blackstrap molasses
1 teaspoon ground cinnamon
1 tablespoon ground ginger
1 big pinch of ground cloves

Extra sugar for dusting - either granulated sugar or colourful sanding sugar such as the sparkly red shown here.

Preheat oven to 180°C/350°F with a rack in the middle.

In a medium mixing bowl, beat the oil and sugar together. You don't need a mixer here, a wooden spoon is fine. Add the egg, and beat until smooth. Add the molasses* and beat until smooth. In a separate bowl, whisk together the flour, baking soda, salt and spices. Whisk until thoroughly combined, and then dump it into the molasses mixture. Stir slowly as the dough stiffens up into a thick paste, being sure to incorporate all of the flour. You don't want any white streaks in the dough; it should be a uniform dark brown.

Use a teaspoon to scoop up a walnut-sized lump of dough, and roll it between your palms until it is nice and round. Dip the top of it in white granulated sugar and place it on a lightly greased cookie sheet. Leave some room between each cookie, as they will expand.

Bake for about 10 minutes - they should be a little soft (underdone) when you pull them out, or they will get very, very hard and be useful only for dunking in coffee (which is not a bad way to go, really). If your oven is a little slow, feel free to crank it up to 190°C/375°F to ensure that the cookies develop their characteristic crackled tops. Remove to cooling racks immediately, and get the next batch in the oven. Try not to eat them all at once.

*a nifty way to make sure you get all the molasses out of the measuring cup is to use the same cup that you measured the oil in. The molasses will just slide right out.

December 07, 2018

Stuffed Pumpkin


Everyone can enjoy a beautiful centrepiece main dish that is as fun to make as it is satisfying to eat. Plus, it's even easier to make than a carved jack-o'-lantern, since you don't have to carve a face (I suppose you could, though...) The use of a pumpkin makes it terrific for Thanksgiving or other harvest feasts, but it would be beautiful on a Christmas dinner table, too.

Naturally, you could use any stuffing you like in your pumpkin, but I've chosen my mother's classic bread stuffing with bacon, sage, and onions. If you're feeling extra, go ahead a spoon a little mornay over the top to help seal in the moisture, but that's purely optional, especially if you're serving it with gravy (recommended).

You can use a larger pumpkin if you're feeding more people, although it might take a little longer in the oven. I'd actually suggest two medium pumpkins, baked side-by-side if you want more servings. Of course, if you have lots of other dishes on the table, you can certainly cut smaller slices.

The pumpkin part is so easy that it's almost not a recipe, but I'll give you the stuffing recipe at least. I've used a French "Muscade/Musquée de Provence" pumpkin, but a cheese pumpkin would work beautifully, too, as would any firm-fleshed winter squash with a spacious cavity and fleshy walls.

Stuffed Pumpkin

Adapted from Epicurious

Makes 1 medium stuffed pumpkin - 4 to 8 servings

1 medium fleshy pumpkin (1-1.3 kg/2-3 lbs)

To prepare the pumpkin, cut the top off and hollow out the seeds and strings the same way you would for carving a Hallowe'en jack-o'-lantern. Brush a little canola oil or melted butter over the inside of the hollowed out pumpkin, and set aside while you make the stuffing.

Preheat your oven to 170°C/350°F with a rack set low enough to accommodate the tray with the pumpkin on it. Prepare the tray (baking sheet, pizza pan, or similar) by lining it with foil for easiest clean up. You could theoretically bake it in a Dutch oven (or a French oven) but you'll have a much more difficult time getting it out, so I wouldn't recommend that approach.

Stuffing

4 large slices French bread, preferably stale or left unwrapped for a few hours
1/2 medium yellow onion
2 medium stalks celery
1 leek, sliced
2 - 4 pieces dry cured bacon, diced
2/3 cup hot chicken stock or broth
1 egg, beaten
2 teaspoons dried sage
1 teaspoon fresh thyme leaves
1/4 cup chopped fresh sage leaves
1/2 teaspoon white pepper
1/8 teaspoon ground celery seed

Dice the bread, toss with a teaspoon of dried sage powder, and set aside. Dice the onions, leek and celery, and bacon.

Fry up the bacon in a big skillet until crispy, then remove the bacon pieces to a plate and fry the onions, celery and leek in the bacon fat. Once the vegetables start to turn translucent, add the bread and stir it all around. Add the rest of the seasonings, and stir around. Empty into a large bowl. If you think it wants more sage or even a little more thyme (go easy on the thyme!), sprinkle a little more of the herb of your choice over the mixture, and stir through.

Add the bacon to the bowl and stir to distribute the pieces throughout. Add the beaten egg and stir well with a fork until combined. Pour the chicken stock over the bread mixture and stir again, vigorously.

Immediately spoon the stuffing into the pumpkin, packing it in gently until the pumpkin is full.


Top with the lid, and bake the pumpkin for about 1.5 - 2 hours, or until a wooden skewer (or dry spaghetti strand) inserted into the fattest part of the pumpkin slides in easily and comes out clean.


Serving can be done in a variety of ways: you can slice it, as we have done here, or you could scoop the stuffing and squash out with a spoon, as either separate items or mixed together. Either way, pass the gravy!


November 18, 2018

Tiger Balls


This was one of our family's favourite snacks when I was a child, and boy did we go through a lot of them! Much like many of today's "energy bites" or protein bars, it's based largely on nuts and seeds, is lightly sweet, and can actually quell a rumbling tummy between meals. It's extremely versatile, so you can feel free to substitute ingredients as you please: sun butter or almond butter for the peanut butter, for example, in addition to the suggested alternative ingredients below. The first ingredient in each case shown was the original we used back in the day.

If you like your treats to be sweeter and more candy-like, double the honey (in which case you will probably need all of the powdered milk as indicated.

Tiger Balls

Adapted from "Tiger's Candy" from Diet for a Small Planet
by Adele Davis


1 cup / 250 mL natural-type peanut butter
1/2 cup / 125 mL fine shredded coconut, plus extra for rolling
2 tablespoons / 30 mL toasted sesame seeds, flax meal, chia meal, or hemp hearts
2 tablespoons / 30 mL rolled oats or chopped sunflower seeds
2 tablespoons / 30 mL honey, agave, or date syrup
1 tablespoon brewers yeast (optional)
6 - 8 tablespoons / 95 - 125 mL non-instant skim milk powder, as needed

In a mixing bowl, layer all of the ingredients except for the skim milk powder, in order shown above. Use a fork to thoroughly combine everything, making sure there are no dry spots in the dough, and then add half the milk powder. Stir that in with a fork, and gradually add enough of the remaining milk powder that you get a stiff dough that you can roll into smooth balls without breaking and falling apart.

Using a cookie-disher or spoon, form small balls, rolling them between your palms until smooth, and then roll them gently in the extra shredded coconut. Place them in a sealable container in the fridge until needed. I note that we never refrigerated these, they just sat in a cookie tin for their (very short) lifespan, as we gobbled them up mighty quickly. These days, I refrigerate them for safety and freshness.

The ones shown here are rather large - a full tablespoon disher was used to portion them, but a half-tablespoon size is a more perfectly sized snack for me (and comes in at around 90 calories). Fortunately, you can also cut them in half later if you make them too large.

September 30, 2018

Plum Cobbler


I originally started recipe blogging to preserve and share my family's recipes, and this one is from my childhood. I've never had another cobbler topping that tasted remotely as good as my mother's. This was always my favourite plum dessert.

You can use any kind of fruit you want...plums, peaches, blackberries, rhubarb...just vary the amount of sugar you use in the fruit mixture accordingly. Mom used rhubarb or plums, mostly, as other fruit tended to have different culinary destinations. For Prunica domestica (aka Italian prune plums or Zwetschge), I needed only 1/2 cup of sugar. You can start with the lower amount and adjust for taste before adding the cobbles.

Old Fashioned Plum Cobbler

Serves 6

Preheat the oven to 190°C/375°F with a rack in the middle.

Fruit base

500 grams (3 to 4 cups) of cleaned, prepared fruit (for plums, quarter them, removing the pits)
1/2 cup sugar (sweeter fruits) 3/4 to 1 cup sugar (rhubarb), depending on taste
1 teaspoon cinnamon (or combined spices, such as 1/2 teaspoon cinnamon, 1/4 teaspoon ginger, and 1/4 teaspoon allspice)

Toss the fruit with the sugar and spices and place in a dry, medium skillet (there should be no bare spaces in the bottom of the skillet, however, you can layer the fruit thicker or thinner, as you like. Heat the fruit and sugar mixture over medium heat, stirring gently as needed until the fruit softens slightly and the sugar has melted and formed a thick syrup with the juices. Taste the syrup (carefully! it will be extremely hot, so best to let it cool for half a minute on the spoon, than to burn your tongue). If it is not sweet enough, or wants more spice, adjust accordingly. Turn the heat to the lowest setting while you make the cobbles.

Cobbler topping

60 grams (1/4 cup) butter, softened to room temperature
125 ml (1/2 cup) sugar
1 large egg
180 ml (3/4 cup) all purpose flour
8 grams (1 3/4 teaspoons) baking powder
pinch of salt

In a medium mixing bowl, cream together the butter and sugar until smooth. Beat in the egg. In a small bowl, combine the flour, baking powder, and salt, stirring well. Add this mixture all at once to the mixing bowl with the butter/sugar/egg mixture, and stir rapidly with a fork to combine into a thick, sticky, dough-like batter.

Use a tablespoon to drop dollops of batter, with a little space between each one, into "cobblestones" on top of the hot fruit syrup mixture in the skillet. You can use big dollops or little ones, and if you want real uniformity of size, you can use a small disher to portion the batter out. Do not try to smooth the batter lumps in any way, it will take care of itself in the oven - the cobblestones will flatten and connect to each other as they bake. Place the skillet, uncovered, in the oven, and bake for 25 - 30 minutes, or until the cobbles are golden brown and delicious.

Serve warm or cold, plain or with ice cream, whipped cream, or even just a drizzle of thick cream.

September 23, 2018

Quail Scotch Eggs


Okay, here's the thing. Quail Scotch Eggs are really no different than regular scotch eggs, other than the obvious: quail eggs are smaller, so... they're smaller. So, if you already make a killer chicken egg version, here's just the suggestion to try using quail eggs instead. Perfect for parties, picnics, bento, or any other time you want a delicious savoury treat.

Essentially, a scotch egg is an egg-stuffed glorified meatball. Traditionally they are deep fried (as these are), but you can bake them in the oven, too (although the longer cooking time may lead to the meat shrinking away from the egg in places). So again, if you have a favourite meatball flavour profile, you can simply go ahead with what you already know and love. That being said, I do find that chicken, turkey, pork (or a blend) tend to work best with these little quail eggs, because they don't overwhelm the delicate flavour in a way that beef or lamb might. Your mileage may vary.

Quail Scotch Eggs

Makes 12

12 quail eggs

Meat layer
500 grams ground meat (shown: 60% pork/ 40% beef)
2 shallots
1 clove garlic
1/2 teaspoon coarse salt (eg. sea salt or kosher)
1/4 teaspoon ground black pepper
1/4 teaspoon dried oregano
1/2 teaspoon dried basil
pinch of chile flakes if you like

Coating:
1/2 cup all purpose flour
1 (chicken) egg, beaten well and seasoned with a pinch of salt
1 - 1 1/2 cups bread crumbs (I use panko style breadcrumbs)

Oil for deep frying

First you will need to cook the quail eggs. Heat water in a small pot, and when it comes to a simmer, carefully lower half of the eggs into the pot and set the timer for 2 minutes (3 minutes if you want the yolks firm), and then remove them to an ice bath to cool them and stop the cooking process. Repeat with the other half of the eggs. I like to use my skimmer to raise and lower the eggs out the boiling water, because it's broad and I can load six quail eggs onto it at once no problem. A spider might also work. Timing is important here, because if you dither about getting them out, they will probably overcook. Not the end of the world, but the yolks won't be soft, and they might even get those nasty grey rings.

While the eggs are cooling, mix up the meat layer: break up the meat using your finger or a fork, to aerate it and make it easier to introduce the seasonings. Finely chop the shallots and garlic (or press the garlic), and sprinkle the herbs and spices over the meat. Use a fork, or your impeccably clean hands to distribute the seasonings throughout the meat without packing it down too much. Just like you would season meat for making burgers or meatloaf. If your meat is very lean, you can always add a bit of beaten (chicken) egg at this stage, too, but I don't find it necessary. Set the meat aside for the flavours to meld while you peel the eggs.

Very carefully tap/roll the eggs to break the shells, and peel them using a small teaspoon to help ease the shell away from the egg. Place on a clean plate to one side until they are all peeled. This will take a few minutes, so be patient.

Divide the meat mixture into 12 portions

Dip each egg in flour, and shake off any excess; this step is important, because it will help the meat layer adhere to the egg. In the palm of one hand, flatten out a portion of meat into a thin patty. Place a floured egg in the middle, and shape the meat up around the egg, enclosing it completely. Pay extra attention to make sure the seams where the meat comes together are strong. Set aside, and repeat with the other 11 eggs.

Prepare your deep fryer, or in my case, a pot with a couple of inches of oil in it. Heat the oil to 370°F/185°C. While the oil heats, use the time to coat the meatballs. Dip each meatball in the flour, dust/pat off anything but the thinnest of layers, dip briefly in the beaten egg, let drip a moment, and then roll in breadcrumbs to coat. Set aside.

When the oil is ready, fry the scotch eggs in batches until the coating is golden brown and delicious looking. Remember, the centre of the meatball is the already-cooked quail egg, so these babies fry up very quickly, since the heat doesn't need to penetrate the centre. Mine took about four minutes to cook, turning them over from every minute or so. Use a metal slotted spoon or spider to remove them to a clean plate lined with paper towels.

Serve hot, room temperature, or cold...with your choice of dipping sauce. I've used everything from aioli to hot mustard to tonkatsu sauce, depending on the flavours in the meat seasoning. We had three apiece for dinner, with potato salad, and then three apiece for lunch the next day.

September 16, 2018

Hummus Kawarma: Hummus with spiced lamb


Think of Hummus Kawarma as the Middle Eastern answer to Tex Mex's Five Layer Dip: the base is creamy hummus, the next layer is fried spiced lamb, further toppings are whole chickpeas, toasted pine nuts, and lemon parsley sauce. (Oh, did you want seven layer dip? Perhaps you could add finely diced cucumber and tomato, although I prefer those on the side as part of a classic Israeli salad.) What about the tortilla chips, you might ask. Well, oven-toasted pita chips make the perfect stand-in, but you could also simply use fresh pita bread cut or torn into pieces as needed. You can serve this as an appetizer or main course, as a communal shared plate or as individual servings.

The recipe for the spiced lamb topping and the lemon sauce is from the Jerusalem cookbook by Ottolenghi and Tamimi, and is also available on the Ottolenghi website, although I note that I used ground lamb instead of hand-chopped lamb neck.

So, what am I bringing to you here, since the exciting part of the recipe is elsewhere? Well, aside from cheap analogies to Tex-Mex cuisine, you also get my formula for extremely creamy hummus using an immersion blender. You'll need a kitchen scale to get the exact ratio, but if you don't have one you can still get by.

Immersion Blender Hummus

Makes 400 grams

Serves 4 as part of the above recipe (as a main course)

400 gram (14 oz) can of chickpeas, drained, reserving liquid (about 265 grams /9.3 oz cooked chickpeas))
45 ml (3 tablespoons) tahini (stirred well)
2.5 ml (1/2 teaspoon) salt
Juice of half a lemon
1 clove garlic, chopped or pressed
1 tablespoon olive oil
Chickpea cooking liquid OR water to make the total weight of all ingredients 400 grams (14 oz). If you don't have a kitchen scale, start with 60 ml (1/4 cup) liquid and add more as needed. You probably won't need more than 125 ml (half a cup).

You can put all of this into the blender cup and blend until smooth, but I find it's easier on the machine if you first make a puree of everything except the chickpeas and extra liquid. Then add the chickpeas, about a quarter of them at a time, blending until smooth between each addition, and finally adding the extra liquid until you achieve a smooth, creamy texture. Devour immediately, or transfer to a sealable refrigerator container. It keeps nicely for at least three days...I've never had it last longer, so after that you're on your own.

If you're completely obsessed with ultra smooth texture, take the time to pinch each chickpea to remove the skin. It takes a while but it's worth it, although I note that this step lowers the insoluble fibre content somewhat.

September 12, 2018

Calypso Potato Salad


Years ago, there used to be a tiny Trini restaurant called Roti Bistro on West 4th Avenue in Vancouver. It was there I was first introduced to soursop punch and peanut punch, and Caribbean lamb and goat curries. One of the things I particularly enjoyed was that they didn't adjust the food to accommodate the northern palate, so everything that was supposed to be hot was indeed fiery hot. Including, unexpectedly, the potato salad. Now, I have a pretty heat-resistant palate myself, and enjoy habaneros and other hot chiles without reserve, but on this particular day the curry was extremely hot, even for my tastes. No problem, I told myself, I'll just have a bit of this creamy-looking potato salad and OH MY GOD! IT'S HOTTER THAN THE CURRY! Thank goodness for that soursop punch.

The restaurant is long gone, sadly, but I was inspired by their blistering potato salad to make a version of it myself. It's not quite as intense as the original, but I think you'll find it to be very tasty indeed.

The potato salad is named after one of the key ingredients, Matouk's Calypso Sauce (which is made in Trinidad & Tobago), but you can substitute that with a fruity habanero sauce and a touch of curry powder. Please note that this is not a sponsored post. The rest of the seasoning for the salad is loosely based on jerk seasoning.

Calypso Potato Salad

Serves 6

3 pounds red skinned nugget potatoes
1/2 cup (125 ml) mayonnaise
1 tablespoon (15 ml) dry mustard
1–2 tablespoons (15-30 ml) fresh chopped thyme
1/2 teaspoon (2.5 ml) ground allspice
1/2 teaspoon (2.5 ml) turmeric
Pinch of cayenne pepper
3 hard boiled eggs, peeled, halved
6 cornichons, chopped
2 celery stalks, finely chopped
3 green onions, finely chopped
2 habanero or scotch bonnet chiles, minced (seeds removed)
1/4 cup (60 ml) Matouk’s Calypso Sauce
Black pepper

Cut the potatoes in halves, or into bite-sized chunks if you have larger potatoes, and steam or simmer gently in lightly salted water until just tender. Drain potatoes and allow them to cool slightly in the colander.

In a large bowl, combine mayonnaise, dry mustard, chopped thyme, allspice, turmeric, cayenne pepper, and Calypso sauce in a medium bowl.

Separately, in a medium bowl, combine celery, cornichons, habaneros, and green onion. Separate the egg yolks and whites. Mash or sieve yolks finely, and mince the egg whites. Add both to the chopped vegetables.

Add the warm-but-not-hot potatoes to the spiced mayonnaise and immediately add the chopped vegetables and egg mixture on top of that. Fold gently with a spatula until the potatoes and vegetables are evenly coated. Garnish liberally with freshly ground black pepper, and extra green onion, if you like. A sprinkle of paprika or cayenne makes a pretty finish.

Allow the salad to rest in the refrigerator for an hour or two before serving, to give the flavours a chance to meld.


September 09, 2018

Curried Egg Breakfast Sandwich


When I lived on Commercial Drive in Vancouver, we used to quite enjoy weekend brunch at Fets Whisky Kitchen. My favourite order was the breakfast egg sandwich named the "Woodford Handheld" which consisted of a ciabatta bun, crispy bacon, cheese, and just a hint of curry in the generous amount of scrambled eggs. As to why they called it the Woodford, I can only imagine that there might have been a little bourbon in the mix somewhere, which wouldn't be a shock from a place known for its whisk(e)y and bourbon selection. Over the years their menu has changed, and they have moved on from the Woodford. But I haven't.

Fortunately, it's a really easy thing to make, although it does take a bit of organization. The important thing is to get the amount of curry powder just right. It should be noticeable, but not jarring or interfering with the flavour of the eggs, bacon and cheese. You can opt not to toast the buns, but I think it's much nicer if you do. It's a departure from the original, but hey - why not use garlic butter while you're toasting them?

Curried Egg Breakfast Sandwich

AKA "The Woodford" (more or less)

2 Sandwiches

2 ciabatta-style buns (or equivalent), split
1 tablespoon butter, or garlic butter
4 - 6 strips of bacon, to taste
Monterey Jack, young Gouda, or melting cheese of your choice, enough to cover the bottom half of each bun

4 eggs, lightly beaten
2 tablespoons cream
pinch of coarse sea salt
1/4 teaspoon hot Indian-style curry powder

Start with the bread. Spread cut sides of the buns with butter (or garlic butter) and place butter-side down in a preheated skillet over medium heat until lightly toasted. Remove buns to serving plates, and lay the slices of cheese on the bottom pieces. The heat will cause the cheese to soften slightly, which is fine.

Wipe out any crumbs and add into the now-empty skillet the strips of bacon. Cook the bacon until slightly crispy, but not too hard, turning as needed. Prepare the eggs by beating them together with the cream, salt, and curry powder. If you plan to use a different skillet to scramble your eggs, get it preheating now.

Remove the bacon from the skillet and distribute between the two cheese-dressed buns.

Scramble the eggs as you please. I use medium high heat with a bit of butter to get it going, and stir frequently to get loose, soft curds. It only takes about a minute. When the eggs are just about to set, take a large serving spoon and serve the eggs on top of the bacon. Close the sandwiches with the toasted bun tops, and devour right away.

It was every bit as delicious as I remembered.