March 28, 2013

Breakfast at Work: Coconut Apricot Oatmeal


I'm a big believer in breakfast, as you may have noticed. However, like everyone else, on workdays I'm usually just trying to get out the door on time, preferably with everything I need and wearing matching socks. High standards, I know.

My weekday at-home breakfast is generally a cup of coffee and a piece of toast with something on it (usually cheese, sliced tomatoes, or avocado). Not really the sort of thing that can carry you all the way through your busy morning, but easy to knock together while you're waiting for the coffee to brew. I save the more elaborate breakfasts for the weekend - Monday to Friday, my solution is to rely on a baseline of toast and cheese and then supplement my morning with planned snacks - fruit, almonds, yoghurt - that sort of thing.

Packets of oatmeal are another solution. Not being a fan of paying huge amounts of money for things I can easily and cheaply make myself, I tend to make my own.

Another reason that I don't generally buy the store-bought packets is that the sweet ones are too sweet, the oatmeal is usually cut too fine (and becomes paste-textured, as a result), or they taste artificial to me (even if they're not).

Sometimes I make a bunch up for the week, and sometimes I just make one for the day that I need it. Because it's easy.

My current favourite is Coconut Apricot Oatmeal, but I also like using dried sour cherries and clove, or plain raisins. If you have a bunch of little containers like these (or even sealable plastic bags) it's easy enough to make your own variety pack. Like maple? Use maple sugar. Like walnuts, or almonds, or pumpkin seeds? Toast 'em up and add them to your mix (you'll want to slice or chop the nuts so the pieces are not too big). In fact, maple sugar and toasted walnuts sounds like a pretty tasty option. Go easy on the amount of nuts if you don't want the calories to stack up, though.


Here is the formula:

Coconut Apricot Oatmeal

Serves 1 (makes one packet)

40 grams quick oats (not instant), or old-fashioned rolled oats
1 tablespoon unsweetened coconut
3 dried apricots (scizzored into bits)
1 tablespoon raw sugar
teeny tiny pinch of salt (literally, about 10 grains of kosher salt)

If you are a fan of spices in your oatmeal, you may also want to add a pinch of cinnamon, or ginger, or nutmeg, or other spices (or blends) in the apple/pumpkin pie family. I usually leave them out of this one, because I think they mask the coconut flavour too much, but your mileage may vary.

To make up, empty the contents into a microwave-safe bowl, and add boiling water to about an inch above. Microwave on medium or low power (keep an eye on it - even in a large bowl, it can try to crawl out and down the sides, if the heat is too high or goes on too long). You can add more water if it looks too thick.

If I am using quick oats, it usually only takes about a minute or two at 50% power, then I give it a quick stir and drag it back to my desk. By the time it has cooled enough to eat, it is completely cooked. You can add milk or cream, if you like (I don't - I've never gone for milk on my porridge).

An online recipe calculator gave the results of this recipe at around 160 calories, which is about perfect for a mid-morning snack for me. If you want something a little lighter - use less. Use 30 grams of oats, 2 teaspoons of coconut, 2 apricots. Or just divide the above amount into two containers - the directions are the same.


The ready-to-eat picture doesn't do it justice; camera phone, lousy office-tower lighting, and utterly uninspiring placemat. But it tastes so good.

March 24, 2013

Tandoori Turkey Meatball Rice Bowl

I confess that I'd hoped that these would be more colourful than they turned out - my masala blend was months old, which I suspect was the problem, and I should have compensated by adding a little turmeric and an extra hit of kashmiri pepper, by the looks of it. However mild in appearance, though, these were absolutely delicious, and made a satisfying dinner.

That being said, these were remarkably easy to make. My standard Pork & Turkey Meatballs got an Indian inspired, all-turkey facelift, replacing the usual herbs and spices with a generous amount of tandoori masala, and using egg white instead of whole egg (I had some to use up).

I scooped the meatballs using my 60 ml disher, and baked them off on a foil-lined baking sheet for 25 minutes:


While they were in the oven, I made a simple pulao, using this Times of India Online recipe for Pulao in a Jiffy The pulao was nice, but overall a little soft, I thought - I used carrots and cauliflower from the recommended vegetables listed, but either I diced them too finely, or used too much water, because they were a little softer than I expected. Not outright mush, you understand, but a bit too soft. I generally find that I need less water when I'm cooking rice than most recipes call for, and that may be the case here - I'm not sure why - some sort of combination of being essentially at sea level, and having very soft water, perhaps? In any event, if I were to make this recipe again, I might go with both larger cut vegetables and a smidge less water. I'd probably throw in a few peas, and an extra few pods of cardamom, too.

When the meatballs came out of the oven, they got a quick brush with hot mango chutney, which went beautifully with the spicy flavour of the meat. As you can see, I also knocked together a quick cucumber and onion raita, and put an extra bit of chutney on the side.

This was a fun dinner (and lunch the next day, and extra meatballs in the freezer for a future rainy day) and while I want to tweak both the pulao and the seasoning of the meatballs (to amp them up into a more deeply fragrant and colourful result), I'm quite looking forward to version 2.0.


March 19, 2013

Spicy Orange Tofu with Broccoli


The first time I made this, I couldn't find the kind of tofu that I wanted, and I ended up with a pre-seasoned "spicy" tofu that unfortunately was also pre-coloured with orangey red food dye, which turned the entire dish an alarming shade of rust, and made the broccoli look like it was suffering from some sort of disease. Not so very appetizing.

The flavour, however, was exactly what I was looking for, so I persevered, bought the proper kind of tofu (atsuage), and happily devoured the results. This is a wonderful way to get extra vegetables (and fruit) into your evening meal.

Spicy Orange Tofu with Broccoli
Adapted from Eating Well

Serves 4

380 grams atsuage (homestyle fried tofu), blotted dry
1 cup mandarin orange segments
200 g broccoli
2 teaspoons olive oil
1/2 teaspoon vegetable base
1 tablespoon Soy Sauce (less Sodium)
1 tablespoon rice vinegar
1 tablespoon dried orange peel, prepared
1 cup orange juice
1 teaspoon cornstarch
2 teaspoon chile flakes
2 cloves garlic

Combine any juices from the mandarins with the extra orange juice, the soy sauce, and the cornstarch. Stir until smooth, and set aside. Clean the tangerine peel if needed, then rehydrate in hot water for ten minutes, scrape away any pith with a spoon, and slice into thin strips (or dice finely).

Prepare the broccoli by separating the florets and trimming and slicing the stem. Prepare the atsuage by cutting each piece in quarters (corner-to-corner), and then turning and slicing into triangles. Slice the garlic and the ginger.

In a large skillet, over medium-high heat, heat the oil, then add the garlic, ginger, and sliced tangerine peel, and stir through, giving it about half a minute to sizzle. Add the orange juice mixture, the drained mandarin sections, and the broccoli, and stir through. The sauce will start to thicken instantly. Reduce the heat to medium, and place a lid on for about two minutes, or until the broccoli starts to become tender. Stir, and check on the broccoli, giving it another minute if necessary. Add the tofu and stir throughout, gently, adding a little more water if necessary to keep the sauce from disappearing (it should reduce to a nice glaze). Cover, and let the tofu warm up (it is already fully cooked). Sprinkle with the dried chile flakes. Serve over rice, garnished with thinly sliced green onion, if you like.

March 10, 2013

Kale Gomaae


I've always loved the enticing little dishes of blanched spinach dressed with sesame that one finds in Japanese cuisine. My earliest attempts at making them at home were somewhat laughable - I firmly believed that I shouldn't need to cut the spinach, despite all evidence to the contrary - but what I really disliked was the step of squeezing the water out of the cooked vegetable. I didn't like the squeezing, and I didn't like the look of the spinach after I was done. I was doing it utterly wrong.

Happily, this recipe does not require squeezing of any kind. I make no claims for culinary authenticity, of course, and I must confess that this is ultimately an outgrowth of an Italian recipe for balsamic-glazed kale with pine nuts, of which I am also very fond. I can say without hesitation that this dish is both a delightful addition to any lunchbox that wants a little extra vegetable, and a perfect companion to a rice or noodle based dinner. There are many different dressing recipes for a Japanese gomaae, so if this one doesn't strike your fancy, I suggest that you keep the method and substitute the dressing of your preference.

One of the delightful things about kale is that it is quite sturdy. While it does require a bit of preparation to clean, remove central stalk, and slice the kale (see below), you can do this ahead and keep it crisp and ready for a few days, in a sealed container in the fridge. Then, dishes such as this become a snap to pull off at the last second when you decide that you really should have some sort of vegetable with your chicken teriyaki or tonkatsu, or even miso halibut cheeks.

Kale Gomaae

Serves 2 - 4

250 grams lacinato kale, cleaned and prepared (see below)
1 tablespoon lower sodium soy sauce
1 tablespoon mirin
1 teaspoon sesame oil
1/2 teaspoon honey (or agave)
1 teaspoon sesame seeds, lightly crushed
1/2 teaspoon sesame seeds, for garnish

Combine the soy sauce, mirin, sesame oil, and honey/agave with the crushed sesame seeds. Set aside.

Run cold water over your prepared kale, drain immediately. The water still clinging to the leaves is desirable, to provide steam. In a medium skillet or wok (I use a 9" steel skillet - nonstick is not necessary), over high heat, place the prepared and drained kale and begin to move the kale around as it wilts (I use a silicone spatula). If necessary, sprinkle a little more water over the kale, and continue to stir it around until the leaves start to become tender, but are still bright-looking (well, as bright as "black kale" gets, anyway).

Add the combined sauce mixture, and continue to stir until the dressing has been evenly stirred through and each leaf is lightly dressed. Remove to serving bowls, and garnish with extra sesame seeds.

The kale can be served warm or cold.

I plan to serve it the next time I make the Miso Halibut cheeks mentioned above, in fact (which is likely going to be soon, because that sounds really good). Incidentally, you can see one of my messy spinach gomaae attempts over in that link, too.

How To Prepare Lacinato Kale - in pictures

For long leaves, I cut them in half to make them easier to manage

Cut along the spine of the leaf, as close as you possibly can

Turn the leaf around, slice the spine off and discard

Repeat with the other half of the leaf


Stack the leaves and slice into ribbons

If you want to store them for a few days, use a container with a good seal, and place a dampened paper towel on the top before closing. Store in the crisper of your fridge

Ready to go!

March 04, 2013

Sweet & Sour Balti Chicken


The most shocking thing about this dish is how quick and easy it is. The second most shocking thing is how delicious it is. The only reason for those two things to be in that order is that you have to make it before you can taste it. Fortunately, that doesn't take long.

Many Indian recipes seem daunting, because they contain a laundry list of spices (possibly some obscure, if you don't have a large spice collection), and a great deal of chopping. Most shortcuts involve pre-packaged sauces that, while convenient, never seem to deliver the right intensity of fragrance that one gets from cooking from scratch.

Now, I should confess straight away that there is in fact a convenience item that makes this whole thing work. If you're fanatical about doing everything from scratch, go ahead and make your own hot mango chutney (I suppose you'd need to make your own tomato paste, too, in that case, but your mileage may vary). If you just happen to have some of your own mango chutney jarred up from a canning session, or lurking in the fridge from a recent previous endeavour, then use that (and I salute you!), but you get a pretty good result from a quality store-bought chutney.

This dish isn't precisely sour in the vinegary way that Chinese sweet and sour can be, but the mango chutney (and the yoghurt) give it a tanginess that skews to the sour side of the palate and offsets the sweetness beautifully. You may want to serve a vegetable side dish (or an aggressive array of side condiments). I recommend curry-roasted cauliflower florets, banana (raita or pachadi), or carrot raita to get some more vegetable matter onto your plate, but you could also add some quick-cooking vegetables, such as peas, half-way through the simmering time.

If, like me, you don't have a balti pan, you can use a wok, which is very similarly shaped. Failing that, you can use a large skillet, which works just fine.

Sweet & Sour Balti Chicken

Serves: 4
Total Prep & Cooking Time: 20 minutes

750 grams chicken (boneless, skinless)
3 tablespoons tomato paste
2 tablespoons plain Greek yoghurt
1 ½ teaspoons garam masala
1 teaspoon cayenne pepper
2 cloves garlic, crushed
2 tablespoons hot mango chutney
½ teaspoon kosher salt
1 teaspoon sugar
3 tablespoons canola oil
¾ cup water
1-2 serrano peppers, thinly sliced
¼ cup cilantro
2 tablespoons Half & Half / light cream

In a medium bowl, combine the tomato paste, yoghurt, garam masala, cayenne, crushed garlic, mango chutney, salt and sugar, and stir until smooth. If your chutney has huge pieces of mango, you may want to chop them up a bit, otherwise leave any chunks whole.

Dice the chicken into bite-sized pieces.

In a large skillet or wok, heat the oil over medium and scrape the tomato-yoghurt mixture into the hot oil. Stir gently but thoroughly, reduce the heat and cook for about 2 minutes, stirring occasionally. The paste and the oil will not truly integrate, but remain partially separated - that's okay.

Add the chicken to the pan, and stir to coat evenly with the tomato mixture. Add the water, and stir gently until the sauce becomes smooth and liquid. Simmer for about 8 minutes, or until the chicken pieces are cooked through and the sauce has thickened slightly. You may lower the heat and add a lid if the sauce is becoming too thick, or add another tablespoon or two of water.

Add half of the serrano chile slices and the light cream, and cook for 2 minutes, stirring gently.

Serve garnished with the remaining chiles and roughly chopped cilantro.


February 24, 2013

French Crêpes


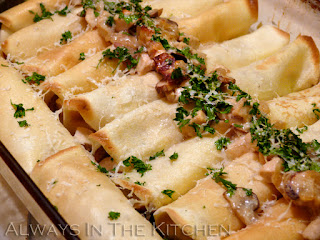
These simple crêpes are the lovely foundation for many different fillings and styles - from Suzette to seafood, from lemon-and-sugar to stacks of savouries sliced into neat wedges. Some particular favourites include a filling of bacon, mushroom, and chicken (topped with parmesan), and tomato, goat cheese, and fresh basil. You can fill them with pretty much anything you like. These ones are filled with a creamy mixture of bacon, chicken, mushrooms, onion, and brandy. The recipe for the filling is below. The filled and baked crêpes heat up wonderfully the next day. Best of all - these are not difficult. They take a little time if you cook one at a time (recommended, to start), but rather low effort, especially once you get the knack of tilting the pan around.

Crêpes (Plain)

Makes 12 crêpes (8" diameter)
Total Prep & Cooking Time: 40 minutes (faster if you can cook two at a time)

3 eggs
1 cup milk (1% is fine)
1 tablespoon oil
3/4 cup unbleached flour

Combine in a blender or food processor until smooth. If you are beating by hand, you may wish to take the extra step of straining the batter once you have finished mixing, to ensure a smooth result.

If you are making a filling, let the batter stand at room temperature until you finish preparing the filling.

Heat a crêpe pan or 8" (20 cm) nonstick skillet over medium heat until a drop of water dances. Spritz with canola oil, or brush lightly with mild oil of your choice.

Using a ladle or scoop that holds 3 tablespoons, measure your first crêpe's worth of batter. Lift the skillet off of the heat (I hold it in the air) and quickly pour the batter into the middle of the pan. Drop the ladle and rapidly tilt the pan in a circular motion, to spread the batter until it evenly covers the base of the pan. Return the pan to the burner, and allow the crepe to cook until lightly golden, and the edges release from the pan, about a minute or two.

Slide a silicone spatula under the crêpe (or grab the edge carefully with your fingers) and flip it over. Let it continue to cook for a minute, and then slide the crêpe onto your work surface for filling.

Repeat until all of the crêpe batter has been cooked.

If I am making baked crêpes, I fill the finished crêpe and place it in a greased baking dish while the next crêpe is cooking, so the process becomes an alternation of tasks. You can also make the crêpes ahead, and fill them all at once. Crêpes keep well in the fridge for a day or so (unfilled, separated by waxed or parchment paper sheets) and can be frozen for up to a month with no ill effect.


Chicken & Mushroom Crêpe filling

Makes enough to fill 12 8-inch crêpes (enough to serve four people)

4 pieces thick cut bacon
2 tablespoons butter
200 grams cremini mushrooms (or mushrooms of your choice)
450 grams cooked chicken breast
1 medium yellow onion, minced
1 teaspoon chicken bouillon paste
2 tablespoons brandy
3/4 cup Greek style yoghurt, plain (or sour cream)
2 teaspoon cornstarch
1/2 cup water
4 teaspoon grated parmesan cheese
1/4 cup parsley

Dice the bacon and fry until almost crisp, and remove most of the rendered fat from the pan. Add the butter, chopped mushrooms, and onion, and cook until tender. Add the brandy, and stir through, and then add the chicken paste. Add the water mixed with 1 teaspoon of the cornstarch and stir through, and then the and yoghurt mixed with the remaining 1 teaspoon of cornstarch. Stir and cook until the mixture is reduced to a thick creamy sauce. Add finely diced chicken, and stir through until everything is nicely heated.

Lightly grease a 9x13" baking dish, and preheat your oven to 350 F. On your work surface, lay one crêpe golden-side-down, and place two tablespoons of filling on the bottom third of the circle. Fold the bottom edge up, and then roll the crêpe into a compact cylinder. Place in the baking dish. Repeat until all the crêpes are filled and in the pan - they should just fit nicely, ten across and two side-ways. Any leftover filling can be mixed with the parmesan and parsley, and spooned down the centre of the row of crêpes.

Put the pan of crêpes in the oven for about ten minutes, and then broil for a few more minutes, or until the edges are golden-tinged.


February 20, 2013

Breakfast at home: Chile Corn Breakfast Casseroles

These are individual breakfast casseroles adapted from "Mini Chile Relleno Casseroles" recipe from Eating Well magazine. It's really not that much work, but it does take a bit of time in the oven (time to have a shower, and make coffee, perhaps?) so is best suited for weekends. Chorizo would make a lovely side dish, as would tortillas, johnnycakes, or cornbread.

Chile Corn Breakfast Casseroles
Serves 2

1/2 cup pickled green chiles
1/3 cup frozen corn
1 green onion
1 cup shredded Pepper Jack cheese
1/4 teaspoon ground cumin
1/2 cup 1% milk
3 large egg whites
2 large eggs
1/4 teaspoon salt
pinch dry mustard
Tabasco pepper sauce to taste
1/4 teaspoon paprika (or ground chipotle)

Preheat the oven to 400 F with the rack in the middle of the oven.

Prepare two ramekins (295 ml/10 oz.) by spritzing very lightly with olive oil. Place the ramekins on an edged baking sheet for easy manoeuvring.

Drain the chiles very well, squeeze dry with a paper towel, and mince. Rinse the corn in a strainer under very hot water until thawed. Drain very well, and squeeze dry with a paper towel. Finely mince the green onion. Divide the chiles, corn, green onion, and cheese equally between the two ramekins. Sprinkle with the cumin.

Combine the eggs, egg whites, milk, salt, dry mustard, and Tabasco sauce, and whisk or blend until smooth. Pour the egg mixture over the vegetables and cheese in each ramekin. Sprinkle with paprika (or chipotle, or ancho).

Slide the baking tray with the ramekins into the oven for about 25 - 30 minutes, or until the top is domed and the dish appears set when jiggled. Serve in the ramekins.

February 12, 2013

Breast of Turducken

Intrigued by the idea of an extravagance like the infamous "turducken", but without the oven space (or the army of people to eat it up)? Why not make a smaller beastie overall by stuffing a turkey breast instead of a whole turkey? After all, Valentine's Day is coming, and if you were wanting a sexy little meal for two, with a bit of extra panache and just a few leftovers for sandwiches or a casserole, then this is the recipe for you.

Sure, it looks difficult, what with the layers and all, but I assure you that it is actually quite simple. It's just showy that way. Best of all, it's really two dishes in one, since the gravy is made from the braising liquid.

My initial inclination was to use duck confit for the "duck" portion of the turducken, but whilst shopping at Oyama Sausage Co., I noticed that they had a special on black truffle duck sausages, and asked myself "What could be fancier than that?" Since sausage is a ground mixture, it also solved the question of how I was going to keep the disparate layers from falling apart when sliced; I simply placed the sausage layer between the flattened turkey and chicken breasts.


Which is, in essence, almost my entire recipe, but for the cooking instructions. You could easily figure the rest out for yourself, I'm sure, but here are the details, just for fun:

Breast of Turducken

Serves 6 - 8

1 large turkey breast (about 750 grams)
250 grams duck sausage
1 large chicken breast (about 200 grams)
1/4 teaspoon kosher salt
1/2 tablespoon peanut oil (or other)
1/2 cup dry vermouth
1 1/2 cups turkey broth
2 tablespoons flour
salt & pepper to taste

Butterfly and pound flat the turkey breast. Take the duck sausage out of its casings, and spread three quarters of it evenly over the inner surface of the turkey. Add the chicken breast (also butterflied and pounded flat) and place the last bit of sausage in a thin line down the centre of the stack. Roll up (in such a way that the centre-line of sausage will run the length of the resulting roulade) and tie with butcher's twine at two-inch (or so) intervals. Rub the surface of the roulade with peanut oil (or olive oil, or grapeseed oil) and sprinkle with salt.


In a large skillet, over medium-high heat, sear the roulade on all sides. Add the vermouth, cover well with foil, and transfer to a preheated oven at 375 F for 1 hour, or until completely cooked (use a probe thermometer to get it to a safe temperature).

While the roulade is in the oven, you can prepare any side dishes that you like. Mashed potatoes are a great one, since you're going to have gravy. Carrots, corn, Brussels sprouts, yams, any or all of these make a fine side to your breast of turducken.

Let stand for 15 minutes on a carving board (loosely tented with the foil) to let rest before slicing. This gives you enough time to make some gravy (not shown, because it obscured the pretty bullseye pattern of the sliced roulade).

If your turkey broth is cold or room temperature to start (you could, of course, also use chicken broth or duck broth), shake it with the flour in a lidded container (holding tightly), and add to the now-empty skillet - do not clean the skillet first! Stir over medium heat until the gravy thickens, scraping up any goodness from the bottom of the skillet. If it is too thick, you can add a little more stock or water, or any vegetable water you might have from, say cooking potatoes, or carrots, or corn, or some other side dish.

If your turkey broth is hot, shake the flour with a little cold water and add it to the skillet after you have added the broth. Feel free to proceed in your usual gravy fashion, if you don't care for either of these methods. Let the gravy simmer very gently on low while you carve the roulade (make sure you remove the strings, first) and plate the rest of the meal, and then pour it into a gravy boat or bowl with spoon and take it to the table.

February 04, 2013

Venetian Chicken Frisinsal


There is a wonderful, medieval attraction to the notion of tearing apart a roasted chicken with one's bare hands, and this dish can be the wonderful result.

There are quite a few recipes for this floating around, many of which appear to be derivatives of "Tagliatelle W/ Chicken From The Venetian Ghetto" from Nigella Lawson's "How To Eat" or "Tagliatelle Frisinsal" which appears in Claudia Roden's "The Book of Jewish Food" which appears to be its antecedent.

I've adjusted the name into something that makes better sense for the amendments that I've made. Gone is the Tagliatelle, because I'm using broad egg noodles instead (and less of them). Other adjustments include opting in for the parsley which Nigella uses (absent from the original), and roasting the chicken on ribs of fennel (to be discarded after), which adds a subtle perfume to the dish, and lifts the chicken off of the roasting pan.

This is a glorious recipe. It may not look terribly exciting, and it is assuredly not low-fat, but it is wonderfully fragrant and delicious, making it a beautiful comfort food sort of meal.

Venetian Chicken Frisinsal
Serves 4

1 medium chicken
3-4 stalks of fennel
1 tablespoon extra-virgin olive oil
kosher salt, as needed
1 long sprig of fresh rosemary (about 5 inches)
1/3 cup golden sultana raisins
1/2 cup pine nuts
225 grams broad egg noodles

Rub the chicken with olive oil and salt lightly on all sides. Place the chicken, breast side down, onto your roasting pan (I use a large cast iron skillet) which has been lined with enough stalks of fennel to keep the chicken elevated from the bottom of the pan. Roast at 400F for 50 minutes, then turn the chicken breast-side up, and continue to roast until the chicken is completely cooked - 20 minutes to 1/2 hour will do nicely for a 3 pound chicken. Remove the chicken from the roasting pan to a plate, and allow to cool for twenty minutes or so, until it is cool enough for you to remove the chicken from the bones with your bare hands.

While the chicken is roasting (and then cooling), soak the sultanas in a little water for about half an hour, and then drain. Toast the pine nuts until just lightly golden brown - this can be done in a dry skillet on the stovetop, and only takes a few minutes. Mince the rosemary finely, and set aside. Chop the parsley as you like it, and set aside.

While the chicken is cooling, remove the fennel stalks from the roasting pan (let the drippings on them fall back into the pan) and discard. They are stringy and tough, and now overcooked, so there's not much use for them; they have given up their flavour to the chicken juices, which is as good a fate as they could hope for. If you really need to watch your fat intake, pour all of the drippings from the chicken into a bowl, and let the fat rise to the top. Skim off some of the fat as desired. Otherwise, just leave the drippings in the skillet, add the chopped rosemary, the pine nuts, and the drained raisins to the drippings, and bring to a simmer. Next, pour any liquid that has pooled around the chicken (on its cooling plate) into the skillet with the rest of the drippings. Reduce the heat to very low and cover, while you prepare the rest.

Bring a large pot of water up to the boil (for the pasta) while you remove the meat from the chicken. Using your hands, strip the meat and skin from the bones and tear into bite-sized shreds, putting them in a large serving bowl. Be sure to use the crispy skin, as well, but any flabby skin can be discarded with the bones. When all of the chicken is shredded* (you can put the bones aside to make stock or to freeze for later use), quickly cook the pasta (do add a little salt to the water). Egg noodles only take a few minutes to cook, which is handy. Drain the noodles, or use a spider-tool to lift the noodles right from the water onto the shredded chicken meat in the bowl. Pour the sauce of drippings, raisins, rosemary and pine nuts over the top, add the parsley, and toss gently to combine.

I recommend a fresh salad with a bit of crunch, to balance the richness of this dish. Fennel & Radish Salad is about perfect with this (since you already have the fennel).

In the spirit of full disclosure, I note that I actually removed the chicken breast (but not the tender) to a separate plate, because a whole chicken's worth of meat was more than we needed for the four servings of this dish. You could, of course, increase the amount of pasta, use all of the chicken, and feed two to four more people, especially if you had a side dish or two to round it out. The chicken breast that I hived away in this instance made a lovely chicken and fennel white pizza two days later.

*When you are stripping the meat from the chicken, be sure to take the meat from the back of the chicken - especially the two lovely roundish bits referred to as "the oysters" from just above the thighs. This is the closest thing to a tenderloin on a chicken, and is a wonderful bit not to be missed. They are small, firm, intensely flavourful bits of dark chicken meat, sometimes doled out as a special favour, or harboured as a cook's treat.

January 27, 2013

Breakfast at home: Arepas (rellenas de queso)

I've been wanting to make these for ages, so I finally decided to get to it. After all, they didn't appear to be terribly difficult, and they are an absolute staple of the cuisines of Colombia and Venezuela (with other corn cakes variants throughout the rest of South America).

Naturally, there are an awful lot of versions out there, but I went straight to one of my favourite recipes blogs, My Colombian Recipes, and chose the one that best suited my purpose: arepa rellenas de queso.

As you can see, I was using yellow masarepa, instead of the prescribed white, but as I understand the only difference to be the colour of the resulting arepa, I wasn't worried about it. In fact, the golden colour of the finished arepa looks quite pretty to me, although if I had been eating white ones all my life it might look a little strange. Still, the very fact that the manufacturer makes yellow masarepa, which is, after all, specifically flour for making arepas, gave me all the permission I needed to go ahead.

This is a very simple recipe. In my online perusals, I found versions that had cheese (and sometimes egg yolk) mixed right into the dough, but I thought that it would be better to go with a "straight up" version, and add the cheese after the fact. I can't give you better directions than Erica does over at My Colombian Recipes, so skip on over to this link to get the recipe.

I made a half-recipe, which was three arepas, because I didn't want to have leftovers. Now I understand that they hold up rather well for a day or two (and can be re-purposed to dip into soup, or split, dipped in egg and re-fried), so I will probably make a full batch next time. I also made a note that I could easily turn a half-batch into four arepas (or a full batch into eight), to portion-control the sizes a little more. They are rather filling! The uncooked dough can also be kept in the fridge for a few days, if well wrapped and sealed to prevent it from drying out.

I note that the middles took a little longer to cook than the recipe expressly indicates, but it may have been that my skillet temperature was a bit low (or my arepas were a little thick). It didn't take much longer to get them to a point where I could split them, although splitting hot corn cakes is a tricky business if you want the result to be tidy. I clearly need more practice in this regard. I also note that other recipes suggest covering with a lid at the end or popping the fried arepas into a hot oven, briefly, to ensure that the middles are cooked. If I'm making more arepas with the same amount of dough next time, I suspect they'll be a bit thinner, and cook a bit faster. There's also the temptation of arepitas, which are little bite-sized arepas. Perhaps a fun party food?

As you can see below, we went the "benedict" route for our arepas rellenas de queso. I filled the arepas with monterey jack cheese, and we topped them with steamed eggs and hot sauce. That's fried garlic sausage on the side - hardly culturally accurate (a nice chorizo would have been preferable) - but we had some that needed using up, and we both gravitate toward fried meats at breakfast. Scrambled eggs would have also made a good topping, or avocado slices. Or more cheese!


January 18, 2013

Winter Salad: Fennel & Radish Salad


Sometimes, I feel an urge to add more vegetables to my dinner. This happens most frequently in the winter, when I'm not gobbling down fruit by the handful, and when summer salad vegetables are both more expensive and no longer at their peak. By late December, I've given up hope on fresh tomatoes until next year.

Salads can feel a little boring, in the winter. The summer vegetables are just too tired to make it through the winter (even if they're available, they have only a fraction of the flavour), and sometimes I forget that there are other kinds of "pure" vegetable salads - that is, without added pasta or grains - than garden, Greek, and chopped.

There are others, sure: there's roasted beet salad (delicious, but which takes quite a bit of time, plus use of the oven), and pear-walnut-blue cheese (costly ingredients, none of which I am likely to have just lying about on any given day), and cabbage slaws (arguably more of a summer salad), and these are all delicious. But this little number here, hand shaved fennel and thinly sliced radishes with an utterly basic vinaigrette - this becomes a winter salad that is fresh, crisp, simple, and something very much to look forward to, during the winter months when fennel (Foeniculum vulgare) is at its peak. Quick and easy to make, this plays nicely as a side dish for those winter dinner blues. Since it's January right now, I might as well also note that this is a nifty little number to help bulwark any resolutions about healthy eating that we may be tempted to let slide right about now...

Fennel & Radish Salad

Serves 4

1 fennel bulb, trimmed of stalks and fronds
8 radishes, trimmed
1 tablespoon olive oil
1 tablespoon sherry vinegar (or white balsamic vinegar)
1/4 teaspoon kosher salt

If you have a mandoline or v-slicer, you can make very quick work of slicing the fennel bulb. Otherwise, I recommend trimming and quartering the bulb, removing the v-shaped core, and then slicing very thinly on the diagonal. For the radishes, slice them in half pole-to-pole, then slice them into very thin half-moons.

Toss the vegetables in a salad bowl (or layer them, which is pretty in a glass bowl). In a small bowl, combine the oil, vinegar and salt, and blend thoroughly. Pour over the fennel and radishes, and refrigerate for 15 minutes (or up to an hour). Decorate sparingly with fennel fronds, if you like. You can eat it right away, of course, but it seems to benefit from a quick chill.

I think making it with sherry vinegar has the best flavour (white wine vinegar was not quite as perky), but it will discolour the crisp whiteness of the fennel, ever so slightly. White balsamic, or champagne vinegars would be good substitutes, if you want to keep the fennel from taking on a beige tinge.

Another addition that would be quite lovely is thinly sliced green apple - added just before serving to prevent discolouration. I think the sweet-tart of the apple would offset the fennel and radish beautifully, and that's how I intend to serve this, next time around.

January 12, 2013

Khachapuri: Georgian Cheese Bread


There are quite a number of types of khachapuri, and this one is generally referred to as Ajarian (Acharuli/Adjaruli). There are also round Imeruli, kubdari (which also contains meat), Megruli (which has extra cheese on top), Ossuri (also contains potato), and many other intriguing looking variations.

I'd been wanting to try this for ages. As a lifelong fan of all combinations of bread and cheese, and as someone who enjoys a nice eggy filling, in retrospect it's kind of a surprise that it took me this long.

I usually bring freshly made bread to housewarming events. However, I had been eyeing a few recipes with intent* prior to my friend Lisa's housewarming / birthday party, and decided that this Khachapuri recipe (from Everyday Russian) was the perfectly over-the-top bread to bring to the a housewarming party that was also a celebration of a significant birthday.

* When I say "with intent", you can imagine the same sort of intent that a kitty has, when crouched low, eyes fixed on target, and tail twitching with increasing agitation. That kind of intent.

So, in order to prevent myself from chickening out at the last moment, I told everyone that this is what I would bring. And so, I did. Here's the various stages of first-time Khachapuri-making, in pictures:

Mix up the dough (link for recipe) and let it rise - the dough is quite similar to a rich challah dough, full of egg and quite yellow (although, that may depend on your eggs):


Meanwhile, mix up the filling of cheese (I used a combination of grated full-fat mozzarella and crumbled feta), butter, and hard-boiled eggs, mashing everything together into a crumbly mass:


Divide risen dough into four pieces.

Roll out one piece of dough into a large circle, as though you were making a thin pizza crust, and cover the dough with a quarter of the filling, leaving a bare dough perimeter.

Beginning at the near side, start to roll the dough up over the filling, as though you were making a jelly-roll. Stop rolling just before you get to the middle:


Beginning from the far side, roll the dough up over the filling, again stopping before you get to the middle, so that there is a little window of filling:

Pinch and fold the unrolled ends to make a little boat shape:

Place the boats on a foil-lined baking sheet, and let rise for another 20 minutes or so (this step seems to be missing from the original recipe), then brush with beaten egg so that the finished bread will have a shiny golden brown glaze to it:


Bake at 425 F for approximately 20 minutes, or until puffed, golden, and delicious looking.


I failed to take a close up of one of the breads once it was sliced and ready to serve at the party, but I can say with confidence that they were very well received indeed, and definitely take a place of pride as a fun and somewhat unusual (in these parts, at least) item to bring to any event. I'm quite keen to make this again, hopefully soon. I might even devour them all myself!

Apparently, in many places there is a further step of sliding a raw egg into the middles, and putting them back in the oven until the egg is cooked to your liking. This seems to be a breakfast iteration, and is very popular in cafes - which makes perfect sense, as someone else gets to get up early to make the dough. I imagine you could cobble together some sort of advance preparation and hold them in the fridge until ready to cook, but frankly even the idea of that makes me a little nervous, and would take up a lot of precious real estate in my tiny fridge. Perhaps some of the more adventurous bread bakers out there can let me know if they've had success with such a method.

January 04, 2013

Banana Pineapple Muffins

It wouldn't be wrong to say that these muffins are the flavour of my childhood.

I don't know where my mother got the recipe for these, or what she might have done to any original recipe she might have been working from. "A recipe is an excellent place from which to depart" was pretty much her battle cry in the kitchen. We made all manner of variations on this, though. Very strict naming protocols do apply: if you leave out the banana, for example, it becomes Un-Banana Pineapple Muffins. If you decide to make a tea loaf instead of muffins, they become Banana Pineapple Un-Muffins. I even recall a singular day when we had Un-Banana Un-Pineapple Un-Muffins. I think my father might have been suspicious as to what exactly was still in those ones.

These are a homely little muffin - not winning any beauty pageants, but a solid coffee/tea/snack break workhorse and (clocking in at about 200 calories per) for far fewer calories than even the driest of coffee-chain muffins. Pep them up with a 15 second blast in the microwave after the first day.

Banana Pineapple Muffins

Makes 12 regular sized muffins

3/4 cup golden sugar
1/2 cup canola oil
1 egg
2 ripe bananas, mashed
1/2 cup crushed pineapple, drained
1 1/2 cups whole wheat flour
1 teaspoon baking soda
1 teaspoon baking powder
1 teaspoon vanilla extract
1/8 teaspoon salt (I use Kosher salt)

Mix ingredients in order given, being careful not to over-mix. Spoon batter into lightly spritzed muffin cups.

Bake at 350-375 F for about 20 minutes, and use a toothpick test for doneness (an inserted toothpick should come out clean). If you like, add a little nutmeg or cinnamon to the batter and sprinkle some on top as well, before baking.

My sister reports that adding two (heaping) tablespoons of cocoa powder and a quarter cup of large flake coconut makes a wonderful variation, and I'm looking forward to giving that one a whirl myself.


December 31, 2012

Coconut Friands

These were the sleeper hit of the season!

I generally tend to have dried coconut around the house - it's wonderful in a lot of baked goods, perks up a bowl of oatmeal, and makes a nifty sambal or chutney. A spoonful in a choco-banana smoothie almost turns a breakfast beverage into a party single handedly.

For all of that, I don't often feature coconut in all of its glory all that often. Sure, I've made the odd macaroon in my day, who hasn't? People like coconut macaroons. But! I suspect that people would probably like coconut friands even better.

I found this recipe on the delightful Girl Cooks World blog, where she subtitles them "little coconut tea cakes", which is a very good description to highlight the differences between friands and macaroons. She also differentiates them from the potentially related financiers, for which she also has a few recipes (and boy, they look good!).

These are gluten free (Girl Cooks World is quietly, entirely gluten free), which makes them an excellent treat to take to festive occasions where such bounty might be thin on the ground. Your gluten-free friends will be delighted, and so will anyone else who tries them. I halved the recipe, with excellent results (as listed below), but you can certainly "double" it again to get 24 lovely little cakes. Don't worry, they won't have a chance to get stale.

Coconut Friands

Makes 12 mini tea cakes

2 large egg whites
3/4 cup finely shredded unsweetened dried coconut
1/3 cup sugar
2 1/2 tablespoons superfine rice flour
1 1/2 tablespoons potato starch
1/4 teaspoon vanilla extract
1/8 teaspoon kosher salt
4 tablespoons butter, melted

Preheat your oven to 350 F. Spritz a 12-whole mini muffin tin with cooking spray, generously. Set aside.

Whip the egg whites until smooth and frothy, but not stiff. Add each of the remaining ingredients, in order, stirring well with a spatula between each addition.

Divide the batter between the muffin-cups. Bake for 17 - 20 minutes, or until the edges are tinged with gold. Remove from the oven, and carefully invert over a rack. A quick tap on the bottom of the pan should remove any stragglers, or you can use a little fork to help lift them out. Re-arrange so they are all right-side-up, and allow to cool at room temperature. Dust with confectioner's sugar, if you like.

Excellent, hot or cold.

Next time I make these, I plan to add a little lime zest in with the sugar. Doesn't that sound delightful?


December 10, 2012

Smoked Tuna Skillet Dinner

I didn't grow up with tuna noodle casserole. My mother didn't buy canned fish, and the only pasta casserole that she made was a (delicious) baked spaghetti. I was highly sensitive to fish when I was young, we considered an allergy even though it wasn't a true anaphylactic risk. It was fairly unpleasant, and when the rest of the family was having fish, I usually had a fried egg instead. Also, I hated peas with the fiery intensity of a thousand suns. I'm over both of those things now, but you can only imagine how shocked my poor mom would be, if she could see me making this dish.

The beauty of not having a childhood tradition to draw on for tuna + noodles is that I don't have any sense of nostalgia forcing my hand in terms of specific ingredients, methodology or presentation in order to get it "right." I just get to mess around with some tasty food, and share the results with you.

This is a grown-up sort of skillet dinner - the smoked tuna is quite strong, so you don't need as much of it as some other recipes might suggest. If you can't get smoked tuna, you may wish to use a little extra of the regular kind, and perhaps add a drop or two of liquid smoke to get a similar effect. This recipe was adapted from Eating Well.

Smoked Tuna Skillet Dinner

Serves 4

200 g broad German egg noodles
1 tablespoon butter
1 medium yellow onion, diced small
100 grams cremini mushrooms
2 teaspoons Mushroom Base (I use Better than Bouillon)
2 tablespoons dry Sherry
1 1/2 tablespoons all purpose flour
3 cups 1% Milk
pinch salt
1/2 teaspoon black pepper
160 grams Smoked Albacore Tuna
1 cup frozen green peas
1/2 cup grated Parmesan cheese
2 tablespoons Panko-style bread crumbs

Position rack in upper third of oven and preheat broiler.

Meanwhile, heat butter in a large ovenproof skillet over medium-high heat. Add onion, mushrooms and a pinch of salt and cook, stirring often, until the onion is softened. Add sherry and cook and stir until evaporated. Shake together the milk and flour until smooth. Add milk and pepper and bring to a simmer, stirring constantly. Then, stir in the dry noodles, along with an extra cup of hot water (the pan will be very full). Cook and stir until the noodles have absorbed the extra water, and are tender, and the sauce has thickened. If it starts looking too dry, add a little more water, a couple of tablespoons at a time. Stir in tuna (broken into small chunks), peas and 1/2 the Parmesan until evenly incorporated.

Sprinkle the casserole with panko and the remaining Parmesan. Broil until bubbly and lightly browned on top, 3 to 4 minutes. The broiler does dry the dish out a bit more (the one pictured is actually a little drier than I wanted it to be), so if you think it's just right going in...keep a close eye on it, or add an "insurance" tablespoon of water to loosen thing up.

There's not a lot of vegetables in this, obviously, so a nice broccoli on the side is a good idea (or tossed green salad, or other tasty plant of your choice).

December 01, 2012

Pork Breakfast Sausage


We wanted to have breakfast in, today. However, it was already quite late, and while we had eggs, we had no bread-stuffs (not even tortillas!), no potatoes, no bacon or sausage, and no mushrooms or tomatoes to grill. We had eggs and cheese, but nothing else to round out into omelettes, for example. Last week's "clean the fridge" efforts had been a little too effective.

However, all was not lost! On my way home last night I impulse-purchased a package of fresh ground pork. Because that's the kind of impulse-buying I do - not candy, not chips, oh no. I buy raw meat. And sometimes broccoli, but that's a different story.

We live close to a lovely Italian bakery, so I sent Palle out for bread (to serve as a toast raft for scrambled eggs, as you can see from the picture). While he was gone, I put the coffee on and started mixing up some homemade sausage. It didn't take long at all, and I had a nice ball of sausage meat ready for shaping and cooking when he arrived with a fresh loaf of Tuscan bread.

These have a fairly pronounced fennel flavour - if you do not want fennel to be quite so prominent, reduce the fennel seeds to 1/4 teaspoon. If you are aiming for a spicy sausage, add a 1/4 - 1/2 teaspoon of cayenne (depending on the level of heat that you want), and a big pinch of chile flakes to your spice mixture.

If you are watching your sodium, you might want to cut the kosher salt back to 3/4 teaspoon, but these are already lower in sodium than many sausages on the market.

Pork Breakfast Sausage

Makes six patties, or 9 sausages (about 3 servings)

500 g medium ground pork
1 teaspoon kosher salt
1 tablespoon sweet paprika
1/2 teaspoon fennel seeds
1 teaspoon granulated onion
1 teaspoon black peppercorns

Combine the salt, paprika, fennel, granulated onion, and peppercorns in a spice grinder (or molcajete) and grind until fairly smooth (if you like a bit of bite from your fennel and black pepper, stop grinding sooner, so that there are chunky bits). Combine spice mixture with the ground pork, mixing well with your fingers to get it all worked through. The paprika will slightly darken the overall colour of the meat.

You can use this right away (as I did this morning), but it would be even better to make it up the night before, and let the flavours combine in the fridge overnight.

Divide into six pieces, flatten into patties (or roll into sausage shapes) and fry in a medium-hot skillet until cooked through, turning as needed to get a nice golden-brown colour over the whole surface.

So there you have it! Rather simple, and easily made even before the coffee has brewed: delicious sausage without preservatives or bread fillers, just pork and flavour.

We were pretty excited by how well the sausage turned out, and are already plotting and scheming future sausage endeavours. I am planning to make some up for the freezer - after all, sausage is good to have on hand: pizza, pasta, sausage & potato dinners, and skillet dinners of all kinds, as well as the breakfast applications. I think I might make some up as meatballs, too - can you visualize a sausage meatball breakfast platter? I'm getting hungry again just thinking about it!

November 11, 2012

Couscous with Lemon & Mint

This works as either a cold salad or as a hot side dish (add some chickpeas either way, to make it a main-course in itself). It is both very easy to make, and very quick. As you can imagine, the lemon and mint flavours conjure the mediterranean climate, so let that be your guide for choosing something to serve with it - a nice Greek salad, perhaps, or some falafel patties, or perhaps a braised lamb shank or a merguez tagine. Its low effort requirement make it perfect for either summer nights when you don't feel much like cooking (or turning on the stove), or as a last-minute way to round out a bit of leftover stew that seemed smaller than you remembered when you pulled it out of the freezer.

I recommend using any bell pepper except green, here. The red, orange, and yellow peppers are much sweeter, and complement the flavours of the mint and lemon. The green bell pepper would impart a more bitter, vegetal flavour - not necessarily a disaster, of course, but less harmonious for the dish overall.

Couscous with Lemon & Mint
Serves 4

1 cup coarse dry couscous (not Israeli style)
1 yellow bell pepper (or other sweet pepper), finely diced
1 green onion, finely sliced (white and green)
1 lemon, zest and juice
1 - 2 tablespoons good olive oil
1/4 teaspoon kosher salt
1/2 cup fresh mint chiffonade
1/2 teaspoon ground cumin
1 1/4 cups boiling water

You need to make this dish in a container with a tight fitting lid - you can either use a metal saucepan (heat the water, remove from heat, add the salt, sprinkle the couscous evenly over the surface, cover, wait), or a ceramic or tempered glass bowl with a lid (heat the water separately, pour into bowl, etc.) but if your lid is not tight-fitting, you may want to drape a heavy kitchen towel over the top. Make sure you allow room for the couscous to expand - allow at least four times as much room as couscous.

Whichever method you choose, prepare the couscous and let it stand, covered well, for about ten minutes, while you prepare your lemon, mint, green onion, and bell pepper.

Combine the lemon juice, zest, olive oil, and cumin, and whisk together as if you were making a vinaigrette. Place the chopped bell pepper into a serving bowl with the sliced green onion, and pour half of the vinaigrette over top. Prepare the mint chiffonade and set aside. When the couscous is ready, remove the lid and fluff carefully with a fork - be patient, and scrape the tines of the fork over the surface, going increasingly deeper, until you have loosened all of it. Add the fluffed up couscous to the serving bowl, and pour in the rest of the vinaigrette. Stir with a fork to combine thoroughly, letting the couscous soak up the liquid from the lemony dressing. Stir in the mint, and serve (hot), or chill for an hour or so to serve as a cold salad.

This dish is tasty whether you are eating it hot, warm, room temperature, or cold. If you are going to add chickpeas, add one cup of cooked (drained) chickpeas to the bell peppers and vinaigrette, tossing well to coat. If you are intending to serve the dish hot, you may want to heat the chickpeas up first.

I love having leftovers of this for my lunch - it packs really well, because the couscous absorbs all of the liquid, making for easy, mess-free transportation.

October 14, 2012

Smothered Perogy Skillet Dinner

Aaaaand this is barely a recipe, I know, but the rain has finally started here, and this easy, tasty dish feels oh-so-autumnal. Essentially, this is just a tweaked version of my all-purpose smothering sauce (mostly used for pork chops) re-purposed for perogies. For the hardcore and badass, or (badcore and hardass), make your own perogies (and wieners!) from scratch. Feel better? And then send me a picture, please! You can substitute kielbasa/kobasa for the european wieners if you like.

Smothered Perogy Skillet Dinner
Serves two greedy people

3 European wieners, sliced into chunky coins
18 bite-sized perogies, any filling you like (I used potato/cheddar/onion)
1 cup diced onion
1 tablespoon butter
3/4 cup Mediterranee yoghurt (plain)
1 teaspoon dijon mustard
2 tablespoons unbleached flour
3/4 to 1 cup chicken or mushroom stock/broth (at room temperature)

Saute the onions in the butter in a large skillet. Add the wieners and stir and saute until they pick up some colour. Lay the perogies (still frozen is fine) in a single layer throughout the pan.

Combine the yoghurt, mustard, flour, and stock (whisking really well) in a measuring cup, blending until smooth. Pour the sauce over the perogies and wieners, turn the heat to low (or move to an oven at 325F) and cook (covered) for 25 minutes. Stirring occasionally if you are going the stovetop route helps you keep an eye on the liquid level - if it's thickening too much, and not looking "saucy", just add a little water, a couple of tablespoons at a time, and stir it through. Fork-test a perogy (they should be tender), and dish up with plenty of black pepper.

We served this with a big tossed salad chock full of vegetables, to compensate for the lack thereof in the recipe.

Not a fan of wieners OR kielbasa? Fat slices of mushroom would be a great vegetarian switch-out.

October 06, 2012

Carrot & Fennel Soup

This soup has a remarkable, silky texture, even when simply pureed with a stick-blender (no chinoise or cheesecloth necessary). The fennel brings a lightness to the character of the soup, as well as a more complex, sophisticated flavour. The fennel also helps keep the sweetness from the carrots in check. This is one of those rare dishes that feels as healthy as it is, so you can feel comforted and virtuous at the same time.

Whenever I make this dish, I berate myself for not making it more often. It's easy, lovely, and very satisfying. As you can see, it doesn't take long to knock together - most of the total time is unattended cooking time.

Carrot & Fennel Soup
Serves 4 (6 as a starter)

1 fennel bulb, sliced
450 grams carrot, sliced
1 medium yellow onion, diced
3 cloves garlic, minced
1 tablespoon extra virgin olive oil
2 cups vegetable broth (or light chicken broth)
2 cups water
1 teaspoon fennel seed
1 teaspoon coriander seed
1/2 teaspoon cumin seed

In a medium-large soup pot, over a medium flame, heat the olive oil and saute the onion and garlic with the spices. Add the sliced carrots and fennel, and stir well. Add the water and the veggie broth, and stir well. Simmer gently, covered for 30 - 40 minutes, or until the vegetables are soft. Puree with a stick blender, being patient to ensure everything is finely pureed. Check seasoning to see if it needs more coriander seed or salt. If your vegetable broth is quite salty, it may not need either.

Serve with crusty bread. If you're not vegetarian, you might want some slices of chorizo on the side or floated on the top, too. For extra fancy presentation use some of the fennel fronds as a garnish instead of the token cilantro shown here. Very fine rings of red chile would also make a delightful finish.

You can also use curry masala instead of the whole spices, for a slightly more curried taste, and you can substitute a cup of the water with coconut milk for a creamier, more luscious effect.

This soup freezes very well, making it a great item to stash in the freezer for an emergency dinner, or as make-ahead lunches. It reheats nicely in the microwave, getting a meal on the table in minutes.

September 23, 2012

Autumn's here: Cabbage Rolls


Cabbage rolls are one of those quintessential comfort foods for anyone with even a passing relationship to the cuisines of northern or eastern Europe, and of course the middle east, central asia, and the eastern mediterranean regions also have stuffed leaf and vegetable dishes with considerable similarities. Did I leave anyone out? Probably. (Sorry.) Stuffing food with other food and wrapping it up, whether you start with dough or a leaf, just seems to be a universal development in almost every cuisine.

If someone tells me that he or she is making cabbage rolls, my first question is "Oooh, what kind?" - closely followed by offers of help eating up any pesky leftovers, of course. In western Canada we tend to favour either the Ukrainian or Polish styles most of all, and the ones I've made here are a sort of unholy hybrid of every cabbage roll that I've ever found to be delicious. These ones are made with meat (beef, specifically) and rice, but there are plenty of options for vegetarian/vegan fillings (I would suggest a rice/walnut/mushroom blend, for starters).

A lot of recipes will suggest that you braise the cabbage rolls in tomato soup. Those of you who have been reading my blog for a while already know that I shy away from tinned soup as an ingredient for my casseroles and such, and I am not recommending tins of soup here, either. Rather, I humbly suggest my very own Simple Tomato Soup recipe (expired link removed, please see recipe in the comments section below), made exactly as listed. It comes together really quickly, and you can also make it a day ahead (or stash some in the freezer, and simply thaw it out when you are ready to make cabbage rolls). One recipe of Simple Tomato Soup is perfect for one tray of 12 large cabbage rolls.

I recommend savoy cabbage, which is easier to peel without tearing the leaves.

Cabbage Rolls

Makes 12 rolls
Total Prep & Cooking Time: 3 - 4 hours

1 Savoy cabbage, whole
500 grams lean ground beef
1/2 onion, very finely minced
2 cloves garlic, pressed
1 tablespoon tomato paste
1 tablespoon water
100 grams (1/2 cup) long grain rice (uncooked)
3/4 cup water
1 teaspoon mushroom base (optional)
1/4 teaspoon salt
2 tablespoons minced parsley
1 egg, beaten
1/4 teaspoon black pepper
1/2 teaspoon smoked paprika (to finish)

1 recipe Simple Tomato Soup, made as directed in the comments section below. You could also use a thin, tomato-based pasta sauce, or even simply use beef, chicken, mushroom, or veggie broth, and serve the rolls "dry" with sour cream. You will need about four cups of soup/braising liquid.

Prepare the soup, or, if defrosting, heat the soup until it is serving temperature.

In a small saucepan, bring water and mushroom base to a boil. Add the rice and stir quickly with a fork. Reduce heat, cover and simmer 10 minutes, then turn off and leave for another 10 minutes. The rice will be slightly underdone - chalky. That's perfect. Combine with the onions and garlic, and let the mixture cool a bit while you deal with the cabbage.

Cut the cabbage deeply, all the way around the core (about half an inch out from the core knob). Peel the outermost leaves, starting from the base of the cabbage, gently pushing up until the leaves come free. You can do this step a day ahead, and loosely bag and refrigerate the leaves (they will take up a lot of room). You will want 12 good, big, whole leaves, plus a couple of spares.

Trim the leaves by shaving down the thick central spine with a paring knife, and cut a small, thumb-tip sized v-shape at the base of each leaf to remove the toughest bit.

Bring a large saucepan of unsalted water to a boil. Add cabbage leaves and cook for 2 to 4 minutes or until softened, and drain. You can also soften the cabbage leaves by dipping them in water and microwaving them, 2 at a time, for about 60 seconds.

In a medium mixing bowl, combine the raw beef (broken into tiny bits), cooked rice mixture, egg, salt and pepper, and parsley, along with 1 tablespoon of tomato paste combined with one tablespoon of water. Mix thoroughly, using your impeccably clean hands, until everything is nicely integrated.

Prepare a 9x13" baking dish by ladling about half a cup of the tomato soup into the bottom of the dish, and swirling it to cover the bottom thinly. Some folks like to chop up the core of the cabbage, along with any leftover leaves, and put that in the bottom, too, as a bed for the cabbage rolls. This is a great way to use up the rest of the cabbage, as well as making sure you get plenty of veggies in your dinner.

Divide the beef mixture into 12 portions, and roll them up: this bit is awesome, but messy: Dip the softened cabbage leaves in the tomato soup/sauce, and microwave them, two at a time, again (unless they are completely floppy) for about 30 seconds. This tomato-dipping of the leaves is optional, but very flavourful.

Lay a limp, tomato-y cabbage leaf on your plate or cutting board, and add a portion of the meat to the lower third of the leaf. Flip the bottom (stem edge) up and over, bringing the points of the "v" closed so that it makes a tight package. Hold that with one hand, while you tuck the sides in (as if you were making a burrito, or an envelope), and then finish rolling up the leaf. A little practice, and this isn't as difficult as it might sound.

Place each roll, seam side down, in the prepared baking dish. You should get two rows of six, filling the pan. Pour the tomato sauce (or any other braising liquid of your choice) gently and evenly over each roll, using all of the soup, cover with tinfoil, and place in a cold oven. Set the oven to 325 F, and set the timer for 2 hours. Remove foil, and sprinkle with smoked paprika before serving.

Serve with sour cream (or plain yoghurt), mixed with a little dill. Perogies (pierogies), naturally, make a fantastic side dish, but so do plain boiled potatoes, or roasted carrots. Obviously, if you need to hurry the process up a bit, set the oven to temperature before you start rolling up the cabbage leaves, and bake for 90 minutes.

These freeze excellently, as well. Make your own ready-meals!

For the curious, here's a picture of the cabbage rolls just before they go into the oven (see how perky the cabbage still is!):

September 20, 2012

Meatballs & Polenta

Technically, not new recipes, simply a serving suggestion: the meatballs are my all-beef Italian-seasoned version of these meatballs here, and the polenta is my all-purpose polenta recipe which you previously saw when I was making polenta fries. This is just how easy it can be to get a good dinner on the table, when you have a stash treasures, such as meatballs, in your freezer (I haven't tried freezing polenta, but I imagine the texture would suffer). We had a tossed salad on the side, but you could add any extra vegetable you like to round out the meal (roasted fennel, anyone?)

The meatballs are somewhat smaller than usual, about half the size indicated in the linked recipe, as they were originally made up as part of a big batch designated for meatball subs, and I find slightly smaller meatballs are preferable in that context (so that you can have more of them, of course). I used a two-tablespoon disher (60 mL, or 1/8 cup) per meatball, and baked them in my usual fashion. Leftovers were briefly frozen on a baking sheet, and then tipped into a freezer bag for storage for another day.

The polenta recipe is particularly unchanged, simply necessitating that you pour it into individual serving bowls as soon as it is cooked, and serve it hot. The texture is a little bit like mashed potatoes - the creamy, finely whipped restaurant style, that is. If you have extra polenta (the recipe makes four servings, served in this manner), you can simply pour it into a baking dish or other small container, and let it set up to make fries (or simply re-heat and eat) at a later date. It would work wonderfully in a bento, although I didn't think of that in time to deal with the leftovers in such a way - I simply plunked slab of cooled polenta on top of the remaining meatballs in sauce, in a standard plastic container.

For the tomato sauce, you can use any one you like, of course. This was, again, a "freezer treasure" - the sauce leftover from making the same meatball subs. Essentially, a simple combination of a little onion and garlic sauteed in olive oil, a 398 mL tin of high-quality diced tomatoes (don't you hate opening a tin and finding it full of stem ends?), fresh oregano and basil, and a little simmering time. Your mileage may vary, of course. A few chile flakes wouldn't be amiss, either.

Reheating the meatballs in the tomato sauce saves time and dishes. Adding a little extra fresh basil as you reheat gives a little lift to the sauce, and makes you forget that you're essentially just eating up leftovers. This can happen almost untended while you stir up the polenta.

Parmesan, of course, is the natural finisher. Mozzarella would also be good, or any grating/melting cheese you fancy.

Now, for those of you following the "convertible to vegan" tag, I haven't completely lost my mind! Here's the fix: Instead of meatballs, use roasted cauliflower chunks, and simply toss them in the sauce for a few minutes before ladling onto the polenta. And as for the polenta, with its pesky sour cream and parmesan? Omit those ingredients in favour of a little silken tofu (beaten well until creamy) and a bit of prepared vegan shredded cheese-substitute. You may need to adjust the salt to your taste, depending on the brand you use. Change the chicken broth to vegetable broth (or just use water, as I sometimes do), and presto: converted to vegan.