May 22, 2016

Porc Normandie


Despite the deliciousness of roasted asparagus, this post is actually about the lovely slices of pork tenderloin peeking out from behind the wall of green.

Technically, this should be Porc à la Normande, in the original French, or Pork Normandy, in English. Somewhere along the line, however, I started calling it Porc Normandie, and that's how it remains in our household. A linguistic abomination, but a delicious and somewhat unusual plat principal. Either way, it's pork tenderloin that has been simmered in wine and served in an apple cream sauce.

Because apples (and the products thereof) are an extremely important crop in Normandy, there are a lot of potential variations on the apple theme in this dish. The apples in the sauce are non-negotiable, but the braising liquid could be wine or apple cider, and many versions add Calvados as a finishing touch. There's a lot of room to customize for your personal preference.

There are two points of interest in the following recipe that fly in the face of most of our assumptions about European food: First, there is no onion or garlic in any form. Secondly, there is no added salt (although I do use salted butter for browning). Of course, you can either or both of those things to the side dishes - mashed potatoes certainly like a bit of salt and usually enjoy a bit of garlic or chive, too, and I always sprinkle a little salt on my roasted asparagus. But the main dish itself does not call for these things as an ingredient (although there are other versions of Porc à la Normade that do - it isn't necessarily a hallmark of the dish). In all the times that I have made this, I have never found it wanting for either.

This recipe has been minimally adapted from French Cooking Made Easy by the Australian Women's Weekly.

Feel free to double the quantities.

Porc Normandie

Serves 4

1 large pork tenderloin (about 700 grams)
1 tablespoon butter
1 tablespoon canola oil
1 cup dry white wine (or dry apple cider)
1 apple
1 sprig of fresh rosemary, minced
1 tablespoon red currant jelly
1/2 cup cream
1 teaspoon cornstarch
Juice of half a lemon

Select an apple that holds its shape, unless you want the pieces to melt during cooking. I use a granny smith, but that might be a little too tart for some tastes. A Gala should also work nicely. Peel and core the apple, and cut it into thin slices. Place the apple slices in a small saucepan with the wine (or apple cider) and minced rosemary. Bring to a simmer, cover, reduce the heat and let cook for ten minutes. Strain, reserving both the apple slices and the liquid separately.

Lay the pork tenderloin out on the cutting board, and trim away any excess fat or silverskin (the shiny coating of connective tissue that often forms a partial sleeve on the outside of the thick end of the tenderloin). Here is a resource for how to remove the silverskin, if you're not sure.

Cut the tenderloin into two or three pieces, so that it can fit in your skillet.

In a medium or large skillet, heat the butter and the canola oil over medium-high heat until a drop of water will dance on the surface of the pan. Place the tenderloin halves in the pan, and lightly brown on all sides. Add the reserved liquid from simmering the apples, bring to a simmer, cover, and allow to cook for ten minutes. The pork will still be slightly pink in the centre, but that's fine. Remove the pork to a plate and set aside.

Increase the temperature to a brisk simmer, stir the red currant jelly into the simmering liquid, whisking or stirring until it is fully dissolved. Add the cream, and stir through. Allow the sauce to bubble while you combine the lemon juice and cornstarch in a small bowl until smooth. Stir the cornstarch/lemon mixture into the sauce, and continue to cook and stir until it thickens into a gravy.

Pour the juices that have collected on the plate under the resting pork into the sauce, and stir through. Reduce the heat to low, and leave uncovered. Slice the pork into thick medallions, and lay it into the sauce. Spoon some of the sauce over the pork, and then add the apples back into the sauce. Allow the pork about five minutes to finish cooking in the sauce, periodically spooning more sauce over the slices.


Serve with something that can take advantage of the beautiful apple-infused sauce - such as the rosemary mashed potatoes shown above, or buttered egg noodles, and a seasonal vegetable of your choice. And maybe a dry Sauterne, if you used wine, or more cider, as you like.

If you have leftovers, they reheat quite beautifully. Simply remove the pork slices, scrape the solidified sauce (with apples) into a small skillet and reheat until bubbling. Turn the heat to the lowest setting, slide the pork slices into the hot sauce, and cover, giving it five or ten minutes to heat through, stirring or turning the pork pieces over mid-way.


May 16, 2016

Smoked Tuna Melt


Tuna Melts show up on a lot of people's comfort food lists. They are a cultural phenomenon that I grew up hearing about, but not eating. My mother didn't buy canned fish (for a variety of reasons, including worries about mercury content), and the fresh fish that we had occasionally was never tuna. Plus, I couldn't really eat fish when I was a kid, so it wasn't served very often. But I heard people talking about them rather a lot. My classmates often had tunafish sandwiches (as an aside, I never understood why these sandwiches were always described as tunafish, rather than just tuna. Is there any non-fish kind of tuna?), which they evidently enjoyed a great deal.

So now that I can eat fish, all these years later, when I find myself in possession of a can of fish, I think about these classic dishes that are comfort food for so many people, but outside of my realm of experience. Today's can of smoked albacore tuna (like the hot-smoked salmon from my recent Kedgeree post) came as part of a care package of local products from my family on the west coast of Canada.

Tuna Melts evoke strong opinions on such points as amount and type of mayonnaise, presence of pickles in or on the sandwich, shredded or not shredded cheese, open- or closed-face, tomato or no tomato. I decided to go open face (to be eaten with cutlery), with tomato but no pickles (mostly because I was out of pickles, to be honest - add some if you like). These sandwiches are very substantial, and one piece would have been completely sufficient for each of us. We were both in a bit of a food coma after eating these.

Smoked Tuna Melt

Makes 4

4 slices bakery bread
4 slices tomato
4 bread-covering slices of cheese (or equivalent shredded)
Fresh ground black pepper
Smoked paprika

Filling
170 grams boneless smoked tuna, drained
1/4 cup mayonnaise (I use Hellmann's)
1 celery stalk
1 green onion
1/4 cup shredded Gouda or Edam or Jack cheese
splash Worcestershire sauce
splash Tabasco sauce
zest of half a lemon
juice of half a lemon
black pepper

Preheat your broiler.

In a medium mixing bowl, slice the celery stalk into quarters lengthwise, and finely chop. Finely slice the green onion, including the dark green part. Flake the tuna on top of the vegetables, and add the rest of the filling ingredients. Stir well with a fork until nicely combined. Taste, and add salt if you think it needs it (mine didn't, but it will depend on both your choice of mayonnaise and the tuna itself).

Toast the bread lightly in a toaster (or under the broiler, as you like). Lay out the toast slices on a baking sheet or pizza pan. Divide the filling mixture between the slices, spreading evenly to the edges. Add a generous amount of black pepper. Top with the sliced cheese, or some of the shredded, if you're going that route. Top with a tomato slice in the centre of each piece, and a final layer of cheese on top of the tomato. Sprinkle with a restrained amount of smoked paprika (not shown).


Broil until cheese is bubbling. Serve with potato chips (for tradition's sake), and a green salad, for balance.

April 23, 2016

Duck and Rabbit Pie


Pie is not very common in Germany, and savoury pie seems almost completely unknown, at least not this part of the country. I've had to explain it to a number of people, who seem, frankly baffled by the whole thing. We like savoury pies rather a lot, though, so I'm forced to make my own. To be fair, I tended to make my own even in Canada, where I could pick up a frozen pie in almost any supermarket, so this is no hardship.

This pie, though, is a little different. I should start by saying that yes, this was our Easter dinner. Rabbit is shockingly popular for Easter in Germany, even if pies aren't, and the markets are full of fresh and frozen rabbit. Not just the usual whole-or-parts options (rabbit liver is a special treat), you can also get fresh, boneless, fillet of rabbit at this time of year. It is a bit more expensive, just like boneless fillet of anything else, but for this kind of dish it seemed worth it not to fuss with the myriad tiny bones.

I was originally going to make the pie with just rabbit, but when my eye fell on the smoked duck breast, I couldn't help but think of that Bugs Bunny cartoon "Rabbit Fire" (is it rabbit season or duck season?), and decided to make it with both. The flavour of commercial rabbit is very mild and the texture much like chicken breast, so the smoky notes of the duck, along with its firm texture, created a nice balance in the finished pie filling.

Duck and Rabbit Pie

Serves 6 - 8

Pastry for a double crust pie (such as this recipe)

600 grams rabbit fillet, fresh or thawed
600 grams smoked duck breast, skin removed
500 mL duck broth (or chicken)
2 tablespoons butter
1 small onion, finely diced
2-3 tablespoons all-purpose flour
3 sprigs fresh thyme
2 bay leaves
1/4 teaspoon white pepper
Salt to taste
one egg, beaten

In a shallow pan such as a small skillet, heat the broth until just bubbling. Place the bay leaves and the rabbit fillets in the liquid, cover tightly, and turn off the heat. Let stand for 20 minutes, after which the rabbit will be perfectly cooked, and very tender.

While the rabbit cooks, dice the smoked duck breast into smallish bite-sized pieces (reserve the skin for another purpose, such as duck skin tacos, or an omelette) and set aside. Peel and finely dice the onion. Strip the leaves from the thyme.

In a different shallow pan/medium skillet, melt the butter over medium heat, add the onions, the white pepper, and the thyme, and sauté until golden. Add 2 tablespoons of the flour, and stir to make a thick roux. Cook and stir the roux, lowering the temperature if necessary, until the rabbit is cooked. Remove the rabbit to a plate to cool enough to dice. Add the broth from cooking the rabbit to the onion-y roux, and stir or whisk until smooth. Continue to cook the gravy until it is very thick. Increase the temperature if you need to, stirring constantly, and let it reduce if it isn't looking very thick. You can also let it simmer, uncovered, on low heat, while you do the rest.

Dice the cooled rabbit to similarly sized pieces as the duck. When the gravy is satisfactorily thick, ie thick enough to coat the pieces of duck and rabbit and not just create a flood of liquid when you cut the finished pie, add the chopped meat to the gravy and stir about. Let stand while you roll out the pie crust.

Preheat your oven to 425 F/ 225 C. Beat the egg very thoroughly in a small bowl and have standing by.

Roll the lower pie crust out and line the pie plate. Before filling the crust, roll out the top crust and have it ready.

Once the oven is preheated, the pie plate is lined with the bottom crust and the top crust is rolled out and standing by, Use a slotted spoon to scoop the meat up out of the gravy and into the pie plate. Fill the pie plate evenly, and if there is leftover gravy add a tablespoon or two (no more) on top. Add the top crust, and finish however you like. I use classic crimped edges, because my mother always did.


Use a pastry brush to gently paint the top of the pie crust with egg wash (there will be a lot of egg wash left over. Use it for scrambled eggs in the morning). Cut a couple of vents for steam in the top of the crust, and then place it in the oven.

Bake for 15 minutes at the high heat, and then lower the heat to 375 F / 190 C for another 25 minutes. Keep an eye on it, and if the top and bottom crust (if you have a glass pie plate) are both golden brown, remove the pie to stand for ten minutes before slicing into six (or eight) pieces.


Serve with a big green salad, ideally one packed with vegetables and with a lemony dressing.

March 28, 2016

Hot-Smoked Salmon & Fennel Kedgeree


A few weeks ago, we received a care package that contained two tins of hot-smoked wild fish from my home province of British Columbia: one BC sockeye salmon, and one BC albacore tuna. I don't have a huge repertoire of fish recipes - if you check out the seafood tag, you'll see mostly prawns, with only a few non-crustacean offerings. So, I've been thinking quite a bit about what to make with this unexpected bounty. The last time I had smoked tuna, I made Smoked Tuna Noodle Skillet Dinner, and the only salmon recipe I've posted is Salmon Corn Chowder.

I decided to use the salmon first. I did a little research online, asked friends on Facebook for suggestions, and even deliberated reworking previous recipes to use fish, but I wanted to make something new and interesting. Finally I remembered Kedgeree, a dish that had always caught my fancy for not only its interesting name but its entire multicultural history. I knew that most Kedgeree recipes call for smoked haddock or sometimes smoked mackerel, but I reasoned that the flavours should also be compatible with hot-smoked sockeye salmon.

Kedgeree is an Anglo-Indian dish, broadly considered to be descended from the South Asian class of rice-and-legume dishes called Khichri (also spelled Khichdi, kitchiri or khichuri, amongst other spellings), whose other culinary offspring might include Egyptian Kushari. Like its parent, Kedgeree has a lot of built in variability - wet or dry, whether you use ghee or oil, curry powder or separately blended spices, what kind of smoked, flaked fish, whether to include raisins. I went with a somewhat drier style, constructed more like a fried rice than a biryani, rice porridge or paella.

This qualifies as a skillet dinner if you have leftover rice to use.

Hot-Smoked Salmon & Fennel Kedgeree

Serves 3 - 4
Total Prep & Cooking Time: 20 minutes (if starting with cooked rice)

3 cups cooked basmati rice, fluffed and cooled, grains separated
4 tablespoons butter, divided
1 small yellow onion, chopped finely
1 small fennel bulb, trimmed and finely sliced (fronds reserved)
4 cloves garlic, sliced
1 red chile, sliced
1 tablespoon Madras-type curry paste
1/2 teaspoon ground cumin
1/2 teaspoon ground coriander seed
1 170 gram tin of hot-smoked wild sockeye salmon
2 boiled eggs
Fresh cilantro leaves
Freshly ground black pepper
Juice of half a lemon

If you need to cook rice from scratch for this recipe, it takes about 1 cup / 200 grams raw basmati, cooked however you like to cook rice. For optimal length and separation of grains, soak the rice in the cooking water for an hour or so before cooking. Be sure to separate the cooled grains of rice with your fingers (or a fork) before adding to the skillet.

Prepare your vegetables. Open and drain the scant liquid from the tin of salmon. Peel the boiled eggs, and slice them lengthwise into quarters. Tear up the fronds of fennel and put them with the cilantro for garnish.

Melt 2 tablespoons of butter in a large, non-stick skillet. Once it has foamed out, add the chopped onion and sliced fennel, and stir and sauté until translucent and the onion is starting to brown at the edges.

Add the curry paste and cumin and coriander seed, and stir through. Add the sliced garlic, and continue to sauté for a couple of minutes. Add the remaining 2 tablespoons of butter and stir until it has melted. Add the rice and half the red chile slices, and stir fry until the rice grains are all well coated with the buttery spices.

Add the salmon, breaking it into large and small chunks with your fingers. Stir gently through the skillet, so it doesn't break down entirely (unless you like it that way). When the salmon has been integrated and warmed through, serve in shallow bowls, garnishing with the remaining chile slices, the quartered eggs, the fennel fronds, and the cilantro leaves.
Finally, squeeze a little fresh lemon juice over each bowl.

We served this with kalonji (nigella seed) studded roti, but this would also be excellent with a bowl of dal on the side (and would feed more people). If I had thought of it in time, I would have served a dollop of curried eggplant chutney, too.

Kedgeree can be eaten hot or cold, and it was reported that this one heated up very nicely in the microwave the next day.

March 13, 2016

Moroccan Shredded Carrot Salad with Lemon Dressing


As I mentioned in the post on Preserved Lemons, we went to Marrakech last December. It is all still in my head, especially the flavours and sounds and scents of the markets and street food, and I am continue to investigate recipes for dishes that we experienced, as well as those that I regret missing the opportunity to experience.

This carrot salad is modelled after the one that was served to us upon arrival in our riad. As we were scheduled to arrive quite late in the evening, our host offered us the option of booking a dinner so that we could relax and enjoy our first evening, without struggling out into a very unfamiliar sort of place late at night after a day of travel. We gratefully accepted, and were sent a menu to pre-order from. The dinner included a choice of three salads from a list of about seven choices, one two-person tagine from a half-dozen compelling possibilities, and a dessert from again, a handful of options. Bread was of course served automatically on the side (Morocco likes to have bread of some sort at every meal) and wine was also available, despite the riad's owners/operators being muslim themselves.

One of the salads we chose was a shredded carrot with lemon, which arrived neatly domed on a plate. I remarked on how finely grated the carrot was, and how wet the dish overall appeared, as we dug into it. We were delighted with the intensity of the lemon flavour, and it automatically went into my mental "make this!" file. While Morocco is famous for its use of preserved lemon, this recipe uses fresh lemon juice only.

Moroccan Shredded Carrot Salad with Lemon Dressing

Serves 4

3 large or 4 medium carrots
2 tablespoons cilantro or parsley leaves
1 large mint leaf
4 tablespoons fresh lemon juice
4 tablespoons extra virgin olive oil
1/4 teaspoon of salt
1/4 teaspoon sugar (honey would also be fine)
1 clove of garlic, crushed
1/8 teaspoon ground cumin
1/8 teaspoon sweet paprika

Peel and finely shred the carrots, and put them in a non-reactive bowl (note that the carrot juice might stain plastic, so best use a glass or ceramic bowl). I used the fine side of a big box grater to do the shredding, which takes a while. If you have a mandoline or other fancy slicer, do whatever gets you the finest possible cut without turning utterly to mush.

Finely chop the cilantro (or parsley) and mint leaf, and stir through the carrot shreds until well distributed.

In a small bowl, whisk together the lemon juice with the olive oil, salt, sugar, garlic, cumin, and paprika. Taste the dressing and add more salt if needed. Pour the dressing over the grated carrots, stir well to combine, cover and refrigerate for at least two hours, to give the carrots time to soak up the flavours.

Spoon onto plates, or pack into a teacup or measuring cup (or small bowl) to make a tidy presentation. The juices from the salad may seep out from the edges quite a bit, so be prepared to blot the plate if you want to keep it clean. In the riad, this was served Moroccan style, meaning one each salad was served on a separate plate, from which we served ourselves, rather than the individual portion you see here.

February 06, 2016

Mashed Potato Soup


I don't currently have a blender, food processor, or even an electric hand mixer. Things that need pulverizing get pulverized the old-fashioned way, using one or more of: mortar & pestle, grater, sieve, chef's knife, criss-cross potato masher. There are whole categories of soup that I'm not making these days, because the labour required to give them a smooth texture usually relegates them to non-weeknight status, and there's usually a huge list of time-consuming recipes that take priority. This soup, however, starts with mashed potatoes. If you have some leftover from a previous meal, this will come together very fast, otherwise you'll need to start by boiling up some potatoes. Still manageable on a weeknight.

Mashed Potato Soup

Serves 4

4 cups mashed potato
2 tablespoons butter, divided
1 medium onion, finely chopped
2 cloves of garlic, minced
big pinch of salt
2 cups chicken or vegetable broth
2/3 cup schmand or thick sour cream
celery seed
white pepper
4 European style wieners (eg. Frankfurter Würstchen), sliced
up to 1 cup diced cooked vegetables (eg. carrots)

If you don't have leftover mashed potatoes, you'll need about four good-sized floury (as opposed to waxy) potatoes, peeled, and boiled or steamed until tender. Cut them in half or smaller if you like, to speed the process.

While the potatoes cook, sauté the onion and garlic in a tablespoon of butter, just until golden and soft. Season with a big pinch of salt, and a smaller pinch of celery seed and white pepper. Set aside.

Drain the liquid from the cooked potatoes, saving it to use in place of some of the chicken stock if you like. Return the potatoes to the warm pan and put it back on the warm burner. Use a wooden spoon to break up the potatoes, so that the steam evaporates off of them, drying them a bit. When the potatoes are well-shattered, add the rest of the butter and mash until very smooth.

Add the sautéed onions to the potatoes, and mash some more. Add the schmand or sour cream, and mash until smooth. Add the broth (and/or potato water) slowly, stirring well with a wooden spoon, until all the liquid is added and the soup is smooth. Turn the heat back on under the soup pot, and stir in the sliced wieners and cooked vegetables. Let cook on a low-ish heat just until the wieners and vegetables are thoroughly heated up, and the soup is hot (don't let it boil). Serve with a roll on the side, German style, or just enjoy as is.

January 30, 2016

Toad in the Hole - Sausages in Yorkshire Pudding


No toads were harmed in the making of this recipe.

Toad in the Hole is a rather off-putting name for a really tasty comfort food from the UK, namely well-browned sausages baked into a Yorkshire pudding. It's classic pub food, both hearty and surprisingly simple, and doesn't take too long to make. You can use any kind of sausage you want, really, but since I live in Germany, I've gone with a fairly neutral bratwurst. A good English banger would be perfect, but you wouldn't go wrong with Cumberland links or Lincolnshires, if you can get them.

In fact, you can use almost any bits of cooked meat and it would be within your rights to call it Toad in the Hole, although the standard that has arisen is for sausages. I wouldn't recommend spam, but apparently that was sometimes used during wartime rationing. You can use big or small sausages, as you wish. Smaller sausages make for easier portioning and serving, of course. There are plenty of vegetarian versions out there, too, featuring field mushrooms and roasted vegetables. Your mileage may vary.

As a quick aside, I followed Various Internet Instructions™ to lay the sausages on top of the batter, but I think next time I will lay the sausages down first, and pour the batter around and partially over them, to get a more classic look.

This recipe uses two skillets, because the gravy is made separately while the "Toad" is in the oven.

Toad in the Hole with Onion Gravy

Serves 2 - 3

400 grams fresh sausage links (I've used large pork bratwurst)
1 medium onion, sliced (I've used red)
2 cups beef (or vegetable) broth
2 tablespoons flour

Batter

3 eggs, beaten really well
1/2 cup flour
1/2 teaspoon salt
1 good dash of Worcestershire sauce
1 tablespoon grainy mustard
1/2 cup milk
2 tablespoons bacon fat or lard, to grease the skillet

The first thing to do is mix up the batter, so that it can rest and fully rehydrate the flour. This is an important step, if you want a nicely risen pudding. In a medium mixing bowl, whisk the eggs really well, and slowly add in the flour, continuing to whisk until smooth. Add the salt, Worcestershire sauce, and grainy mustard, and whisk until thoroughly integrated. Finally, slowly whisk in the milk until the mixture is smooth. Set aside at room temperature while you get everything else ready.

If you have a cast iron skillet, that's the thing to use. Preheat your oven to 220 C. (425 F.), with the skillet on the middle rack, so that it preheats nicely, too.

While the batter rests and the oven and skillet are preheating, cook the sausages and start the onion gravy. In a large, skillet, brown the sausages on all sides (I use a little cooking spray to get them going). Let them build up a little fond on the bottom of the pan, which will provide flavour for the gravy. When the sausages are nicely browned, add the sliced onion to the skillet, and stir it all about, so the onions start cooking.

When the sausages are ready, pull the pre-heated skillet out of the oven, and add the bacon fat to the hot skillet. Put the skillet back in the oven for a minute to fully melt and heat the fat. Pull the skillet back out of the oven, and lay the sausages (but not the onions) down in the hot fat. It will spit at you, so be careful. Working quickly and carefully, pour the rested batter (give it one last quick stir) around the sausages, partially covering them (I did this in the reverse order, putting the batter down and then laying the sausages, which is also fine, but makes the sausages float on top of the batter at the end).

Put the skillet back in the oven as quickly as possible, so that it doesn't cool down at all, and set your timer for 15 minutes. It will probably take 20 minutes, but depending on your oven you will want to at least look at it at 15. Don't open the oven if you can avoid it - this is a popover, and they notoriously won't puff if the oven door gets opened too soon.

Meanwhile, add the broth to the onions cooking on the stove top, and stir well, scraping up any fond. Depending on the quality of your broth, you might want to add an extra shot of Worcestershire sauce, too. Your choice. Make a slurry by shaking together the flour with a half-cup of water, and slowly add it to the pan, stirring. When the mixture comes to a full boil, it will be nicely thickened from the flour. Let it continue to cook, stirring frequently, so that the raw taste is cooked out of the flour. Taste, and adjust the seasoning if necessary.

At the 15 minute mark, check your Toad in the Hole's progress. The batter should have risen up nicely, but it might still be rising at 15 minutes. It will also start becoming a rich golden brown. There should be no liquid in the centre of the pan. Unless it looks in danger of burning, leave it in the oven for another five minutes, then remove, admire, top generously with gravy and serve without delay.

We served ours with English-style baked beans in tomato sauce, which is a classic pairing. A bit of salad would not go amiss, and peas are also a frequent side in the UK (not so much in our house, though). Leftovers heat up surprisingly well in the microwave.


January 16, 2016

Preserved Lemon


We spent last Christmas in Marrakech, and returned with a reignited love of North African flavours. The single most notable ingredient in Moroccan cooking, from my perspective, is the generous use of preserved lemon that occurs in everything from tagines to tangia, couscous to zaalouk. It is a key component of many of the signature dishes of the region.

I've talked about the wonderful depth of flavour one can get with preserved lemon in my Lemon Risotto recipe. Historically, I've made an Indian version of preserved lemon, namely a modified Nimbu Ka Achar (not the sweet version), which has the additional flavourings of a smidge of cayenne and turmeric, giving the finished condiment a deeply burnished yellow appearance, and a lightly spicy fragrance from the additional seasonings.

Today, I decided to make a more classic version, because I've planned a lot of Moroccan recipes in the next few months. The lemons will take about a month to cure before I can use them, and will continue to get better and better after that.

Preserved Lemon

1 sealable 500 ml canning jar with a clean new seal

4 unwaxed lemons
3 tablespoons coarse salt

Wash the lemons really well. If you have the misfortune to have access to waxed lemons only, you can clean them thusly: In a colander, pour boiling water over them to heat/loosen the wax. Immediately place them in a cool vinegar water bath. One lemon at a time, rub the wax off using a scrub made of baking soda and coarse salt on a damp, clean kitchen cloth. Rub and scrub and rinse under cool water, until the skin squeaks (like tupperware) when you rub it. Dry well and set aside. Or, you can google for a different wax removal system that suits you.

Fill your clean canning jar with boiling water, and let it stand. Let some of the water run over the inside of the lid, too, so it's best to do this in a clean basin or handy kitchen pan.

On a clean cutting board, slice three of the lemons lengthwise into eighths. Traditionalists leave the lemons joined at one end, that is to say, not cutting the whole way through, but I find it's quite hard to fit them all into the jar that way. So, I do one the traditional way, and the others I just slice into eighths. Discard any seeds.

Empty the boiled water from your jar. Sprinkle a little of the coarse in the bottom, and start layering your lemon wedges and salt into the jar, using all of the salt. If you are doing traditional lemons, connected at one end, pack some of the salt between the slices and into the middle. The lemons should just nicely fill up a 500 ml jar. Finally, take your last lemon, and squeeze the juice out. Discard the empty husks, and pour the juice over the salted lemon slices, and seal the jar. The juice will not cover the lemons, but rather will fill about half-way, depending on how juicy your lemons are.

That's pretty much all the work. Put the jar on a counter where you will see it every day, and once per day turn it upside down and back again, to make sure all the lemon gets bathed in the juice. After about four weeks, you can move it to the fridge, and you don't have to turn it anymore. Over time, the lemons will start to break down a bit, releasing more juice into the jar, and dissolving some of the pulp.

To use, unseal the jar and use a clean fork to extract however many segments you need. Re-seal the jar, and return to the fridge. I've kept one as long as a year and a half, with no signs of deterioration. The combination of salt and the extremely acidic environment seem to keep it from growing mould or unfriendly bacteria. That being said, food safety, folks. If something does go wrong with yours, and it starts growing something or smelling funky (in a bad way, because it does smell a bit funky in a good way already), use your judgment. I've never had one go bad on me, but I'm not ruling it out.

29 days to go...

December 31, 2015

Nanaimo Bars


Much like the recipes for Kalte Schnauze and shortbread, this was one of the required Christmas baking items of my childhood. They are a quintessential Canadian treat named after the city of Nanaimo ("Nan-EYE-mo") on Vancouver Island, and these days are available year round in bakeries across Canada (sometimes in disconcertingly large serving sizes). You can get them with non-traditional flavours added to the filling - orange or mint or caramel, for example - but I've always preferred the standard version.

For the pan, I always use my 7x11" Pyrex glass baking dish, but I note that the original recipe called for a 9x9" pan, so either would do. Of course, the area of a 7x11" pan is 4 inches smaller, so the bars will be a tiny bit thicker. We always used a 7x11" pan, and I don't think I ever noticed that it was technically the wrong pan size.

Did I mention that these are no-bake? You do need a stove top, but not an oven.

Nanaimo Bars

Makes a 7x11" pan

Prepare your pan. For easy removal, a strip of parchment paper works well. Grease the sides with a thin skim of butter.

Base layer

1/2 cup butter
1/4 cup sugar
5 tablespoons cocoa powder
1 teaspoon vanilla
1 egg, beaten
1 1/2 cups graham wafer crumbs*
1 cup unsweetened, dried shredded coconut
1/2 cup chopped walnuts

Put the butter, sugar, cocoa powder, vanilla, and beaten egg in a bowl (or the top of a double-boiler), and set the bowl over hot water, stirring until the butter has melted and the mixture resembles a thick custard. If your butter is very cold, chop it into small bits to facilitate the process.

Remove from the heat, and add the crumbs, coconut, and walnuts. Stir rapidly and thoroughly (I find a fork is the best tool here), to incorporate all of these dry additions into the mixture, until it becomes a damp, crumbly mixture without any dry spots. Turn it out into your prepared pan, spread it evenly across the bottom, and then pack it down tightly with your hand (as evenly as possible). Don't be afraid to press firmly - that will help it hold together later, when you're slicing it. Set aside, and make the filling.

Filling layer

1/4 cup butter, softened
2 cups (500 grams) icing sugar
2 tablespoons custard powder (We always used Bird's Custard Powder)
3 tablespoons whole milk

Put all of the filling ingredients in a medium mixing bowl, and mix until smooth. A hand mixer is really the easiest tool for this, and if your icing sugar is really old and clumpy, you might want to sift it first, for best results.

The result should be a thick, stiff butter icing, slightly yellow from the custard powder. Dollop the icing onto the chocolatey base, and spread and smooth it until it evenly covers the base layer.

Let the filling harden for at least 15 minutes at normal room temperature, 30 minutes is better (gives you time to clean a few dishes, or make a whole different recipe).

Top layer

200 grams dark/bittersweet chocolate (75%)
1 3/4 tablespoons butter

Melt the chocolate and the butter together, stirring until smooth. You can use the double boiler, a pan directly on the stove over low heat, or the microwave, however you prefer to melt chocolate. Just don't burn it. I just use a small pan directly on the stove.

When the butter and chocolate is melted and smoothly combined, pour it evenly over the surface of the filling layer, using a spoon or a spatula to spread the chocolate quickly and evenly over the whole surface, before it begins to set. I always pour the chocolate so that it falls onto the spoon, held right above the filling layer, so it sort of floods over the edges of the spoon and doesn't hit the filling from a height. That's possibly an unnecessary precaution, but that's my method.

Now the difficult part: The whole thing needs to set, preferably at cool room temperature (pantry, root cellar, that sort of thing) before you can slice and serve. Once it has cooled completely to room temperature, we normally slip a plastic bag over it to keep dust etc. off, and put it aside at least overnight. Far better if you can bring yourself to wait an extra day or two (my mother would try to hide it in the pantry for a couple of weeks when we were small). We've never kept it in the fridge -- it usually disappears far too fast to worry about it getting stale anyway.

When you're ready to serve it, run a sharp knife along the un-papered edges, and then lift the parchment ends straight up to lift the whole thing out at once. Transfer to a cutting board, paper and all, and slice as you wish. I find that quite tiny squares, the size of large truffles, are perfect, although as a child I always wanted much more than that. You can also leave them in the pan, and just slice and lift squares as you go, but I'd usually rather free up the pan.


Below is our family's original recipe, in my mother's handwriting. You will note a couple of differences - mostly in the somewhat expanded directions, and a thicker layer of chocolate for the top layer (which makes it easier to spread evenly over the surface). Of course, you could make it the more frugal way with only 4 ounces/114 grams chocolate and one tablespoon of butter, but that does result in a very thin layer of chocolate on the top. I note that the adjustment from 2 cups to 1 1/2 cups of graham cracker crumbs was my mother's correction to prevent the base layer from being too dry and crumbly.


*Living in Germany, it was a challenge to find an appropriate substitute for graham crackers - crumbs or otherwise. I eventually settled on Leibniz Vollkorn Kekse, and used my chef's knife to finely crumble them. It turned out really well, and I would use that substitution again.

November 22, 2015

Cranberry Sauce with Orange & Sherry


It's that time of year again. Canadians have already had Thanksgiving, Americans are just revving their KitchenAid™ motors and/or checking travel schedules.

Cranberry sauce has a place on many of our holiday tables. In North America, wherever there is a roast turkey, cranberry sauce must not be far behind. For some folks, it's as easy as opening a can and upending the contents into a bowl, and for others, it takes a little more time, but really not by much. Plus, you can make it ahead. Freeze it, if you're really super organized (labeled, of course) or just store it in a sealed container in the fridge for a few days before the big event.

This version is made with a bit of orange juice instead of water, and a splash of sherry (optional) at the end. It takes about fifteen minutes to make. If you like your cranberry sauce sweet, go with the full amount of sugar. If you prefer it tart, use the lesser amount. If you're not sure...well, you can always add more sugar later.

Cranberry Sauce with Orange & Sherry

340 grams fresh or frozen whole cranberries
3/4 cup - 1 cup sugar
3/4 cup orange juice
1 cinnamon stick
zest of one clementine, thinly sliced
2 tablespoons dry sherry (optional)

If you are using fresh cranberries, rinse them in cold water, and discard any that are overripe (discoloured, already squishy), and pick out any bits of stem, if necessary. Drain.

In a large saucepan (do not be fooled into using a small one! You want high sides to keep hot sugar from splashing and burning you) over medium heat, dump the cranberries (fresh, frozen, or defrosted), sugar, cinnamon stick and orange juice into the pan. Using a long-handled wooden spoon, stir it about and let it come up to a simmer. Add the zest, stir through, and let the mixture bubble and spit for about ten minutes, until all of the cranberries have swollen up and split open, and then about five minutes longer, stirring periodically. Taste the mixture carefully, by spooning some onto a cold spoon, letting it cool down, and then tasting. If you want to add a bit more sugar, by now you should be able to tell. If you want more sugar, add it and cook for another five minutes, until fully dissolved.

Take the pan off the heat, and stir in the sherry. Let the mixture cool (it will thicken up a lot as it cools, and the natural pectin in the cranberries has a chance to set). When it has cooled down to your satisfaction, put it in a serving bowl and cover with plastic or a sealable fridge/freezer container, and store in the fridge until ready to serve (or ready to transfer to the freezer). It will set up very firmly, so you may wish to stir it about before serving.

If you prefer your cranberry sauce warm, you can reheat in a saucepan it over low heat, or in the microwave (in the appropriate kind of dish, partially covered, so rogue cranberries don't explode all over the interior).

There you have it: a glistening jewel on your holiday table, and absolutely fantastic on turkey sandwiches the next day.

November 17, 2015

Lamb & Guinness Stew


This delicious stew is built using my base model for meat stew: brown the meat well on at least two sides, braise the meat with onions for a good long time, add vegetables and cook until tender, season to taste.

We had this bread the first night with thick slices of rye bread from our bakery, but just about any kind of bread would be good with this. The remaining half-batch of stew was put into a freezer container to be pulled out later in the month when we're feeling particularly in need of an effortless, homemade meal. Depending on my energy level at the time, I might, or might not, decide to make biscuits or dumplings to go along with the stew.

In Germany, the supermarkets and farmers' markets have a pretty wonderful concept: Suppengrün. Literally translated, it means "Soup greens" and consists of a single bundle containing at least a wedge of celeriac, a few carrots, a section of leek, and some parsley. Some of them will have part carrots and part parsnips, and some of them will add a whole bundle of fresh herbs instead of just the parsley, but that's dependent on the individual character of the vendor. The basic version is always available, and is nicely sized for one pot of soup or stew. This is not only perfectly sized for small German fridges, but also helps keep food waste to a minimum. One package of Suppengrün just exactly what you need for a recipe without having to buy a whole bag of carrots, for example, or an enormous celery root or bunch that you might not be able to use up in time before it gets squishy in the vegetable drawer. It takes care of the crisper portion of the mirepoix in one item, and even the fancier ones are well priced. I hope this idea catches on worldwide.

Lamb & Guinness Stew

Serves 4 - 6, depending on sides

900 grams cubed lamb shoulder, lightly salted
1 tablespoon peanut oil (or other oil for frying)
1 large yellow onion, diced medium
1 small leek, white part only, thinly sliced
3 cloves garlic, minced
1 cup diced celeriac or 2 stalks of celery, diced
3 large carrots (or a mixture of carrots and parsnips)
2 large waxy potatoes
1 can or bottle of Guinness
2 cups lamb or beef broth or stock
3 bay leaves
1 tablespoon tomato paste
1 teaspoon Worcestershire sauce
1/4 teaspoon white pepper, ground
1/2 teaspoon yellow mustard seeds
2 tablespoons of all-purpose flour
1/2 cup water

Heat a dutch oven over medium-high heat, and when hot, add the oil. When the oil is also hot, add a sparse layer of lamb cubes, and allow to sear on one side, before turning to sear on a second side. Remove the lamb from the pan to a holding plate, and repeat until all of the lamb cubes are seared on two sides. Add the diced onion, the leek, the bay leaves, and the minced garlic to the fond in the empty pot, and add a little splash of water if necessary to prevent scorching. If you are using stalk celery instead of celeriac, add that now, too. Stir and scrape up the brown fond in the bottom of the pot, until the onions are starting to turn translucent. Add the tomato paste, and stir through again, being careful not to let it burn. Add the Worcestershire sauce, the mustard seeds, and the ground white pepper, and stir through.

Then, add the Guinness, and stir through, making sure to scrape up the bottom of the pot very thoroughly. Add the lamb or beef broth or stock (it's okay to use a good quality concentrate that you like the flavour of), and return the seared lamb to the pot. Simmer, covered at a low temperature for 1.5 hours, for meltingly tender lamb.

While the lamb simmers, prepare the remaining vegetables. Peel the carrots and cut them into large bite-sized chunks. Same for the potatoes. The celery root should be heavily peeled, and diced fairly small.

When the lamb is tender, combine the flour and the half cup of water in a small, sealable container, and shake vigorously (holding it shut the whole time) to make a smooth slurry. Pour it into the dutch oven and stir it through. It will not look very appealing, at first, and it won't do much to thicken the stew until it comes up to a full simmer, but it needs to go in now because it takes about a half-hour to cook out the raw taste of the flour.

Add the prepared vegetables, stir through, and bring up to a simmer again (the slurry and the cold vegetables will bring the temperature down very quickly). Turn the heat back down, cover the pot, and simmer for another 30 - 45 minutes (testing larger chunks of carrots for doneness seems to work well). Alternatively, you can put it (covered) in the oven at 350 F for the same amount of time.

Serve with a fat slice of bread, or a bun, or biscuits, or dumplings. Leftovers, should you be so lucky, keep nicely in a sealed container in the freezer for up to a month without loss of quality. Be sure to cool the stew thoroughly before freezing, for best textural results. I like to leave it in the fridge overnight, and then transfer it to the freezer in the morning.

October 24, 2015

Crumpets


I've always enjoyed making breads - pancakes, biscuits, tortillas, pizza crusts, sandwich loaves, challah, pita with self-forming pockets, crisp coiled flatbreads full of green onions...and of course, recently, bagels. I probably won't ever run out of new ones to try. The world is full of amazing bread.

This is the first time I've ever made crumpets, though. They are a quintessentially English bread that is cooked on a griddle or skillet rather than in the oven, and I can't find them easily in Germany. So, of course I decided to make my own, especially as they've been on my list for quite a while, now. There is, however, a surprising number of recipes to be had. I read a lot of them online, and combed through my cookbook collection for good measure. I wanted something that was easy, didn't take too long, and yet had the true characteristics of a ideal crumpet - airy, with a nice holey structure throughout and a tender middle. I ended up hybridizing several recipes to create the one below, with a hat-tip to the Tesco website for providing the starting point for the ratios.

You will need crumpet rings, or egg-poaching rings, or some other food-safe way of corralling your batter in the pan. The standard size is about 3 inches or 7 3/4 centimetres diameter.

Crumpets

Makes 8 - 10

1 teaspoon canola oil
225 grams (1 3/4 cups) all-purpose flour (Type 505 in Germany)
150 ml whole milk
150 ml water plus extra as needed
1 teaspoon dried yeast
1/2 teaspoon sugar
1/2 teaspoon coarse salt
50 ml warm water
1/2 teaspoon baking soda

Warm the milk and 150 ml water together until just pleasantly warm but not hot. While it heats, in a mixing bowl, combine the flour, yeast, sugar, and salt, and stir together well with a whisk to integrate and aerate the ingredients. Make a well in the centre, and pour in the warm milk-water mixture. Stir briskly with a whisk to get a smooth batter. It should be about the consistency of pancake batter, so if it is too thick, add another tablespoon or two of water to loosen it up.

Scrape down the sides and cover the mixing bowl with a clean kitchen towel, and put it someplace warm to rise. I use my oven, which I had turned on for a minute or two to warm up, and then shut off before using. Let the batter rise for 45 minutes.

Preheat a large nonstick skillet over medium heat. Spritz it with canola oil, or use a pastry brush to brush on a thin coating. Brush your crumpet rings lightly with oil, too.

While the pan is warming up, mix the warm water and baking soda together, then stir it quickly but thoroughly through the crumpet batter. The batter is kind of stretchy at this point.

When the pan is ready, add about three tablespoons of batter to each crumpet ring (I use a small ladle to scoop the batter), turn the heat down, and set your timer for 5 minutes. It might take as long as six or seven minutes, depending on how thick your batter and hot your pan is, so you need to watch them. Bubbles will start to form quite quickly, but you want to wait until they burst and become holes that stay visible, before removing the rings (using tongs or a glove, because they are hot!), and flipping the crumpets over.

Let the crumpets cook for about one minute on the second side, and then flip them over again and remove to a rack to cool.

Bag them and store them in the fridge once cooled.

They toast up beautifully for breakfast or afternoon tea - top them with a little butter, with or without jam, or a slice of good sharp cheese. You could also use them as a base for poached or fried eggs, of course. Perhaps even some sort of unholy breakfast sandwich. It's up to you.

October 13, 2015

Pumpkin Pie


Pumpkin pie represents such a beloved combination of flavours in North America that we're apparently even happy to consume it as a latte (okay, maybe not all of us), or (better still) beer.

It is also a staple long associated with harvest season feasts such as Thanksgiving and Hallowe'en - eminently sensible, since this is when pumpkins are ready for cooking. There's a lot of great options for pumpkin desserts - everything from flan to mousse, and that's not even counting the muffins, quick breads, and scones. My sister makes a fantastic pumpkin cheesecake, with a baked on sour cream topping, but that's a lot more advanced than this simple pie, which is just a single bottom crust and a filling that could best be described as mix-and-pour.

Somehow, though, pie remains the classic pumpkin dessert. This one is a little bit tangy from the crème fraîche, sweet (but not breathtakingly so), and not too dense. If you prefer mild spices, reduce the cinnamon to 1 teaspoon and the ginger to half a teaspoon. You can substitute ground cloves for the allspice, if you like.

Pumpkin Pie
Makes 1 pie

1 single pie-crust, unbaked
425 grams pumpkin puree (unsweetened, unseasoned)
3 large eggs
1/3 cup raw sugar
1/3 cup granulated sugar
200 grams crème fraîche
3 tablespoons dark rum
1 teaspoon cornstarch
1 1/2 teaspoons cinnamon
3/4 teaspoon ground ginger
1/2 teaspoon ground nutmeg
1/4 teaspoon ground allspice
1/8 teaspoon salt

Make your favourite single pie crusts recipe (or try the one shown here), and line a standard 23 cm pie-plate, folding and crimping the edges under if you like, or even simply pressing them gently with a fork against the top edge of the plate, if you want to go super simple.

Once the crust is in the pan, preheat your oven to 425 F / 225 C.

In a medium-large mixing bowl, beat the eggs until smooth (I use a whisk, but you could also use a food processor). Remove a tablespoon or two into a separate ramekin dish and set aside. Add the sugars to the mixing bowl, and beat until smooth. Dissolve the cornstarch in the rum, and add to the eggs and sugar, and stir through. Add the pureed pumpkin, the salt, and the spices, and stir until smooth. Finally, stir in the crème fraîche and mix until thoroughly combined. It will be a very pale orange at this stage, but it will darken up nicely as it cooks.

Put the pie pan on a baking sheet (or pizza pan) for easier handling. Use a pastry brush to paint the top edges of the crust with the reserved beaten egg. Pour any leftover egg into the pie filling, and stir it through.

Pour the thick pumpkin mixture into the unbaked pie shell, and give the pan a little jiggle to settle it evenly.

Move the pie (on its baking sheet) to a rack in the middle of the oven, and bake for 15 minutes. Lower the heat to 350 F / 180 C, and bake for another 45 minutes. The pie filling should look kind of rounded, glossy, darker than it was, and still a touch wet in the middle. The middle might even still jiggle a bit, which is okay - this pie must cool for a couple of hours before being cut, and it will continue to cook as it cools, and it will set up very nicely during that time.

Remove the pie from the oven and place on a cooling rack. As the pie cools, the surface will flatten out, losing the slightly domed look for a completely flat surface. Sometimes cracks will appear in the surface, but that's fine - doesn't change the flavour (and you can always fill them with whipped cream if you like).


Wait a minimum of two hours before slicing and serving. Excellent with a cup of coffee, or a glass of bourbon. If you like, feel free to add a little whipped cream (or a lot).

Cover leftovers well with plastic wrap and refrigerate for up to three days.

September 20, 2015

Lye Water Bagels


Bagels always sounded like a lot of work. First you have to make the dough, then let it rise, shape, boil (!), and finally bake. And then there's the lye water, which is a separate sort of anxiety on its own. Lye is caustic and requires careful, safety-forward handling, which raises a additional barrier to being motivated enough to begin.

Happily, although there are lengthy-process recipes out there, you can absolutely make delicious bagels in only a couple of hours. I started these after breakfast, and we ate them for lunch.

I scoured around the internet for recipes, and finally hybridized the likely-looking ones into the recipe below. These are made partially with high-gluten flour, but you could as easily use only white bread flour instead. The extra gluten in bread flour helps these bagels develop their trade-mark chewiness.

These are somewhere between the aesthetics of New York style bagels and Montreal style. I make no claims to authenticity, so if you're a style hard-liner, this recipe may not be for you. If you happily eat any kind of bagel you encounter, I hope you'll give this one a try.

Lye Water Bagels

Makes 8 medium-large bagels

300 mL water, heated to wrist-warm
1/2 tablespoon honey
20 grams raw sugar
7 grams active dry yeast
10 grams salt
200 grams high-gluten or bread flour (such as German flour type 1050)
200 - 300 grams all purpose flour

For boiling:
1 tablespoon lye water* (I get mine from an Asian supermarket)
12 cups water

For baking:
Cornmeal as needed
egg wash (optional)

This dough will be a very firm one, and I caution you not to all all of the flour at once, lest you make it too firm. I was a little careless myself, and added a bit more flour than I should have. The end result was that I had a tough time shaping my bagels, and one of the hand-looped ones came apart during boiling (it was still delicious).

Pre-warm the oven so that the dough will have a nice warm place to rise.

Into a large mixing bowl, dissolve the honey and sugar in the warm water. If the water is a bit hot, let it cool until it's pleasantly warm but not hot against the wrist. Sprinkle the yeast over the sweet water, and wait until it proves itself by foaming up and smelling yeasty.

Add the 200 grams of high-gluten (or bread flour) and the salt, and beat vigorously with a wooden spoon until it is nice and smooth. Add 200 grams of the all-purpose flour, and stir it in, turning it out onto the work surface eventually, to knead it all in. If needed, add the remaining 100 grams flour a little at a time until you have a stiff dough.

Knead the stiff dough for 10 minutes, either by hand or with a very sturdy stand-mixer. If you are kneading by hand and are having a tough time, clean your hands thoroughly and oil them before continuing to knead. After ten minutes, smooth the dough into a compact ball and return it to the mixing bowl, which you have cleaned and lightly oiled. Roll the dough around in the bowl so that the surface of the dough picks up some of the oil. Cover the bowl loosely with plastic wrap, and let sit until the dough has doubled in size - about an hour.

Preheat the oven to 450 Fahrenheit, with a rack in the middle slot.

In a large pot (I used my Dutch oven) on the stove, heat the 12 cups of water until boiling, and then add the lye water just before you add the bagels.

While the water is heating, shape your bagels. Squeeze the excess air out of the dough, and then divide into 8 equally sized (more or less) pieces. You can shape your bagels by making a dough rope (or "snake") and looping it into a ring by wrapping it around your hand, pressing the ends together very firmly, or by making a smooth ball of dough and then forcing your thumb through the centre, gradually expanding the hole until the desired doughnut-shape is achieved. I tried both, but found the second method a bit easier than the first.


Prepare a plate or wooden cutting board with a thin layer of cornmeal. Also prepare a baking sheet with a thin layer of cornmeal for the oven stage.

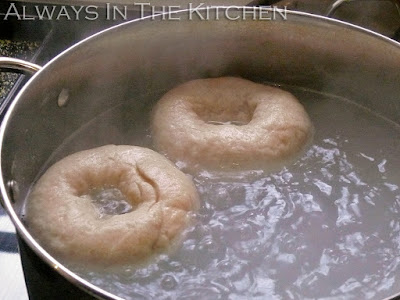
When the water is boiling, add the lye water, and then immediately add 2 or 3 bagels, carefully, by hand, and time them for one minute. After the minute, turn the bagels over, and boil for one more minute. Use a spider-tool to remove the bagels from the water, onto the cornmeal-covered cutting board. Add the next bagels into the water and start the timer again.


If you want toppings on your bagels - poppy seeds, or sesame seeds, or whatever - now is the time. Brush the tops of the just-boiled bagels with an egg wash, and press them upside-down into a plate of seeds/toppings. Place the bagels topping-side-up on the baking sheet.

Move all the boiled bagels onto the baking sheet, cornmeal-side down. Bake at 450 F for 10 minutes, or until nicely browned. Allow to cool for at least 15-20 minutes before eating.


We had ours with cream cheese, of course, and a heavy grinding of black pepper.


Once completely cool, bag up and store as you would any freshly baked bread.

*I should note that I may use more lye water next time, as I couldn't find a reliable guide to how much lye water to add to my boiling water. Most instructions assume you will be using a dry form of lye, which is more concentrated. A higher concentration of lye should make for a somewhat darker colour on the finished bagel.

September 13, 2015

Chanterelle Risotto


Late summer through fall is chanterelle season here in Germany. You will see market stalls piled high with Pfifferlinge, as they are called here, and you will see specials on the chalkboard of almost every restaurant: chanterelles with dumplings (especially a variety called Serviettenknödel), chanterelles with pasta, creamed chanterelles on toast, and of course, chanterelle risotto.

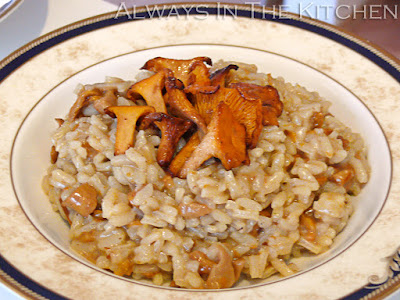
The secret to a nice mushroom risotto is not to overcook the mushrooms. I like to fry a few decorative ones in butter to set aside to use as a garnish, and then sauté the rest for the main risotto itself. By sautéing the mushrooms first, before anything else goes in the pot, it's easy to remove the lightly sautéed mushrooms to a plate to add back in later, so that they don't get that wrung-out squidgy quality that happens with overcooked mushrooms.

As always, everything that is not a feature ingredient in a risotto should be so finely chopped as to not exceed the size of a cooked grain of arborio.

Chanterelle Risotto

Serves 4

300 grams fresh chanterelle mushrooms
4 tablespoons salted butter, divided
2 shallots, finely minced (or small onions)
2 cloves of garlic, pressed or microplaned
220 grams risotto rice (I'm using Baldo here, but arborio is fine)
1/2 cup dry white vermouth (or dry white wine)
1/2 teaspoon coarse sea salt or Kosher salt
4 cups warm vegetable stock/broth (or mushroom stock)
juice of 1/2 lemon
1/2 cup freshly grated parmesan cheese

Clean your mushrooms and set aside the ones you want to use for garnish. Remove hard stem-ends from the rest, and roughly chop. Finely chop your shallots and press your garlic. Measure out everything else and have it standing at the ready.

In a large pot, such as a Dutch oven, heat 2 tablespoons of the butter and quickly fry the chanterelles reserved for garnish. Set aside, and then add the rest of the mushrooms to the pot. Sauté briefly, then set aside in a bowl until the risotto is almost finished.

In the same pot, add one more tablespoon of butter, and then add the shallots and garlic. Stir and sauté until slightly translucent, and then add the rice, stirring well to make sure none of the grains stick and burn. When the grains of rice are all coated with the butter and they start to catch at the bottom of the pan and a little golden colour starts creeping in to the bottom of the pan, add the vermouth (or white wine), all at once. Stir vigorously to make sure everything is scraped up from the bottom. Add the salt, and stir through.

The vermouth will disappear pretty quickly, so be prepared to start ladling stock into the rice. Use a small amount at first, just adding a little at a time, stirring well over medium heat, and waiting until most of the liquid has been absorbed before adding more.

When you are halfway through your stock, stir in the lemon juice. Continue to stir and add stock until you have no more liquid to add, and then return the reserved chopped mushrooms to the pot and gently stir through. Add the final tablespoon of butter, and stir through. Turn off the heat, cover the pan, and let stand for 5 minutes. Remove the lid and stir in the parmesan cheese. Spoon into shallow bowls and top with the reserved fried mushrooms, and maybe a little extra sprinkle of parmesan.

August 26, 2015

Chicken Tikka Masala


There are a lot of origin stories about Chicken Tikka Masala, and a lot of claims to ownership. As far as I can tell, there's no way to even verify which country the dish originated in, let alone the specific claimant.

Some folks will tell you that this is not a proper curry, but that is quite ridiculous. It may not be a historical dish, but it's in no way illegitimate because of that. It's delicious and acceptable and popular. At it's heart, it is derived from an Indian tandoori dish called Chicken Tikka - marinated chicken cooked in a tandoor (Indian clay oven), although according to Wikipedia, the Punjabi version is simply cooked over coals. The chicken is usually marinated in yoghurt and spices, and is typically cut into chunks and cooked on skewers. Where the masala bit comes in, is when you take a perfectly good (or maybe a little dry?) Chicken Tikka, and simmer it gently in a spiced tomato sauce, enriched with yoghurt at the end. There are, of course, many iterations, including one of the origin stories, which claims that an undiluted can of Campbell's Tomato Soup was the base of the sauce.

There is likely no place on earth where Chicken Tikka Masala is more popular than the UK, where it appears to be fast approaching (or even edging out) the traditional Sunday roast as most beloved national dish. You can get Chicken Tikka Masala pre-packaged sandwiches in the Tesco, which gives you an idea of the market penetration of the dish.

Versions of Chicken Tikka Masala that are made using commercial Tandoori paste often have a pink tone to the gravy and the outer surface of the chicken itself. Since that is derived using a food colouring that I don't usually have in my kitchen, I skipped it and simply went with a turmeric-forward spice mixture that is often used for Chicken Tikka. If yours must be pink, skips the spices listed below in favour of the commercial paste, and slather the chicken pieces liberally with it.

I don't have a tandoor oven, which is probably no surprise, nor do I have a kitchen set-up conducive to cooking with coals. This is my home kitchen version, adapted from many different sources, but this one from Palachinkablog in particular.

Chicken Tikka Masala

Serves 4

2 tablespoons ghee or vegetable oil, divided
400 grams boneless chicken, in chunks
2 tablespoons turmeric
2 tablespoons ground cumin
1 tablespoon cayenne
1 teaspoon ground coriander seed
1/2 teaspoon kosher salt
1 large onion, grated
4-5 cloves garlic, pressed
1 inch fresh ginger, grated
500 mL tomato passata (or unseasoned tomato purée)
1/2 teaspoon sugar (optional)
1 cup full-fat plain yoghurt
1 tablespoon cornstarch

As always with Indian food, prep your mise en place completely before you start cooking. Put your basmati rice on to soak in its cooking water, too. Start to cook the rice just before you start to cook the chicken (unless you are using a rice cooker, in which case, time it to be ready when the chicken is done - about a 35 minute total cook time).

Combine all of the dry spices except the salt, and toss the chicken pieces in the mixture until they are all nicely coated. Set aside. You can do this in the morning, or at any point during the day, but bring back up to room temperature before cooking.

In a large skillet or a dutch oven, heat half the oil or ghee very hot and sear the chicken in batches, without cooking through, and remove the chicken to a holding plate as you go. When all the chicken is seared, add the rest of the oil and the grated onion, pressed garlic, and grated ginger, and any accumulated juices therefrom. Stir and scrape the pan, add the salt, and continue sautéing the onion mixture for about 5 minutes or so until just tender. Turn down the heat to medium-low and add the passata, and stir and scrape to ensure that the bottom is free of any stuck-on bits. After a couple of minutes, taste the sauce. If it is a little bitter from the tomato addition, add the sugar. If not, just proceed.

Add the seared chicken (and any residual spices) into the sauce, and turn the heat to its lowest setting. Let the chicken simmer very gently for 15 - 20 minutes. Take the pan off the heat. Combine the yoghurt and cornstarch and stir until smooth. Add a bit of the tomato sauce to the yoghurt, and stir it in, before adding all of the yoghurt mixture into the dutch oven. Stir through, watching to colour lighten and turn orangey. Cover and let the residual heat cook the cornstarch for about five minutes - just enough time to fry up some Indian-spiced Cabbage on the side, or make a fresh chutney or maybe a grated carrot salad, since your grater is already out. Your rice should also be done (and waiting patiently). If you happen to have some cilantro on hand, that would make a very nice garnish.

August 03, 2015

Southern Spoon Bread


It has been a long time since I last made Southern Spoon Bread, which is an egregious oversight. This is one of the few recipes that I still have from my teen years, handwritten on a 3x5" index card, from when I realized that I should make my own copies of all of my favourite recipes. After making it today, I'm reminded how much I like it, and what an interesting option it can make to round out a dinner. Or a breakfast. Or a snack.

Southern Spoon Bread is a kind of cornbread, or a kind of baked polenta, or maybe a kind of soufflé; maybe it's all of these things.

It is leavened solely with beaten egg*, which gives it a moist, wobbly, delicate texture when it first comes out of the oven, as well as a soufflé's tendency to deflate almost immediately. Made without wheat flour, it is naturally gluten free (check your own cornmeal supply to verify, of course, if that's a concern), and it is so tender and soft that you need a big spoon to serve it up -- it won't hold its structural integrity well enough to slice in a more conventional manner.

Southern Spoon Bread

Serves 4 - 6

1 cup yellow cornmeal
1 3/4 cups water
1/2 teaspoon salt
2 teaspoons butter
1 cup milk
2 eggs, separated, whites beaten to soft peaks

Preheat your oven (rack in the middle slot) to 375 F / 180 C. Butter a 2 quart capacity shallow baking dish - I used a 7x11" Pyrex dish.

Separate your eggs, putting the whites into a large-enough bowl that you can use a whisk or mixer to beat them until they are soft peaks, and setting the yolks aside into a separate small bowl.

In a medium saucepan or cooking pot, heat the water over medium heat until just simmering. Add the cornmeal in a steady stream, whisking constantly, until smooth. Add the salt and continue to whisk and cook until the mixture becomes stiff and thick. Remove the pan from the heat, add the butter and roughly half of the milk, and continue to whisk until smooth.

Add the remaining milk to the egg yolks, and whisk until smooth, and then add the yolk/milk mixture to the cornmeal mixture, and whisk it in until the mixture is completely smooth and everything is integrated.

Add the beaten egg whites to the cornmeal mixture, and fold the mixture gently with a wide spatula until the egg whites are thoroughly incorporated without any clumps. Bake, uncovered, for 30-35 minutes, or until puffed up and golden on top.

Serve immediately, spooning the bread onto individual plates.

If you have any leftover spoon bread, once it cools and sets more firmly you can slice it and fry it up in a skillet. You can serve it for breakfast (with or without syrup) or dinner alongside your main course.

*My original recipe is hardcore Southern-style, and does not call for the eggs to be separated, simply beaten well. If you choose this method, you might want to bump your oven temperature up to 400 F/200 C to ensure it puffs up nicely.

July 18, 2015

Chickpea & Carrot Salad with Tahini Dressing


We're well into salad season. Every thought of actually cooking something when the temperature keeps spiking outside is accompanied by a shudder, and a look around for alternatives. Alternatives such as letting someone else do the cooking, perhaps, or maybe just preparing something that doesn't require heat.

This simple salad works really well as a dinner salad, or as a take-to-work/school lunch, takes very little time to prepare, and lets me continue my love affair with tahini unabated.

You could, of course, cook the chickpeas yourself, in which case do that however you like best. In the interests of a no-heat meal, however, this recipe is made with canned chickpeas (or, if you've got some home-cooked ones stashed in the freezer, by all means use those instead).

Chickpea & Carrot Salad with Tahini Dressing

Serves 2

1 400 gram can of chickpeas/garbanzo beans, drained and rinsed
50 grams of grated carrot (about 1 medium)
1 green onion, finely sliced
1 cup loose-packed cilantro, washed and roughly chopped

Tahini Dressing (only half needed for this recipe)

3 tablespoons tahini (stirred well)
1/2 teaspoon salt
Juice of half a lemon
1 clove garlic, pressed or pureed
1 tablespoon olive oil
cold water, if necessary, to made a thick salad-dressing consistency

This should all be pretty self-explanatory. In a large bowl, combine the salad ingredients (I hold the cilantro to the very end, though, and add it after the dressing).

In a small bowl, combine the dressing ingredients, mixing well with a fork (or one of those mini-whisks, if that's what you like). I didn't need to add water, here, but if you find your dressing is too thick or is clagging up (as often happens if you're down at the bottom of the tahini jar), add a little cold water, a tablespoon at a time, and stir until it becomes creamy again.

Add half the dressing to the chickpeas, carrots, and green onion, and stir through. Add the cilantro, and stir through again. Serve immediately, or transfer to a sealable container and chill until you're ready to eat.

If you happen to live near a Turkish bakery, or are feeling extra industrious and unafraid of baking during the heat, I highly recommend picking up a nice cheese or spinach gözleme (soft flatbread with baked-in filling) to have alongside this.

July 12, 2015

Chicken Plov — Chicken and Rice, Uzbek Style


I always associated plov with Russian cuisine -- partly because it has been adopted as the pilaf of choice for much of the former USSR, and partly because there were very few restaurants in my hometown (or, later, the city of Vancouver) featuring cuisine from Eastern Europe or Central Asia. Russian, you might be able to find in the city (or more likely, a blend of Russian and Ukrainian dishes), but not much luck trying to find restaurants featuring Georgian, Kyrgyz, or Uzbek food.

Plov, as it turns out, is ultimately a traditional Uzbek dish. By any other name, it might be palov, polov, or pilav, or perhaps more recognisably pilau, pulau, polow, pilaf, or almost any other spelling imaginable. It is considered a manly sort of dish to cook, the making of which can take on similar cultural overtones (sometimes similarly proprietary) to the idea of the masculine art of barbecue in North America. Traditional Uzbek plov is made with lamb (or mutton), which necessitates a long simmering time before the rice is added, to ensure that the lamb is tender and the connective tissues have all melted into an unctuous, satisfying texture. However, you can also make it with beef, and increasingly it is being made with chicken, whose speedy cooking time means the dish is on the table much, much faster. It is also easy and delicious, which are the only reasons that you need, to decide to make it.

Chicken Plov

Serves 4

400 grams boneless skinless chicken
1 head garlic plus 2 cloves
1 medium onion, finely diced
1 large or 2 medium carrots, grated
2-3 bay leaves
1 teaspoon ground cumin
1 teaspoon ground coriander seed
pinch ground turmeric
1/2 teaspoon white pepper
1/2 teaspoon coarse salt (optional)
1 tablespoon olive oil
1 tablespoon duck fat (or more olive oil)
200 grams long grain rice
2 cups (500 ml) heated chicken broth or stock
1 - 2 tablespoons vodka

Finely chop the onion and 2 cloves of garlic. Slice the chicken (thigh is best, breast is also fine) into bite-sized chunks. Peel (if necessary) and grate the carrot coarsely. You could julienne the carrot if you prefer. Remove the outer layers of paper from the head of garlic, leaving the head whole, but the cloves still encased in one layer of skin. Use a very sharp knife to slice off the tip of the head of garlic, and set the whole head aside (tips can be added to the onions and chopped garlic).

In a medium-large pot or wok (the one I used is probably a little too big for this amount of food, and would have been perfect for a double recipe), heat the olive oil over a medium heat until just shimmering. Add a third of the chicken in a single layer, and let sizzle for 30 seconds or so before you stir through once, push the cooked pieces to the outside edge, and add the next third of the chicken. Continue until all the chicken has been lightly seared on at least one side, and remove to a holding plate.

Into the emptied pot, add the duck fat, the onions and minced garlic, and the salt (if your broth or stock is quite salty, you might want to omit the salt). Sauté until the onions start to change colour, and then add the carrots. Continue to sauté, and add the bay leaves, turmeric, white pepper, ground cumin and coriander. Stir and cook for a few minutes, until the carrots are wilting down nicely. Deglaze by adding the vodka to the pot, and scraping up any flavourful bits that might be stuck to the bottom.

Return the chicken to the pot, along with any juices that have accumulated on the holding plate. Pour the uncooked rice evenly over the chicken, smoothing it flat, and then gently pour the hot broth/stock/water over the rice, being careful not to disrupt the surface any more than is necessary. Smooth the rice a little again, if you need to.

Take the prepared head of garlic and plunge it cut-side down into the rice, leaving the root-end sticking up just a little. As soon as the liquid is starting to bubble a little, cover the pot with a tight-fitting lid, turn the heat to the lowest possible setting, and let cook undisturbed (no peeking!) for 17 minutes. When 17 minutes is up, still without lifting the lid/peeking, turn the heat off completely, and remove the pot to a resting place (a pot holder, or an unheated burner) for another 17 minutes. This time, when the 17 minutes is up, you are ready to serve.

You can upend it onto a fancy platter, or you can simply stir it through and spoon it into shallow bowls.It should be moist and fragrant, but not overly wet. Remove the garlic first, and squeeze the tender, fragrant cloves of garlic out of their skins by putting pressure around the base, scattering the cloves over the rice or dividing them amongst serving dishes. Some preparations call for a whole head of garlic per person being served, but I'll leave that up to your discretion. I've served it here with Ukrainian pickled tomatoes.


Leftovers reheat beautifully.