There isn't much about the pig that I don't like, culinarily speaking. I'm a huge fan of pork tenderloin, which is about as low-maintenance a piece of meat as you can find - tender, lean, boneless, and I'm very fond of ham dinners, as well - preferably from a nice, country-cured red ham, but I'll take an Alton Brown-style city ham with gingerbread crust, too. However, while I do pork chops, tenderloin, ribs, ham, and all manner of sausage (and I've roasted a pork loin or two), I've never really tried my hand at the classic Roast Pork. I recently decided that it was high time I did.
If there is a culture that is pre-disposed towards expertise in the roasting of pork, it is Cuba. Roast pork sandwiches are a national dish, after all - either as "cubanos" or the smaller, snacktacular "medianoches". Where does the pork come from for these ubiquitous favourites? From a nice, seasoned roasted pork shoulder. The Cubans call it "pernil".
Start with a lesson from the best, I say!
I staggered back from the grocery store with a whopping (to me) 5.5 lb. boneless pork shoulder roast, and proceeded to do the following:
Cut some deep, short cuts into the roast (think shallow stabs with a pointy carving knife). Slather thoroughly with marinade, allow to rest, covered, at room temperature (but in a sealed environment, in this case my cold microwave) for three hours, then roast fatty-side up in a 350 F. oven for 3 hours (covered with tinfoil), uncover, remove juices to make gravy, and roast at 400 F. for another half-hour until dark golden brown. The internal temperature for those counting such things, was 170 F., which co-incidentally is the "pork/veal" setting on my probe thermometer. Allow to stand for fifteen minutes before roasting - which gives you more than enough time to make gravy.
And do, please do, bother to make gravy. A little roux, a little wine, about half of the juices from the pork, and a little water is all you need - no further seasoning required. Not only is it lovely on the black beans and rice that you should be serving with this, it makes an excellent medium for re-heating slices of pork for dinner the following day (assuming, of course, that it isn't all going to be et at once, or saved for cold sandwiches).
The pork was meltingly tender, thoroughly seasoned, and wonderfully flavourful - and possibly, even better the next day, re-heated in its gravy.
I should mention that classic pernil is made with a shoulder that is skin-on, to give a wonderful crackling, but that option was not available to me.
Here is the marinade:
4 cloves garlic
5 teaspoons kosher salt
1 tablespoon black peppercorns
1 handful fresh oregano leaves
All pounded to a smooth grey-green paste in the mortar & pestle, to which is then added: 2 tablespoons white wine vinegar, and 3 tablespoons vegetable oil.
This definitely requires an encore performance, and soon! Because it serves a lot of people, it would be perfect for a casual dinner gathering, so that might be just the thing.
November 22, 2008
October 11, 2008
Chocolate Peanut Butter Granola
I know that I may be getting a little bit repetitive. I'm guilty of kicks, jags, and culinary obsessions, and I make little effort to get over it. But, when faced with the need for more granola to make it through my workday mornings, I thought...why not add chocolate and peanut butter to it?
Oh, yeah.
Essentially, that's exactly what I did. I took the recipe for Pirate Granola, and used a half-cup of smooth organic peanut butter instead of a quarter-cup oil. Then I sprinkled it fairly liberally with Cocoa Camino's organic dark cocoa powder, and let it ride. My regular granola is a lot less sweet than most versions that I've tried, and since I didn't add extra sugar for this version, it's about as non-sweet as you can anywhere. My co-workers pronounced it suitable for sprinkling on yoghurt, but I just eat it by the handful, while I work.
When I was looking at various recipes for chocolate granola, I considered Nigella's. She suggests that raisins have no business in a chocolate granola, and having flouted her advice, I suspect she's actually right. When I make this again, in oh, say, three or four granola-cycles from now, I will omit the raisins. I may, in fact, opt for whole peanuts instead of my favourite almonds, just to heighten the whole peanut-factor. We shall see - my granola making does tend to be a bit mood-driven (not to mention what's-in-the-cupboard driven).
I did notice that this version of granola had more clusters than my Pirate Granola, which I suspect is a function of peanut butter's inherent stickiness. Clearly, more research is required.
September 27, 2008
Vegetarian Pizzas
I don't have any revelations about vegetarian pizza, really. I haven't found some new, hitherto undiscovered topping that requires me to shout from the rooftops. I've just been reminded that sometimes the simple things are really, really good.
The pizza above has those most classic of vegetarian pizza toppings: artichoke hearts, roasted red peppers, good black olives, and cheese (in this case, a nice Monterey Jack), and a slightly spicy, garlicky tomato sauce. I refrained from adding more and more and more toppings, which used to be my pizza downfall, and let the combined flavours hum along in harmony.
The pizza below, is a very, very simple pie based on my memories of post-nightclubbing slices devoured at a long-departed establishment that stayed open until 3:00am downtown. The deceptively simple pesto pizza. Really, all you need is a good, home-made crust (expired link removed, please see comments below for recipe), and a good, home-made pesto, and the cheese of your choice. No tomatoes. No chunky bits. Just you and the pesto and the crust. For cheese, I opted to use some of the Jack (as above), and some parmesan, which is simply a component of the pesto. You don't need a lot of cheese - and you will need to shore up the edges of your crust a little to avoid spill-age if your crusts get any oven-spring lift to them. Just smear the pesto on, sprinkle the cheese, and ignore the pang of sadness that you feel when the beautifully bright pesto turns dark, olivey green from the heat of the oven.
I've learned a thing or three about pizza crust, in the years that I've been, ahem, studying.
1) Don't add too much flour. A looser dough has better texture
2) It doesn't matter if you forget to add salt to the crust, just sprinkle a little on the dough before you add the toppings (or use salty toppings, like feta).
3) The longer and slower the rise, the better the crust - airy, chewy, complex and delicious.
The two pizzas above were made with a batch of dough that was stirred up just before heading out to meet some friends for drinks. I only used a small amount of yeast (1 teaspoon for a double batch of dough, whereas many recipes - including my master recipe - use up to a tablespoon per pie). Three hours, on the counter, later, the dough was well-risen, soft, pliable, and ready to be stretched into shape. I can actually toss pizza crust, but generally I just pat it back and forth in my hands, like a chapatti, until it is big and round, and then flop it on a cornmeal-lined pizza pan and finish pressing it out to the edge.
I'm definitely going to try the low-yeast, slow rise thing again - it has wonderful schedule flexibility potential, and I feel the urge to experiment a little. Next time, maybe some other classics: pepperoni mushroom, perhaps (always a favourite), spinach and feta, or my personal guilty-pleasure - the cheeseburger pizza.
Labels:
Pizza
September 11, 2008
A Soup For All Seasons: Borscht
I had just about given up on summer. Before this glorious September sneaked up on us, I was frantically soaking up as much sunshine and warmth as I could, trying to store it up for the depths of December, when I would most miss it. I started, as the weather started to turn to wet, to make soup.
Borscht is one of those dishes that engenders strong opinions in its adherents. Should it be beets alone, or with cabbage? Should there be meat stock, or should it be vegetarian? Carrots? Do you add wine, or just vinegar? Should it be hearty, a meal in itself, or a starter for cabbage rolls, pyrohy, and sausage? Should it be hot or cold? Chunky, or smooth? Truth is, you can serve it any way you like. Cold and pureed in the summer, hot and chunky in the autumn and winter, clear, spare and delicate in the spring. There isn't a season that doesn't have its borscht.
The funny thing is, most folks who acknowledge their love of a good bowl of borscht like the variations just fine...they simply may not consider them to be proper. You know, the grail borscht, the standard from which all others are merely delicious anomalies.
My favourite version comes from Diane Forley's lovely work Anatomy of a Dish which is required reading for the botanically inclined cook. I haven't altered it much at all, going with the full cup of red wine and full cup of red wine vinegar, but I've cut the sugar down to a lean 1 tablespoon, whilst she allows (gasp!) as much as 2/3 of a cup, which I think is the short train to crazyville. Beets, especially roasted ones, are quite sweet enough. However, she gets my big seal of approval for eliminating much of the tedium of borscht making - she doesn't grate or chop the raw beets. She roasts them, skin and all, and when they are done you can simply slip the skins right off. If you have roasted them a little more al dente, so to speak, you may need to grasp the roasted (and cooled) beet in a clean cloth, such as a washable jaycloth, and briskly rub to remove the skins. I do so under running cool water, which minimizes any potential mess. It is marvelously easy - and has less waste than using a vegetable peeler.
I also note that Forley suggests that this recipe serves 8. What she doesn't mention, is that this would be eight starving farmhands. If you're simply serving it as a generous appetizer, it would easily serve 20. It's a lot of soup. My freezer is now full of it, in fact. But, really, there's no sense in making a tiny pot of borscht. Go big, and dine off it for a couple of months.
Borscht
adapted from Anatomy of A Dish, by Diane Forley
Serves 8 (farmhands).
1½ lbs. baby beets, roasted, peeled and diced
2 onions, diced
2 celery stalks, diced
2 carrots, diced
¼ head red cabbage, sliced
2 tablespoons olive oil
4 cups chicken stock
4 cups water
1 cup red wine
1 cup red wine vinegar
1 tablespoon sugar
1 cinnamon stick
2 cloves
1 bay leaf
1 sprig of fresh thyme
1 waxy potato, diced (Forley recommends a russet, but I find them too mealy)
To roast the beets, seal them in a foil pouch with a spritz of olive oil, and roast at 400° F for approximately 1 hour, or until a knife slides easily into one. Remove, allow to cool for fifteen minutes, and rub the skins off under cool water. Dice and set aside.
In a large Dutch oven, sauté the onion, carrot, celery and cabbage in the olive oil with a little salt and pepper until vegetables soften and become translucent. Add the diced beets, stock, water, spices/seasonings, sugar, wine and wine vinegar. Bring to a gentle simmer and allow to cook for 15 minutes. Add the potato and allow to cook for another 15 minutes. Taste, re-season as necessary, and serve. If you're a fan of dill, sprinkle some over each bowl, but it certainly doesn't need it.
A note on dicing: beets do not shrink down, so dice them to the size you want to find in your spoon, when you are eating.
August 31, 2008
Last Rays of Sunshine (Paella with Tomatoes)
It has not been a stellar summer, here in the permanently damp Pacific Northwest. August, usually our go-to month for griping about the heat and languishing over drinks on patios about town, has been a disappointment most of the way through. So, now that the sun has come out again, however briefly, and given that it's the end of August, it seemed like a good idea to go for a dish that in itself evokes sun-drenched days and summer lassitude. I'm talking paella.
I have never made paella before. It's one of those dishes that seems a bit scary, all fraught with rules, and despite having spent a couple of weeks in Spain, I'm not as familiar with Spanish cuisine as I might be. It's not a well-represented style, around here. However, I do remember from my travels that I encountered many a diverse dish that all claimed to be a type of paella, which encouraged me that there are a variety of acceptable variations - and probably some devious restaurateurs who will call anything made with rice a paella to get some tourist dollars.
In the spirit of full disclosure, the dish that I made would probably properly be designed an "arroz" in Spain, because a) the pan it was made in (not a proper paella pan, simply a big ol' non-stick skillet) and b) much of the cooking time is spend in the oven. Not, therefore officially paella, even though its oven-time was uncovered, to allow the dish to roast, as opposed to steam.
The recipe I chose to take a whack at is none other than Mark Bittman's Paella with Tomatoes. It promised to be fairly quick and painless, and that is exactly what I was looking for. However, since I wasn't serving vegetarians, I decided to meat-it-up a little. My brief search for serrano ham was unfruitful, so I settled for thick-cut lean prosciutto, which I then cut into matchsticks (or rather, Palle cut into matchsticks, since cutting anything is hard for me these days), and rounded it out with a half-pound of large, raw prawns. I also added some sliced green olives (which had been stuffed with garlic, yum) because the flavours just seemed to go.
Other than that, I followed the linked-above recipe fairly closely. I added the matchsticks of ham with the onions, I tossed the sliced olives with the raw tomato wedges (heirloom tomatoes, an orange brandywine type and a green zebra), and I added the peeled prawns to the top of the pan when it had just seven minutes left to go in the oven. The only real divergence from the recipe methodology was to add the saffron to the warmed veggie stock, as opposed to simply plunking it in with the tomato paste.
I learned a few useful things:
One, I used too much saffron. My version of a large pinch may have been just a smidge too large. It didn't render it inedible, or even unenjoyable, but for future reference, a medium pinch would be better. There is a very slight bitterness to saffron, which becomes exacerbated when used in too-great a quantity. A little goes a long way.
Two, I should have tossed the shrimp with a little of the olive oil and maybe a dab of paprika, before adding them to the pan. While they were plump and delicious, they did sit on top looking a bit like an after-thought. A little pre-emptive anointing would have taken care of that beautifully. When I was in Spain, the prawns that arrived on a paella were inevitably in head-on fashion, but I wanted this to be simple to eat. If I had left the prawns at least in their shells, however, I could have added them with the tomato layer at the beginning of the oven time, and they would have integrated into the dish a bit more.
Three, while heirloom tomatoes make a very sexy salad, there's something unsettling about green tomatoes coming out of the oven. Not a huge objection, but I found myself thinking that red tomatoes might have been more beautiful.
Four, the quality of the olives counts. Enough said.
Five, the slightly caramelized roasted tomatoes were fantastic. I wouldn't dare try this with insipid supermarket orbs.
With all of those things in mind, it is really only a matter of time before I make this again, incorporating my new-found experience and, since it produces such a lot of food, maybe even for guests.
August 12, 2008
Gluten-Free Granola Bars
I'm taking advantage of the cooler weather today to make Pirate Granola, which I have already shown on this site, so I thought that I would share this picture that has been lurking around my hard drive, waiting for its chance.
After the success I had with the granola, I decided to take a whack at granola bars. Of course, I turned to trusty Alton Brown for help. His recipe on the Food Network website looked like a great place to start, so I did.
Making this dish gluten free was actually pretty easy, providing you can get "clean oats" which are certified gluten free. If not, you might want to try substituting quinoa flakes, but I haven't tried that yet. Alton's recipe called for wheat germ, for which I substituted besan, a gluten-free chickpea flour used in Indian cooking.
It made quite a lot of granola bars, actually. See the link above for the original recipe.
Granola Bars
Adapted from Alton Brown's recipe on Food Network
2 cups old-fashioned rolled oats
½ cup raw pumpkin seeds
1 cup sliced almonds
½ cup chickpea flour(besan)
½ cup honey
1 tablet of palm sugar (approximately ¼ cup packed dark brown sugar)
1 tablespoon unsalted butter, plus extra for pan
2 teaspoons vanilla extract
½ teaspoon kosher salt
6 ½ ounces (total) raisins and chopped dried apricots
Butter a 9 x 9-inch glass baking dish. Preheat the oven to 350° F.
Spread the oats, pumpkin seeds, almonds, and besan onto an edged baking sheet. Toast in the pre-heated oven for about 15 minutes, stirring occasionally.
Combine the honey, brown sugar, butter, extract and salt in a medium saucepan and place over medium heat. Cook until the sugar has completely dissolved.
Once the oat mixture is toasted, remove it from the oven and reduce the heat to 300 degrees F. Immediately add the hot oat mixture to the liquid mixture, add the dried fruit, and stir to combine. Turn mixture out into the prepared baking dish and press down (firmly, but not insanely firmly) to distribute the mixture evenly. Bake for 25 minutes. Remove from the oven and allow to cool completely.
You may need to lever the entire thing out of the baking dish with a spatula in order to cut it, that’s okay. Cut into squares and wrap well in waxed paper. Store in an airtight container in the fridge for up to a week, or freeze for a month.
July 27, 2008
Spanish Meatloaf
I don't recall eating any meatloaf in Spain. I do recall albondigas, the wonderful little meatballs, which I mostly encountered as tapas in Barcelona. This is different. This was inspired by a rather successful (if you don't count me pretty much scorching the buns) dinner of Spanish-inspired pork burgers, the recipe for which was in Eating Well magazine. I greatly enjoyed the flavours of the finely chopped Manzanilla olives and the earthy saffron. It was as different (in a good way) a burger as I'd had in a very long time.
Since, a few days later, I still had a quantity of both sautéed onion rings and lemon-saffron mayonnaise left from the original dinner, I decided to redux the dinner. However, instead of the potato salad that I served with the burgers, I went with an orzo-chickpea salad with lemon dill dressing, and instead of fussing around with individual burgers, I made the whole thing into a meatloaf, so I could have leftover slices for sandwiches.
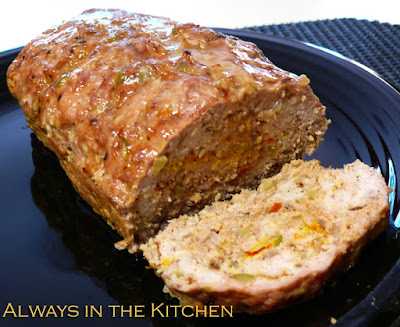
I was unable to find sufficiently lean ground pork on this particular shopping excursion, so I settled on half medium pork and half ground turkey, which also turned out to be pretty delicious. I also decided to actually add some saffron right into the meat mixture, which is what gives the little swirls of vibrant yellow that you can see in the photograph. The flecks of red are diced pimento. It worked very well: the flavours stayed true to the original recipe, the meatloaf was moist and tender - partly thanks to the well-minced sautéed onions.
It was fun, a little different, and definitely in the running for repeats. I may even decide to make them into little albondigas, and serve them as a party snack - with a little dipping sauce made from the lemon-saffron mayonnaise, on the side.
Labels:
Pork
July 12, 2008
Salad Days Are Here Again (Sesame Peanut Noodles)
I love interesting salads, and summer seems to be the time when they really come out to play. I've made much of lentil salads, and couscous or quinoa salads, and of course the ever-beloved potato salads and pasta salads.
Sometimes a salad is really all you want for dinner, on hot, summer days, something light and refreshing and vegetably. There's a lot of ways to get your fix. Greek and Turkish chopped salads are always a good side dish for food cooked on the grill, or to add a civilized touch to a burger feast. The ingredients generally vary from cook to cook, based on individual preferences, and once you find the ways that speak to you, they become ingrained. It can be a challenge, sometimes, to accept someone else's version of something you love, but that's a whole different story.
The salad above is the Sesame Peanut Noodles from Nigella Express, from which I have already made a number of recipes, generally to good effect. This was no exception.
I had to fiddle a couple of things, because my peanut butter was a little on the dried-out side, so I needed to add a little more oil and a little warm water to sufficiently lubricate the ingredients into a sauce consistency. I also don't stock sweet chili sauce, so I simply used sambal oelek and a tiny drop of honey to balance its heat.
I also didn't blanche the vegetables, which may or may not have made a huge difference - I may try it that way next time, just to see what difference it really makes, but at the time I just wanted to get on with things. I did slice the peas, though, because I thought they would integrate better that way; I think I was right. I used fresh steam noodles from the grocer's, and cooked them as directed, since the already-cooked noodles looked a little too oily, for my tastes, and it worked just fine.
Finally, and you won't see it in the picture, because the photo is of the stash relegated to the fridge (it does indeed make rather a lot of food, this recipe) and I wanted it to be available for the vegetarian staying with us, I added some sliced chicken from a chicken breast that I quickly sauteed while everything else was going on. The chicken was a definite hit, and made the dish very much into a suppery sort of affair. I would do that again in a heartbeat, because I love the way the chicken soaks in the sauce, and the combination of the bright lime juice and vegetable flavours against the sultry back notes of toasted sesame oil and peanut.
The leftovers were lovely to take to work the following day, as promised. This is one for my permanent summer salad rotation. Joy!
June 26, 2008
Coconut Ginger Noodles (with extras)
I've been wanting a good Coconut Ginger Noodle recipe for some time. Variations abound online, but they often contain strange ingredients, such as tomato paste, or look like a coconut-y version of Pad Thai, which is not what I was looking for, albeit more or less in the same family. I've been tinkering for a while now, and I've figured out a pretty nice recipe that can be made as a simple side dish or gussied up with shrimp and vegetables to make a full-on meal. Aside from the tedious peeling of the shrimp, if you're making it as a main course, this is very quick to make! However, the wonderful texture of using raw shrimp more than makes up for the fifteen minutes of drudgery.
Coconut Ginger Noodles
250 grams dry rice stick noodles
400 ml. coconut milk
1/4 teaspoon ground ginger
2 medium cloves garlic, crushed
3 cm fresh ginger root, grated or minced
3 - 5 kafir lime leaves (dry or fresh)
1/4 teaspoon ground lemongrass
1 red bird chile (Thai chile)
salt to taste
juice of 1 lime
1 green onion, finely sliced
pinch cayenne pepper (optional, if you want it spicier)
Bring a large pot of water to boil and have it standing by for the noodles. Don't cook them yet.
In a large skillet, over high heat, add the coconut milk, the white part of the sliced green onion, the garlic, ginger root and powder, lime leaves, lemon grass and a good pinch of salt. simmer for 5 to 7 minutes, uncovered, and allow the liquid to reduce. Taste the sauce (carefully!) and add more salt if necessary. Turn heat to medium-low and allow to continue to simmer. Add a little water if it starts looking too thick.
Drop the rice sticks into the boiling water and allow to cook for 3 minutes. While it cooks, stir the lime juice into the coconut sauce. Taste the sauce , and add a little more ginger powder, and the optional cayenne, if you like. Drain the noodles in a colander, then rinse with cold water to stop the cooking process and cool them down. Add the noodles to the coconut sauce, turn off the heat, and stir through carefully so that all of the noodles are coated with the coconut sauce. Garnish with the green part of the sliced onion.
Extras to make it a meal:
Shrimp: peel 450 g. of raw shrimp (frozen works fine, just soak them in cool water for a few minutes to loosen them up). Add to the coconut sauce just as you drop the rice sticks into their pot of boiling water. Stir them until they are pink on all sides.
Snow peas & red peppers: julienne a red bell pepper, and cut a good handful of snow peas each once on the bias. Add to the sauce at the same time as the noodles, and stir/toss through. No pre-cooking or blanching required!
June 20, 2008
Scottish Oat Bread
It's not bread in the sandwichy-way, which may be immediately noticable from the photograph. Rather, it's bread in the tea-time way, or perhaps in the ginger way. That is to say, in some ways, it bears a resemblance in taste and texture to old-fashioned, cake-style gingerbread (as opposed to gingerbread cookies), except that it doesn't contain ginger. Although, of course, you could add some.
This recipe dates back at least to the 1970s, when my mother acquired it from a friend (who was not Scottish, it should perhaps be noted) and immediately adopted it as a favourite. It may not be, in fact, Scottish, in the same way that the salad toppings we know as Russian or French dressing are not really Russian or French. Perhaps the presence of oats, or the combination of oats and molasses (although Scottish cuisine is heavier on treacle, than molasses) leads to the association.
2 eggs
2/3 cup blackstrap molasses
1/2 cup brown sugar
2 cups buttermilk or yoghurt
2 teaspoons baking soda
3 cups stoneground whole wheat flour
1 teaspoon kosher salt
1 teaspoon baking powder
1/2 cup rolled oats
1/2 - 2 cups nuts or raisins (optional)
In a medium mixing bowl, beat together the eggs, molasses, sugar, and buttermilk. In another bowl, mix all of the dry ingredients - the flour, oatmeal, baking soda, baking powder, and salt. Dump the dry ingredients on top of the egg and molasses mixture, and stir gently with a wooden spoon or spatula, just to combine. About half way through the stirring, add the raisins or nuts, if you like.
Divide batter between two lightly greased or oil-spritzed regular-sized loaf pans. Bake at approximately 350 F. for 35 - 45 minutes, depending on your oven. A toothpick or cake tester should come out clean.
Serve fresh and warm with a little butter, or cold with cream cheese.
I am aware that I am rambling.
This recipe dates back at least to the 1970s, when my mother acquired it from a friend (who was not Scottish, it should perhaps be noted) and immediately adopted it as a favourite. It may not be, in fact, Scottish, in the same way that the salad toppings we know as Russian or French dressing are not really Russian or French. Perhaps the presence of oats, or the combination of oats and molasses (although Scottish cuisine is heavier on treacle, than molasses) leads to the association.
However, the fact I have yet to see any recipe from Scotland that appears similar (with the possible exception of Broonie), does not mean that it isn't really Scottish, either. What really raises my suspicions is the fact that there is no added fat of any kind. No lard, no butter, no oil... only the naturally occurring fat in the eggs and buttermilk/yoghurt, really. Which just does not seem very Scottish, to me. Perhaps one of my kind readers can shed some light on whether this recipe does owe its heritage to Scotland or thereabouts - I encourage you to do so, as I would really like to know.
So, without further meandering, here is my mother's recipe for Scottish Oat Bread. It makes two squat loaves, stores well in fridge or freezer (or countertop, even, for about a week if it's not too warm/humid), and it makes a very tasty breakfast when toasted and lightly spread with cream cheese.
Scottish Oat Bread
2 eggs
2/3 cup blackstrap molasses
1/2 cup brown sugar
2 cups buttermilk or yoghurt
2 teaspoons baking soda
3 cups stoneground whole wheat flour
1 teaspoon kosher salt
1 teaspoon baking powder
1/2 cup rolled oats
1/2 - 2 cups nuts or raisins (optional)
In a medium mixing bowl, beat together the eggs, molasses, sugar, and buttermilk. In another bowl, mix all of the dry ingredients - the flour, oatmeal, baking soda, baking powder, and salt. Dump the dry ingredients on top of the egg and molasses mixture, and stir gently with a wooden spoon or spatula, just to combine. About half way through the stirring, add the raisins or nuts, if you like.
Divide batter between two lightly greased or oil-spritzed regular-sized loaf pans. Bake at approximately 350 F. for 35 - 45 minutes, depending on your oven. A toothpick or cake tester should come out clean.
Serve fresh and warm with a little butter, or cold with cream cheese.
June 12, 2008
Cheddar Cheese Risotto with Sausages
Upon seeing the original recipe ("Cheddar Cheese Risotto" in Nigella Express), I couldn't help but wonder what it would be like with a few sliced up smokies in it. I think it's the use of Cheddar cheese, which is often added so haphazardly to a variety of dishes without necessarily any cultural compatibility that made me think of it. Isn't that fusion, though? Perhaps it is the common-place nature of the default Cheese of Choice in North America, placed against the exquisite, attention-demanding princess of Italian cuisine, risotto. The neon-orange of the annatto colouring can sometimes be the harbinger of ill-considered, underwhelming cooking. I won't torture you with a scalloped potato recipe I was once encountered, which involved not just Cheddar as the preeminent ingredient, but a in the form of a canned, condensed Cheddar cheese soup.
Still, I have nothing but respect for Cheddar. I tend to keep a rather well-stocked cheese shelf, and Cheddar always has a place there, and a place in my heart. This is an enormously comforting dish, friendly and accessible to even the fussiest children, I would think, who might enjoy a new name, though...Picky Picky Princess Cheesy Rice?
Here's the recipe:
Cheddar Cheese Risotto
1 tablespoon butter
1 tablespoon oil
2 baby leeks or fat spring onions
300 grams risotto rice (such as arborio)
125 ml white wine (I used white vermouth)
1/2 teaspoon Dijon mustard
1 litre hot vegetable stock
125 grams cheddar cheese, chopped (I grated mine)
2 tablespoons chopped chives
Melt the butter and sautee the leeks until softened. Add the rice and stir around for a minute or so, then add the wine and mustard. Stir until the liquid is absorbed. Begin adding the stock, one ladle at a time, stirring after each addition until the liquid has been absorbed. When the rice is just tender (about 18 - 25 minutes, depending on heat), turn off the heat and add the cheese, stirring until it melts. Garnish with chives.
I've paraphrased the directions here, but they are pretty much the same as any standard risotto. For my part, I also seared three beef smokies and then sliced them quickly, stirring into the risotto right at the end. I used spring onions, but leeks would be better. Better still, a couple of shallots, but that does step away a little from the very ordinary nature of the dish. I'd say, use them if you have them, but otherwise, use whatever oniony goodness you desire.
If it were really a white trash risotto, I expect there would be some form of crumbled potato chip on top, and it probably be made with processed cheese, and cheap beer instead of wine. Ketchup, anyone?
I may joke about this dish, but it was absolutely delicious. We served it with broccoli, to give it a little vegetable consequence, but you could easily gussy it up to your own taste. Do give this a try, whether you have picky children or not. Nigella correctly places this in her chapter entitled "Instant Calmer" and it certainly does the trick.
Labels:
Rice
June 08, 2008
Rescuing the Spinach (Buffalo & Spinach Orzo)
I absolutely hate discovering that I have allowed good food to go bad in my fridge. At least a portion of my weekly cooking involves some sort of triage to make sure that anything that is on its last legs gets prioritized. Sometimes, when there are several to choose from, that means I end up in a strange Iron Chef-like competition with myself.
I like to think that I am organized. I know that it's not entirely true. I attempt to be organized, but life sometimes gets in the way. So, when I got home from work to discover that not only is the ground buffalo that I thawed (in the refrigerator) two days previously still had not been used, and the half-bunch of spinach (which I had been planning to use for a lasagna) had wilted to the very last stage of possible resuscitation, I decided that I had to make something that involved both.
However, I was also having trouble with my hands. The swelling in my right palm was still restricting movement, and a new swelling at the base of my left thumb meant that my left-handed grip was pretty unreliable. So, no opening jars or tins of tomatoes for a slam-dunk pasta sauce. I also found that I was out of basmati rice, which is my preferred, lower-glycemic rice choice for daily use. This pretty much obliterated the first couple of ideas that came to mind. Fortunately, my hands were not too swollen to preclude stirring, or I would not have attempted to cook anything.
I stripped the unusable parts from the spinach and washed the rest in cool water. Then I let it lie in a bowl full of very cold water, and started rummaging through the pantry. My mind kept returning to my relatively recent discovery that a chiffonade of spinach can brighten an entire pasta dish, and I wanted to go with that theory. I found some orzo in the cupboard, and realized what I could make: a version of a favourite side dish called Creamy Parmesan Orzo. With meat. Like, just sort of, kind of reminiscent of... a homemade hamburger helper. Or, in this case, Buffalo helper.
Buffalo & Spinach Orzo
375 grams ground buffalo
1/2 medium onion, diced
2 cloves of garlic, minced
6 mushrooms, sliced
1 cup orzo, uncooked
2.5 cups hot liquid (half chicken stock, half water)
¼ cup grated Parmesan cheese
1/4 cup half-and-half
1/2 bunch of spinach, washed and sliced into narrow ribbons
pinch of salt, to taste
fresh ground black pepper
In a large skillet, brown the buffalo meat and sliced mushrooms. Add the onion and garlic, and saute until translucent. Add the raw orzo, and stir around for a couple of minutes to get it well coated. Add the liquid, bring to the boil, reduce the heat and allow to simmer for about 10 – 15 minutes (depending on what “medium” is on your stovetop), stirring frequently. When the liquid is mostly absorbed, turn the heat off and add the cream, Parmesan, spinach, salt and pepper. Allow the spinach to wilt down into the orzo (just put the lid on for a minute or two, then stir through), and dish up with a big old spoon.
The spinach had revived considerably for its short soak in cold water, and became crisp enough to cook with (a raw or salad preparation would have been expecting a little much). All in all, for a thrown-together dinner, it was pretty tasty, and the leftovers traveled well to work the next day.
I also discovered a sort of two-handed chopping technique that allowed me to deal with the onions and garlic, although I wouldn't want to have to sustain it through more than the very small amount of chopping that I actually did. The mushrooms and the spinach were sliced with a strange, scalpel-like grip on my smallest (and therefore lightest) paring knife, which again, would not have held up for any length of time. I'm thinking of investing in a slicer of some sort, which would not have helped with the spinach, but would have made short work of the onion and mushroom elements.
So, I defeated the arthritis for another dinner, and I rescued the spinach from untimely demise. I'll get the hang of this yet.
June 01, 2008
I Think I'm Ready For Summer (Iced Tea)
Even if summer isn't quite ready for me.
In summer, I'm always fighting dehydration. Water is essential, of course, but really, a girl can only drink so much water without wanting something flavourful, not to mention wanting to be able to move about without sloshing sensations.
Sugar, however is the issue. I like real sugar. I approve of sugar, especially where the alternatives and fake sugars are concerned. I do not, however, need large quantities of it. For some reason, most summery drinks are filled to the brim with sugar, far in excess of the quantities I find desirable, or worse still, "sugar-free" sugar substitutes which may or may not lead to health problems unto themselves, while still tasting uncomfortably sweet. Juices, lemonades, iced teas, and "virgin cocktails" are all quite sweet...usually, too sweet.
In parts of the United States, one can blessedly get iced tea that has not been pre-sweetened. That does not appear to be the case in most places in Vancouver. I can, however, make my own so that at least when I return home, hot and exhausted from tripping around farmers' markets and beaches, I can drink something delicious that doesn't feel like it's going to kill me in one way or another.
Despite my crankiness above, I do like a little hint of sweetness in my iced tea. A little simple syrup, or even a couple of teaspoons dissolved in a half-cup of hot water and then added to the steeped tea as it cools does the trick nicely, and doesn't leave me feeling like I've just mainlined a candy bar. I can get it just to my taste, and just to my comfort level.
I have a couple of favourite iced tea recipes that are both easy to make and delicious, and a little unexpected. Make the tea as strong or as weak as you generally like it hot. If you like adding ice to your drinks, but don't want to dilute the flavours, make a batch of iced tea just to freeze into ice cube trays and use them in place of ordinary ice cubes.
Isis Tea
1 litre freshly brewed black tea, cooled
2 tablespoons simple syrup (equal parts sugar and water, boiled for one minute on the stove, then cooled)
1 teaspoon rosewater
Juice of half a lemon
Chill thoroughly. Serve in a tall glass, with a mint sprig
Lavender Iced Tea
1 litre freshly brewed lavender-scented black tea, cooled
2 tablespoons simple syrup
2 drops 100% pure lavender essential oil
Chill thoroughly. Shake well before serving.
I wouldn't keep either of these for longer than a few days in the fridge, due to the botanicals added, but that's not usually a problem, for me. I drink these up pretty quickly.
Basically, any tea, whether black, green, or herbal, can be made into a delicious iced tea. It just takes a little preparation to have some on hand, and a jug to keep it in.
May 19, 2008
Frittata
Now, where was I? Oh, yes. Breakfasts.
I must protest the suggestion that eggs are culinary velcro. While you can certainly add almost anything to eggs, it does pay off to make sure the flavours and textures are harmonious. My mother, otherwise an excellent cook, had an unfortunate habit of adding cooked rice, baby shrimp and green onion to scrambled eggs, and attempting to pass it off as brunch. The texture was unforgettable, and not in a good way. I do not mean to suggest that you cannot make interesting omelettes or frittatas out of your leftovers, but for goodness sake, there are limits. Sometimes, things work best if you only select one of your leftovers, and build around it.
Frittatas (frittati?) are a favourite simple breakfast. Sure, not as simple as cheese on toast, or avocado on toast (a weekday staple) but they come out of the gate rather quickly, and divide nicely into two portions. This one made use of leftover roasted asparagus, with the addition of some crisp-fried bacon, fresh thyme, and parmesan cheese that was just hanging about in the fridge. I didn't salt the eggs, because bacon and parmesan are already salty, but I had fleur de sel standing by in case it was needed. I did add a pinch of ground mustard seed and a couple of tablespoons of half-and-half to the eggs, just to give the flavours a little punch-up.
Making a frittata is pretty easy, although there are diverse methods. I melt a little butter or heat olive oil in a small, non-stick pan, briefly saute whatever bits of meat or vegetable are going to be the "filling", and pour the seasoned eggs over top. A little judicious stirring, lifting the edges of the egg-mass up for the uncooked liquid to run underneath, a good sprinkling of cheese, and then under a broiler to finish it off, which causes the eggs to puff up around the edges. It takes only a few minutes from start to finish - really, the dicing and grating of filling items and beating the eggs takes the same amount of time as the cooking, if not longer, so have the coffee ready before you start.
So, breakfast was ready very quickly, allowing us more time to lounge around and discuss everything from the black plague to the (suspected) difficulty involved in raising genius offspring. We also figured out a plan for dinner, and made some lofty projections about meals for the coming week. We shall see about the latter.
I've been somewhat out of commission, of late, and consequently (I confess) out of the kitchen. I am currently attempting to find a way to control an unusual type of arthritis and a right trigger-wrist, which has made a substantial impact upon my ability to cook on any sort of regular basis. Much of my time in the kitchen of late has been prowling through the cupboards and trying to figure out what I can eat that takes minimal use of hands and/or wrists. We have had to adjust and accommodate our lives quite a bit to enable me to cook at all, and while Palle has certainly stepped up to the skillet a lot recently, we've also ended up eating out a lot, too.
I can still cook if I have help, especially with knife-work. A sous chef who is on hand to slice and dice things, open lids (!), and manhandle anything that needs to be dealt with in some manner more sophisticated than bashing it into the food processor. Lately, I have been finding new and exciting ways to hold spatulas and spoons and whatnot that accommodate my physical limitations, but I haven't been able to entirely do things on my own (unless I'm having an outstandingly good day, inflammation-wise). We have been developing strategies for coping, and I'm starting to feel a bit more positive about the daily business of getting food on the table.
Some of the things that I've made lately have been simply too dull to post about. Y'all have seen me make risotto, and pasta-with-things-in-it repeatedly through the archives, and really, there's only so much I expect people to want to read about turning leftovers into quesadillas. I've spent a certain amount of time lately returning to old favourites, my comfort foods, but I'm starting to get that twitch again, where I want to explore, experiment, and immerse myself in culinary possibilities.
So, stay tuned. I'll try to start bringing some new things to the table.
March 19, 2008
Just Another Meatball
I like meatballs. They weren't something that I experienced much of when I was growing up, but we certainly had ground meat patties (usually beef) and sauce, and that is certainly in the same family. Little meatballs, though...that was more work, although I doubt that my mother (who was willing to make individual meat pies with two-crusts and full crimping for our family of five) was afraid of a few minutes' more work. Perhaps she was merely constitutionally averse to the meatball notion, for some reason.
I don't usually use a recipe to make meatballs, but I do try to stick in some sort of flavour-family, and that occasionally requires some sort of organizational decision making. While I once made "Christmas Dinner meatballs" (although for a Christmas party, not for our actual Christmas dinner, I confess) using ground turkey, dried cranberries, and stuffing-seasoned breadcrumbs...if I could have found a way to get yams and brussels sprouts in there, I would have...I usually go with a more "what's around the house" mandate.
They always have garlic. They usually have some sort of egg or egg white binding them together. They always have more seasoning than simply salt and pepper. Sometimes I serve them on spaghetti, in the classic Italian-American fashion, reserving any leftovers for sub sandwiches the next day, but sometimes I like to explore the other alternatives. Most cuisines have something along the lines of meatballs, all varying in size, composition, and serving format. Even my filling recipe for gyoza - is something along the lines of an Asian meatball wrapped in dough.
The above-shown meatballs were a stab at cuisine from northern Europe. I was going something for a Danish feel, borrowing heavily from frikadeller, but I felt compelled to jump-up the seasoning a little with some powdered mustard seed and a wee pinch of allspice. The accompaniment was Red Cabbage with Apples, mushroom sour cream gravy, and basmati rice (my standard, go-to rice around the house). The base for the meatballs was a pound of lean ground pork seasoned with salt, pepper, the above-mentioned mustard seed and allspice, some grated garlic, dried breadcrumbs (panko), a good splash of heavy cream, and an egg-white. Fried in butter, because I am told that is the correct way, but with a little splash of canola oil to help keep the butter from burning.
While I can't make any claims to authenticity of a Danish meal (since the Danish half of my household would certainly set me straight if I did), it did have a lovely, northern European comfort food vibe about it, and was pretty darn tasty. The leftovers warmed up pretty well for lunch the next day, eliciting stares and sighs and outright drooling in the lunchroom. I bet they would have made a pretty good sub, too.
Labels:
Pork
March 09, 2008
Refrigerator Triage (Broccoli, Blue Cheese & Walnut Linguine)
I'm usually pretty good at dealing with leftovers, whether they are remains of dinners that find new life as lunch (or are converted, via pasta, pizza dough, or tortilla into new dinners) or are the bits and bobs left over from various other culinary ventures. Both require a systematic approach and an aversion to (if not downright dedication to avoidance of) finding such things weeks later after they have mutated on their own.
I'm even better at coming up with reasons not to have to walk home from the grocery store in the rain. These two skills, scarcely related as they may be, were the genesis of last night's dinner.
In fact, I planned the dinner upon rooting through the fridge on Friday, and discovering that not only did I have a nice block of Danish Blue cheese that failed to make it onto the cutting board when we were last entertaining, but that I also had some good-sized walnut pieces and an impulse-bought head of broccoli (I know...) that needed using pronto. Since I also was feeling fairly lazy, it seemed the easiest thing in the world to combine these things into a pasta dish, and darned if I wasn't right! While we didn't have it for dinner on Friday, since it seemed even easier to go out for dinner by the time we were ready to get on with it, I liked the idea so much that I scheduled it for dinner Saturday.
It was a very, very good idea. I've heard of many combinations of blue (or bleu) cheese and walnuts before, including some pasta dishes, but I'd never seen one involving broccoli. It was every bit as easy as I thought it would be (especially with Palle around to crush the garlic and separate the florets), and even tastier than I imagined.
Next time I make this, because it is a keeper, I will probably serve it as a side dish next to a simply-seared strip loin steak (or possibly a chicken paillard) with a little spinach salad and a good glass of red wine. The broccoli adds a wonderful freshness to the dish, and cuts through the heaviness of the cheese and walnuts.
Broccoli, Blue Cheese & Walnut Linguine
serves 2 as a main dish (although, very rich)
or 4 as a side
1/2 lb. dried linguine
2 tablespoons extra virgin olive oil
4 large cloves of garlic, crushed
100 grams blue cheese of your choice, crumbled
1 head of broccoli, sectioned into tiny florets
2/3 cup large walnut pieces
Cook the linguine in rapidly boiling, lightly salted water. While it cooks, heat the olive oil in a large, non-stick skillet, and saute the garlic gently over a medium-low heat until mellow. Add the walnut pieces, stir well, and allow them to toast in the oil a little. When the pasta is ready, scoop it into the skillet with the garlic and walnuts, and combine thoroughly (a pasta fork is very useful for both the scooping and the combining). In the still-simmering pasta water, quickly blanch the broccoli florets for 20 to 30 seconds (I use a mesh spider-tool to hold them in briefly in the hot water, then quickly raise them) and add to the pasta. Sprinkle with the crumbled blue cheese, and stir through once more. Top with freshly ground black pepper, if you wish.
February 03, 2008
Buckwheat Molasses Cookies - Gluten Free!
I wanted to make a good, gluten-free cookie, something that I could give as a birthday gift to friends with wheat allergies, or celiac or, for other reasons, are living gluten-free. I wanted it to be something that I would be proud to serve to anyone, something that didn't have that settling for less quality about it.
Alton Brown has published a gluten-free chewy chocolate chip cookie recipe that looks pretty good, but I don't usually have brown rice flour or xantham gum lying about the kitchen. I do have buckwheat flour, though, and arrowroot powder. I wanted something that I wouldn't have to run to the specialty store to buy (although your pantry mileage may vary).
Buckwheat flour has a more drying effect than whole wheat flour, so I decreased the amount from my usual recipe. Without gluten to stabilize the cookie shape, I added a little arrowroot powder to help control the spread and height.
Buckwheat flour has a pretty strong flavour, and not everyone grooves on it. I decided that it's best bet was a cookie that had a lot of aggressive flavours of its own. Enter the Ginger Snap, one of my favourite stir-up-and-bake recipes. With molasses and ginger and cinnamon competing for tongue-time, the buckwheat taste would be more muted, more sedate, right? Well, as it turns out, almost. It should be noted that I increased the amount of ginger and cinnamon to double the usual amount (and, heck, it should even be noted that this was an accident), but it stands as the way to go, to stand up to the strong scent and character of the buckwheat.
Texturally, they got the lovely crackled tops that I was hoping for, but the interior of the cookie is tenderer than a classic Ginger Snap. Almost fudgy, while they're still warm, and I confess I have yet to try them completely cooled.
I didn't get a perfectly interchangeable version of my Ginger Snaps, the never tell the difference kind, but I got a very, very good cookie.
Buckwheat Molasses Cookies
"Buckies"
Makes 3 - 4 dozen
1 3/4 cups buckwheat flour
1/4 cup arrowroot powder
2 teaspoons baking soda
1/2 teaspoon salt
2/3 cup canola oil
1 cup sugar
1 egg
1/3 cup molasses
2 teaspoons ground cinnamon
2 tablespoons ground ginger
1/2 teaspoon ground cloves
Extra sugar for dusting
In a medium mixing bowl, beat the oil and sugar together. You don't need a mixer here, a wooden spoon is fine. Add the egg, and beat until smooth. Add the molasses and beat until smooth. In a separate bowl, whisk together the buckwheat flour, arrowroot powder, baking soda, salt and spices. Whisk until thoroughly combined, and then dump it into the molasses mixture. Stir slowly as the dough stiffens up into a thick paste, being sure to incorporate all of the flour. You don't want any white streaks in the dough, it should be completely dark brown.
Use a teaspoon to scoop up a walnut-sized lump of dough, and roll it between your palms until it is nice and round. Dip the top of it in white granulated sugar and place it on a lightly greased cookie sheet. Leave a little room between each cookie, as they will expand.
Bake at 350 F for about 10 minutes - they should be a little underdone when you pull them out. Remove to cooling racks immediately, and get the next batch in the oven. Try not to eat them all at once.
They smell a little bit like pancakes, while they're baking.
February 02, 2008
Hash in the Morning Light
Getting back to my love of all things breakfast, I have to put in a good word for hash. It is necessarily potato-intensive, so I don't have it terribly often, but I do enjoy it. The Cajun Chicken Hash at the now-closed VineYard Restaurant (RIP) is the inspiration for this version, which omits the hollandaise of the original, but features a home-blended Cajun spice mixture. As I am usually too unco-ordinated (and possibly too lazy) first thing in the morning to actually poach eggs properly, these have merely been steamed in little cups. I tend to only make one egg for myself, but the original dish had two, of course.
A close-up of the early stages of cooking illustrates the ingredients fairly well:
The chicken was leftover roasted chicken, skinned and trimmed and tossed with the aforementioned Cajun seasoning. The onions are still raw here, and look pretty fierce, but had mellowed considerably by the time it was served. The potatoes were leftover from some other dinner, where I had deliberately cooked a little more than necessary, just so I could have some sort of hash-y affair on the weekend. The rest - the bacon was diced and cooked up in the frying pan, a little of its rendered fat used to lubricate the whole dish, and then everything else was added and sauteed until just the right amount of tenderness or crunch, depending. A little extra Cajun seasoning was sprinkled over the whole as it cooked, before portioning it out and sliding the steamed eggs atop. Add a little hot sauce of your choice...
This is a pretty hearty breakfast, even without any sort of toast weighing in. I certainly didn't feel like moving for a while after - even with only one egg! Still, perfect for those lazy weekend days when you've got a whole lot of lying around on your schedule.
Hash is a useful way to use up the bits and ends in the fridge (as is frittata, or quesadilla, for that matter) - a sort of "kitchen velcro"- to borrow a term from Alton Brown. You can sneak a few more veggies in than your traditional bacon-and-egg breakfast, too. Highly customizable.
January 20, 2008
Soup Weather (Brown Lentil & Tomato Soup)
Winter, particularly its snowy, rainy, and slushy bits, is the weather for enjoying a good steaming bowl or mug of soup. I like soup. I especially like soup that has an identity. While I grew up with the ever-evolving (mutating?) pot of "Heirloom Soup", which served a terrific purpose and was generally tasty, there is certainly something to be said for creating a soup that will dependably turn out to be exactly what you are craving.
Lentil soups are often on the uninteresting side - serviceable, but not truly delicious. Oh, there are exceptions, of course, and much depends on the nature of the type of lentil being used. For a hearty yet basic brown-lentil soup that is full of vegetables, I have been developing this particular recipe for a few months now, and have come to the conclusion that it overtakes all others in terms of a go-to, dependable, delicious winter lentil soup. Its foundation is European, somewhat along the lines of an Italian soup, but I've never really tasted one quite like it. The addition of red wine vinegar at the end perks up the flavours remarkably, and contributes substantially to the overall depth of flavour.
It is much more handsome if you add a cup of finely chopped parsley (or indeed, a fine chiffonade of spinach) and stir it in right at the end, and the fresh, scarcely cooked greenery adds a certain brightness of flavour that is very pleasing, too. However, if you are planning to freeze the soup for future lunches and dinners, you may wish to leave those out, and add them upon re-heating. The soup in the photo is greenery free, because I forgot that I was out of both parsley and spinach when I started making it. It was still very tasty.
I have yet to try this as a purely vegetarian (or indeed, as it would be, vegan) soup, which would entail exchanging the beef stock for vegetable, but I am confident that this particular recipe would be delicious either way. Next time I plan to try it as a vegetarian version, with the added spinach as suggested above, and (possibly) with a little hit of cumin.
Brown Lentil & Tomato Soup
Makes about 8 cups
1 cup dry brown lentils, rinsed and drained
1 stalk of celery, strung and diced small
1 medium onion, diced small
1 1/2 cups small-diced carrots
3 garlic cloves, minced
2 tablespoons olive oil
3 cups beef stock (I use Better Than Bouillon)
2 cups water
2 bayleaves
1 14 oz./398 ml. crushed tomatoes (I prefer no salt added)
1/2 teaspoon oregano leaves (less, if powdered)
1/2 teaspoon ground white pepper
1/2 to 2 tablespoons red wine vinegar (to taste - start small)
1 cup finely chopped parsley (or spinach)
In a large soup pot, heat the olive oil and saute the onion, celery and carrots until the onions are tender and a little translucent. Season with white pepper, bay leaves, oregano, and add the garlic. Stir through. Add the drained lentils, the beef broth, the crushed tomatoes, and the water. Bring to a simmer, reduce heat, and let cook at a low temperature (bubbles just barely breaking the surface of the soup) with the lid on, until the lentils are tender - 30 to 35 minutes. Taste, and add salt if needed. If the soup is thicker than you like, stir in a little more water. Stir in vinegar, parsley (or spinach). Taste, and add more vinegar if you like.
If you like the look of the perfectly round little carrot pieces, use "baby" carrots, and simply slice them into coins. Otherwise, dice as you like. I think that a sort of evenness of size makes a soup like this the most attractive but, certainly, feel free to to adapt as the spirit moves you.
January 12, 2008
Nigella Express - Macaroni & Cheese
One of my Christmas gifts was the brand-new Nigella Express, which I had been eyeballing in the bookstores. While there are a number of items that jump out as must-make, no-time-to-waste, I happened to notice that the amount of cheese called for in her streamlined macaroni and cheese was exactly the amount that I wanted to clear out of the fridge, having rather a lot of post-holiday cheese accumulation taking up space. Since I couldn't legitimately claim not to have the time to make it, I actually managed to get on this recipe fairly promptly.
While I have long been making my favourite version (adapted-from Cooks Illustrated) of Macaroni and Cheese, which is done entirely on the stove top and really does not take long at all, I know that Palle's very favourite kind is the baked variety. Upon further review, I noticed that this recipe not only calls for slightly less cheese overall than my usual recipe, it does not contain any butter at all! This makes it a somewhat healthier dinner (or side dish, if you must), and increased my enthusiasm for trying it out.
Her method is almost ridiculously simple: boil up some macaroni, and while it comes to a boil, throw some cheese, evaporated milk, egg and seasonings into the food processor. Blitz it up, as she says, and combine it with the now-cooked and drained macaroni. Pour the mass into a shallow pan, and bake for about 15 minutes. Dead simple.
Mine did not turn out as lovely-looking in the pan, because I had the oven rack set rather too low to get the seared and blistered appearance of hers before the custardy mass had set. Next time, I will try it on a higher rack, and then it may be as pretty to look at in the pan, as it was on the plate. Instead of the perfectly smooth, impenetrably orange character of the stove-top method, this had little cheesy pockets amidst the generally cheesy matrix, and a perhaps more rustic texture. I don't mean that as a discreet criticism, it should be noted, but rather a careful observation of discrepancy. Both versions are delicious, and the one to make is the one that best fits the rest of the meal (if there is, in fact, another component to the meal).
I couldn't leave the recipe entirely alone, I admit. Those of you who know me, or have been reading my blog for a while, know that I am almost constitutionally incapable of letting a recipe alone, and when I do I view it as some marvelous achievement of self-restraint. That said, my modification to this recipe was fairly minor - I added a dash of Tabasco sauce and a pinch of mustard powder to the milk mixture. I'd do it again, too.
January 06, 2008
Other Things For Breakfast (Walnut Coffee Cake)
I am generally a fan of the savory side of breakfast. While I adore pancakes, I require a side of something meat-y to really enjoy them first thing in the morning. Crepes, of course, allow for the happy concatenation of the two, but are not always an option.
Still, there is certainly something to be said for a quick burst of food as one is about to fly out the door in the morning, or something that requires zero preparation or refrigeration to be enjoyed once one has arrived at their destination. To this end, there are few things that fit the bill better than a good coffee cake, especially one that is not cloyingly sweet.
While many coffee cakes are tasty, but heavy things, this one is shockingly light and airy and allows for almost infinite variety. Here I have used my basic Buttermilk Coffee Cake recipe (available in the comments section below), but skipped the sugared layering process, and instead scattered well-toasted walnut pieces on top and throughout, and stirred a little nutmeg into the batter.
I enjoy nuts, but I usually tend toward almonds, which are more shelf-stable, rather than walnuts. A walnut that has gone rancid is second only to rotten milk for a heebie-jeebie taste in the mouth that will not be vanquished. Still, a fresh, toasted walnut is so incredibly delicious that it is worth the risk. It also helps to purchase your walnuts from a specialty store that has a high turnover, so you can feel confident that you are getting a product that hasn't been sitting around forever. Also, it is good to purchase only as much as you need, and if you find yourself with a few leftover, you will want to toss them into some sort of endive salad or trail-mix snack in fairly short order.
This cake can also be frozen very successfully, if wrapped in a nice tight layer of plastic wrap, either whole or in serving-sized pieces (which generally will have defrosted completely by the time coffee-break rolls around, if taken from the freezer that same morning). This is one of the endearing features of this cake, because it means that I am not sentenced to repetition (which can be tedious, no matter how good the item repeated may be) in order to use it up while it is still fresh-tasting.
January 04, 2008
Breakfast & the New Year
I don't really make New Year's resolutions, except for the amusing, off-the-cuff kind uttered for entertainment value only. I have long believed that one should implement any improvements that are needed as soon as possible, and not wait for essentially arbitrary milestones.
That said, in the spirit of fresh starts (now that I am once again able to post photographs!) I do hope that my posts here will be a little more frequent in the coming year than they have been and the end of the last.
Also in the spirit of fresh starts, I cannot recommend the meal of breakfast highly enough. Despite my enthusiasm for breakfast, I will confess to having rather recently choked down a few fast-food breakfast sandwiches of the biscuit-y variety, and I probably don't need to tell you that these occasions were met with a flinchy "I can do better than this." So, in fact, I have.
The biscuit here is a cheddar biscuit based on the lovely cream biscuits recipe from Cook's Illustrated's Fall Entertaining issue, made in my kitchen by my friend Lisa, who is somewhat new to the biscuit-making ranks, although a solid cook in her own right. It was she who came up with the idea of prepping a bunch of acceptable biscuits for breakfasts-on-the-go, and we took some time recently to play with the dough a little.
The rest of the ingredients are pretty much self-evident: a little back bacon (easily fried up and stored in a container in the fridge or freezer, depending on how frequently one wants to slap together a breakfast); an egg quickly-fried in a ring - in this case, a tuna can with the top and bottom cut out and pressed smooth; a slice of good, sharp cheddar - coincidentally, the same cheese as the one grated into the biscuit. Alternate versions saw instead a scrambled egg that had been pepped up with a little granulated onion and garlic, which was also a hit (and possibly even faster on the stove top).
Need I tell you how scrumptious it was, and how desperately I am in need of making these again?
November 10, 2007
Comfort Food: Chili Mac
If there's one thing that the chilly autumn weather and the battling of health issues have in common, it's that comfort food makes them recede a little into the background, leaving instead (if only temporarily) a swathe of warm, well-fed well being.
It's a little funny to me that this dish, Chili Mac, is a comfort food for me, because it is something that I never had growing up. However, we did have a lot of chili, and if this had occurred to my mother as an option, I'm certain she would have made it, and often, at that.
The type of chili necessary for this dish is the uber-basic ground meat and bean style chili, which can be made very quickly and without much fuss. My standard, go to recipe is called "20 Minute Chili" because it is really that quick to knock together, and while chili is always better the next day, it's pretty good as is, shored up with lots of spices. This kind of thick chili can be made from simple pantry/freezer staples, and it freezes most excellently itself, ready to be hauled out and used for anything from Chili Mac to chili dogs, or even as a filling for a fluffy omelette!
Assuming that one has the chili already in the freezer, Chili Mac is dead easy to make (even for someone whose hands don't always work very well). The meat, onions and peppers, and other things that require knife-wielding have, for the most part, already been done, and it becomes a simple skillet dinner of patience and stirring (topped with a little cheese, and maybe some green onion and/or cilantro).
You can use your own favourite ground-meat chili here. Heck, you could even use your own favourite vegetarian chili. It's very adaptable. It uses the absorption method, so you only mess up one pot, which is also good. It's sort of like making a risotto out of pasta, only much less fussy.
Chili Mac
3 cups prepared chili (defrosted)
1 cup uncooked elbow macaroni
2 1/2 cups low-sodium beef broth (or water)
1 cup tomato sauce
Optional garnishes:
Grated cheese
Sliced green onion
Chopped cilantro
Extra hot sauce
In a 12" non-stick skillet with high sides, heat up the chili until bubbly. Add the uncooked macaroni, the broth (or water) and the tomato sauce, and bring up to a boil. Reduce heat to a simmer, and cook and stir intermittently for about 10 minutes, or until the macaroni is cooked to your liking. The liquid should be mostly absorbed, but the dish should still be a little saucy. If your heat was too high, and your liquid evaporated to quickly, you may need to add a little more water (or, for example, if you like your macaroni well-cooked instead of al dente).
Dish up and garnish as you see fit. If there are any leftovers, they warm up nicely for lunch the following day.
September 24, 2007
Dzik
I'm always intrigued when I am exploring another cuisine, and I find that there is a common use of an ingredient that I do not associate with that culture. In Mexican cookery, I would never have guessed (based on the restaurants in my neck of the woods) that radishes play a frequent supporting role.
Likewise, I was not expecting to find such a thing as a cold beef salad, although when I did, it didn't surprise me at all that it was full of spicy habanero chiles. Palle, who has been to the Yucatan, fell in love with this dish, but didn't know what it was called until we saw it being made on a television show. Recipe now accessible, he wanted to make it right away. So he did.
The dish is called Dzik, and is also known more generically as Yucatecan salpicón de res. The recipe is from Rick Bayless's Mexico, One Plate at a Time (season 5). Because it is served cold, it is perfect summer food, and while summer is definitely on the way out, here in the Pacific Northwest, we squeezed in one last summery dinner.
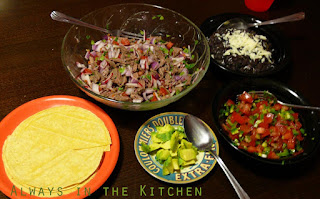
The avocado should be sprinkled over the Dzik, but Palle doesn't like avocado as much as I do, so we left it on the side. Also, the Dzik should be resting on top of a bed of lettuce, but we didn't quite get around to doing that, although the presentation would be nicer. Thick, spicy black beans, hand-chopped fresh salsa cruda, and corn tortillas rounded it all out, and we enjoyed every little bit of it.
Next time, I think we will simmer the meat a little longer, to make it even more tender, and chop the red onion a little finer. Other than that - I wouldn't change a thing. Full of tangy lime juice, zippy habanero peppers, fresh crunchy radishes, and (for me) creamy avocado, it was tasty and satisfying, and definitely on the "let's make again" list.
I may not be able to wait until next summer.
The dish is called Dzik, and is also known more generically as Yucatecan salpicón de res. The recipe is from Rick Bayless's Mexico, One Plate at a Time (season 5). Because it is served cold, it is perfect summer food, and while summer is definitely on the way out, here in the Pacific Northwest, we squeezed in one last summery dinner.
The avocado should be sprinkled over the Dzik, but Palle doesn't like avocado as much as I do, so we left it on the side. Also, the Dzik should be resting on top of a bed of lettuce, but we didn't quite get around to doing that, although the presentation would be nicer. Thick, spicy black beans, hand-chopped fresh salsa cruda, and corn tortillas rounded it all out, and we enjoyed every little bit of it.
Next time, I think we will simmer the meat a little longer, to make it even more tender, and chop the red onion a little finer. Other than that - I wouldn't change a thing. Full of tangy lime juice, zippy habanero peppers, fresh crunchy radishes, and (for me) creamy avocado, it was tasty and satisfying, and definitely on the "let's make again" list.
I may not be able to wait until next summer.
August 30, 2007
Pirate Granola
Should I explain the name? Well, I'll try: Maybe it's because I'm soon going to be attending a pirate-themed party, and maybe it's because I've still got the image of Johnny Depp's Jack Sparrow burned into my retinas, and maybe it's because I sort of highjacked the original recipe from the inimitable Alton Brown. Maybe it's just that the changes I made all sort of smacked of the Caribbean, and while I know there is more to that culture than pirates (cue Johnny Depp, again), it just sounded kind of fun.
But, really? It's very, very good. Lightly sweet, satisfyingly crunchy, and easy to make.
I did, in fact, start with Alton's ratios, but because I don't like my granola to be too sweet, I cut down on the amount of sugars going into this by quite a bit. Once I decided to use rum syrup instead of maple syrup, well, that along with the coconut was really the start of the theme. I added pumpkin seeds in place of one of the types of nuts that Alton used, and this was a good thing, because a well-toasted pumpkin seed is a delicious addition to many a snackfood.
This recipe is rather goody-heavy. It's not like those sad bags you can see in some markets which are ninety-five percent oats and sugar, with a few stray-looking nuts or raisins. This granola is laden with, ahem, booty. While it's not in the picture, I later added some banana chips, although I've since become horrified at the fat content of those, and won't be repeating that adjustment.
Pirate Granola
Severely adapted from a recipe looted from Alton Brown
3 cups old fashioned rolled oats
1 cup very roughly chopped almonds
1 cup raw pumpkin seeds
3/4 cup shredded unsweetened coconut
2 tablespoons golden brown sugar
1/4 cup rum syrup (recipe follows)
2 tablespoons blackstrap molasses
1/4 cup canola oil
1/2 teaspoon kosher salt
1 cup raisins (chopped dates would also be good)
Preheat oven to 275 degrees F.
In a large bowl, combine the oats, nuts, pumpkin seeds, coconut and brown sugar.
In a separate bowl, combine the molasses, rum syrup, oil and salt, and stir well. Combine both mixtures and stir until thoroughly integrated. Pour onto one or two large, foil-lined (and oil-spritzed) sheet pans. Cook for about 1 hour and 30 minutes, stirring gently every 30 minutes to achieve an even colour.
Remove from oven and transfer to a large bowl. Add raisins and mix until evenly distributed. Once cool, seal in an air-tight container and keep unrefrigerated.
Yield: approximately 7 cups
Exellent as a topping for yoghurt, as a breakfast cereal, or - my favourite - as a coffee-break snack! I just pour a bit into a mug, sit at my desk, and much while I'm working, surfing, or typing.
Rum Syrup
1 cup brown sugar, not packed
1/2 cup water
2 teaspoons rum extract
Combine sugar and water in small saucepan on stovetop, over a medium heat. Allow it to come to a gentle boil, and allow to cook until all sugar is dissolved. Remove from heat, and add extract. Allow to cool, bottle, and refrigerate. Excellent on pancakes, or over ice cream.
August 26, 2007
Easiest Pasta Ever (Fettuccine Tapenade)
This is, really, the easiest pasta dish I've ever made. Barely more effort than packet pasta, really, and easy enough to accomplish when tipsy!
It's not even a recipe, really. It just sort of went like this:
I confess that I did a second version of this without the capicolla, but instead with some sauteed yellow and green zucchini and red peppers, and tossed it with tortellini. Slightly more effort, true, but a more well-rounded meal. You could easily make it a vegetarian or vegan dish, as it doesn't need (or want) any cheese atop.
It's not even a recipe, really. It just sort of went like this:
- Boil up water for pasta.
- Throw in a good pinch of salt and about 200 g of fettuccine (aka "a good handful").
- While the pasta comes back up to the boil, roughly chop up some capicola found languishing in fridge. Haphazard chopping is okay.
- Toss capicola into nonstick skillet over medium heat, and let it frizzle a bit. Dump about half a cup or so of good quality black olive tapenade over capicola.
- Scoop al dente pasta out of boiling water and dump it on top of the tapanade. Give it a good stir. Add a clove of crushed garlic, if you're feeling fancy, and if the mixture is tight you can loosen it with a glug of olive oil.
- Top with a fair bit of freshly chopped parsley, to give it a bit of a lift.
- Dish up and devour.
I confess that I did a second version of this without the capicolla, but instead with some sauteed yellow and green zucchini and red peppers, and tossed it with tortellini. Slightly more effort, true, but a more well-rounded meal. You could easily make it a vegetarian or vegan dish, as it doesn't need (or want) any cheese atop.
Subscribe to:
Posts (Atom)