It has not been a stellar summer, here in the permanently damp Pacific Northwest. August, usually our go-to month for griping about the heat and languishing over drinks on patios about town, has been a disappointment most of the way through. So, now that the sun has come out again, however briefly, and given that it's the end of August, it seemed like a good idea to go for a dish that in itself evokes sun-drenched days and summer lassitude. I'm talking paella.
I have never made paella before. It's one of those dishes that seems a bit scary, all fraught with rules, and despite having spent a couple of weeks in Spain, I'm not as familiar with Spanish cuisine as I might be. It's not a well-represented style, around here. However, I do remember from my travels that I encountered many a diverse dish that all claimed to be a type of paella, which encouraged me that there are a variety of acceptable variations - and probably some devious restaurateurs who will call anything made with rice a paella to get some tourist dollars.
In the spirit of full disclosure, the dish that I made would probably properly be designed an "arroz" in Spain, because a) the pan it was made in (not a proper paella pan, simply a big ol' non-stick skillet) and b) much of the cooking time is spend in the oven. Not, therefore officially paella, even though its oven-time was uncovered, to allow the dish to roast, as opposed to steam.
The recipe I chose to take a whack at is none other than Mark Bittman's Paella with Tomatoes. It promised to be fairly quick and painless, and that is exactly what I was looking for. However, since I wasn't serving vegetarians, I decided to meat-it-up a little. My brief search for serrano ham was unfruitful, so I settled for thick-cut lean prosciutto, which I then cut into matchsticks (or rather, Palle cut into matchsticks, since cutting anything is hard for me these days), and rounded it out with a half-pound of large, raw prawns. I also added some sliced green olives (which had been stuffed with garlic, yum) because the flavours just seemed to go.
Other than that, I followed the linked-above recipe fairly closely. I added the matchsticks of ham with the onions, I tossed the sliced olives with the raw tomato wedges (heirloom tomatoes, an orange brandywine type and a green zebra), and I added the peeled prawns to the top of the pan when it had just seven minutes left to go in the oven. The only real divergence from the recipe methodology was to add the saffron to the warmed veggie stock, as opposed to simply plunking it in with the tomato paste.
I learned a few useful things:
One, I used too much saffron. My version of a large pinch may have been just a smidge too large. It didn't render it inedible, or even unenjoyable, but for future reference, a medium pinch would be better. There is a very slight bitterness to saffron, which becomes exacerbated when used in too-great a quantity. A little goes a long way.
Two, I should have tossed the shrimp with a little of the olive oil and maybe a dab of paprika, before adding them to the pan. While they were plump and delicious, they did sit on top looking a bit like an after-thought. A little pre-emptive anointing would have taken care of that beautifully. When I was in Spain, the prawns that arrived on a paella were inevitably in head-on fashion, but I wanted this to be simple to eat. If I had left the prawns at least in their shells, however, I could have added them with the tomato layer at the beginning of the oven time, and they would have integrated into the dish a bit more.
Three, while heirloom tomatoes make a very sexy salad, there's something unsettling about green tomatoes coming out of the oven. Not a huge objection, but I found myself thinking that red tomatoes might have been more beautiful.
Four, the quality of the olives counts. Enough said.
Five, the slightly caramelized roasted tomatoes were fantastic. I wouldn't dare try this with insipid supermarket orbs.
With all of those things in mind, it is really only a matter of time before I make this again, incorporating my new-found experience and, since it produces such a lot of food, maybe even for guests.
August 31, 2008
August 12, 2008
Gluten-Free Granola Bars
I'm taking advantage of the cooler weather today to make Pirate Granola, which I have already shown on this site, so I thought that I would share this picture that has been lurking around my hard drive, waiting for its chance.
After the success I had with the granola, I decided to take a whack at granola bars. Of course, I turned to trusty Alton Brown for help. His recipe on the Food Network website looked like a great place to start, so I did.
Making this dish gluten free was actually pretty easy, providing you can get "clean oats" which are certified gluten free. If not, you might want to try substituting quinoa flakes, but I haven't tried that yet. Alton's recipe called for wheat germ, for which I substituted besan, a gluten-free chickpea flour used in Indian cooking.
It made quite a lot of granola bars, actually. See the link above for the original recipe.
Granola Bars
Adapted from Alton Brown's recipe on Food Network
2 cups old-fashioned rolled oats
½ cup raw pumpkin seeds
1 cup sliced almonds
½ cup chickpea flour(besan)
½ cup honey
1 tablet of palm sugar (approximately ¼ cup packed dark brown sugar)
1 tablespoon unsalted butter, plus extra for pan
2 teaspoons vanilla extract
½ teaspoon kosher salt
6 ½ ounces (total) raisins and chopped dried apricots
Butter a 9 x 9-inch glass baking dish. Preheat the oven to 350° F.
Spread the oats, pumpkin seeds, almonds, and besan onto an edged baking sheet. Toast in the pre-heated oven for about 15 minutes, stirring occasionally.
Combine the honey, brown sugar, butter, extract and salt in a medium saucepan and place over medium heat. Cook until the sugar has completely dissolved.
Once the oat mixture is toasted, remove it from the oven and reduce the heat to 300 degrees F. Immediately add the hot oat mixture to the liquid mixture, add the dried fruit, and stir to combine. Turn mixture out into the prepared baking dish and press down (firmly, but not insanely firmly) to distribute the mixture evenly. Bake for 25 minutes. Remove from the oven and allow to cool completely.
You may need to lever the entire thing out of the baking dish with a spatula in order to cut it, that’s okay. Cut into squares and wrap well in waxed paper. Store in an airtight container in the fridge for up to a week, or freeze for a month.
Labels:
Baking,
Breakfast,
Gluten-Free
July 27, 2008
Spanish Meatloaf
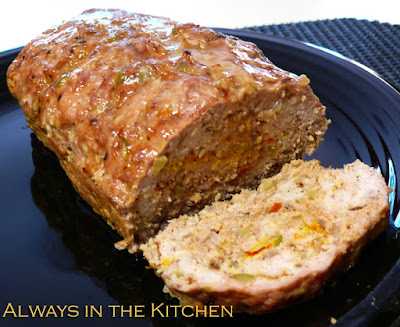
I don't recall eating any meatloaf in Spain. I do recall albondigas, the wonderful little meatballs, which I mostly encountered as tapas in Barcelona. This is different. This was inspired by a rather successful (if you don't count me pretty much scorching the buns) dinner of Spanish-inspired pork burgers, the recipe for which was in Eating Well magazine. I greatly enjoyed the flavours of the finely chopped Manzanilla olives and the earthy saffron. It was as different (in a good way) a burger as I'd had in a very long time.
Since, a few days later, I still had a quantity of both sautéed onion rings and lemon-saffron mayonnaise left from the original dinner, I decided to redux the dinner. However, instead of the potato salad that I served with the burgers, I went with an orzo-chickpea salad with lemon dill dressing, and instead of fussing around with individual burgers, I made the whole thing into a meatloaf, so I could have leftover slices for sandwiches.
I was unable to find sufficiently lean ground pork on this particular shopping excursion, so I settled on half medium pork and half ground turkey, which also turned out to be pretty delicious. I also decided to actually add some saffron right into the meat mixture, which is what gives the little swirls of vibrant yellow that you can see in the photograph. The flecks of red are diced pimento. It worked very well: the flavours stayed true to the original recipe, the meatloaf was moist and tender - partly thanks to the well-minced sautéed onions.
It was fun, a little different, and definitely in the running for repeats. I may even decide to make them into little albondigas, and serve them as a party snack - with a little dipping sauce made from the lemon-saffron mayonnaise, on the side.
Labels:
Pork
July 12, 2008
Salad Days Are Here Again (Sesame Peanut Noodles)
I love interesting salads, and summer seems to be the time when they really come out to play. I've made much of lentil salads, and couscous or quinoa salads, and of course the ever-beloved potato salads and pasta salads.
Sometimes a salad is really all you want for dinner, on hot, summer days, something light and refreshing and vegetably. There's a lot of ways to get your fix. Greek and Turkish chopped salads are always a good side dish for food cooked on the grill, or to add a civilized touch to a burger feast. The ingredients generally vary from cook to cook, based on individual preferences, and once you find the ways that speak to you, they become ingrained. It can be a challenge, sometimes, to accept someone else's version of something you love, but that's a whole different story.
The salad above is the Sesame Peanut Noodles from Nigella Express, from which I have already made a number of recipes, generally to good effect. This was no exception.
I had to fiddle a couple of things, because my peanut butter was a little on the dried-out side, so I needed to add a little more oil and a little warm water to sufficiently lubricate the ingredients into a sauce consistency. I also don't stock sweet chili sauce, so I simply used sambal oelek and a tiny drop of honey to balance its heat.
I also didn't blanche the vegetables, which may or may not have made a huge difference - I may try it that way next time, just to see what difference it really makes, but at the time I just wanted to get on with things. I did slice the peas, though, because I thought they would integrate better that way; I think I was right. I used fresh steam noodles from the grocer's, and cooked them as directed, since the already-cooked noodles looked a little too oily, for my tastes, and it worked just fine.
Finally, and you won't see it in the picture, because the photo is of the stash relegated to the fridge (it does indeed make rather a lot of food, this recipe) and I wanted it to be available for the vegetarian staying with us, I added some sliced chicken from a chicken breast that I quickly sauteed while everything else was going on. The chicken was a definite hit, and made the dish very much into a suppery sort of affair. I would do that again in a heartbeat, because I love the way the chicken soaks in the sauce, and the combination of the bright lime juice and vegetable flavours against the sultry back notes of toasted sesame oil and peanut.
The leftovers were lovely to take to work the following day, as promised. This is one for my permanent summer salad rotation. Joy!
June 26, 2008
Coconut Ginger Noodles (with extras)
I've been wanting a good Coconut Ginger Noodle recipe for some time. Variations abound online, but they often contain strange ingredients, such as tomato paste, or look like a coconut-y version of Pad Thai, which is not what I was looking for, albeit more or less in the same family. I've been tinkering for a while now, and I've figured out a pretty nice recipe that can be made as a simple side dish or gussied up with shrimp and vegetables to make a full-on meal. Aside from the tedious peeling of the shrimp, if you're making it as a main course, this is very quick to make! However, the wonderful texture of using raw shrimp more than makes up for the fifteen minutes of drudgery.
Coconut Ginger Noodles
250 grams dry rice stick noodles
400 ml. coconut milk
1/4 teaspoon ground ginger
2 medium cloves garlic, crushed
3 cm fresh ginger root, grated or minced
3 - 5 kafir lime leaves (dry or fresh)
1/4 teaspoon ground lemongrass
1 red bird chile (Thai chile)
salt to taste
juice of 1 lime
1 green onion, finely sliced
pinch cayenne pepper (optional, if you want it spicier)
Bring a large pot of water to boil and have it standing by for the noodles. Don't cook them yet.
In a large skillet, over high heat, add the coconut milk, the white part of the sliced green onion, the garlic, ginger root and powder, lime leaves, lemon grass and a good pinch of salt. simmer for 5 to 7 minutes, uncovered, and allow the liquid to reduce. Taste the sauce (carefully!) and add more salt if necessary. Turn heat to medium-low and allow to continue to simmer. Add a little water if it starts looking too thick.
Drop the rice sticks into the boiling water and allow to cook for 3 minutes. While it cooks, stir the lime juice into the coconut sauce. Taste the sauce , and add a little more ginger powder, and the optional cayenne, if you like. Drain the noodles in a colander, then rinse with cold water to stop the cooking process and cool them down. Add the noodles to the coconut sauce, turn off the heat, and stir through carefully so that all of the noodles are coated with the coconut sauce. Garnish with the green part of the sliced onion.
Extras to make it a meal:
Shrimp: peel 450 g. of raw shrimp (frozen works fine, just soak them in cool water for a few minutes to loosen them up). Add to the coconut sauce just as you drop the rice sticks into their pot of boiling water. Stir them until they are pink on all sides.
Snow peas & red peppers: julienne a red bell pepper, and cut a good handful of snow peas each once on the bias. Add to the sauce at the same time as the noodles, and stir/toss through. No pre-cooking or blanching required!
June 20, 2008
Scottish Oat Bread
It's not bread in the sandwichy-way, which may be immediately noticable from the photograph. Rather, it's bread in the tea-time way, or perhaps in the ginger way. That is to say, in some ways, it bears a resemblance in taste and texture to old-fashioned, cake-style gingerbread (as opposed to gingerbread cookies), except that it doesn't contain ginger. Although, of course, you could add some.
This recipe dates back at least to the 1970s, when my mother acquired it from a friend (who was not Scottish, it should perhaps be noted) and immediately adopted it as a favourite. It may not be, in fact, Scottish, in the same way that the salad toppings we know as Russian or French dressing are not really Russian or French. Perhaps the presence of oats, or the combination of oats and molasses (although Scottish cuisine is heavier on treacle, than molasses) leads to the association.
2 eggs
2/3 cup blackstrap molasses
1/2 cup brown sugar
2 cups buttermilk or yoghurt
2 teaspoons baking soda
3 cups stoneground whole wheat flour
1 teaspoon kosher salt
1 teaspoon baking powder
1/2 cup rolled oats
1/2 - 2 cups nuts or raisins (optional)
In a medium mixing bowl, beat together the eggs, molasses, sugar, and buttermilk. In another bowl, mix all of the dry ingredients - the flour, oatmeal, baking soda, baking powder, and salt. Dump the dry ingredients on top of the egg and molasses mixture, and stir gently with a wooden spoon or spatula, just to combine. About half way through the stirring, add the raisins or nuts, if you like.
Divide batter between two lightly greased or oil-spritzed regular-sized loaf pans. Bake at approximately 350 F. for 35 - 45 minutes, depending on your oven. A toothpick or cake tester should come out clean.
Serve fresh and warm with a little butter, or cold with cream cheese.
I am aware that I am rambling.
This recipe dates back at least to the 1970s, when my mother acquired it from a friend (who was not Scottish, it should perhaps be noted) and immediately adopted it as a favourite. It may not be, in fact, Scottish, in the same way that the salad toppings we know as Russian or French dressing are not really Russian or French. Perhaps the presence of oats, or the combination of oats and molasses (although Scottish cuisine is heavier on treacle, than molasses) leads to the association.
However, the fact I have yet to see any recipe from Scotland that appears similar (with the possible exception of Broonie), does not mean that it isn't really Scottish, either. What really raises my suspicions is the fact that there is no added fat of any kind. No lard, no butter, no oil... only the naturally occurring fat in the eggs and buttermilk/yoghurt, really. Which just does not seem very Scottish, to me. Perhaps one of my kind readers can shed some light on whether this recipe does owe its heritage to Scotland or thereabouts - I encourage you to do so, as I would really like to know.
So, without further meandering, here is my mother's recipe for Scottish Oat Bread. It makes two squat loaves, stores well in fridge or freezer (or countertop, even, for about a week if it's not too warm/humid), and it makes a very tasty breakfast when toasted and lightly spread with cream cheese.
Scottish Oat Bread
2 eggs
2/3 cup blackstrap molasses
1/2 cup brown sugar
2 cups buttermilk or yoghurt
2 teaspoons baking soda
3 cups stoneground whole wheat flour
1 teaspoon kosher salt
1 teaspoon baking powder
1/2 cup rolled oats
1/2 - 2 cups nuts or raisins (optional)
In a medium mixing bowl, beat together the eggs, molasses, sugar, and buttermilk. In another bowl, mix all of the dry ingredients - the flour, oatmeal, baking soda, baking powder, and salt. Dump the dry ingredients on top of the egg and molasses mixture, and stir gently with a wooden spoon or spatula, just to combine. About half way through the stirring, add the raisins or nuts, if you like.
Divide batter between two lightly greased or oil-spritzed regular-sized loaf pans. Bake at approximately 350 F. for 35 - 45 minutes, depending on your oven. A toothpick or cake tester should come out clean.
Serve fresh and warm with a little butter, or cold with cream cheese.
June 12, 2008
Cheddar Cheese Risotto with Sausages
Upon seeing the original recipe ("Cheddar Cheese Risotto" in Nigella Express), I couldn't help but wonder what it would be like with a few sliced up smokies in it. I think it's the use of Cheddar cheese, which is often added so haphazardly to a variety of dishes without necessarily any cultural compatibility that made me think of it. Isn't that fusion, though? Perhaps it is the common-place nature of the default Cheese of Choice in North America, placed against the exquisite, attention-demanding princess of Italian cuisine, risotto. The neon-orange of the annatto colouring can sometimes be the harbinger of ill-considered, underwhelming cooking. I won't torture you with a scalloped potato recipe I was once encountered, which involved not just Cheddar as the preeminent ingredient, but a in the form of a canned, condensed Cheddar cheese soup.
Still, I have nothing but respect for Cheddar. I tend to keep a rather well-stocked cheese shelf, and Cheddar always has a place there, and a place in my heart. This is an enormously comforting dish, friendly and accessible to even the fussiest children, I would think, who might enjoy a new name, though...Picky Picky Princess Cheesy Rice?
Here's the recipe:
Cheddar Cheese Risotto
1 tablespoon butter
1 tablespoon oil
2 baby leeks or fat spring onions
300 grams risotto rice (such as arborio)
125 ml white wine (I used white vermouth)
1/2 teaspoon Dijon mustard
1 litre hot vegetable stock
125 grams cheddar cheese, chopped (I grated mine)
2 tablespoons chopped chives
Melt the butter and sautee the leeks until softened. Add the rice and stir around for a minute or so, then add the wine and mustard. Stir until the liquid is absorbed. Begin adding the stock, one ladle at a time, stirring after each addition until the liquid has been absorbed. When the rice is just tender (about 18 - 25 minutes, depending on heat), turn off the heat and add the cheese, stirring until it melts. Garnish with chives.
I've paraphrased the directions here, but they are pretty much the same as any standard risotto. For my part, I also seared three beef smokies and then sliced them quickly, stirring into the risotto right at the end. I used spring onions, but leeks would be better. Better still, a couple of shallots, but that does step away a little from the very ordinary nature of the dish. I'd say, use them if you have them, but otherwise, use whatever oniony goodness you desire.
If it were really a white trash risotto, I expect there would be some form of crumbled potato chip on top, and it probably be made with processed cheese, and cheap beer instead of wine. Ketchup, anyone?
I may joke about this dish, but it was absolutely delicious. We served it with broccoli, to give it a little vegetable consequence, but you could easily gussy it up to your own taste. Do give this a try, whether you have picky children or not. Nigella correctly places this in her chapter entitled "Instant Calmer" and it certainly does the trick.
Labels:
Rice
June 08, 2008
Rescuing the Spinach (Buffalo & Spinach Orzo)
I absolutely hate discovering that I have allowed good food to go bad in my fridge. At least a portion of my weekly cooking involves some sort of triage to make sure that anything that is on its last legs gets prioritized. Sometimes, when there are several to choose from, that means I end up in a strange Iron Chef-like competition with myself.
I like to think that I am organized. I know that it's not entirely true. I attempt to be organized, but life sometimes gets in the way. So, when I got home from work to discover that not only is the ground buffalo that I thawed (in the refrigerator) two days previously still had not been used, and the half-bunch of spinach (which I had been planning to use for a lasagna) had wilted to the very last stage of possible resuscitation, I decided that I had to make something that involved both.
However, I was also having trouble with my hands. The swelling in my right palm was still restricting movement, and a new swelling at the base of my left thumb meant that my left-handed grip was pretty unreliable. So, no opening jars or tins of tomatoes for a slam-dunk pasta sauce. I also found that I was out of basmati rice, which is my preferred, lower-glycemic rice choice for daily use. This pretty much obliterated the first couple of ideas that came to mind. Fortunately, my hands were not too swollen to preclude stirring, or I would not have attempted to cook anything.
I stripped the unusable parts from the spinach and washed the rest in cool water. Then I let it lie in a bowl full of very cold water, and started rummaging through the pantry. My mind kept returning to my relatively recent discovery that a chiffonade of spinach can brighten an entire pasta dish, and I wanted to go with that theory. I found some orzo in the cupboard, and realized what I could make: a version of a favourite side dish called Creamy Parmesan Orzo. With meat. Like, just sort of, kind of reminiscent of... a homemade hamburger helper. Or, in this case, Buffalo helper.
Buffalo & Spinach Orzo
375 grams ground buffalo
1/2 medium onion, diced
2 cloves of garlic, minced
6 mushrooms, sliced
1 cup orzo, uncooked
2.5 cups hot liquid (half chicken stock, half water)
¼ cup grated Parmesan cheese
1/4 cup half-and-half
1/2 bunch of spinach, washed and sliced into narrow ribbons
pinch of salt, to taste
fresh ground black pepper
In a large skillet, brown the buffalo meat and sliced mushrooms. Add the onion and garlic, and saute until translucent. Add the raw orzo, and stir around for a couple of minutes to get it well coated. Add the liquid, bring to the boil, reduce the heat and allow to simmer for about 10 – 15 minutes (depending on what “medium” is on your stovetop), stirring frequently. When the liquid is mostly absorbed, turn the heat off and add the cream, Parmesan, spinach, salt and pepper. Allow the spinach to wilt down into the orzo (just put the lid on for a minute or two, then stir through), and dish up with a big old spoon.
The spinach had revived considerably for its short soak in cold water, and became crisp enough to cook with (a raw or salad preparation would have been expecting a little much). All in all, for a thrown-together dinner, it was pretty tasty, and the leftovers traveled well to work the next day.
I also discovered a sort of two-handed chopping technique that allowed me to deal with the onions and garlic, although I wouldn't want to have to sustain it through more than the very small amount of chopping that I actually did. The mushrooms and the spinach were sliced with a strange, scalpel-like grip on my smallest (and therefore lightest) paring knife, which again, would not have held up for any length of time. I'm thinking of investing in a slicer of some sort, which would not have helped with the spinach, but would have made short work of the onion and mushroom elements.
So, I defeated the arthritis for another dinner, and I rescued the spinach from untimely demise. I'll get the hang of this yet.
June 01, 2008
I Think I'm Ready For Summer (Iced Tea)
Even if summer isn't quite ready for me.
In summer, I'm always fighting dehydration. Water is essential, of course, but really, a girl can only drink so much water without wanting something flavourful, not to mention wanting to be able to move about without sloshing sensations.
Sugar, however is the issue. I like real sugar. I approve of sugar, especially where the alternatives and fake sugars are concerned. I do not, however, need large quantities of it. For some reason, most summery drinks are filled to the brim with sugar, far in excess of the quantities I find desirable, or worse still, "sugar-free" sugar substitutes which may or may not lead to health problems unto themselves, while still tasting uncomfortably sweet. Juices, lemonades, iced teas, and "virgin cocktails" are all quite sweet...usually, too sweet.
In parts of the United States, one can blessedly get iced tea that has not been pre-sweetened. That does not appear to be the case in most places in Vancouver. I can, however, make my own so that at least when I return home, hot and exhausted from tripping around farmers' markets and beaches, I can drink something delicious that doesn't feel like it's going to kill me in one way or another.
Despite my crankiness above, I do like a little hint of sweetness in my iced tea. A little simple syrup, or even a couple of teaspoons dissolved in a half-cup of hot water and then added to the steeped tea as it cools does the trick nicely, and doesn't leave me feeling like I've just mainlined a candy bar. I can get it just to my taste, and just to my comfort level.
I have a couple of favourite iced tea recipes that are both easy to make and delicious, and a little unexpected. Make the tea as strong or as weak as you generally like it hot. If you like adding ice to your drinks, but don't want to dilute the flavours, make a batch of iced tea just to freeze into ice cube trays and use them in place of ordinary ice cubes.
Isis Tea
1 litre freshly brewed black tea, cooled
2 tablespoons simple syrup (equal parts sugar and water, boiled for one minute on the stove, then cooled)
1 teaspoon rosewater
Juice of half a lemon
Chill thoroughly. Serve in a tall glass, with a mint sprig
Lavender Iced Tea
1 litre freshly brewed lavender-scented black tea, cooled
2 tablespoons simple syrup
2 drops 100% pure lavender essential oil
Chill thoroughly. Shake well before serving.
I wouldn't keep either of these for longer than a few days in the fridge, due to the botanicals added, but that's not usually a problem, for me. I drink these up pretty quickly.
Basically, any tea, whether black, green, or herbal, can be made into a delicious iced tea. It just takes a little preparation to have some on hand, and a jug to keep it in.
May 19, 2008
Frittata
Now, where was I? Oh, yes. Breakfasts.
I must protest the suggestion that eggs are culinary velcro. While you can certainly add almost anything to eggs, it does pay off to make sure the flavours and textures are harmonious. My mother, otherwise an excellent cook, had an unfortunate habit of adding cooked rice, baby shrimp and green onion to scrambled eggs, and attempting to pass it off as brunch. The texture was unforgettable, and not in a good way. I do not mean to suggest that you cannot make interesting omelettes or frittatas out of your leftovers, but for goodness sake, there are limits. Sometimes, things work best if you only select one of your leftovers, and build around it.
Frittatas (frittati?) are a favourite simple breakfast. Sure, not as simple as cheese on toast, or avocado on toast (a weekday staple) but they come out of the gate rather quickly, and divide nicely into two portions. This one made use of leftover roasted asparagus, with the addition of some crisp-fried bacon, fresh thyme, and parmesan cheese that was just hanging about in the fridge. I didn't salt the eggs, because bacon and parmesan are already salty, but I had fleur de sel standing by in case it was needed. I did add a pinch of ground mustard seed and a couple of tablespoons of half-and-half to the eggs, just to give the flavours a little punch-up.
Making a frittata is pretty easy, although there are diverse methods. I melt a little butter or heat olive oil in a small, non-stick pan, briefly saute whatever bits of meat or vegetable are going to be the "filling", and pour the seasoned eggs over top. A little judicious stirring, lifting the edges of the egg-mass up for the uncooked liquid to run underneath, a good sprinkling of cheese, and then under a broiler to finish it off, which causes the eggs to puff up around the edges. It takes only a few minutes from start to finish - really, the dicing and grating of filling items and beating the eggs takes the same amount of time as the cooking, if not longer, so have the coffee ready before you start.
So, breakfast was ready very quickly, allowing us more time to lounge around and discuss everything from the black plague to the (suspected) difficulty involved in raising genius offspring. We also figured out a plan for dinner, and made some lofty projections about meals for the coming week. We shall see about the latter.
I've been somewhat out of commission, of late, and consequently (I confess) out of the kitchen. I am currently attempting to find a way to control an unusual type of arthritis and a right trigger-wrist, which has made a substantial impact upon my ability to cook on any sort of regular basis. Much of my time in the kitchen of late has been prowling through the cupboards and trying to figure out what I can eat that takes minimal use of hands and/or wrists. We have had to adjust and accommodate our lives quite a bit to enable me to cook at all, and while Palle has certainly stepped up to the skillet a lot recently, we've also ended up eating out a lot, too.
I can still cook if I have help, especially with knife-work. A sous chef who is on hand to slice and dice things, open lids (!), and manhandle anything that needs to be dealt with in some manner more sophisticated than bashing it into the food processor. Lately, I have been finding new and exciting ways to hold spatulas and spoons and whatnot that accommodate my physical limitations, but I haven't been able to entirely do things on my own (unless I'm having an outstandingly good day, inflammation-wise). We have been developing strategies for coping, and I'm starting to feel a bit more positive about the daily business of getting food on the table.
Some of the things that I've made lately have been simply too dull to post about. Y'all have seen me make risotto, and pasta-with-things-in-it repeatedly through the archives, and really, there's only so much I expect people to want to read about turning leftovers into quesadillas. I've spent a certain amount of time lately returning to old favourites, my comfort foods, but I'm starting to get that twitch again, where I want to explore, experiment, and immerse myself in culinary possibilities.
So, stay tuned. I'll try to start bringing some new things to the table.
Labels:
Breakfast
Subscribe to:
Posts (Atom)