September 07, 2014
Gâteau de Crêpes
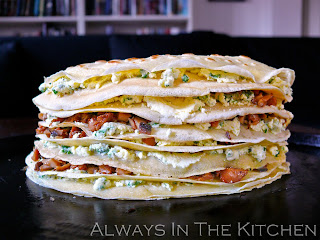
Looking for something interesting to do with a batch of crêpes? This is a Gâteau de Crêpes, aka Crêpe Cake or Crêpe Stack. It can be savoury, like this ones (full of mushrooms, herbs, and mascarpone), or they can be sweet (for example, alternately layered with dark chocolate and sour cherry jam). The possibilities are almost endless.
Since I was making only two servings (albeit very filling servings), I used a total of six crêpes, but in order to get a tall and pretty tower of a gâteau, I cut them in half and made a half-moon shaped stack.
For a filling, I chose duxelles (basically, finely chopped mushrooms, onion, garlic, butter, and brandy that have been sautéed together into an almost paste consistency), and a cheese mixture of mascarpone, crushed garlic, fresh parsley, basil, and sage, a good pinch of salt and a tablespoon or two of butter, which functioned as a sort of delicious glue to keep any stray mushrooms from running amok. If I'd done a better job chopping my mushrooms, the glue factor would have been moot, but worth including from a flavour perspective in any event.
If you are making a round Gâteau de Crêpes, simply double the ingredients and leave your crêpes intact.
Gâteau de Crêpes
Serves 2
6 6-inch crêpes, each sliced in half
Duxelles
450 grams mixed mushrooms, finely minced
(I used half chanterelles, half cremini)
2 tablespoons butter
1/4 medium onion, finely minced
2 cloves crushed garlic
2 tablespoons brandy
Kosher salt
If you have a food processor, use it to pulse the mushrooms until they are finely chopped. Otherwise, you'll need a knife and a bit more patience than I have. In a medium skillet over medium heat, sauté the onion, garlic, and mushrooms in the butter. Add a pinch of salt, and continue to sauté until the mushrooms start to stick. If you have any fresh thyme, you might want to add a pinch or two. Add the brandy, and stir through. Turn the heat to low and continue to cook and stir until the brandy has evaporated, and the mass becomes a purée.
Savoury Mascarpone
125 grams mascarpone
2 cloves garlic, crushed
large pinch of salt
2 tablespoons butter
1/3 cup chopped fresh herbs (parsley, basil, sage)
Mix everything together with a fork until thoroughly integrated.
If your crêpes are cold, warm them up. They won't be spending much time in the oven at the end, and you don't want them to start out chilly.
Lightly butter (or oil) a baking sheet (or pizza pan).
On each crêpe-half, spread a small amount of the mascarpone cream and a tablespoon or so of the duxelles. Be sure to spread the fillings all the way to the edges, to keep the stack from sagging at the sides. Place the first crêpe on the greased sheet, and then stack each "filled" crêpe-half on top of the previous one, until you run out of filling and crêpes. If you like, you can top the final crêpe with some grated parmesan, but it works just fine without, as well.
Place in a 400 F oven for about 10 minutes, or until the mascarpone is bubbling slightly and the top appears crisp at the edges.
Slice into two portions with a sharp chef's knife (a serrated knife would be more difficult to slice cleanly). Cut each slice again, to serve as an appetizer. Serve right away, or at room temperature. I served this one right away, with a chopped salad to follow.
Here it is once more, just before it went into the oven.
Flat side:
Round side:
Labels:
Breads,
French,
Miscellaneous,
Vegetarian
August 28, 2014
Cucumber Tea Sandwiches with Chile-Basil Butter
These darling little sandwiches were inspired by Madhur Jaffrey's Indian-accented tea sandwiches, which call for chile-mint butter, and don't contain cucumber. I was tempted to add a hint of ground coriander and cumin to the butter mixture, just to elevate the sense of Indian flavours, and I might do that next time. Hers also had a touch of lemon juice in the butter mixture, which I might try as well, as I think the added brightness will work nicely.
Cucumber Tea Sandwiches with Chile-Basil Butter
Makes 8 Tea-sized Sandwiches
4 larges slices of thinly sliced soft white bakery bread
2-3 inches finely sliced cucumber
3 tablespoons soft butter
2 tablespoons minced basil
1 minced green chile
Kosher salt
Black pepper to taste
Mix the butter, basil, green chile, and a pinch of salt (along with any bonus seasonings you'd like to add) until thoroughly combined. Spread the butter mixture thickly on one side of each piece of bread.
On two of the slices of buttered bread, layer as many pieces of cucumber, overlapping, as you can fit onto the bread. Don't worry about peeling the cucumber (unless it has an inedible peel), the dark green adds a nice bit of contrast. Top the cucumber'd bread slices with the other buttered slices of bread, to make two large sandwiches.
Trim the crusts, using a very sharp knife and a single downward slicing motion for each side, to prevent the sandwiches from trying to fall apart. Slice each sandwich into quarters, in whichever way you see fit, or use a sandwich punch or cookie cutters if you want fancy shapes.
Serve right away, so that the bread doesn't have a chance to dry out. If necessary, cover tightly with plastic wrap until ready to serve.
August 10, 2014
International Bento (Mixed): Ham, Cheese, & Walnut Crêpes with Greek Salad
I've been making crêpes fairly often since we moved to Germany. They're a wonderful, multi-purpose flatbread that you can make in advance, even refrigerating for a few days (or freezing...separate each one with parchment, and bag them up) so that you can have them on hand for quick breakfast, lunch, snacks, hors d'oeuvres, dinner, or dessert. It's all about what you fill them with, and how many of them you want to eat at a time, that determines their role.
I have posted a recipe for Crêpes before, showcasing one of the wonderfully tender and silky French styles of crêpe. I still make those (they are especially good as dessert crêpes, with a sweet filling), but I also have another, slightly less eggy-and-rich go-to recipe for an everyday crêpe that can be used in exactly the same way.
These crêpes are the ones you want to use if you want the emphasis to be on the filling slightly more than the crêpe itself (don't worry, they're still delicious!), if you want a slightly lower fat/calorie version, or if you go to make crêpes and discover that you only have two eggs on hand. If you are planning breakfast crêpes with an egg filling, you probably want to use this recipe rather than the other.
The ratios are from Cook This Not That! but with better (I think) mixing directions.
You can easily halve the batch, or double it, as you see fit.
Everyday Crêpes
Makes 10-12 6-inch crêpes
1 cup unbleached all-purpose flour
pinch of salt
2 large eggs
3/4 cup milk
1/2 cup water
1-2 tablespoons melted butter
In a medium mixing bowl (or food processor, or blender), mix the flour and salt. Separately, combine the eggs, milk, and water, and beat well. Add the liquid mixture to the flour, and whisk (or process with a cutting blade) until smooth.
If you are mixing by hand and cannot get rid of a few lumps, simply pour the batter through a sieve, and push-through or discard any lumps left behind.
Stir in the melted butter, and then let the batter rest for about 15 minutes so that the flour fully hydrates. If you're planning to fill the crêpes right away, you might want to get your filling(s) ready while the batter rests. Otherwise, just pour yourself a glass of something pleasant - might I suggest wine? - to sip at during the cooking process.
To make a six-inch (15 cm) crêpe, I use an eight-inch (20 cm) non-stick skillet. The skillet is usually measured by the width of the top of the pan, but the base is usually somewhat smaller. The base of my skillet is just over 6 inches. You can use whatever size skillet you like, for whatever size crêpes you like, but I find this to be the best all-purpose crêpe size.
Just like in the previous recipe:
Heat the skillet over medium heat until a drop of water dances. Spritz with canola oil, or brush very lightly with mild oil of your choice. You only need to do this for the first crêpe, if you're using a non-stick pan.
Using a ladle or scoop that holds 3 tablespoons, measure your first crêpe's worth of batter. Lift the skillet off of the heat (I hold it in the air) and quickly pour the batter into the middle of the pan. Drop the ladle back into the batter-bowl and rapidly tilt the skillet in a circular motion, to spread the batter until it evenly covers the base of the pan. Return the pan to the burner, and allow the crepe to cook until lightly golden, and the edges release from the pan, about a minute or two.
Slide a silicone spatula under the crêpe (or grab the edge carefully with your fingers) and flip it over. Let it continue to cook for a minute, and then slide the crêpe onto your work surface for filling.
Repeat until all of the crêpe batter has been cooked. This does take a little bit of time, unless you've got multiple skillets going and are multi-tasking like a champ, which is (well, one reason) why I suggest having a beverage on hand to sip while you cook.
The crêpes in the bento above have a filling of Tilsit cheese (you could substitute Havarti), very thinly sliced ham, and chopped toasted walnuts. I find that it's important when considering crêpe fillings to ensure that there is something that will act as a sort of "glue" to keep the filling together while you're eating. A filling of only dry items, such as dice chicken, chopped almonds, and asparagus will simply fall apart into its discrete components once you cut into it. A small amount of cheese, or scrambled egg, or thick sauce (or paste) of any kind will help keep the filling together.
The other compartment of the bento above has a Greek-ish salad chopped cucumber, bell pepper, tomato, feta, radishes and an oregano lemon dressing, and the little dark item is a miniature Chocolate Oatmeal Peanut Butter Chip muffin, as a tiny little dessert.
Labels:
Bento,
Freezer Treasures,
French,
Pork
July 27, 2014
Caribbean Curried Chicken Skillet Dinner
It's been a while since I made a rice-based skillet dinner, so I thought it was time. You can easily adapt this recipe to use boneless chicken thighs, if you prefer, simply by shortening the cooking time and finishing the cooking solely on the stovetop. However, you won't get quite as pretty an effect, and of course, you won't get the crispy, delicious chicken skin.
Caribbean Curried Chicken Skillet Dinner
Serves 4
8 bone-in chicken pieces
1 tablespoon unbleached flour
2 — 3 tablespoons Jamaican-style curry powder*
1 tablespoon peanut oil
1 cup parboiled rice
2/3 cup coconut milk
1 1/3 cups water
3 tablespoon shredded unsweetened coconut, toasted
2 large carrots, shredded
30 grams sultana or golden raisins
1/4 cup finely sliced green onions
1 — 2 Scotch Bonnet Chili peppers, minced
Preheat oven to 400 F.
Combine the flour, curry powder (and salt, if you are using an unsalted curry powder) in a shallow bowl, and toss the chicken pieces to lightly coat.
In a large skillet over medium heat, heat the peanut oil and add the chicken pieces, skin side down, working in batches if you need to. Sear the chicken until darkly golden brown on the skin side, about six to eight minutes, and then flip over to brown the other side, too (for about five minutes). Set the chicken aside on a clean plate.
While the chicken is browning, combine the coconut milk, water, and the remaining curry powder/flour mixture, whisking until smooth, and have it standing ready.
When all of the chicken is out of the pan, drain most of the fat (and any loose browned curry powder) leaving only a thin layer of oil in the pan. Add the shredded carrots, green onions, scotch bonnets, and raisins. Stir and fry for a minute or so, before adding the rice and toasted coconut. Stir around until the rice is thoroughly coated, scraping the bottom of the skillet with your spoon or spatula so that everything is evenly integrated.
Add the coconut milk mixture to the rice and stir well, to ensure that nothing is sticking to the bottom of your skillet.
Return the chicken to the pan, placing each piece skin-side up in a single layer so that the skin is not submerged in the liquid. Place skillet uncovered in the hot oven, on a middle shelf for 30 minutes. (check at 20 minutes to see if more liquid is needed).
Remove chicken pieces from the skillet onto serving plates, and spoon up the rice with a big serving spoon. The rice will be creamy-textured rather than pilaf style. If I have leftovers, I take the meat off the bones before cooling and refrigerating, to make re-heating in a skillet or microwave easier.
This dish can be pretty fiery and intense, so a fresh green salad will help provide a cooling counterpoint.
*Use a Jamaican-style curry powder if possible. Also, check to see if your curry powder contains salt; if not, you may want to add a half-teaspoon of kosher salt (or coarse sea salt).
Labels:
Chicken,
Chiles,
Rice,
Skillet Dinners
July 20, 2014
Käsespätzle: Germany's Macaroni & Cheese
This is German comfort food, as evidenced by its remarkably frequent appearance on menus here. It sometimes has different names - for example, one of my favourite places for German classics calls their version of this "Brauerspätzle" (Brewer's Spätzle), but when you read the description, it's the same dish. You can even buy it frozen in bags in the freezer section of supermarkets, although I can't imagine the quality is that impressive.
There's a lot of room for personalization here. Käsespätzle can be served vegetarian or with tiny ham cubes, the latter being the most common one I've seen (Germany loves its pork, after all). It can be short, stubby spätzle, or longer, more uniformly thin ones. It can have crispy onions on top, or finely diced sautéed onions throughout. You can use Emmenthal, Gouda, Bergkäse, Edam, or a blend of whatever grated/grate-able cheeses you have hanging about in your fridge. I used a pre-shredded combination of Gouda and Tilsit, which was advertised as "cheese for gratin".
This took me about 70 minutes, start to finish, and makes a bit of a mess (but one that is mercifully easy to clean up).
Pro Tip: Have a sink or basin of cold water standing by for you to put the batter-goopy tools in as soon as you've finished the stove-top phase.
Käsespätzle
Serves 4-6
Spätzle
4 eggs
400 grams all-purpose flour
1 teaspoon kosher salt
1/2 - 1 cup water (or more, as needed)
For assembly:
150 - 200 grams grated tasty cheese
125 grams tiny ham cubes (Schinken Würfel, bacon, or similar)
3 tablespoons cream
1 medium onion
1 tablespoon olive oil
Combine flour and kosher salt in a medium-large mixing bowl or food processor. Beat the eggs and 1/2 cup of water together, and stir into the flour mixture. Add additional water until you get a thin batter, that falls in ribbons from the spoon or whisk. Beat/whisk/blend until smooth. If you can't get it completely smooth, pour it through a sieve and push any lumps through, otherwise you risk clumps of uncooked flour in your finished noodles. Let stand 15 minutes to allow the flour to fully hydrate.
Next thinly slice an onion, and set it to fry over low heat in the olive oil (with maybe a pinch of salt), until deeply coloured and crispy. This will take a while, and is low maintenance. It can finish crisping up while you're cooking the spätzle.
Preheat your oven to 400 F while you cook the spätzle.
While the batter is resting, get your onions and ham cubes (if using) cooking and set up your spätzle cooking rig. If you have a spätzle Hobel or spätzle Brett and know how to use it, carry on however you see fit. If not, here's my method:
Half-fill a tall saucepan with water. Ideally, the width of the saucepan will allow you to rest a four-sided grated over the top in a way that you won't need to hold onto it (although I do usually use one hand to keep it steady while I'm working). The batter is going to be pushed from inside the grater through the "large holed" side straight into the boiling salted water. You're going to want to lightly oil the grater (just the one side), inside and out, to help the batter fall more smoothly through the holes.
Place the grater over the gently boiling, salted water, with the largest round(ish)-holed side facing down. Use a large spoon to add a scoop of batter inside the grater. The batter will start to drip through the holes.
Using a flat-ended wooden spoon (you can use a spatula, but is easier to use a rigid tool), gently but firmly scrape the dough back and forth along the inside the grater, repeatedly, until all of the dough is pushed through.
Remove the grater from the top of the pot, and start using a spider-tool or other skimmer to remove the floating spätzle to a near-by waiting bowl. I like to use a large mesh colander over a plate, but a large bowl also works fine.
Return the grater to the pot and repeat the dough scooping and scraping, spoonful by spoonful, removing the cooked spätzle regularly with your skimmer, until all of the batter is gone. Remove the grater and any other batter-crusted tools immediately to a basin of cold water, and allow them to soak while you complete the next steps.
Loosen the spätzle with a fork, to de-clump it. In a 10 or 11-inch skillet (cast iron is terrific), rub a little butter or vegetable oil over the bottom, and then add a layer of spätzle. Top with a handful or two of grated cheese, and some of the ham cubes. Repeat until all of the spätzle are in the pan, ending with a layer of cheese or cheese-and-ham. I got about three layers of noodles, but your mileage may vary. Scatter the fried onions evenly over the top of the last cheese layer, and gently pour a couple of tablespoons of cream over all.
Place uncovered in the preheated oven for 15 - 20 minutes. Serve with a nice big salad (or at least some sliced fresh vegetables).
Spätzle also reheats quite well the next day, either in the microwave, or in a foil-covered dish in a moderate oven.
July 13, 2014
Strawberry Shortcake
There are generally two camps for Strawberry Shortcake lovers -- the biscuit camp and the sponge cake camp. As you can see here, I clearly fall into Camp Biscuit. In fact, it was not until I was in my late teens that I learned about the sponge cake variation. It sounded good, but was a little disappointing when I tried it. Sponge cake gives you a much softer overall dessert -- easily made in advance, and easily sliced and portioned for a crowd, for sure -- but the firmer, yet still tender, biscuit gives each serving of this dessert an individual, more impressive character: each biscuit becoming a small work of art assembled for each guest. The crisply sweet finish on the golden top crust, the squish of the top of the biscuit descending into the tender interior of whipped cream and macerated berries, feel more decadent to me.
The biscuit method for Strawberry Shortcake is almost laughably easy: make your favourite drop-biscuit dough with an extra teaspoon of sugar per cup of flour, and before baking brush the tops with cream and sprinkle with a little more sugar.
If strawberries are not your thing, plenty of other fruits also work beautifully: raspberries, or peaches, or my all-time favourite, the tiniest possible blackberries.
Strawberry Shortcake
Serves 4
Berries:
3 - 4 cups sliced strawberries
2 tablespoons sugar
Toss the strawberries with the sugar and refrigerate, covered, for a couple of hours, stirring once or twice.
Shortcake Biscuits:
1 cup pastry flour
2 teaspoons sugar, plus extra to finish
2 teaspoons baking powder
1/2 teaspoon baking soda
pinch of salt
3 tablespoons butter
7 tablespoons milk
1 tablespoon cream
Combine flour, sugar, baking powder, baking soda, and salt. Cut in the butter with a pastry blender (or use your usual method, if different), and set aside until you're ready to bake the biscuits, say... just after dinner.
Preheat the oven to 450 F, and lightly grease a baking sheet. Make a well in the flour mixture and add the milk all at once. Stir rapidly with a fork until it becomes a sticky dough without streaks of dry flour. Drop in four equal spoonsful to make four biscuits on your baking sheet. Lightly press the biscuit into shape, flattening the top slightly if necessary. Brush the tops with cream and sprinkle lightly with sugar. Bake for 12 - 15 minutes, or until risen and golden brown. Allow to cool slightly before assembling, so that the whipped cream doesn't melt.
Whipped Cream:
Whip 3/4 cup of cream with a teaspoon of sugar and a quarter teaspoon vanilla extract (or use vanilla sugar), until you have stiff peaks.
To assemble:
Use a fork to separate the biscuits into top and bottom halves. Spoon whipped cream onto the bottoms, top with berries, then another dollop of whipped cream before perching the lids on top. Serve immediately.
July 06, 2014
Smoked Duck Étouffée with Artichokes
I love Cajun food, which probably comes as no surprise to those of you who know how often I use chiles (and how many, and how hot) in my cooking. That said, there is a wealth of Cajun and Creole dishes that are not hot at all. They are often intensely flavourful without necessarily using loads of chile peppers.
This dish is one of those. The combination of a caramel-coloured roux, smoked duck breast, and artichoke hearts, along with the Cajun trinity of onion, celery, and green bell pepper and typical Cajun herbs and spices makes this Étouffée recipe decadent, richly flavoured, and incredibly satisfying, and is a unique dish in its own right rather than simply replacing seafood with duck in a Shrimp or Crawfish Étouffée. It does have the tiniest bit of cayenne in it, and you could add a drop or two of Tabasco sauce if you insist, but this recipe doesn't even remotely qualify as spicy.
Do not mess around when you are making your roux. It takes a bit of time, and patience, and stirring - generally around 25 minutes of stirring, but it's easy to do and your patience will be rewarded. Make sure you have completed all of your mise en place before you begin the roux. You can cook the rice separately during the simmering stage, which only requires intermittent stirring.
If you do not have access to duck fat to make your roux, use lard. If you cannot source duck stock, a strong brown poultry stock (such as roasted-bone chicken stock) will do, but do note that without duck fat and duck stock in this dish, you will be reducing the luxurious duck flavour significantly. If you've never made roux before, here are some links you might want to check out: Making Roux Step by Step (Allrecipes), and Master the Art of Making Roux (The Daily South). Making a roux is not difficult, but it must be done correctly -- no shortcuts or cowboy moves until you've mastered the basics -- at which time you'll understand why cowboy moves simply shouldn't be applied to roux.
Smoked Duck Étouffée with Artichokes
Adapted from Cajun-Creole Cooking by Terry Thompson-Anderson
Serves 4
Roux
1/2 cup duck fat
1/2 cup flour
Étouffée
1 large yellow onion, diced
1 medium green bell pepper, diced
1 stalk celery, diced
4 large garlic cloves, minced/crushed
600 grams smoked duck breast, diced (largish)
1/4 teaspoon ground cayenne
1/2 teaspoon dried thyme
1/3 teaspoon dried marjoram
1/4 teaspoon dried sage
1/4 teaspoon ground black pepper
dash Tabasco sauce (optional)
1 cup duck stock (room temperature)
3-4 canned artichoke hearts, cut into sixths
2 green onions
handful flat-leaf parsley, chopped
Before you begin, prepare all ingredients so that they are ready to add to the dish. If your duck breast is skin-on, remove the skin and set aside for another dish - perhaps turn it into cracklings to garnish a pasta or an omelette or risotto, or tuck it into the freezer until you know what you want to do with smoked duck skin. Measure out your spices (they can all go into a single mise dish).
In a large Dutch oven, prepare your roux by melting the duck fat over high heat and add all of the flour at once (you can use all-purpose flour or cake flour). Whisk like mad for about a minute, to make sure you don't get any lumps. Then reduce the heat, change your whisk to a spatula, and stir over medium-low heat until it is all smooth and gently bubbling. Continue to stir relentlessly, regularly scraping the entire surface of the bottom of the pot, for about 25 - 35 minutes, or until the roux passes "peanut butter" (light brown) colour and moves on to "caramel" (medium-brown). The darker the roux, the easier it is to burn it, so be increasingly vigilant as you go along. Once the roux begins to darken, the process accelerates: you need to pay attention.
As soon as the roux reaches the right colour, add your onion, bell pepper, and celery (the "Cajun trinity") and the garlic, and cook, stirring frequently, for about 10 minutes, or until they have started to soften. You don't need to turn the heat up - it's plenty hot already.
Add the spices (note there is no added salt in the recipe - there's quite enough from the smoked duck and the duck stock). Stir the spices through and allow to cook for a couple of minutes before adding the diced duck breast. If you are adding Tabasco sauce, add it now.
Add the duck breast, and stir until it is thoroughly coated with the roux.
Pour in the duck stock in a steady stream, stirring constantly, until it is all integrated. Reduce the heat to the lowest setting, cover, and let simmer for 30 minutes, stirring occasionally. At this time, you can put your rice on to cook. We've used parboiled rice here, but long grain white or brown rice would also be fine.
At the end of the simmering time, add the artichoke heart pieces, the green onions, and the parsley, and cook for a further 5 or 10 minutes. Taste the Étouffée and add salt if needed (you probably won't need any, but it's good to check). When the artichoke heart pieces are heated through, you're ready to serve.
To serve, place about 3/4 cup rice in the middle of individual serving bowls, and spoon the Étouffée in around the rice. I like to use a round measuring cup (lightly buttered) to shape the rice --just pack the rice into the cup and turn it over into the middle of each bowl-- but it's certainly not necessary.
Labels:
Game,
Palle cooks,
Rice
June 22, 2014
Schweizer Wurstsalat (Swiss Sausage Salad)
This is an enormously popular salad in this part of Germany, and while variations are also enjoyed in Switzerland, Austria, and the Alsace, this particular version of Wurstsalat (which also goes by the names "Straßburger Wurstsalat" and "Elsässer Wurstasalat") is often referred to as "Schweizer", meaning Swiss, because of the inclusion of Emmental cheese. It's a common summertime snack (as you can imagine, it goes rather well with a nice glass of beer) or light lunch, and easy to pack for a picnic.
As with the Rheinischer Kartoffelsalat, in my last post there are many, many iterations of this salad, and you can easily customise it as you see fit. As previously, I'm posting a fundamental version for your consideration, but feel free to adjust the proportions of the key ingredients — as I served this with the potato salad as linked, I kept the number of pickles somewhat discreet, although I have seen some versions that boast almost as much pickle as meat, and ones with a shocking amount of onions. There are versions with or without cheese, and versions with mayonnaise instead of marinade. Some delis here will have two or three different versions, so you can choose depending on your mood. So feel free to let your own needs and preferences dictate the balance of the various ingredients.
One thing that I appreciate about grocery shopping here is that there tends to be no real difference in price for "format shifting". That is to say, if I buy my cheese or meat as a block, or in slices, or shredded, it costs pretty much the same, priced by weight. Since I can buy pre-julienned sausage here, too — available, I'm sure, expressly due to the popularity of this salad in these parts — this dish comes together in a snap. You'll see that the marinade is quite similar to that of the potato salad, but has less liquid, since none of the marinade gets absorbed.
Schweizer Wurstsalat
Swiss Sausage Salad
Serves 4
300 grams thinly julienned sausage (recommended: Schinkenwurst or Lyoner sausage)
1/4 - 1/2 medium yellow or red onion, finely sliced
6 - 8 cornishon-style pickles, julienned
3/4 - 1 cup grated Emmental cheese (or Edam, or Gouda)
Marinade:
100 millilitres vegetable broth or stock
1/4 cup finely sliced green onion
2 tablespoons fresh parsley
3 tablespoons white wine vinegar
1 tablespoon hot mustard
3 tablespoons neutrally-flavoured vegetable oil
1/4 teaspoon Kosher or coarse sea salt
ground white pepper to taste
Heat the vegetable broth/stock until not-quite boiling, and remove from the heat. In a medium-large mixing bowl, combine the green onion, parsley (finely minced), vinegar, mustard, oil, salt and white pepper and whisk. Slowly pour in the broth, whisking, to bring the marinade together. Add the julienned sausage and stir well, ensuring each piece is thoroughly coated with the marinade. Cover and refrigerate for at least an hour, or overnight. Stir periodically, if convenient.
When you're ready to finish the salad, give it a quick stir, and then add the yellow or red onion, the pickles (julienned), and the grated cheese. Toss lightly to ensure that the marinade (I guess it's a dressing, by this stage) gets evenly distributed, and serve with buttered bread on the side.
One of the attractive looking versions that I've seen includes tiny bits of red chile peppers (and possibly also chile flakes). You could also use paprika sausage (which is essentially Lyoner sausage with pepper flakes) for all or a portion of the meat. I wouldn't use a super aged or smoked Gouda here, as it might overpower (or, go ahead, but maybe use half the amount of cheese to start, and adjust as necessary). While this salad is normally served without greens, you could certainly serve it on a bed of baby lettuces, for a sort of chef salad effect (with or without the hard-boiled egg). You could probably also use it as a basis for a pasta salad, although I think you would need quite a bit more marinade, and maybe more parsley.
June 19, 2014
Rheinischer Kartoffelsalat (Rhineland-Style German Potato Salad)
Summer weather has arrived in Rheinland-Pfalz, and with it many restaurants have switched over to their summer menus. Oh, not to worry, you can still get the heartiest of hearty items (Sauerbraten, Rinderrouladen, Goulash, etc.), but the seasonal offerings have definitely shifted. This includes a fundamental shift in the lunchtime menus from fried potatoes (that is, bratkartoffeln) on the side, to potato salad.
I was a pleased and surprised, here in the heart of sweetened mayonnaise country, to discover that most of the potato salads in this region are marinated in a vinaigrette as opposed to a creamy dressing. What didn't surprise me, however, is the lack of crumbled bacon in the salads. Oh, a lot of them have pork in them, but it's ham. Tiny, tiny cubes of fried ham. Also, not every potato salad, even the Rheinisch ones, contains pork - although plenty of them do. But it is definitely not the crumbled bacon, or even bacon bits, that so often comes with the "German Potato Salad" label in Canada. I chose to make this one vegetarian, simply because I was serving it as part of a duo alongside a sausage and cheese salad, and decided that my meat requirements were being well met already.
At its most plain, this potato salad omits the radishes, and at its most fancy (known as Bunter (colourful) Kartoffelsalat) it will have not only the radishes, but also a sparse inclusion of red and/or yellow bell pepper pieces, and possibly fresh cucumber to go alongside the pickles. The fun thing about salads is that it's very easy to customise them to your personal tastes. So, by all means, feel free to add the extra vegetables. Or tiny cubes of fried ham. This ham-free version is vegan.
Rheinischer Kartoffelsalat
Rhineland-Style German Potato Salad
Serves 4 - 6
2 kilos waxy potatoes
1/2 medium yellow onion
4 cornishon-style pickles
4 large radishes
200 millilitres vegetable stock or broth
1/4 cup white wine vinegar
1 tablespoon hot mustard
1/2 teaspoon kosher or coarse sea salt
white pepper to taste
1/4 cup parsley (and/or fresh dill)
Boil and peel the potatoes in whichever order you choose. Allow them to cool, and then cut them into slices. Some of those slices will break up a bit - that's supposed to happen, and if it doesn't happen now, it probably will when the remaining ingredients are stirred in. Put the potatoes in a bowl with a bit of extra room (to allow you to stir).
In a small saucepan, heat the vegetable stock or broth (or heat up some water and add vegetable base as is appropriate). Add the vinegar, mustard, salt and white pepper, and whisk to partially integrate. Finely dice the onions, and add them to the stock, simmering very briefly - not for more than about two minutes. Pour the onion-stock mixture over the potatoes, and stir through. Allow to cool at room temperature for about 15 minutes, then stir in the parsley. Cover and place in the fridge. Let the potatoes soak up the liquid for at least an hour or two, then thinly slice and add the cornishons and radishes, and any of the optional additional ingredients that you like. Taste, and add a little extra vinegar if you like (places around here serve it extremely tart, which is very refreshing in hot weather) and more salt if needed. Allow the salad to chill again, covered, for about half an hour, and serve. If you like, you can garnish with wedges of hard-boiled egg or tomato. I like to do a final pass with freshly ground black pepper to serve.
Coming soon: Swiss-style Sausage Salad (Update: Now posted!)
May 31, 2014
Himmel und Erde (Heaven & Earth), plus International Bento (German)
Himmel und Erde (Heaven and Earth) is a classic regional meal popular in the state of Rheinland-Pfalz (also called the Rhineland-Palatinate), among others.
This is really more of a serving suggestion than a recipe - I'm assuming that you know how to make simple mashed potatoes, and can source decent sausage, onions, and applesauce. A basic sort of peasant dish, Himmel und Erde is simply mashed potatoes, served with sausages, applesauce, and fried onions. Himmel, or Heaven, is invoked by the apple, which grows high in the air, and Erde, or Earth, is invoked by the potato, which in some German dialects is Erdapfel ("earth apple", not unlike the nomenclature for French pommes de terre, which also means "apples of the earth"). But where do the sausage and fried onions come in? Well, short answer is, that the sausages are pork, and Germans seem to serve pork with almost everything. Fried onions are just a bonus.
The classic iteration of this dish that I can find is with blood sausage and bratwurst, and that's what I've done here. The blood sausage is a smokier version of the United Kingdom's blood pudding, which you could also use in a pinch. The applesauce I made by peeling and dicing some pie-making apples into a saucepan with a pinch of salt and some water, and then simmering and stirring until they became sauce, but you could use any applesauce you like (I would avoid overly sweetened ones myself...but a lot of Germans probably wouldn't). Then, it's just a matter of cooking it all up and getting it onto the plate.
So, boil your potatoes to make the mash, and warm up your applesauce. While that's happening, sauté your onion rings in the same skillet that you're using to cook up the bratwurst. When the applesauce is ready, turn it off with a lid on to keep it warm. Push the onions and bratwurst to one side of your skillet, and add the slices of blood sausage to the pan. Let the blood sausage cook over medium heat (turning once) for about five or six minutes, while you mash the potatoes. Once the potatoes are mashed, the onions and sausages are fried and standing by, assemble as desired.
I'm contemplating a slightly more elegant version of this dish using roasted potatoes and apples in wedges, in some sort of clever baking-dish assembly, but that hasn't happened yet.
I sent the leftovers to work with Palle the next day as a German bento. There are extra onions acting as a bed for the blood sausage, and no bratwurst (this seemed plenty filling for a lunch as it was). His co-workers seem to find it amusing when he arrives with home cooked German food for lunch, while many of them head out for pizza and Burger King.
Subscribe to:
Posts (Atom)