Showing posts with label Rice. Show all posts

February 07, 2015

Prawn & Pumpkin Risotto


This is the traditional Hallowe'en dinner in our household, but really, you can make it all winter long when the winter squashes are cheap and plentiful. I've used a butternut squash here, but you could of course use any cooking pumpkin with firm, dense flesh (acorn or muscat squash might not be at their best here, because they would likely turn to mush with all the stirring). The final colour of the dish will depend greatly on which squash you decided to use, but usually ranges from an intense yellow to a vibrant orange.

For the shrimp, please check out this Oceanwise resource page for prawns/shrimp if you need help making an informed choice about sustainable harvesting.

If you're vegetarian/vegan, or just not a fan of seafood, you can omit the prawns and still have a beautiful, delicious side dish. Either way, don't drown in in cheese at the end - it really doesn't want or need it.

Prawn & Pumpkin Risotto

Serves 4

4 cups diced-small pumpkin or winter squash
250 grams risotto rice (arborio, carnaroli, or similar)
1 small onion, finely diced
4 cloves of garlic, minced or pressed
4 cups vegetable broth
1/2 cup white vermouth or dry white wine
2 tablespoons olive oil or butter
1 1/2 tablespoons tomato paste
1/2 teaspoon coarse sea salt
1/4 teaspoon ground white pepper
250 grams raw prawns or large shrimp (frozen is fine)
Hot water from a recently boiled kettle (just in case)

If you've read my other risotto recipes, you will know that I am extremely particular about the size of ingredients in my risotto. My theory is, broadly, if it's not a featured ingredient, it should be no bigger than a (cooked) grain of the rice that you are using. Basically, onions, I'm looking at you. Because the squash and prawns are features, they get to be bigger, but I do find having a small dice for the pumpkin here makes a more visually and texturally pleasing choice.

First step, as always, is get your mise en place ready: Peel, clean, and dice your pumpkin, and set aside. If you have a little less pumpkin than 4 cups, it's still fine, although 4 cups gives the best result. Finely dice your onion, and mince your garlic. Warm up your broth and keep it on a low flame on the stove, so it's ready to be ladled into the rice. Clean the shrimp, removing shells (if necessary) and veins. If frozen, rinse them in a sieve under cold running water until they are mostly defrosted. Basically, get all ingredients prepared, measured, and standing by, because you get no further time to prep once you've started cooking. Be sure to boil a kettle, and have the hot water standing by in case you need it later.

In a large saucepan, heat the butter or olive oil over medium heat until quite hot, and then add the shrimp and quickly sauté them until they just barely change colour. Remove to a nearby plate/bowl to add into the risotto later.

In the same saucepan, without cleaning it, add the onion and garlic, and sauté just until the onion begins to turn translucent. Add the salt and white pepper, and stir through.

Next, add the rice and stir well, to get a nice, thin coating of fat on the rice grains. Add the tomato paste, and stir through until it is completely integrated and there are no streaks of red running through the rice. Add the diced squash, and stir it through gently. (You can also reverse the order of adding the rice vs. the squash, no biggie as long as everything is nicely coated in the end. I find it easier to add the tomato paste before adding the squash, though, to get it evenly distributed.)

Add all of the wine/vermouth at once, and stir, carefully scraping up the bottom of the pot so that nothing sticks. Lower the heat to medium-low, and begin to add the warm vegetable broth, one ladleful at a time, stirring gently but pretty much constantly in between each addition until the liquid has been absorbed before adding more. It should take about 25 - 35 minutes to add all of the liquid, and that variable is based on how hot your burner is.

If you get to the end of your broth and find that the rice is not quite cooked enough to your taste, add a little of the hot water from your recently boiled kettle, and continue until the texture is just right - a little bite to the rice, but not crunchy. Next time, you might want to lower the heat a bit more.

When the rice is ready, stir the prawns gently into the risotto. If you want an especially luxurious dish, add in another tablespoon of butter or olive oil, but it's not strictly necessary. Cover the risotto, and remove from the heat. Let stand for five minutes, and then spoon into shallow bowls and serve. Feel free to add a garnish of parsley if you like, but steer clear of the parmesan.

December 07, 2014

Arroz con Pollo, Chorizo, y Choclo: Rice with Chicken, Chorizo, and Corn


Rice-based skillet dinners (or other one-pot meals) are very rewarding to make and to eat. I grew up on my mother's iteration of chicken and rice, but as an adult, I've discovered the joy of so many different versions from all over the world. Takikomi Gohan in the Japanese style, for example, Chinese Chicken Fried Rice, Caribbean Chicken & Rice, Italian Chicken Risotto, Russian Chicken Plov, and of course, the many, many versions of Arroz con Pollo - Chicken and Rice to our Spanish speaking friends.

My version plays up the Spanish and Latin American flavours, with saffron and chorizo that you might find in Europe, and the corn that you might find in a Peruvian variation. The method is rather like an oven-finished paella (in the Mark Bittman style); a quick weeknight meal that you can put in the table without a lot of fuss.

I have used fresh corn, cut off the cob, but you could as easily use frozen kernels.

Arroz con Pollo, Chorizo, y Choclo

Serves 4

1 3/4 cups short grain rice, such as Bomba
400 grams boneless chicken, chopped
1 - 2 cups sliced cured chorizo
3 1/2 cups water or chicken broth
1 tablespoon olive oil
1 medium yellow onion, diced
1 fresh corn cob worth of corn kernels (approximately 1 1/4 cups)
2 garlic cloves, sliced
1 tablespoon tomato paste
1 pinch saffron, brewed
2 teaspoon paprika
splash of dry sherry

Preheat your oven to 400 F., with the rack in the middle or lower-middle slot.

To brew your saffron, grind it with the back of a spoon in a small dish, and add a tablespoon or so of near-boiling water. Let stand for about 10 minutes while you prep the rest of the ingredients

In a 30-centimetre skillet, heat the sliced chorizo in the olive oil, and quickly sauté the chicken pieces until lightly golden on the outside, but not cooked through. Add the diced onion and sliced garlic, and stir through. When the onions have turned translucent, add the paprika and the brewed saffron, and keep stirring through. Add the tomato paste, and a splash of sherry, and stir again.

Add the rice, and stir it through until every grain of rice is coated in the rich, golden colour. Add the corn, and stir through until evenly distributed. Add the water or broth (or stock), and stir through once more. Bring the liquid just to a light boil.

Carefully move the (very full!) pan to the oven, and bake uncovered for 20 minutes. Check to see if it needs a bit more liquid, and add up to a quarter cup if it does. Turn the heat off, and continue to cook with carryover heat for another 10 minutes. Test a few rice grains to make sure they are done. Scoop into shallow bowls, and serve with crusty bread and a salad on the side.

You can garnish with freshly chopped parsley if you like, or a pinch of pimentón - Spanish smoked paprika.

There are so very many more chicken and rice recipes out there to try, from the simple to the far more complex! Biryani, Jollof Rice, Oyakodon, Clay-pot Chicken Rice, Hainanese Chicken Rice, Zereshk Pulao...so many wonderful dishes yet to come.

July 27, 2014

Caribbean Curried Chicken Skillet Dinner


It's been a while since I made a rice-based skillet dinner, so I thought it was time. You can easily adapt this recipe to use boneless chicken thighs, if you prefer, simply by shortening the cooking time and finishing the cooking solely on the stovetop. However, you won't get quite as pretty an effect, and of course, you won't get the crispy, delicious chicken skin.

Caribbean Curried Chicken Skillet Dinner

Serves 4

8 bone-in chicken pieces
1 tablespoon unbleached flour
2 — 3 tablespoons Jamaican-style curry powder*
1 tablespoon peanut oil
1 cup parboiled rice
2/3 cup coconut milk
1 1/3 cups water
3 tablespoon shredded unsweetened coconut, toasted
2 large carrots, shredded
30 grams sultana or golden raisins
1/4 cup finely sliced green onions
1 — 2 Scotch Bonnet Chili peppers, minced

Preheat oven to 400 F.

Combine the flour, curry powder (and salt, if you are using an unsalted curry powder) in a shallow bowl, and toss the chicken pieces to lightly coat.

In a large skillet over medium heat, heat the peanut oil and add the chicken pieces, skin side down, working in batches if you need to. Sear the chicken until darkly golden brown on the skin side, about six to eight minutes, and then flip over to brown the other side, too (for about five minutes). Set the chicken aside on a clean plate.

While the chicken is browning, combine the coconut milk, water, and the remaining curry powder/flour mixture, whisking until smooth, and have it standing ready.

When all of the chicken is out of the pan, drain most of the fat (and any loose browned curry powder) leaving only a thin layer of oil in the pan. Add the shredded carrots, green onions, scotch bonnets, and raisins. Stir and fry for a minute or so, before adding the rice and toasted coconut. Stir around until the rice is thoroughly coated, scraping the bottom of the skillet with your spoon or spatula so that everything is evenly integrated.

Add the coconut milk mixture to the rice and stir well, to ensure that nothing is sticking to the bottom of your skillet.

Return the chicken to the pan, placing each piece skin-side up in a single layer so that the skin is not submerged in the liquid. Place skillet uncovered in the hot oven, on a middle shelf for 30 minutes. (check at 20 minutes to see if more liquid is needed).

Remove chicken pieces from the skillet onto serving plates, and spoon up the rice with a big serving spoon. The rice will be creamy-textured rather than pilaf style. If I have leftovers, I take the meat off the bones before cooling and refrigerating, to make re-heating in a skillet or microwave easier.


This dish can be pretty fiery and intense, so a fresh green salad will help provide a cooling counterpoint.

*Use a Jamaican-style curry powder if possible. Also, check to see if your curry powder contains salt; if not, you may want to add a half-teaspoon of kosher salt (or coarse sea salt).


July 06, 2014

Smoked Duck Étouffée with Artichokes


I love Cajun food, which probably comes as no surprise to those of you who know how often I use chiles (and how many, and how hot) in my cooking. That said, there is a wealth of Cajun and Creole dishes that are not hot at all. They are often intensely flavourful without necessarily using loads of chile peppers.

This dish is one of those. The combination of a caramel-coloured roux, smoked duck breast, and artichoke hearts, along with the Cajun trinity of onion, celery, and green bell pepper and typical Cajun herbs and spices makes this Étouffée recipe decadent, richly flavoured, and incredibly satisfying, and is a unique dish in its own right rather than simply replacing seafood with duck in a Shrimp or Crawfish Étouffée. It does have the tiniest bit of cayenne in it, and you could add a drop or two of Tabasco sauce if you insist, but this recipe doesn't even remotely qualify as spicy.

Do not mess around when you are making your roux. It takes a bit of time, and patience, and stirring - generally around 25 minutes of stirring, but it's easy to do and your patience will be rewarded. Make sure you have completed all of your mise en place before you begin the roux. You can cook the rice separately during the simmering stage, which only requires intermittent stirring.

If you do not have access to duck fat to make your roux, use lard. If you cannot source duck stock, a strong brown poultry stock (such as roasted-bone chicken stock) will do, but do note that without duck fat and duck stock in this dish, you will be reducing the luxurious duck flavour significantly. If you've never made roux before, here are some links you might want to check out: Making Roux Step by Step (Allrecipes), and Master the Art of Making Roux (The Daily South). Making a roux is not difficult, but it must be done correctly -- no shortcuts or cowboy moves until you've mastered the basics -- at which time you'll understand why cowboy moves simply shouldn't be applied to roux.

Smoked Duck Étouffée with Artichokes
Adapted from Cajun-Creole Cooking by Terry Thompson-Anderson
Serves 4

Roux
1/2 cup duck fat
1/2 cup flour

Étouffée
1 large yellow onion, diced
1 medium green bell pepper, diced
1 stalk celery, diced
4 large garlic cloves, minced/crushed
600 grams smoked duck breast, diced (largish)
1/4 teaspoon ground cayenne
1/2 teaspoon dried thyme
1/3 teaspoon dried marjoram
1/4 teaspoon dried sage
1/4 teaspoon ground black pepper
dash Tabasco sauce (optional)
1 cup duck stock (room temperature)
3-4 canned artichoke hearts, cut into sixths
2 green onions
handful flat-leaf parsley, chopped

Before you begin, prepare all ingredients so that they are ready to add to the dish. If your duck breast is skin-on, remove the skin and set aside for another dish - perhaps turn it into cracklings to garnish a pasta or an omelette or risotto, or tuck it into the freezer until you know what you want to do with smoked duck skin. Measure out your spices (they can all go into a single mise dish).

In a large Dutch oven, prepare your roux by melting the duck fat over high heat and add all of the flour at once (you can use all-purpose flour or cake flour). Whisk like mad for about a minute, to make sure you don't get any lumps. Then reduce the heat, change your whisk to a spatula, and stir over medium-low heat until it is all smooth and gently bubbling. Continue to stir relentlessly, regularly scraping the entire surface of the bottom of the pot, for about 25 - 35 minutes, or until the roux passes "peanut butter" (light brown) colour and moves on to "caramel" (medium-brown). The darker the roux, the easier it is to burn it, so be increasingly vigilant as you go along. Once the roux begins to darken, the process accelerates: you need to pay attention.

As soon as the roux reaches the right colour, add your onion, bell pepper, and celery (the "Cajun trinity") and the garlic, and cook, stirring frequently, for about 10 minutes, or until they have started to soften. You don't need to turn the heat up - it's plenty hot already.

Add the spices (note there is no added salt in the recipe - there's quite enough from the smoked duck and the duck stock). Stir the spices through and allow to cook for a couple of minutes before adding the diced duck breast. If you are adding Tabasco sauce, add it now.

Add the duck breast, and stir until it is thoroughly coated with the roux.

Pour in the duck stock in a steady stream, stirring constantly, until it is all integrated. Reduce the heat to the lowest setting, cover, and let simmer for 30 minutes, stirring occasionally. At this time, you can put your rice on to cook. We've used parboiled rice here, but long grain white or brown rice would also be fine.

At the end of the simmering time, add the artichoke heart pieces, the green onions, and the parsley, and cook for a further 5 or 10 minutes. Taste the Étouffée and add salt if needed (you probably won't need any, but it's good to check). When the artichoke heart pieces are heated through, you're ready to serve.

To serve, place about 3/4 cup rice in the middle of individual serving bowls, and spoon the Étouffée in around the rice. I like to use a round measuring cup (lightly buttered) to shape the rice --just pack the rice into the cup and turn it over into the middle of each bowl-- but it's certainly not necessary.

May 04, 2013

BBQ Pork Fried Rice


Fried rice is a culinary wonder. How else can you take a few bits of meat, an egg, some scraps of vegetables, and leftover rice, and make a meal worthy of a feast? But...what if you have no leftover rice? Fried rice is the valedictorian in the argument for making more rice than you need to. Still, I've been known to fire up the rice cooker first thing in the morning, to make sure I have "leftover" rice for dinner in the evening. As I did, in fact, this time.

Fried rice can be an intensely personal dish - we all have a favourite version (or versions) that define it in our minds and in the expectations of our stomachs. One of the most delicious ones I know is a dried scallop and egg white fried rice prepared by a local restaurant. It is incredibly pale, with only coins sliced from (I think!) gai lan stalks to relieve the otherwise monochromatic rice-scape. One day, I'll take a crack at making that one, too.

My at-home go-to fried rice, however, is very simple. I pick up some char siu from a Chinese market (or restaurant) on the way home and, if I have successfully avoided simply eating it all straight out of the container, into the skillet it goes.

I make this in a large non-stick skillet, as opposed to a wok, but feel free to use a wok, especially if you have a gas burner that can get it hot enough. As you can see, this goes wonderfully with Beijing Wings and blanched gai lan with oyster sauce (or choy sum with hoisin sauce).

BBQ Pork Fried Rice

Makes about 4 cups

150 grams Chinese barbeque pork
1 tablespoon vegetable oil
1-2 eggs, lightly beaten
1/2 small (yellow) onion, finely diced
1 rib celery, sliced thinly
1 tablespoon slivered fresh ginger
2 tablespoons low-sodium soy sauce
1/4 teaspoon sesame oil
3 cups steamed rice, cooled
1-2 finely sliced green onions

Dice pork into small cubes and set aside. Separate the cooled rice gently with your fingers (a quick spritz of cooking oil can help) so that no large chunks remain.

Heat 1/2 tablespoon oil in hot skillet and stir-fry yellow onion, celery and ginger for 30 seconds. Add the pork and stir-fry for a further 30 – 60 seconds. Stir in soy sauce and sesame oil and cook, stirring, for 1 minute. If you want to add snow or snap peas (a very nice optional extra), add them now, and stir fry for another 30 – 60 seconds. Push everything to the edges of the pan, leaving a bare space in the middle. Add the remaining 1/2 tablespoon of oil, and pour the beaten eggs into it. Let the eggs set for a minute, and then add the rice, spreading it quickly around the pan. Stir-fry for a minute or two, using a spatula to break up the eggs into small pieces. Lastly, add spring onions and stir-fry for a further 30 seconds or until well combined and rice is heated through.

Transfer rice to a platter and serve with soy sauce and hot chile oil on the side.

March 24, 2013

Tandoori Turkey Meatball Rice Bowl

I confess that I'd hoped that these would be more colourful than they turned out - my masala blend was months old, which I suspect was the problem, and I should have compensated by adding a little turmeric and an extra hit of kashmiri pepper, by the looks of it. However mild in appearance, though, these were absolutely delicious, and made a satisfying dinner.

That being said, these were remarkably easy to make. My standard Pork & Turkey Meatballs got an Indian inspired, all-turkey facelift, replacing the usual herbs and spices with a generous amount of tandoori masala, and using egg white instead of whole egg (I had some to use up).

I scooped the meatballs using my 60 ml disher, and baked them off on a foil-lined baking sheet for 25 minutes:


While they were in the oven, I made a simple pulao, using this Times of India Online recipe for Pulao in a Jiffy The pulao was nice, but overall a little soft, I thought - I used carrots and cauliflower from the recommended vegetables listed, but either I diced them too finely, or used too much water, because they were a little softer than I expected. Not outright mush, you understand, but a bit too soft. I generally find that I need less water when I'm cooking rice than most recipes call for, and that may be the case here - I'm not sure why - some sort of combination of being essentially at sea level, and having very soft water, perhaps? In any event, if I were to make this recipe again, I might go with both larger cut vegetables and a smidge less water. I'd probably throw in a few peas, and an extra few pods of cardamom, too.

When the meatballs came out of the oven, they got a quick brush with hot mango chutney, which went beautifully with the spicy flavour of the meat. As you can see, I also knocked together a quick cucumber and onion raita, and put an extra bit of chutney on the side.

This was a fun dinner (and lunch the next day, and extra meatballs in the freezer for a future rainy day) and while I want to tweak both the pulao and the seasoning of the meatballs (to amp them up into a more deeply fragrant and colourful result), I'm quite looking forward to version 2.0.


September 23, 2012

Autumn's here: Cabbage Rolls


Cabbage rolls are one of those quintessential comfort foods for anyone with even a passing relationship to the cuisines of northern or eastern Europe, and of course the middle east, central asia, and the eastern mediterranean regions also have stuffed leaf and vegetable dishes with considerable similarities. Did I leave anyone out? Probably. (Sorry.) Stuffing food with other food and wrapping it up, whether you start with dough or a leaf, just seems to be a universal development in almost every cuisine.

If someone tells me that he or she is making cabbage rolls, my first question is "Oooh, what kind?" - closely followed by offers of help eating up any pesky leftovers, of course. In western Canada we tend to favour either the Ukrainian or Polish styles most of all, and the ones I've made here are a sort of unholy hybrid of every cabbage roll that I've ever found to be delicious. These ones are made with meat (beef, specifically) and rice, but there are plenty of options for vegetarian/vegan fillings (I would suggest a rice/walnut/mushroom blend, for starters).

A lot of recipes will suggest that you braise the cabbage rolls in tomato soup. Those of you who have been reading my blog for a while already know that I shy away from tinned soup as an ingredient for my casseroles and such, and I am not recommending tins of soup here, either. Rather, I humbly suggest my very own Simple Tomato Soup recipe (expired link removed, please see recipe in the comments section below), made exactly as listed. It comes together really quickly, and you can also make it a day ahead (or stash some in the freezer, and simply thaw it out when you are ready to make cabbage rolls). One recipe of Simple Tomato Soup is perfect for one tray of 12 large cabbage rolls.

I recommend savoy cabbage, which is easier to peel without tearing the leaves.

Cabbage Rolls

Makes 12 rolls
Total Prep & Cooking Time: 3 - 4 hours

1 Savoy cabbage, whole
500 grams lean ground beef
1/2 onion, very finely minced
2 cloves garlic, pressed
1 tablespoon tomato paste
1 tablespoon water
100 grams (1/2 cup) long grain rice (uncooked)
3/4 cup water
1 teaspoon mushroom base (optional)
1/4 teaspoon salt
2 tablespoons minced parsley
1 egg, beaten
1/4 teaspoon black pepper
1/2 teaspoon smoked paprika (to finish)

1 recipe Simple Tomato Soup, made as directed in the comments section below. You could also use a thin, tomato-based pasta sauce, or even simply use beef, chicken, mushroom, or veggie broth, and serve the rolls "dry" with sour cream. You will need about four cups of soup/braising liquid.

Prepare the soup, or, if defrosting, heat the soup until it is serving temperature.

In a small saucepan, bring water and mushroom base to a boil. Add the rice and stir quickly with a fork. Reduce heat, cover and simmer 10 minutes, then turn off and leave for another 10 minutes. The rice will be slightly underdone - chalky. That's perfect. Combine with the onions and garlic, and let the mixture cool a bit while you deal with the cabbage.

Cut the cabbage deeply, all the way around the core (about half an inch out from the core knob). Peel the outermost leaves, starting from the base of the cabbage, gently pushing up until the leaves come free. You can do this step a day ahead, and loosely bag and refrigerate the leaves (they will take up a lot of room). You will want 12 good, big, whole leaves, plus a couple of spares.

Trim the leaves by shaving down the thick central spine with a paring knife, and cut a small, thumb-tip sized v-shape at the base of each leaf to remove the toughest bit.

Bring a large saucepan of unsalted water to a boil. Add cabbage leaves and cook for 2 to 4 minutes or until softened, and drain. You can also soften the cabbage leaves by dipping them in water and microwaving them, 2 at a time, for about 60 seconds.

In a medium mixing bowl, combine the raw beef (broken into tiny bits), cooked rice mixture, egg, salt and pepper, and parsley, along with 1 tablespoon of tomato paste combined with one tablespoon of water. Mix thoroughly, using your impeccably clean hands, until everything is nicely integrated.

Prepare a 9x13" baking dish by ladling about half a cup of the tomato soup into the bottom of the dish, and swirling it to cover the bottom thinly. Some folks like to chop up the core of the cabbage, along with any leftover leaves, and put that in the bottom, too, as a bed for the cabbage rolls. This is a great way to use up the rest of the cabbage, as well as making sure you get plenty of veggies in your dinner.

Divide the beef mixture into 12 portions, and roll them up: this bit is awesome, but messy: Dip the softened cabbage leaves in the tomato soup/sauce, and microwave them, two at a time, again (unless they are completely floppy) for about 30 seconds. This tomato-dipping of the leaves is optional, but very flavourful.

Lay a limp, tomato-y cabbage leaf on your plate or cutting board, and add a portion of the meat to the lower third of the leaf. Flip the bottom (stem edge) up and over, bringing the points of the "v" closed so that it makes a tight package. Hold that with one hand, while you tuck the sides in (as if you were making a burrito, or an envelope), and then finish rolling up the leaf. A little practice, and this isn't as difficult as it might sound.

Place each roll, seam side down, in the prepared baking dish. You should get two rows of six, filling the pan. Pour the tomato sauce (or any other braising liquid of your choice) gently and evenly over each roll, using all of the soup, cover with tinfoil, and place in a cold oven. Set the oven to 325 F, and set the timer for 2 hours. Remove foil, and sprinkle with smoked paprika before serving.

Serve with sour cream (or plain yoghurt), mixed with a little dill. Perogies (pierogies), naturally, make a fantastic side dish, but so do plain boiled potatoes, or roasted carrots. Obviously, if you need to hurry the process up a bit, set the oven to temperature before you start rolling up the cabbage leaves, and bake for 90 minutes.

These freeze excellently, as well. Make your own ready-meals!

For the curious, here's a picture of the cabbage rolls just before they go into the oven (see how perky the cabbage still is!):

August 19, 2012

International Bento (China): Chicken wings bento


My last post reminded me that I've really fallen down on posting my bentos, so here's another one: Chinese-inspired chicken wings ("Beijing Wings" from Cook This, Not That!), pork fried rice, and baby bok choy with spicy vinaigrette.

The pork fried rice is much like pork fried rice anywhere - a bit of egg, a bit of bbq pork from a Chinese butcher, some onion, leftover plain long grain rice. There's an art to a great fried rice, but this one was just a quick, cobble-together: tasty, but not truly a classic of its kind.

The bok choy in vinaigrette did not enjoy waiting in the fridge until morning, and it looks as though I may have over-steamed it, too, as it's usually a bit brighter green. The vinaigrette is a mixture of soy sauce, rice vinegar, sesame oil, sambal oeklek, minced ginger, and minced garlic. I don't use measurements when I make this up, but I don't use much oil. It's more like a dipping sauce than a real vinaigrette, but it goes beautifully on steamed or stir-fried bok choy, gai lan, or other strong greens.

The wings are fairly simple to make, and are baked instead of fried, so, theoretically a bit healthier for you, even though the skin's still on.

Beijing Wings
Adapted from Cook This, Not That!

Serves 3 - 4

1 kilo chicken wings, jointed (freeze the tips for making stock)
1/3 cup low sodium soy sauce
3 tablespoons brown sugar (or honey)
4 cloves of garlic, minced
2 tablespoons freshly grated ginger
2 tablespoons butter
2 tablespoons Sriracha
1 - 2 tablespoons fresh lime juice (half a lime)
toasted sesame seeds
1 green onion, sliced

Combine the soy sauce, sugar, garlic, and ginger in a large glass or ceramic bowl. Add the wing sections (you can also buy just paddles or drumettes) and stir them around until they are well coated. Cover the container with its lid or plastic wrap, and refrigerate for at least an hour, four or eight hours being better (ideally, do this after breakfast to be ready for dinner).

Preheat the oven to 450F, and line a baking sheet with foil. Spray the baking sheet with a thin layer of canola spray (or brush lightly with peanut oil). Drain the wings from the marinade (discard the marinade). Lay out the wings in a single layer on the foil, and bake for about 15 minutes. The skin should start to get crispy. Turn the wings over and bake for another 5 to 10 minutes.

In a large skillet, melt the butter and Sriracha, stirring to combine. Remove the wings from the oven, and quickly add them to the skillet. Toss the chicken around in the hot sauce, and saute for a couple of minutes. Remove the chicken to a platter, and garnish with sesame seeds and thinly sliced green onion.

January 15, 2012

Mujaddara


Mujaddara sure has a lot of different spellings: mujadarrah, mudardara, mejadra, moujadera...the legacy, I suppose of translating from an alphabet with so many more options for the letter "r" alone, than English. The name derives from the Arabic word for smallpox, apparently because of the way the lentils interrupt the rice surface is said to look like a pockmarked face (another example of this imagery in cooking is in the Chinese dish MaPo Tofu, in which chile flakes stand in as pockmarks). It is a relative of kushari, biryani, and probably a dozen other rice-based dishes, and can be dressed up or dressed down as desired.

In any language, Mujaddara is one of those beautifully simple dishes that is both incredibly healthful and eminently affordable. It is a staple in the Middle East that is, even in its simplest form, popular amongst people of every walk of life. Each cook makes adjustments based on his or her preference, availability, or cultural norm: what starts as a dish of rice and lentils topped with fried onions finds infinite variability in the type of lentil, the ratio of lentil to rice, the type of rice or grain, the medium for frying the onions, and the seasonings. It can be served as a complete meal unto itself, plain or garnished with yoghurt sauce, or beside meat or other vegetables for a more complex meal.

It is delicious. It is easy to make. We served it for dinner with a little leftover roasted chicken mixed in, and curry-roasted cauliflower on the side. I want to try making some of the infinite varieties out there, but first I want to make it again, just like this:

Mujaddara

Serves 4

2 medium yellow onions
2 1/2 tablespoons olive oil
1 cup basmati rice
3/4 cup brown lentils
1 teaspoon ground cinnamon
1/4 teaspoon ground allspice
1 teaspoon ground cumin
125 grams roasted chicken thigh meat (optional)
2 tablespoons flaked almonds or pine nuts
1/2 teaspoon kosher salt
1 teaspoon Baharat* (optional)

Slice one onion, and dice the other. Fry the onions rings in 1 1/2 tablespoons of olive oil, until dark brown, 25 to 30 minutes.

Meanwhile, bring 4 cups of water to a boil in a medium pot, and boil the lentils for ten minutes.

Fry diced onions in 1 tablespoon of oil in a large pot. Once translucent, add the salt and spices. Add the rice, and stir it about for a couple of minutes, and then add two cups of boiling water (from the microwave, or a recently boiled kettle). Drain the lentils, and add immediately to the pot of onions, rice and water. Stir well, and bring back to a boil, reduce heat, and let simmer on the lowest temperature for 25 minutes.

If using chicken, remove meat from bones and skin and set aside. Toast the almond flakes or pine nuts in a dry skillet.

Remove lentils and rice from the heat. Stir in chicken and almond pieces, and half the onions. Top bowls with remaining onions and almonds, and serve, sprinkled with Baharat if you like.


*Baharat: Technically, baharat simply means "spices" in Arabic (bahar means spice), and versions vary from place to place. The one I use is a rather simple one made of cinnamon, nutmeg, cloves, cardamom and black pepper, and I use it in the dish, too, in place of the cinnamon and allspice. It is very fragrant. I add the cumin separately, although some versions of Baharat include it in the mix.

September 04, 2011

Pineapple Thai Fried Rice

Summer has finally arrived in Vancouver, just in time for one little wave of sunshine before autumn officially hits. What this means for me, practically speaking, is that I now have a limited amount of time to wedge in all of the summery meals that I feel the need to visit every year, or else it will be as if summer never happened at all.

One of these summer favourites is Thai lettuce wraps, which I have posted about long ago again, strangely, just squeezing it in at the end of the season. While I'm eating it, I marvel that I don't make it every single week. The lettuce wraps are dangerous, in a fashion, because I will eat as much filling as I have made, no matter whether I plan to have some leftovers to take to work. I'm assuming it would travel very well to work, but I've never quite managed it. That notwithstanding, some sort of side dish is absolutely necessary, unless you want to make a filling that incorporates a starch as well, which doesn't exactly float my boat. The last time I wrote about it, I served it with spicy soba and gyoza in a sort of glorious cultural mishmash. This time, as of course you can probably guess, I chose pineapple fried rice.

I've made fried rice before, plenty of times, generally leaning toward the Chinese style that features char siu (barbeque pork), scrambled egg, and sometimes shrimp. I love it. Thai-style fried rice, however, I had never actually made at home, although I enjoy having it when I go out. Boy-howdy, there are a lot of different versions out there in Internet Land! I couldn't find one that exactly fit my needs, so I took the information that I gleaned from reading through a lot of different recipes, and put them to work on a sort of ad hoc basis. We were really pleased with the results, so I'm setting down the recipe for my own future reference, and of course, to share with you:

Pineapple Thai Fried Rice
Serves 2 to (theoretically) 4 as a side dish, or one greedy person as a main

1 cup jasmine rice
3 tablespoons coconut powder
1 large pinch lemon grass powder
water, as needed to cook the rice

Don't use too much water, you don't want the rice to become mushy. A little firm is better. Cook the rice using your usual evaporation method. It helps if you stir the coconut powder into the water and whisk to thoroughly combine. When the rice is cooked, turn it out into a bowl, carefully, and use a fork to gently separate out the grains, being careful not to overwork the rice, which will make it sticky. Allow to cool. If making this part ahead, cover and refrigerate until wanted.

1 tablespoon peanut oil
3 red Thai chiles, seeded and minced
1 Thai chile, seeded and cut into strips
2 green onions, sliced
2 tablespoons minced ginger
3 to 5 cloves garlic, minced
5 kafir lime leaves
1 cup finely diced fresh pineapple
1 to 2 tablespoons fish sauce (omit for vegan version, obviously)
1 to 2 tablespoons low-sodium soy sauce (use double soy sauce if omitting fish sauce)
a few fresh Thai basil leaves
lime quarters, for squeezing over top
chopped cilantro, for garnish

In a wok or, failing that, a large non-stick skillet, over high heat, heat the peanut oil. Add the garlic and ginger, and minced chiles, and stir fry for a few seconds, before adding the lime leaves and pineapple. Stir fry until the pineapple starts to caramelize, and then add in the rice. Use a spatula (or wok tool) to fold the rice in the dish, coating all of the rice with the oil and seasonings. Sprinkle with fish sauce, and fold the rice again. Add the soy sauce, and fold again. Add the chile strips, some torn up basil, and the sliced green onions, and fold again. Taste the rice and see if it wants more fish sauce or soy. You want a bit of separation of rice grains, here, so that each grain of rice gets a nice "fried" texture and flavour. In practice, it will still cling gently to its neighbours. Keep gently turning the rice until everything is evenly distributed.

Tweak the seasonings as desired, adding more fish sauce or soy, or a pinch of sugar if that rocks your world, I don't think it needs it with the pineapple, but you choose. Turn out the rice into a large serving bowl, and garnish with cilantro and lime quarters for squeezing over individual portions. The cucumber garnish is of course, entirely optional, but it makes for a nice presentation, and I love eating cucumber slices, so it makes good sense to me.

If this is your main dish, you may want to top it with a crispy-fried sunny egg for each person. If you want to make it hotter, there's always sriracha, or more chiles.

The chile-star garnishes, by the way, are supremely easy. Using those little red Thai chiles, and a sharp knife, slice lengthwise through the chiles in a sort of asterisk pattern, being careful to stop at the top end of the chile. Gently scrape out any seeds. Place the cut chile in a bowl of cold water, and watch it curl open into a star/flower. If it isn't opening up nicely after 30 minutes, check to see if you need to cut down a little closer to the stem. I like to do these up for rice noodle dishes, too - it's the first thing I do when I walk into the kitchen, since they take time to open, and the cold water keeps them fresh until needed.

I didn't have Thai basil at hand, this time, so I made do with Genovese basil, which was perhaps off-profile for Thai cooking, but still delicious. Next time, Thai basil for sure.

August 27, 2011

Cajun Jambalaya with Okra

I am a huge fan of jambalaya, and it's something I almost always make at home, rather than order out. That is solely because I live on the west coast of Canada, where "jambalaya" usually involves pasta instead of rice, and seldom has sufficient seasoning - either in type or quantity, and shockingly often includes cream. When I was in New Orleans, I took great delight in sampling the extensive varieties of jambalaya available - each with a different ratio of ingredients (including seasoning), a different degree of sauciness, and a different notion as to how much one person could/should eat at lunch. Each one was a definitive jambalaya, in its own right.

Jambalaya is such a wonderfully versatile dish, that more's the pity that so few places up here get it right, and by "right" I mean an acceptable variant of the classic forms (Cajun or Creole), which is most emphatically not merely sausage and bell peppers tossed with pasta. Jambalaya needs to be a one-pot dish, rice based, and incorporating the seasonings of the Cajun or Creole variety. The rest - the protein(s), the wet/dry ratio, the choice of featured vegetables, these are all up to the cook. It can be cooked in a deep pot or a skillet, depending on how much you are making at a time.

I have been leaning toward brown, or Cajun-style jambalayas, lately, which tend not to be tomato based. This variation was conceived because I had picked up a bag of lovely looking fresh okra from the market, and needed something to make with it. As it happened, I also had some ham and a couple of chicken thighs that needed using, so, in fine ad hoc style, into the pot they went. My basic methodology is essentially the same as I previously wrote about, but tweaked to incorporate the okra.

Jambalaya with Okra
Serves 4

1 tablespoon vegetable oil
1 large onion, diced
2 medium stalks celery, diced
1 medium green bell pepper, diced
1 cup orange (or red) bell pepper, diced
2 jalapeño peppers, diced
1 1/2 cups okra, sliced
8 oz ham steak, diced
175 g boneless skinless chicken thighs (about 2), diced
3 cloves garlic, minced/crushed
3 cups chicken broth or stock
1 cup parboiled rice
1 teaspoon red Tabasco sauce
1/2 teaspoon cayenne pepper
Salt-free Cajun spice blend (to taste - start with a tablespoon)

Heat a large cast iron frying pan well over high heat. Add oil, and tilt pan to coat bottom. Add ham cubes and sautée until they start to take on a bit of colour. Add cubed chicken, and stir well, but don't allow chicken to brown. Add the onion, celery, green pepper and jalapeño, and stir.

Cook until the onion turns nicely translucent, then add the garlic, Tabasco sauce, and spices. Stir well. Stir in the orange/red bell pepper pieces and the okra until thoroughly combined.

Stir in the (uncooked) rice, making sure that each grain gets well coated by the juices in the pan. Add the chicken stock/broth and stir again, making sure that the rice grains are all submerged. Bring up to a gentle simmer.

Turn heat to very low, cover pan, and cook for 25 minutes, stirring gently once at the ten minute mark. If it seems a little dry, you may wish to add a bit more water at this point, too. If you want to go crazy and add some raw shrimp, this is also the time to do it, at the ten (or, for small shrimp, fifteen) minute mark. Garnish with a little sliced green onion, if you like, and lots of black pepper. Pass the hot sauce.

Obviously, you can switch out the proteins however you like best: smoked sausage, turkey or duck meat, rabbit, venison sausage, shrimp, oysters, alligator, crawfish, or the classic, tasso (spiced ham) for serious points. You can increase or decrease the meat(s) and the amount of vegetables, depending on your taste or what you need to use up - this is a great way to use up extra bell peppers that might be lurking in your fridge.

May 21, 2011

Hot Sauce! (Hot Orange Pork Skillet Dinner)


Oh, hot sauce. At any given time, my fridge holds anywhere from six to thirty hot sauces. It's really my go-to condiment (closely followed by mustard), and it can be used in oh-so-many different applications, from deep in the cooking process to the finishing flare, to the rescue of deeply questionable take-out.

The four lovely hot sauces that you see above were sent to me recently by the good folks at Cholula, who either stumbled upon my blog post in '06 for our Hot Sauce Tasting Party, which featured Original Cholula as the third sauce in the line-up, or they saw my back-in-the-day essay extolling the virtues of hot sauce. Either way, a quick glance at this blog undoubtedly suggests that I'd be interested in trying the new flavours, and rightly so! I was pleased to accept the offer, since I already like and buy the original Cholula hot sauce.

One of the reasons that I stock Cholula Original in my fridge is that it is a very versatile sauce, adding a little zip (it's not too hot) and has a pleasantly peppery, yet neutrally "Mexican" taste, without significantly changing the flavour profile of whatever you are adding it to. It's very good for a quick quesadilla, or to jazz up some chicken wings (or legs...), or even just on top of cheese-and-crackers, and it sometimes adds just the right note to a simmering pot of chili that wants a little something. It's perfect for making buffalo-wing pizza. But, I already knew all that. That's why I buy it. The other flavours were launched throughout North America last year.

First up: Cholula Chili Lime - a no-brainer for someone like me, who loves citrus almost as much as hot sauce.

Straight up, Cholula Chili Lime tastes just as you would expect it to. The same basic flavour profile as Cholula original (the same pepper blend, in fact, of pequin and arbol chiles, plus guajillo and paprika), punched up with lime flavour which leaves more citrus-y aftertaste. The lime flavour comes from "natural flavor", I assume, as there is no mention of lime in the ingredients. The bad news (and there is some) - the somewhat odd choice to put sugar and dried tomato into the sauce, in combination with the unspecified natural flavor/lime, gives a faintly metallic tone and aftertaste to the sauce. A lot of folks I know aren't affected by that (whatever it is that creates that particular sensitivity), but if you are someone who really dislikes lime-flavoured tortilla chips, this may not be the sauce for you. For me, it just means that I am more likely to use it as an ingredient, where that faint aftertaste can be burned away by other flavours, than as a finishing sauce for something delicate, such as scrambled eggs.

I did crack it open in time to use with a recipe that I am currently developing - Hot Orange Pork Skillet Dinner. The "Hot" in the name is from the two habanero peppers in the recipe, and they nicely blast away any aftertaste. The Cholula Chili Lime was used in the recipe itself, and as a finishing garnish.


Hot Orange Pork Skillet Dinner

Makes 4 servings
Total Prep and Cooking Time: 45 minutes


1 lb pork sirloin steak
½ teaspoon salt
½ teaspoon black pepper
1 tablespoon olive oil
1½ cups diced red onion
1 tablespoon chopped garlic
2 habañero peppers, 1 minced, 1 whole
½ teaspoon ground cumin
1 teaspoon hot sauce of your choice (I used Cholula Chili Lime)
1 cup orange juice
2 tablespoons lime juice
200 grams parboiled rice
2-3 cups diced zucchini*
1 medium red bell pepper, diced
1 cup hot chicken broth
1 teaspoon cornstarch
½ cup cold water

Cut the pork steaks into 4 equal pieces, and sprinkle lightly with salt and pepper on each side. In a 12" skillet, quickly sear the pork, and remove to a separate plate as soon as it is golden. Add the oil to the emptied skillet, and once the oil is hot, add the onions, garlic, cumin, and habañeros, cooking and stirring until the onions are softened and a bit translucent. Add a splash of water (or tequila!) if needed to prevent burning.

Add the zucchini and the bell pepper and stir again. Add the rice to the skillet, and add the hot sauce, orange juice and lime juice. Stir well so the rice grains get thoroughly coated and loosen any stuck-on bits. Add the hot water and chicken base and stir again. Stir the cornstarch into the cup of cold water, until smooth. Add to the skillet and stir carefully (your skillet will be quite full) until thoroughly incorporated and bring to a simmer.

Top with the pork in a single layer over top of the rice, cover tightly, turn the heat to the lowest setting and cook for 25 minutes. Garnish with extra hot sauce, and maybe some cilantro, if you like.

Serve with a sliced avocado, or maybe a jicama salad.

Estimated Nutritional breakdown (via online calculator) per serving: Calories: 445, Fat 10.76g; Saturated Fat 2.98g; Cholesterol 73mg; Sodium 312.57mg; Total Carbohydrate 59.77g; Dietary Fiber 5.14g; Sugars 6.03g; Protein 26.66g; Est. Percent of Calories from: Fat 21%, Carbs 54%, Protein 24% Please note: your mileage may vary.

*If you are wondering what the heck kind of zucchini is in the photo, I actually used a chayote squash, instead. Big mistake. The pieces were too large, the texture too much like apple, and the flavour contribution almost non-existent. Zucchini, my first thought, should have been the way to go. Maybe corn. I'll keep you posted.

Next up: Cholula Chili Garlic. Looking forward to it!

Are you a Cholula fan? Check out their Facebook page for contests and recipes.

April 16, 2011

Takikomi Gohan

Another rice post - but rather different from risotto!

I've always enjoyed the small bowls of mixed rice, or takikomi gohan that one can get in Japanese restaurants - they provide a wonderful, warm, savory hit of satisfaction. The kind I tend to see around Vancouver are usually made with chicken, with mushroom, or with both, and I went for the combination, since it struck me as a fine idea for a casual supper at home.

I went looking online for suggestions regarding recipes, and there certainly is a number to choose from, each with a different approach to the necessary components. After a lot of searching, I finally came back to the incredibly useful Just Hungry food blog, the sister site of Just Bento. Her recipes are for straight-up mushroom (one traditional, one vegan), but she does mention the addition of diced chicken instead of bean curd, so that's the option I took. I thought I was getting the chicken pieces small enough, but next time I will dice them more finely.

The recipe itself is simplicity, if you are using a rice cooker. Chop your mushrooms (and chicken) and allow to marinate for an hour or so in a small amount of a mixture of roughly equal proportions of soy sauce, mirin, and sake. Add this mixture on top of the rice and water mixture in your rice cooker, then turn it on as usual for plain rice. Gently mix with a paddle when it is cooked, to integrate everything. Garnish as you please.

It is not a particularly elegant dish, as you can see below. It is simple, comforting, and easy fare, and one I intend to repeat again soon. The leftovers, as you can see above, made absolutely charming onigiri for a bento lunch the next day (and froze fairly nicely, too).

You can use whatever mushrooms you like. We used a combination of shiitake, king oyster, and enoki. Next time, I plan to include shimeji (beech mushroom), since I found that HMart carries the more widely cultivated bunashimeji. But really, any mushroom that you enjoy eating will work just fine.

I'm surprised it took me so long to try making this for myself, because it is very rewarding for the small amount of prep involved. Even if you've never had the restaurant version, you might want to give this a try: it is a solid entry in the grand category of soothing rice-with-bits dishes.

March 30, 2011

Lemon Risotto


I make a very lemony risotto.

Oh. Hello, there. Is it the end of March already? I'd ask where the time has gone, except that I know (all too well): I've been moving. My last few weeks especially have been a haze of restaurant meals, often at odd hours, and foraged food that is less cooked than it is assembled. We're all moved in, now, which is to say that there are boxes everywhere and loads to do, but the kitchen is up and running (thank goodness!) and I hope to be back to more frequent posting now.

But back to the matter at hand. Risotto! Specifically, a deeply yellow, unabashedly lemony risotto that is neither sour nor acidic, but has wonderful lemon flavour that is dialed all the way up to eleven. A little goes a long way, but even a small serving of Lemon Risotto makes a meal feel like a special occasion.

The trick to all this lemony bounty without the pain and suffering is the sneaky third ingredient in the recipe, that is, preserved lemon. Now, I'm sure there are shop-bought preserved lemons that you can buy, and frankly I don't know whether or not they would do the trick here (perhaps they would serve quite nicely), but I can tell you that making your own preserved lemon is both astonishingly easy and very rewarding. For one thing, it keeps for a surprisingly long time (tightly bottled in the fridge), and you only need a little tiny bit of it to get huge flavour. Essentially, preserving the lemon means that you get all of the intense flavour of the zest, without the bitterness of the pith. The lemon simply becomes a wobbly translucent mass - chutney textured if, like me, you wholly quarter your lemons and then slice them, as opposed to leaving them connected at the base in quarters. The clean, sliced lemons are tossed with kosher salt and the spices of your choice (I like to put a bare pinch of turmeric in there, to enhance the colour), packed into a jar and completely covered with freshly squeezed lemon juice. There's a quick version here, which has a very basic, clean flavour profile, but you can also google your way through Nimbu Achar recipes to get something more interestingly flavoured.

This risotto really has a triple lemon threat: the preserved lemon, yes, but also the zest and juice of a fresh lemon. With all that lemon going on, what do you pair it with? In restaurants, it can sometimes be found as a bed for seared scallops or prawns, which is a fine idea. Or, as seen above, it makes a beautiful plate partner with roasted chicken and braised fennel. But, right at the moment, asparagus is in season, and that's my go-to favourite. Anything that could benefit from a lemony kick, really.

The link provides a pretty comprehensive recipe for the risotto, but a couple of extra notes: take your time, when you're making risotto. You don't have to stir it for every single second, while it cooks, but almost! It pays to have all of your prep done ahead, and any other dishes you plan to serve mapped out.

Give a really lemony risotto a try. It's a great way to celebrate Spring.

November 21, 2010

Forbidden Rice


A friend gave me some beautifully inky "Fobidden Rice" earlier this year, and I was quite thrilled, because I had been wanting to try it (thanks, Lisa!). It's quite different from Thai black rice, which is a fairly long grain and appears to be primarily used for sweet snacks and desserts. Chinese Forbidden Rice is a short grain, and is rather small overall. A grain of the black rice next to a grain of basmati, for example, is an almost comical contrast.

Having never made Forbidden Rice before, I did a little research online before I started cooking. Most of the advice that I encountered suggested that the the rice needs less in the way of cooking water than most rices, but we found it quite firm and a little dry in texture, so a little more water would not have hurt, I think. The actual packaging (Cote D'Azur™ Chinese Forbidden Rice) called for equal parts water and rice, plus a pinch of sea salt. Next time, I think I would add another quarter-cup of water per cup of rice.

The flavour was very interesting. Definitely falling on the "nutty" side of unpolished rices, there was an almost woodsy undertone that I found very appealing, especially against a simple, brightly flavoured counterpoint such as the basic gingered chicken and broccoli stir fry that we paired it with.

I was really amazed by how black the rice stayed, once cooked. I was expecting it to go rather purplish, like many of the "red" rices do (although perhaps darker), but those little rice grains stayed black.

After poking around the internet for further suggestions for the remaining rice, and eyeing various recipes for puddings, salads, and, intriguingly, mixed rice types, I decided to take up a suggestion that I found in a few places: mixing about 20% of the black rice into 80% "regular" japonica rice (Japanese-style rice). I cooked it in the rice cooker, using the same amount of water as I would if I were making 100% japonica. The result was quite striking (sorry, no picture), as the black rice turned everything a sort of gentle, royal purple colour, with darker purple grains of the black rice. I should have made some of it into onigiri, because that would have been adorable (especially using a cherry-blossom shaper). I don't have very much of the black rice left, however, so I may try the mixed rice again. If I do, I will be sure to take pictures to share with you, and maybe make those onigiri, if we have any leftovers.

October 27, 2009

Chicken Teriyaki Donburi = Chikiteridon!


I had no idea that delicious chicken teriyaki was so darn easy.

I've become very interested in Japanese cuisine, of late. I learned how to make maki sushi years ago, but frankly it's not something that I tend to make at home. I have never been to Japan, so my assumptions about the cuisine are somewhat biased by the Japanese restaurants in Vancouver, and somewhat ruthless reading. I'm currently trolling for cookbook recommendations, if you have any suggestions, please leave me a comment or shoot an e-mail my way.

I recently purchased some Japanese rice, and have consequently been playing a little. I've always been fond of donburi - Japanese rice topped with assorted delicious bits - and I had some luck with an oyakodon (chicken and egg donburi) several years ago. Donburi is a favourite (and infinitely variable) and filling lunch when I'm out and about.

Chicken Teriyaki is one of those things that I tend to find, in restaurant preparations, rather too sweet for me, although I do like the flavours. Most of the attractive recipes that I could find specified a mixture of sake, mirin, sugar and soy sauce. Some had ginger and garlic, which doesn't seem to suit the smooth texture of the sauce. The most user-friendly recipe that I found was from Just Bento, a website devoted to the marvels of the bento lunch. This is also where I found the term "Chikiteri", which is quite wonderful. Here is my adaptation.

Chicken Teriyaki
Adapted from Just Bento

Serves 4
Total Prep & Cooking time: 45 minutes, including 30 minutes marinating time

Note: I didn't have mirin (alas! Next time!), so I made do with just sake. The good news is, it was excellent, so don't let a lack of mirin put you off making this as soon as possible.

¼ cup Japanese soy sauce (low sodium)
¼ cup sake
2 Tablespoons honey
1 Tablespoon plain rice vinegar
6 skinless chicken thighs
1 Tablespoon canola oil
2 green onions, sliced diagonally

Mix the soy sauce, sake, rice vinegar and honey in a wide, shallow dish.
Remove any big fatty bits from the chicken and slice the thighs into chopstick-friendly pieces – I cut with the grain into pieces roughly the size of short, fat, carrot sticks. Add the chicken to the soy sauce mixture, stir well, and allow to rest for 15 - 30 minutes (or overnight, if you can plan ahead).

Drain the chicken in a sieve, reserving the marinade.

In a large, non-stick skillet, heat the canola oil over high heat. Once it is hot enough for a drop of water to sizzle, add 1/3 of the drained chicken to the pan in a single layer. Let it cook without moving the pieces for 30 seconds, then add half the remaining chicken in the spaces around the first batch. Allow to cook further 30 seconds undisturbed, then stir through once and add the rest of the chicken to the pan. Let it cook undisturbed for about a minute (you can keep an eye on the earlier pieces, and flip them if they look like they’re going to burn otherwise) and then stir everything through so that the chicken browns and turns glossy on all sides.

Add the reserved marinade and stir through. Cook, stirring occasionally, until the chicken is a lovely dark golden brown and the sauce has reduced to the desired consistency.
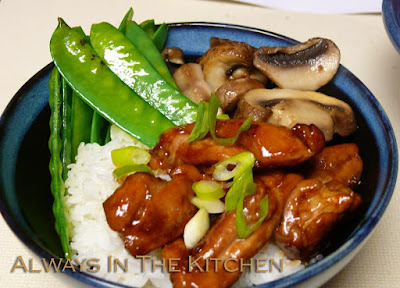
Serve with Japanese rice, and garnish with green onions. Stir fried snow peas and shiitake mushrooms make a lovely accompaniment.

Garnish with green onion. Serve with Japanese rice, preferably, and some crisply cooked vegetables (upon reflection, I should have added some ginger to the mushrooms above).


August 31, 2008

Last Rays of Sunshine (Paella with Tomatoes)

It has not been a stellar summer, here in the permanently damp Pacific Northwest. August, usually our go-to month for griping about the heat and languishing over drinks on patios about town, has been a disappointment most of the way through. So, now that the sun has come out again, however briefly, and given that it's the end of August, it seemed like a good idea to go for a dish that in itself evokes sun-drenched days and summer lassitude. I'm talking paella.

I have never made paella before. It's one of those dishes that seems a bit scary, all fraught with rules, and despite having spent a couple of weeks in Spain, I'm not as familiar with Spanish cuisine as I might be. It's not a well-represented style, around here. However, I do remember from my travels that I encountered many a diverse dish that all claimed to be a type of paella, which encouraged me that there are a variety of acceptable variations - and probably some devious restaurateurs who will call anything made with rice a paella to get some tourist dollars.

In the spirit of full disclosure, the dish that I made would probably properly be designed an "arroz" in Spain, because a) the pan it was made in (not a proper paella pan, simply a big ol' non-stick skillet) and b) much of the cooking time is spend in the oven. Not, therefore officially paella, even though its oven-time was uncovered, to allow the dish to roast, as opposed to steam.

The recipe I chose to take a whack at is none other than Mark Bittman's Paella with Tomatoes. It promised to be fairly quick and painless, and that is exactly what I was looking for. However, since I wasn't serving vegetarians, I decided to meat-it-up a little. My brief search for serrano ham was unfruitful, so I settled for thick-cut lean prosciutto, which I then cut into matchsticks (or rather, Palle cut into matchsticks, since cutting anything is hard for me these days), and rounded it out with a half-pound of large, raw prawns. I also added some sliced green olives (which had been stuffed with garlic, yum) because the flavours just seemed to go.

Other than that, I followed the linked-above recipe fairly closely. I added the matchsticks of ham with the onions, I tossed the sliced olives with the raw tomato wedges (heirloom tomatoes, an orange brandywine type and a green zebra), and I added the peeled prawns to the top of the pan when it had just seven minutes left to go in the oven. The only real divergence from the recipe methodology was to add the saffron to the warmed veggie stock, as opposed to simply plunking it in with the tomato paste.

I learned a few useful things:

One, I used too much saffron. My version of a large pinch may have been just a smidge too large. It didn't render it inedible, or even unenjoyable, but for future reference, a medium pinch would be better. There is a very slight bitterness to saffron, which becomes exacerbated when used in too-great a quantity. A little goes a long way.

Two, I should have tossed the shrimp with a little of the olive oil and maybe a dab of paprika, before adding them to the pan. While they were plump and delicious, they did sit on top looking a bit like an after-thought. A little pre-emptive anointing would have taken care of that beautifully. When I was in Spain, the prawns that arrived on a paella were inevitably in head-on fashion, but I wanted this to be simple to eat. If I had left the prawns at least in their shells, however, I could have added them with the tomato layer at the beginning of the oven time, and they would have integrated into the dish a bit more.

Three, while heirloom tomatoes make a very sexy salad, there's something unsettling about green tomatoes coming out of the oven. Not a huge objection, but I found myself thinking that red tomatoes might have been more beautiful.

Four, the quality of the olives counts. Enough said.

Five, the slightly caramelized roasted tomatoes were fantastic. I wouldn't dare try this with insipid supermarket orbs.

With all of those things in mind, it is really only a matter of time before I make this again, incorporating my new-found experience and, since it produces such a lot of food, maybe even for guests.

June 12, 2008

Cheddar Cheese Risotto with Sausages

Upon seeing the original recipe ("Cheddar Cheese Risotto" in Nigella Express), I couldn't help but wonder what it would be like with a few sliced up smokies in it. I think it's the use of Cheddar cheese, which is often added so haphazardly to a variety of dishes without necessarily any cultural compatibility that made me think of it. Isn't that fusion, though? Perhaps it is the common-place nature of the default Cheese of Choice in North America, placed against the exquisite, attention-demanding princess of Italian cuisine, risotto. The neon-orange of the annatto colouring can sometimes be the harbinger of ill-considered, underwhelming cooking. I won't torture you with a scalloped potato recipe I was once encountered, which involved not just Cheddar as the preeminent ingredient, but a in the form of a canned, condensed Cheddar cheese soup.

Still, I have nothing but respect for Cheddar. I tend to keep a rather well-stocked cheese shelf, and Cheddar always has a place there, and a place in my heart. This is an enormously comforting dish, friendly and accessible to even the fussiest children, I would think, who might enjoy a new name, though...Picky Picky Princess Cheesy Rice?

Here's the recipe:

Cheddar Cheese Risotto

1 tablespoon butter
1 tablespoon oil
2 baby leeks or fat spring onions
300 grams risotto rice (such as arborio)
125 ml white wine (I used white vermouth)
1/2 teaspoon Dijon mustard
1 litre hot vegetable stock
125 grams cheddar cheese, chopped (I grated mine)
2 tablespoons chopped chives

Melt the butter and sautee the leeks until softened. Add the rice and stir around for a minute or so, then add the wine and mustard. Stir until the liquid is absorbed. Begin adding the stock, one ladle at a time, stirring after each addition until the liquid has been absorbed. When the rice is just tender (about 18 - 25 minutes, depending on heat), turn off the heat and add the cheese, stirring until it melts. Garnish with chives.

I've paraphrased the directions here, but they are pretty much the same as any standard risotto. For my part, I also seared three beef smokies and then sliced them quickly, stirring into the risotto right at the end. I used spring onions, but leeks would be better. Better still, a couple of shallots, but that does step away a little from the very ordinary nature of the dish. I'd say, use them if you have them, but otherwise, use whatever oniony goodness you desire.

If it were really a white trash risotto, I expect there would be some form of crumbled potato chip on top, and it probably be made with processed cheese, and cheap beer instead of wine. Ketchup, anyone?

I may joke about this dish, but it was absolutely delicious. We served it with broccoli, to give it a little vegetable consequence, but you could easily gussy it up to your own taste. Do give this a try, whether you have picky children or not. Nigella correctly places this in her chapter entitled "Instant Calmer" and it certainly does the trick.

December 05, 2005

Creamy goodness #2 (Cardamom Rose Rice Pudding)

Last night we had a few friends over for vegetarian Indian food. I did most of the cooking ahead on Saturday, which meant that I only had a few tasks on Sunday and could enjoy my guests' company. The main menu consisted of old favourites: Bengali Dal, Saag Paneer, Aloo Gobi, and Channa Masala, accompanied by a carrot and chile salad dressed with lime juice, and a banana raita that is based on a pachadi recipe from the outstanding Seductions of Rice. The banana raita is fast becoming a must-have dish when we make Indian food at home.


Dessert was also from Seductions of Rice - a rice pudding flavoured with cardamom and rose water. It is creamy and light-tasting, despite being made with whole milk. I topped it with pistachios, as suggested, not knowing that one of my guests was in the process of developing a nut intolerance. Not an allergy, thank heavens, so he was able to simply remove them from his portion. The original recipe called for twice as much sugar as I used, but I loved the balance of sugar to rosewater and spice, so I don't think I'd increase it.

Cardamom Rose Rice Pudding
Adapted from Seductions of Rice

1 cup short grain rice, rinsed and drained (I used arborio)
4 cups whole milk
2 cups water
1/2 cup granulated sugar
3 tablespoons rose water
1 teaspoon cardamom powder
pistachios and extra cardamom to garnish

Place the rice, milk, and water in a large, heavy-bottomed pot over medium heat. Bring to boil, stirring, and back the heat off to a bare simmer. Cook and stir frequently for about one and a quarter hours. The rice may develop a bit of a skin, but just stir it back into the pot and it will be fine. When the rice is tender and the liquid is mostly absorbed but still a bit soupy, add the sugar, rose water and cardamom powder. Stir in thoroughly until sugar dissolves, and remove from the heat. Transfer rice to a serving bowl or individual serving dishes, and allow to cool. Chill, covered with plastic wrap, until needed. To garnish, give each portion a "hit" of cardamom powder and top with a few lightly toasted pistachio nuts.

Serves 6

November 30, 2005

Rice and Beans, Jamaican style


I eat rather a lot of beans, for someone who grew up with beans primarily in chili or occasionally in the Boston Baked family of dishes. I embraced garbanzos for hummus, the Southwestern American tradition of adding black beans to just about anything, black or pinto beans for refried beans at breakfast, lunch, or dinner, and flageolets for cassoulet. Got exciting variants, like Romano beans, Cranberry beans, Pink-eyed peas? Anasazi beans? Bring 'em on. I do like beans.

I also eat a lot of rice, partly because I came late to some of the great rice-based cuisines, and am now making up for lost time. The New Orleans classic, Red Beans and Rice, was a happy combination of these two ingredients and led to other discoveries such as Moros & Cristianos, and, at long last, Jamaican Rice and Peas. At first, I was a little concerned about the title "Rice and Peas" because I'm notoriously unfriendly toward the green garden variety of pea (unless a) raw, b) whole, such as snow-peas, or c) as split pea soup). From there, I confess to being a little confused, when the pea-component of the dish turned out to be considerably more bean-like in character, often being made with kidney beans. I'll happily eat kidney beans, so there was no worry about it, but it didn't entirely make sense to me.

Eventually, I discovered that the traditional pea used in Jamaica is the Pigeon Pea, which is a brown, oval bean originating in Africa. At last, I was able to align the Pigeon Pea with the Black-Eyed Pea in my mind, and came to a sort of understanding.


The thing that makes Jamaican Rice and Peas so very appealing is that it is quite spicy, and contains coconut milk, another ingredient I have come to love. Additionally, Rice and Peas is a one-pot dinner, which makes clean-up a quick affair.

There are as many Rice and Pea recipes as there are cooks who make it, like national dishes the world over. This one is adapted from Full of Beans by the delightfully named Violet Currie and Kay Spicer. It's a lower-fat version than many you'll find, but the flavour is fantastic. I use Kidney beans, as the recipe suggests. Pigeon peas are difficult to come by, in this neck of the woods. Usually, I make this as a side dish and omit the ham, which makes it vegetarian/vegan.

Jamaican Rice and Beans
adapted from Full of Beans by Violet Currie and Kay Spicer

1 teaspoon canola oil
1 medium onion, diced
2 cloves garlic, minced
2 cups cooked kidney beans (drained and rinsed, if canned)
160 ml coconut milk
1 cup diced ham (optional)
1/2 teaspoon hot sauce of your choice (habanero would be very appropriate)
1/2 teaspoon thyme
1/2 teaspoon cayenne powder
1/2 teaspoon salt
1/2 teaspoon pepper
1/4 teaspoon ground sage
1/4 teaspoon ground allspice
1 cup uncooked rice (I use parboiled for this dish)
1 medium red bell pepper, diced (optional)
sliced green onions to garnish

In a medium pot with a tight-fitting lid, cook the diced onion, garlic in the canola oil until it starts to turn translucent. Add the beans, coconut milk, ham (if using), and spices, and bring to a boil. Let cook, stirring, for about a minute, and then add the rice and 1 & 1/4 cups boiling water. Bring the mixture back up to a boil, stirring, then immediately cover. Turn down the heat to a bare simmer and leave undisturbed (no peeking!) for 25 minutes. When it is done, stir gently and fold in the bell pepper garnish. Sprinkle with green onions and serve.