Showing posts with label Freezer Treasures. Show all posts

August 10, 2014

International Bento (Mixed): Ham, Cheese, & Walnut Crêpes with Greek Salad


I've been making crêpes fairly often since we moved to Germany. They're a wonderful, multi-purpose flatbread that you can make in advance, even refrigerating for a few days (or freezing...separate each one with parchment, and bag them up) so that you can have them on hand for quick breakfast, lunch, snacks, hors d'oeuvres, dinner, or dessert. It's all about what you fill them with, and how many of them you want to eat at a time, that determines their role.

I have posted a recipe for Crêpes before, showcasing one of the wonderfully tender and silky French styles of crêpe. I still make those (they are especially good as dessert crêpes, with a sweet filling), but I also have another, slightly less eggy-and-rich go-to recipe for an everyday crêpe that can be used in exactly the same way.

These crêpes are the ones you want to use if you want the emphasis to be on the filling slightly more than the crêpe itself (don't worry, they're still delicious!), if you want a slightly lower fat/calorie version, or if you go to make crêpes and discover that you only have two eggs on hand. If you are planning breakfast crêpes with an egg filling, you probably want to use this recipe rather than the other.

The ratios are from Cook This Not That! but with better (I think) mixing directions.

You can easily halve the batch, or double it, as you see fit.

Everyday Crêpes

Makes 10-12 6-inch crêpes

1 cup unbleached all-purpose flour
pinch of salt
2 large eggs
3/4 cup milk
1/2 cup water
1-2 tablespoons melted butter

In a medium mixing bowl (or food processor, or blender), mix the flour and salt. Separately, combine the eggs, milk, and water, and beat well. Add the liquid mixture to the flour, and whisk (or process with a cutting blade) until smooth.

If you are mixing by hand and cannot get rid of a few lumps, simply pour the batter through a sieve, and push-through or discard any lumps left behind.

Stir in the melted butter, and then let the batter rest for about 15 minutes so that the flour fully hydrates. If you're planning to fill the crêpes right away, you might want to get your filling(s) ready while the batter rests. Otherwise, just pour yourself a glass of something pleasant - might I suggest wine? - to sip at during the cooking process.

To make a six-inch (15 cm) crêpe, I use an eight-inch (20 cm) non-stick skillet. The skillet is usually measured by the width of the top of the pan, but the base is usually somewhat smaller. The base of my skillet is just over 6 inches. You can use whatever size skillet you like, for whatever size crêpes you like, but I find this to be the best all-purpose crêpe size.

Just like in the previous recipe:

Heat the skillet over medium heat until a drop of water dances. Spritz with canola oil, or brush very lightly with mild oil of your choice. You only need to do this for the first crêpe, if you're using a non-stick pan.

Using a ladle or scoop that holds 3 tablespoons, measure your first crêpe's worth of batter. Lift the skillet off of the heat (I hold it in the air) and quickly pour the batter into the middle of the pan. Drop the ladle back into the batter-bowl and rapidly tilt the skillet in a circular motion, to spread the batter until it evenly covers the base of the pan. Return the pan to the burner, and allow the crepe to cook until lightly golden, and the edges release from the pan, about a minute or two.

Slide a silicone spatula under the crêpe (or grab the edge carefully with your fingers) and flip it over. Let it continue to cook for a minute, and then slide the crêpe onto your work surface for filling.

Repeat until all of the crêpe batter has been cooked. This does take a little bit of time, unless you've got multiple skillets going and are multi-tasking like a champ, which is (well, one reason) why I suggest having a beverage on hand to sip while you cook.

The crêpes in the bento above have a filling of Tilsit cheese (you could substitute Havarti), very thinly sliced ham, and chopped toasted walnuts. I find that it's important when considering crêpe fillings to ensure that there is something that will act as a sort of "glue" to keep the filling together while you're eating. A filling of only dry items, such as dice chicken, chopped almonds, and asparagus will simply fall apart into its discrete components once you cut into it. A small amount of cheese, or scrambled egg, or thick sauce (or paste) of any kind will help keep the filling together.

The other compartment of the bento above has a Greek-ish salad chopped cucumber, bell pepper, tomato, feta, radishes and an oregano lemon dressing, and the little dark item is a miniature Chocolate Oatmeal Peanut Butter Chip muffin, as a tiny little dessert.

March 09, 2014

Vietnamese-inspired Lemongrass Pork Meatballs


What do you do when you have a surplus of lemongrass? Well, you could make meatballs, of course.

Living in this small city in Germany, access to Asian cuisines is rather limited, and often quite different from my previous experience of those cuisines in Vancouver. There are some tasty options, but there are also some notable absences, and much less variety than I've been accustomed to. I've taken on the challenge of making some of the things that I miss from Vancouver, and my list grows bigger every day.

That being said, I don't believe this to be any kind of authentic Vietnamese dish; rather, it is me playing with the flavours of Vietnamese cuisine and having fun while I do it. If you are looking for the springy sort of meatballs that one gets in Phó, you'll need to look elsewhere, as these are more in the Italian meatball school of texture (if not flavour). But if you want a tasty Vietnamese-inspired meatball treat - lordy, check these out! Bursting with flavour.

As I slowly build up my pantry, each new ingredient opens another door to new items to cook. My latest ingredient is fish sauce - essential for Vietnamese and Thai cooking. Because my fridge is a tiny German bar-sized fridge, shelf space for bottles is at an absolute premium, so I looked for the smallest bottle of fish sauce that I could find. That turned out to be a brand that also has red chiles in it. At first I balked - I tend to stick to the more neutral versions of basic ingredients, especially for cuisines outside my own - but as I turned it over in my head, I realized that I never use fish sauce without also adding chiles, so it was probably going to be okay. And it was. There's something about the chiles that actually takes the edge of the odour of the fish sauce, and that's kind of a relief, actually. It means that I get that all-important flavour that is so necessary in a lot of the dishes, without flinching my way through the adding of it.

Vietnamese-inspired Lemongrass Pork Meatballs

Makes 20 meatballs

500 grams finely ground lean pork
2 stalks lemongrass (preferably young)
1 tablespoon finely grated ginger
2 large cloves garlic, crushed
1 tablespoon fish sauce (with chiles)
1 long red chile pepper, seeded and finely minced
1/2 teaspoon kosher salt
½ teaspoon ground white pepper
¼ cup minced cilantro
4-5 basil leaves (preferably Thai or Vietnamese basil), minced
¼ cup panko-style flakey breadcrumbs

Into a large mixing bowl, grate the tender, white part of the lemongrass using a microphone grater. Add the rest of the ingredients (except the pork) and mix well with a fork. If the mixture seems quite dry (it should look crumbly but a bit moist), add up to another tablespoon of the fish sauce. I use fish sauce with chiles, because there's simply no application that I have for fish sauce that doesn't call for chiles, and I find the added chile flavour takes some of the edge of fish sauce, while still allowing it to contribute its essential fish sauce qualities to the dish.

Crumble or tear the pork into little bits, allowing the bits to fall onto the seasoning mixture. When all the pork is added to the bowl, use a fork, or your impeccably clean hands, to gently work the seasoning mixture through the pork until it is evenly distributed, but try not to overwork the mixture - you're not kneading bread here, just trying to combine the ingredients.

Preheat your oven to 400 F. Use about a teaspoon of peanut oil to grease the bottom of a 7x11" glass baking dish or a rimmed baking sheet. Divide the meat mixture into twenty golf ball sized meatballs (a 1-tablespoon disher is what I use; I scoop all of the meatballs out, and then go quickly back over them to make sure they have a nice, round shape all the way around, since the disher tends to make them a bit flat on the bottom). Bake uncovered for 25 - 30 minutes. Serve hot, or allow to cool and freeze on a plate until firm before bagging them up for a future meal.

I've served these over a plain version of Coconut Ginger Noodles, with a marinated vegetable salad - essentially, fresh shredded carrots, julienned cucumber, minced chiles, green onion, cilantro, basil, with a (chile) fish-sauce vinaigrette (if I'd had daikon on hand, or even any other radish, I'd have thrown that in, too). Given the added chile in the fish sauce, it was quite spicy, but added a wonderfully fresh crunch to contrast against the soft noodles and luxurious textured meatballs.

Since there were only two of us for dinner, we restrained ourselves at consuming half the batch and the rest were stashed in the freezer for a future dinner - very likely a banh mi choose-your-own-adventure meal within the next week or so. I can hardly wait.

December 22, 2013

Perogies, Pyrogies, Pyroheys!


Just before I left Vancouver in September, I finally got together with my friends Rodney and Sandi for a long overdue cooking session. We had been talking about making perogies together from almost the first day Sandi and I met, but had never quite gotten around to planning it until the clock was ticking rather loudly. Fortunately, we managed to squeeze in an afternoon of cooking a couple of weeks before I got on the plane.

Oddly enough, none of us had ever made perogies from scratch before. I think we had all helped others do so, but had never been in charge of the recipe before. This version comes from Sandi's family, and is a Schmunk-Kilby family recipe. I have adapted the original, very brief instructions slightly to provide more information based on our session.

Please note that there is mashed potato in both the dough and the filling. We used a total of 12 medium potatoes to make the whole recipe, and cooked them up in the morning, so that they would be cooled enough to make into dough in the afternoon. The perogies were cooked up for breakfast the next day, which is why we are all wearing different clothes - it wasn't that messy an endeavour.

This post has two unusual features, compared to my usual blog style: First, not all of the photos in this post are from Always In The Kitchen -- photos marked ©Rodney Gitzel were taken by Rodney or Sandi, and are used with permission. Second, I think this may be the first time I'm actually appearing in this blog (other than as a disembodied hand); that's me in the glasses.

Perogies

Yield: 6 dozen

Dough:

3 cups all-purpose flour
3 cups mashed Russet potatoes (cold or room temperature)
1 teaspoon salt
3 large eggs
1/2 cup oil

In a large mixing bowl, beat the eggs, oil and salt together until smooth, and then add the mashed potatoes, combine, and then stir in the flour until it becomes a soft dough. Cover and let stand (room temperature is fine) for 1 1/2 hours. We used a ricer to "mash" the potatoes, which gave them a very nice texture. While the dough is resting, you can make up the fillings (see below).


When ready to roll out the dough, divide it in half, keeping half covered while working with the rest. Use sufficient flour on your work surface so that you can lift the eventual individual circles of dough without distorting their shape (we learned that one the hard way). If the dough starts sticking, sprinkle it with more flour as needed (it was a fairly hot, sticky day, so we needed the extra flour).


Roll out the first portion of dough to about the thickness of a flour tortilla, and use a floured glass to cut out the circles. We used small (emptied, cleaned, of course) Nutella glass cups, which I estimate yielded about two-and-a-half inch diameter circles of dough. Fill each little circle of dough with a tablespoon of filling, folding and pinching the edges to make the classic half-moon shape. Place the formed perogy on a baking sheet lined with parchment paper, and repeat until you've cut out (and filled) as many circles as possible, and then gather up the scraps of dough into a ball and re-roll them, repeating until all of the dough has been used. The last perogy may be a bit mutant looking, but that's okay. Be sure to lay the finished perogies out in a single layer, and leave a little space between each perogy, so that they don't stick together. The perogies might look a bit irregular or downright messy to begin with, but as you get the hang of it, they will look more uniform. Even the oddly shaped ones ones will be delicious though, so keep going.


Apparently, the perogy dough needed to be subdued at one point, which Sandi handled nicely. We took turns rolling out the dough, just so we could all see and feel the texture of the dough.

Once all of the perogies are formed, you can cook them immediately, refrigerate them, or freeze them for future use. If you want to freeze them, freeze them in a single layer on a sheet or plate until hard, then transfer them to a freezer bag, seal and date.


Filling(s):

6 large potatoes (russet)
Aged Cheddar
Bacon
OR/
Cottage Cheese and potato

If you cooked all of the potatoes together, you'll be using all of the remaining mashed potatoes left over from making the dough in the filling. We divided the potatoes in half here, so that we could make both of these classic fillings. There are many other fillings you can make as well (I'm quite partial to potato and onion, for example, or you could forgo the potatoes entirely for stewed fruit, such as cherries or blueberries).

For the cottage cheese and potato version, we used about two cups of cottage cheese, and added a pinch of salt, and mixed them together. Very quick!

For the potato, bacon, and cheddar version, we fried up some of Rodney's home-smoked bacon, and then finely minced it so that there wouldn't be big pieces that would poke through the soft dough. There was about a cup of finely chopped bacon and about a cup-and-a-half to two cups of coarsely shredded cheddar. Stir into the mashed potatoes just to combine, and it's ready to go. You can of course vary the proportions as you see fit.

Cooking:

Drop a dozen or so perogies (don't overcrowd the pot) into a large pot of gently boiling water and simmer for 3-4 minutes. Perogies will float when cooked. Serve immediately or give them a quick toss in a skillet with butter and onions (and/or bacon). If necessary, place in a (buttered) baking dish in an oven preheated to 200 degrees F. and keep warm until ready to eat.

We had ours with Manitoba Mennonite sausage cooked on an outdoor grill before adding to the pan, onions, butter, and more of Rodney's home-smoked bacon.


That's a fine afternoon's labour, right there.


May 15, 2013

Kali Dal (Curried Black Lentils)


You can use a variety of different lentils to make this - the version shown here is made using whole urad dal (aka black gram), which is traditional, but you can also use black beluga lentils, and even mung beans. You can also make it with or without rajma (red kidney beans). I enjoy including the rajma for the contrast in size, texture, and colour.

You can add melted butter and/or cream or yoghurt to finish this dish (making it, in effect, a Dal Makhani), but it is delicious as is - and vegan, to boot. Perfect for entertaining your vegetarian friends. Make lots - it freezes well and reheats wonderfully for a future lunch or dinner. It thickens slightly once it cools, so if you like a wet dal, you may wish to add a little bit of water to loosen it up (wait until it is reheated before adding any water, as warming it up will also loosen it a bit). You can also make this very wet (simply by adding more water) and serving in small bowls as part of a thali, or as a first course.

Be sure to wash your urad dal very well, in lots of fresh water. A bit of grit will make the whole pot disappointing.

Kali Dal

Serves 8 (with rice or bread)

1 cup black lentils (urad dal or similar)
1/2 cup red kidney beans
6 cups water
1 thumbs-length fresh ginger, minced (divided)
1 teaspoon cayenne powder
2 teaspoon garam masala

Tempering:
2 tablespoons vegetable oil
2 teaspoon whole cumin seeds
1 medium onion, finely diced
8 cloves garlic, minced or crushed
4 fresh tomatoes, peeled and diced
1 teaspoon kosher salt


Pick over lentils and kidney beans to remove misshapen, discoloured or otherwise irregular lentils and any foreign matter (little rocks, plant stems, stray bits of grain, etc). Rinse thoroughly, with several changes of water to remove any grit or dust.

Place lentils in a heavy pot with the water and the cayenne and half the minced ginger, and bring to a boil. Reduce the heat to a medium-low simmer, and skim any foam from the top. Allow the lentils to simmer gently, covered, until kidney beans and lentils are tender – 45 minutes or a bit more, if you have older lentils. You can do this ahead, and let it sit overnight or for a couple of days in the fridge, before proceeding to the next step. At this stage, the lentils look pretty unappealing (and kind of grey-ish), but their appearance will improve greatly with the next step.

In a medium-sized skillet, heat oil over medium-high heat. Add the cumin seeds, giving the pan a shake to distribute. As soon as the cumin starts to pop, add the onions and garlic and the rest of the ginger, and fry gently until the onions have softened and started to brown. If you like your food very spicy, you can add extra cayenne to taste at this point. Next, add the diced tomatoes and salt, and stir until they give up their liquid - often they turn the onions a pretty golden colour - and scrape the mixture into the lentil pottage. Use a spatula to get every last bit. Simmer for about 15 minutes.

Add garam masala powder and simmer on a low heat for 15 minutes. If you are adding dairy, add up to half a cup of half-and-half (or plain yogurt) and let simmer for another five minutes (or until heated through). You can keep this warm, on the heat, for a long time, as long as you stir it once in a while to make sure it doesn't scorch on the bottom.

Taste and adjust for salt to your preference.

March 24, 2013

Tandoori Turkey Meatball Rice Bowl

I confess that I'd hoped that these would be more colourful than they turned out - my masala blend was months old, which I suspect was the problem, and I should have compensated by adding a little turmeric and an extra hit of kashmiri pepper, by the looks of it. However mild in appearance, though, these were absolutely delicious, and made a satisfying dinner.

That being said, these were remarkably easy to make. My standard Pork & Turkey Meatballs got an Indian inspired, all-turkey facelift, replacing the usual herbs and spices with a generous amount of tandoori masala, and using egg white instead of whole egg (I had some to use up).

I scooped the meatballs using my 60 ml disher, and baked them off on a foil-lined baking sheet for 25 minutes:


While they were in the oven, I made a simple pulao, using this Times of India Online recipe for Pulao in a Jiffy The pulao was nice, but overall a little soft, I thought - I used carrots and cauliflower from the recommended vegetables listed, but either I diced them too finely, or used too much water, because they were a little softer than I expected. Not outright mush, you understand, but a bit too soft. I generally find that I need less water when I'm cooking rice than most recipes call for, and that may be the case here - I'm not sure why - some sort of combination of being essentially at sea level, and having very soft water, perhaps? In any event, if I were to make this recipe again, I might go with both larger cut vegetables and a smidge less water. I'd probably throw in a few peas, and an extra few pods of cardamom, too.

When the meatballs came out of the oven, they got a quick brush with hot mango chutney, which went beautifully with the spicy flavour of the meat. As you can see, I also knocked together a quick cucumber and onion raita, and put an extra bit of chutney on the side.

This was a fun dinner (and lunch the next day, and extra meatballs in the freezer for a future rainy day) and while I want to tweak both the pulao and the seasoning of the meatballs (to amp them up into a more deeply fragrant and colourful result), I'm quite looking forward to version 2.0.


February 24, 2013

French Crêpes


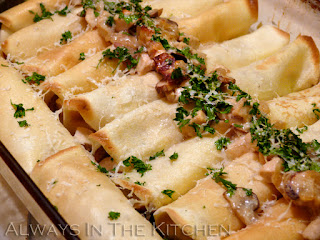
These simple crêpes are the lovely foundation for many different fillings and styles - from Suzette to seafood, from lemon-and-sugar to stacks of savouries sliced into neat wedges. Some particular favourites include a filling of bacon, mushroom, and chicken (topped with parmesan), and tomato, goat cheese, and fresh basil. You can fill them with pretty much anything you like. These ones are filled with a creamy mixture of bacon, chicken, mushrooms, onion, and brandy. The recipe for the filling is below. The filled and baked crêpes heat up wonderfully the next day. Best of all - these are not difficult. They take a little time if you cook one at a time (recommended, to start), but rather low effort, especially once you get the knack of tilting the pan around.

Crêpes (Plain)

Makes 12 crêpes (8" diameter)
Total Prep & Cooking Time: 40 minutes (faster if you can cook two at a time)

3 eggs
1 cup milk (1% is fine)
1 tablespoon oil
3/4 cup unbleached flour

Combine in a blender or food processor until smooth. If you are beating by hand, you may wish to take the extra step of straining the batter once you have finished mixing, to ensure a smooth result.

If you are making a filling, let the batter stand at room temperature until you finish preparing the filling.

Heat a crêpe pan or 8" (20 cm) nonstick skillet over medium heat until a drop of water dances. Spritz with canola oil, or brush lightly with mild oil of your choice.

Using a ladle or scoop that holds 3 tablespoons, measure your first crêpe's worth of batter. Lift the skillet off of the heat (I hold it in the air) and quickly pour the batter into the middle of the pan. Drop the ladle and rapidly tilt the pan in a circular motion, to spread the batter until it evenly covers the base of the pan. Return the pan to the burner, and allow the crepe to cook until lightly golden, and the edges release from the pan, about a minute or two.

Slide a silicone spatula under the crêpe (or grab the edge carefully with your fingers) and flip it over. Let it continue to cook for a minute, and then slide the crêpe onto your work surface for filling.

Repeat until all of the crêpe batter has been cooked.

If I am making baked crêpes, I fill the finished crêpe and place it in a greased baking dish while the next crêpe is cooking, so the process becomes an alternation of tasks. You can also make the crêpes ahead, and fill them all at once. Crêpes keep well in the fridge for a day or so (unfilled, separated by waxed or parchment paper sheets) and can be frozen for up to a month with no ill effect.


Chicken & Mushroom Crêpe filling

Makes enough to fill 12 8-inch crêpes (enough to serve four people)

4 pieces thick cut bacon
2 tablespoons butter
200 grams cremini mushrooms (or mushrooms of your choice)
450 grams cooked chicken breast
1 medium yellow onion, minced
1 teaspoon chicken bouillon paste
2 tablespoons brandy
3/4 cup Greek style yoghurt, plain (or sour cream)
2 teaspoon cornstarch
1/2 cup water
4 teaspoon grated parmesan cheese
1/4 cup parsley

Dice the bacon and fry until almost crisp, and remove most of the rendered fat from the pan. Add the butter, chopped mushrooms, and onion, and cook until tender. Add the brandy, and stir through, and then add the chicken paste. Add the water mixed with 1 teaspoon of the cornstarch and stir through, and then the and yoghurt mixed with the remaining 1 teaspoon of cornstarch. Stir and cook until the mixture is reduced to a thick creamy sauce. Add finely diced chicken, and stir through until everything is nicely heated.

Lightly grease a 9x13" baking dish, and preheat your oven to 350 F. On your work surface, lay one crêpe golden-side-down, and place two tablespoons of filling on the bottom third of the circle. Fold the bottom edge up, and then roll the crêpe into a compact cylinder. Place in the baking dish. Repeat until all the crêpes are filled and in the pan - they should just fit nicely, ten across and two side-ways. Any leftover filling can be mixed with the parmesan and parsley, and spooned down the centre of the row of crêpes.

Put the pan of crêpes in the oven for about ten minutes, and then broil for a few more minutes, or until the edges are golden-tinged.


December 01, 2012

Pork Breakfast Sausage


We wanted to have breakfast in, today. However, it was already quite late, and while we had eggs, we had no bread-stuffs (not even tortillas!), no potatoes, no bacon or sausage, and no mushrooms or tomatoes to grill. We had eggs and cheese, but nothing else to round out into omelettes, for example. Last week's "clean the fridge" efforts had been a little too effective.

However, all was not lost! On my way home last night I impulse-purchased a package of fresh ground pork. Because that's the kind of impulse-buying I do - not candy, not chips, oh no. I buy raw meat. And sometimes broccoli, but that's a different story.

We live close to a lovely Italian bakery, so I sent Palle out for bread (to serve as a toast raft for scrambled eggs, as you can see from the picture). While he was gone, I put the coffee on and started mixing up some homemade sausage. It didn't take long at all, and I had a nice ball of sausage meat ready for shaping and cooking when he arrived with a fresh loaf of Tuscan bread.

These have a fairly pronounced fennel flavour - if you do not want fennel to be quite so prominent, reduce the fennel seeds to 1/4 teaspoon. If you are aiming for a spicy sausage, add a 1/4 - 1/2 teaspoon of cayenne (depending on the level of heat that you want), and a big pinch of chile flakes to your spice mixture.

If you are watching your sodium, you might want to cut the kosher salt back to 3/4 teaspoon, but these are already lower in sodium than many sausages on the market.

Pork Breakfast Sausage

Makes six patties, or 9 sausages (about 3 servings)

500 g medium ground pork
1 teaspoon kosher salt
1 tablespoon sweet paprika
1/2 teaspoon fennel seeds
1 teaspoon granulated onion
1 teaspoon black peppercorns

Combine the salt, paprika, fennel, granulated onion, and peppercorns in a spice grinder (or molcajete) and grind until fairly smooth (if you like a bit of bite from your fennel and black pepper, stop grinding sooner, so that there are chunky bits). Combine spice mixture with the ground pork, mixing well with your fingers to get it all worked through. The paprika will slightly darken the overall colour of the meat.

You can use this right away (as I did this morning), but it would be even better to make it up the night before, and let the flavours combine in the fridge overnight.

Divide into six pieces, flatten into patties (or roll into sausage shapes) and fry in a medium-hot skillet until cooked through, turning as needed to get a nice golden-brown colour over the whole surface.

So there you have it! Rather simple, and easily made even before the coffee has brewed: delicious sausage without preservatives or bread fillers, just pork and flavour.

We were pretty excited by how well the sausage turned out, and are already plotting and scheming future sausage endeavours. I am planning to make some up for the freezer - after all, sausage is good to have on hand: pizza, pasta, sausage & potato dinners, and skillet dinners of all kinds, as well as the breakfast applications. I think I might make some up as meatballs, too - can you visualize a sausage meatball breakfast platter? I'm getting hungry again just thinking about it!

October 06, 2012

Carrot & Fennel Soup

This soup has a remarkable, silky texture, even when simply pureed with a stick-blender (no chinoise or cheesecloth necessary). The fennel brings a lightness to the character of the soup, as well as a more complex, sophisticated flavour. The fennel also helps keep the sweetness from the carrots in check. This is one of those rare dishes that feels as healthy as it is, so you can feel comforted and virtuous at the same time.

Whenever I make this dish, I berate myself for not making it more often. It's easy, lovely, and very satisfying. As you can see, it doesn't take long to knock together - most of the total time is unattended cooking time.

Carrot & Fennel Soup
Serves 4 (6 as a starter)

1 fennel bulb, sliced
450 grams carrot, sliced
1 medium yellow onion, diced
3 cloves garlic, minced
1 tablespoon extra virgin olive oil
2 cups vegetable broth (or light chicken broth)
2 cups water
1 teaspoon fennel seed
1 teaspoon coriander seed
1/2 teaspoon cumin seed

In a medium-large soup pot, over a medium flame, heat the olive oil and saute the onion and garlic with the spices. Add the sliced carrots and fennel, and stir well. Add the water and the veggie broth, and stir well. Simmer gently, covered for 30 - 40 minutes, or until the vegetables are soft. Puree with a stick blender, being patient to ensure everything is finely pureed. Check seasoning to see if it needs more coriander seed or salt. If your vegetable broth is quite salty, it may not need either.

Serve with crusty bread. If you're not vegetarian, you might want some slices of chorizo on the side or floated on the top, too. For extra fancy presentation use some of the fennel fronds as a garnish instead of the token cilantro shown here. Very fine rings of red chile would also make a delightful finish.

You can also use curry masala instead of the whole spices, for a slightly more curried taste, and you can substitute a cup of the water with coconut milk for a creamier, more luscious effect.

This soup freezes very well, making it a great item to stash in the freezer for an emergency dinner, or as make-ahead lunches. It reheats nicely in the microwave, getting a meal on the table in minutes.

September 23, 2012

Autumn's here: Cabbage Rolls


Cabbage rolls are one of those quintessential comfort foods for anyone with even a passing relationship to the cuisines of northern or eastern Europe, and of course the middle east, central asia, and the eastern mediterranean regions also have stuffed leaf and vegetable dishes with considerable similarities. Did I leave anyone out? Probably. (Sorry.) Stuffing food with other food and wrapping it up, whether you start with dough or a leaf, just seems to be a universal development in almost every cuisine.

If someone tells me that he or she is making cabbage rolls, my first question is "Oooh, what kind?" - closely followed by offers of help eating up any pesky leftovers, of course. In western Canada we tend to favour either the Ukrainian or Polish styles most of all, and the ones I've made here are a sort of unholy hybrid of every cabbage roll that I've ever found to be delicious. These ones are made with meat (beef, specifically) and rice, but there are plenty of options for vegetarian/vegan fillings (I would suggest a rice/walnut/mushroom blend, for starters).

A lot of recipes will suggest that you braise the cabbage rolls in tomato soup. Those of you who have been reading my blog for a while already know that I shy away from tinned soup as an ingredient for my casseroles and such, and I am not recommending tins of soup here, either. Rather, I humbly suggest my very own Simple Tomato Soup recipe (expired link removed, please see recipe in the comments section below), made exactly as listed. It comes together really quickly, and you can also make it a day ahead (or stash some in the freezer, and simply thaw it out when you are ready to make cabbage rolls). One recipe of Simple Tomato Soup is perfect for one tray of 12 large cabbage rolls.

I recommend savoy cabbage, which is easier to peel without tearing the leaves.

Cabbage Rolls

Makes 12 rolls
Total Prep & Cooking Time: 3 - 4 hours

1 Savoy cabbage, whole
500 grams lean ground beef
1/2 onion, very finely minced
2 cloves garlic, pressed
1 tablespoon tomato paste
1 tablespoon water
100 grams (1/2 cup) long grain rice (uncooked)
3/4 cup water
1 teaspoon mushroom base (optional)
1/4 teaspoon salt
2 tablespoons minced parsley
1 egg, beaten
1/4 teaspoon black pepper
1/2 teaspoon smoked paprika (to finish)

1 recipe Simple Tomato Soup, made as directed in the comments section below. You could also use a thin, tomato-based pasta sauce, or even simply use beef, chicken, mushroom, or veggie broth, and serve the rolls "dry" with sour cream. You will need about four cups of soup/braising liquid.

Prepare the soup, or, if defrosting, heat the soup until it is serving temperature.

In a small saucepan, bring water and mushroom base to a boil. Add the rice and stir quickly with a fork. Reduce heat, cover and simmer 10 minutes, then turn off and leave for another 10 minutes. The rice will be slightly underdone - chalky. That's perfect. Combine with the onions and garlic, and let the mixture cool a bit while you deal with the cabbage.

Cut the cabbage deeply, all the way around the core (about half an inch out from the core knob). Peel the outermost leaves, starting from the base of the cabbage, gently pushing up until the leaves come free. You can do this step a day ahead, and loosely bag and refrigerate the leaves (they will take up a lot of room). You will want 12 good, big, whole leaves, plus a couple of spares.

Trim the leaves by shaving down the thick central spine with a paring knife, and cut a small, thumb-tip sized v-shape at the base of each leaf to remove the toughest bit.

Bring a large saucepan of unsalted water to a boil. Add cabbage leaves and cook for 2 to 4 minutes or until softened, and drain. You can also soften the cabbage leaves by dipping them in water and microwaving them, 2 at a time, for about 60 seconds.

In a medium mixing bowl, combine the raw beef (broken into tiny bits), cooked rice mixture, egg, salt and pepper, and parsley, along with 1 tablespoon of tomato paste combined with one tablespoon of water. Mix thoroughly, using your impeccably clean hands, until everything is nicely integrated.

Prepare a 9x13" baking dish by ladling about half a cup of the tomato soup into the bottom of the dish, and swirling it to cover the bottom thinly. Some folks like to chop up the core of the cabbage, along with any leftover leaves, and put that in the bottom, too, as a bed for the cabbage rolls. This is a great way to use up the rest of the cabbage, as well as making sure you get plenty of veggies in your dinner.

Divide the beef mixture into 12 portions, and roll them up: this bit is awesome, but messy: Dip the softened cabbage leaves in the tomato soup/sauce, and microwave them, two at a time, again (unless they are completely floppy) for about 30 seconds. This tomato-dipping of the leaves is optional, but very flavourful.

Lay a limp, tomato-y cabbage leaf on your plate or cutting board, and add a portion of the meat to the lower third of the leaf. Flip the bottom (stem edge) up and over, bringing the points of the "v" closed so that it makes a tight package. Hold that with one hand, while you tuck the sides in (as if you were making a burrito, or an envelope), and then finish rolling up the leaf. A little practice, and this isn't as difficult as it might sound.

Place each roll, seam side down, in the prepared baking dish. You should get two rows of six, filling the pan. Pour the tomato sauce (or any other braising liquid of your choice) gently and evenly over each roll, using all of the soup, cover with tinfoil, and place in a cold oven. Set the oven to 325 F, and set the timer for 2 hours. Remove foil, and sprinkle with smoked paprika before serving.

Serve with sour cream (or plain yoghurt), mixed with a little dill. Perogies (pierogies), naturally, make a fantastic side dish, but so do plain boiled potatoes, or roasted carrots. Obviously, if you need to hurry the process up a bit, set the oven to temperature before you start rolling up the cabbage leaves, and bake for 90 minutes.

These freeze excellently, as well. Make your own ready-meals!

For the curious, here's a picture of the cabbage rolls just before they go into the oven (see how perky the cabbage still is!):

September 20, 2012

Meatballs & Polenta

Technically, not new recipes, simply a serving suggestion: the meatballs are my all-beef Italian-seasoned version of these meatballs here, and the polenta is my all-purpose polenta recipe which you previously saw when I was making polenta fries. This is just how easy it can be to get a good dinner on the table, when you have a stash treasures, such as meatballs, in your freezer (I haven't tried freezing polenta, but I imagine the texture would suffer). We had a tossed salad on the side, but you could add any extra vegetable you like to round out the meal (roasted fennel, anyone?)

The meatballs are somewhat smaller than usual, about half the size indicated in the linked recipe, as they were originally made up as part of a big batch designated for meatball subs, and I find slightly smaller meatballs are preferable in that context (so that you can have more of them, of course). I used a two-tablespoon disher (60 mL, or 1/8 cup) per meatball, and baked them in my usual fashion. Leftovers were briefly frozen on a baking sheet, and then tipped into a freezer bag for storage for another day.

The polenta recipe is particularly unchanged, simply necessitating that you pour it into individual serving bowls as soon as it is cooked, and serve it hot. The texture is a little bit like mashed potatoes - the creamy, finely whipped restaurant style, that is. If you have extra polenta (the recipe makes four servings, served in this manner), you can simply pour it into a baking dish or other small container, and let it set up to make fries (or simply re-heat and eat) at a later date. It would work wonderfully in a bento, although I didn't think of that in time to deal with the leftovers in such a way - I simply plunked slab of cooled polenta on top of the remaining meatballs in sauce, in a standard plastic container.

For the tomato sauce, you can use any one you like, of course. This was, again, a "freezer treasure" - the sauce leftover from making the same meatball subs. Essentially, a simple combination of a little onion and garlic sauteed in olive oil, a 398 mL tin of high-quality diced tomatoes (don't you hate opening a tin and finding it full of stem ends?), fresh oregano and basil, and a little simmering time. Your mileage may vary, of course. A few chile flakes wouldn't be amiss, either.

Reheating the meatballs in the tomato sauce saves time and dishes. Adding a little extra fresh basil as you reheat gives a little lift to the sauce, and makes you forget that you're essentially just eating up leftovers. This can happen almost untended while you stir up the polenta.

Parmesan, of course, is the natural finisher. Mozzarella would also be good, or any grating/melting cheese you fancy.

Now, for those of you following the "convertible to vegan" tag, I haven't completely lost my mind! Here's the fix: Instead of meatballs, use roasted cauliflower chunks, and simply toss them in the sauce for a few minutes before ladling onto the polenta. And as for the polenta, with its pesky sour cream and parmesan? Omit those ingredients in favour of a little silken tofu (beaten well until creamy) and a bit of prepared vegan shredded cheese-substitute. You may need to adjust the salt to your taste, depending on the brand you use. Change the chicken broth to vegetable broth (or just use water, as I sometimes do), and presto: converted to vegan.

June 08, 2012

Gyoza Stir-Fry


This recipe is my version of the Chicken Pot Stickers in the highly useful Cook This Not That! Kitchen Survival Guide by David Zinczenko and Matt Goulding. It is fast, tasty, and relatively healthy. It makes a light meal, so if you want something more substantial, you might consider serving it over rice or noodles, but it's also good simply on its own.

To be sure, it's more of a recipe concept, since it revolves around a pre-made ingredient (the pot stickers themselves), but you can easily outfox that by making your own dumplings. I've gone with my favourite recipe for pork gyoza, a Japanese-style dumpling that is kissing-cousin to the Chinese pot sticker, making up a batch of 36 dumplings. The stir-fry recipe calls for 24, leaving me 12 to stash in the freezer. If you don't want to do that, there's always the ones from the freezer section of the supermarket, totally up to you.

The stir-fry, then, is pretty much self-explanatory from the photo above:

You start by par-cooking the frozen dumplings for a couple of minutes in boiling water (you could also steam them), although if you're using freshly made non-frozen dumplings, you can skip this step and just add a couple of minutes to the stir fry time.

Next, heat a small amount of sesame oil in a large non-stick skillet, and add some sliced shittake mushrooms, a couple of cups' worth. A few shreds of fresh ginger are great at this point, too, but not necessary. Stir fry those for a minute or two, then add the dumplings, cooking for 2 or 3 minutes per side until browned.

Add a couple of cups of trimmed snap peas (or snow peas, if you prefer) for one more minute of cooking, then remove from the heat and stir in a tablespoon of low sodium soy sauce, a tablespoon of rice vinegar, and however much sriracha you fancy (more sriracha can be used as a condiment, of course).

Stir it all through, and divide between four bowls. Sprinkle with toasted sesame seeds (I use a combination of black and white sesame seeds, because I like the effect) and throw a sliced green onion on top for a burst of fresh flavour. I totally forgot the onion in the above picture, as you can see - it's not necessary, it is tasty.

Easy, yes? If you have the dumplings already in the freezer (one way or another), it only takes about 15 minutes to make, including waiting for the water to boil for the dumplings, and prepping the vegetables.


July 26, 2011

Chicken Gold

This isn't a recipe, it's...well, it's kind of a secret. But, oh! It shouldn't be! It didn't used to be.

This is the dripping from a roast chicken. I roast my chickens in a cast iron skillet, and after the chicken comes out of the pan to rest (before carving), there's a lot of fatty liquid left behind. After the chicken has rested, and been carved, and after dinner has been finished and the plates cleared away, I do two things:

1) I take any remaining chicken meat off of the bones, and stash it in the fridge for future uses (I usually have at least a couple already in mind). The bones themselves generally go in the freezer, wrapped, to make chicken stock, if I have the room to store them.

2) I pour the liquid from under the chicken (on its carving plate) into a small, lidded container, and pour the dripping from the skillet on top of that.

The container sits innocuously on the counter until I have finished cleaning the skillet and tidying up, and by then the liquid will have magically separated out into the two layers you can (kind of) see above. I put a lid on it, label it with a sticky note, and pop it into the fridge.

Within a couple of hours, the fatty layer, which has risen to the top, becomes solid. This can be scraped off and discarded, if you are the sort of person who is frightened of a little chicken fat, or it can be used culinarily to make the best darn stew-dumplings you've ever had, or to roast up a gorgeous pan of Brussels sprouts, or even simply to fry up potatoes. But I digress. The fat is a valuable culinary ingredient, although I know not everyone in this fat-wary age is inclined to make use of it.

Underneath that layer of fat, however, is the true chicken gold. This is the distilled chickeny goodness that contains a wonderfully dense chicken flavour, as well as a rich, collagen-heavy texture. It sets up like aspic and, since the fat has risen to the surface where it can be removed, it is virtually fat free.

Think of it as a sort of chicken demi-glace. You can add it to darn near anything that needs a little punch of chicken flavour. You can save several chickens' worth and make the best chicken gravy you can possibly imagine (great with fried chicken), or dole it out by the spoonful to add a little fabulous to each soup, stew or pot pie. Diluted with a little water, it makes a beautiful, cloudless chicken broth.

Most excellently, you don't have to use it up all that promptly. The fat perfectly seals in the chicken gold and protects it from freezer burn as you stack up the little containers in the freezer (assuming you haven't just decided to use it the very next night). Once frozen, you can also slice the fatty part away from the concentrated juices, but I find it easier to just let it defrost, and scrape away as needed.

Even a generic, supermarket-type of chicken gives off excellent chicken gold, but it you go the extra mile and get a tasty organic or naturally raised bird, the results can be truly exceptional. Don't let it go to waste: you'd be pouring gold into the trash bin.

March 06, 2006

Beef Barley Soup


It's a fortifying soup. Rich without being fatty, filling thanks to the chunks of tender beef and the plump grains of barley, not to mention the slightly exotic and ever-so-suggestively boozy shiitake mushrooms. This, my tongue informs me, is what soup is supposed to taste like. It isn't just a catch-all of leftovers shunted into a pot full of water or stock, it's a precision-strike in the kitchen, each ingredient calibrated to bring a specific characteristic to the party.

I am gradually shifting most of my eating patterns towards foods with a lower glycemic index - loosely, this means foods with "staying power" - that don't instantly get converted into glucose the moment they hit my stomach. I should note that I am not categorically shunning any food or category of food, but that I am making an effort to eat thoughtfully in such a way that my blood glucose levels achieve a kind of Tao - an even-keel instead of the sugar spikes and crashes that can be problematic with my particular health concerns. This means that I am increasing my use of the foods that achieve the slower digestion that will benefit me. One of the big players is barley.

I confess that it has been a while since I made anything with barley. I don't have anything against it, in fact I quite like the flavour, but to me it has never been anything other than soup or stew. I had a risotto made from barley and lamb broth at a restaurant in Scotland, and it was quite delicious - really almost more of a stew, but isn't that what risotto is? A kind of particularly creamy, luscious rice stew?

I thought I would start of small, though. A nice pot of the good old beef barley soup, perfect in the iffy weather of not-quite-spring. My mother made a lovely version using leftover roast beef, but since she was "cooking from her head" there was never any recipe written down. I decided to turn to the experts - Cook's Illustrated. I plugged the words Beef Barley Soup into their search engine, and it spat out the issue that contained the recipe - February 1998. From there, it was an easy saunter over to the bookshelf to extract the right slim volume (I am very proud to own every single issue of Cooks Illustrated magazine) and turn to the right page.


Here is my version of their recipe - although I used the considerable shortcut of the entirely servicable Pacific brand beef broth. I only made a half-recipe, since I only had one litre of broth, but next time I make this I will make at least a whole recipe - gosh, maybe even a double! It's that good, people. I tweaked the recipe here and there for other reasons, too, but as you can tell I'm very happy with the result. The following recipe is for the quantity that I made:

Beef Barley Soup
Adapted from Cooks Illustrated

1 lb. bottom blade steak, cubed into stew-sized pieces, lightly salted
1/2 cup white vermouth
1 litre beef broth (I used Pacific brand, and was quite happy with it)
1 tablespoon canola oil
1 stalk celery, de-strung and finely diced
1 med onion, finely diced
2 cloves garlic, minced
2 carrots, peeled and cut into quarter-coins
6 large shiitake mushrooms, stem removed, sliced into half-slices
1/4 tsp powdered thyme
1 tablespoon tomato paste
1/4 cup pearl barley
1/4 cup parsley, chopped
salt
pepper
2 tablespoons dry sherry to finish

Preheat oven to 350 F. Preheat cast iron skillet on stove top.

In a dry, preheated cast iron skillet, sear the beef in batches until all pieces have a good, dark golden brown on at least two sides. Do not cook all the way through. Remove each piece as it is ready to your empty soup pot. Deglaze the skillet with the vermouth, and pour over the beef pieces. Add all of the beef broth, and place soup pot, covered, in the oven. Let the meat and broth stew together for an hour and a half. Toward the end of the stewing time, start prepping the rest.

In your skillet, heat the oil and saute the onion, celery, carrots, and mushrooms. If the mixture is too dry, deglaze slightly with a little water or vermouth. Continue to saute until onions are translucent and celery is tender. Add the garlic, thyme, and tomato paste, again with a little water if necessary to prevent sticking.

Remove soup pot from oven, and scoop out the pieces of beef to a cutting board. Chop the beef to soup-sized pieces and return to soup pot, along with vegetable mixture and barley. Simmer on the stovetop for about 40 minutes, or until barley is fully cooked and tender. Adjust for salt and pepper, add the chopped parsley and stir through. Remove from heat and stir in dry sherry. Serve with a nice hearty bread for a surprisingly filling dinner.

Serves 2 - 4, depending on what else you're serving and how greedy/hungry people are.

July 17, 2005

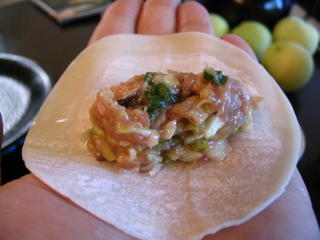
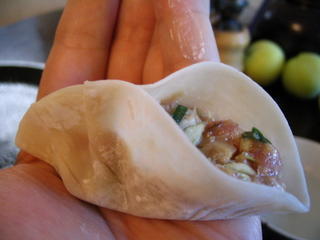
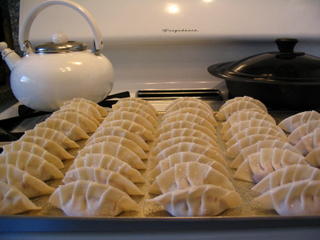
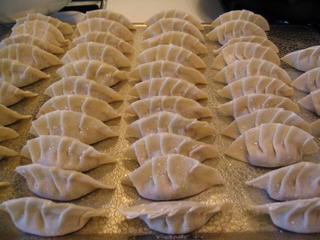
Gyoza factory

I have been told that in some Asian families, children often participate in making dumplings - quickly learning the skills required to nimbly fold soft sheets of dough around a variety of succulent fillings - and the entire family sits around a table making dozens of dumplings at a time. Some for now, some for the freezer. It's a mental image that I love: it reminds me of making perogies with my mother, although we never made them in such a quantity (or all that often).

For the most part, I am a factory of one. Still, after the first couple of clumsily folded dumplings, I usually get into a groove and manage to fold three dozen neatly folded dumplings in less than an hour all by myself. Today, I decided to fold both halves of my package of gyoza skins - a total of six dozen dumplings. Since mixing up the filling takes the same amount of time, whether you are doing one or six dozen, it doesn't really add much time to the task to do a whole lot at once.


Since my last batch of gyoza were chicken, ginger, and water chestnut, I decided to go back to my standard pork recipe for this batch. Who knows what the next batch will be - I'm thinking I might try something with shrimp. So now, once again my freezer is stuffed with little treasures. I have my Jamaican Jerk Patties, I have some burritos (although they are running low) and I have six dozen gyoza, just waiting for a noodle-feast! I am pleased with my afternoon's work. Less than a couple of hours, really.

July 04, 2005

Yowza! Gyoza!

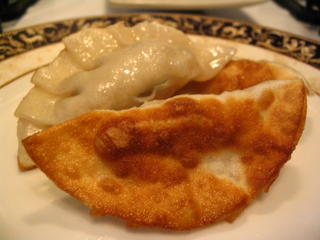
This is why I love having a stash of homemade things in the freezer. Even straight from the freezer, these little devils cook in mere minutes, and if you're feeling frisky, a quick little fry on one side gives a fantastic result.

This was the last of my most recent batch of gyoza - chicken with shiitake mushrooms, ginger and green onion. I must make more soon! Every time I make them, I vary the ingredients on whim and availability, and I've never had anything less than stellar results. While admittedly, this is a tiny serving - 3 dumplings of 2 1/2 inches long - it makes a wonderful topping for ramen, soba, or spicy somen, or as an appetizer.

(Note: expired link removed - instead, please see recipe(s) in the comments, below)