Showing posts with label Chicken. Show all posts

December 07, 2014

Arroz con Pollo, Chorizo, y Choclo: Rice with Chicken, Chorizo, and Corn


Rice-based skillet dinners (or other one-pot meals) are very rewarding to make and to eat. I grew up on my mother's iteration of chicken and rice, but as an adult, I've discovered the joy of so many different versions from all over the world. Takikomi Gohan in the Japanese style, for example, Chinese Chicken Fried Rice, Caribbean Chicken & Rice, Italian Chicken Risotto, Russian Chicken Plov, and of course, the many, many versions of Arroz con Pollo - Chicken and Rice to our Spanish speaking friends.

My version plays up the Spanish and Latin American flavours, with saffron and chorizo that you might find in Europe, and the corn that you might find in a Peruvian variation. The method is rather like an oven-finished paella (in the Mark Bittman style); a quick weeknight meal that you can put in the table without a lot of fuss.

I have used fresh corn, cut off the cob, but you could as easily use frozen kernels.

Arroz con Pollo, Chorizo, y Choclo

Serves 4

1 3/4 cups short grain rice, such as Bomba
400 grams boneless chicken, chopped
1 - 2 cups sliced cured chorizo
3 1/2 cups water or chicken broth
1 tablespoon olive oil
1 medium yellow onion, diced
1 fresh corn cob worth of corn kernels (approximately 1 1/4 cups)
2 garlic cloves, sliced
1 tablespoon tomato paste
1 pinch saffron, brewed
2 teaspoon paprika
splash of dry sherry

Preheat your oven to 400 F., with the rack in the middle or lower-middle slot.

To brew your saffron, grind it with the back of a spoon in a small dish, and add a tablespoon or so of near-boiling water. Let stand for about 10 minutes while you prep the rest of the ingredients

In a 30-centimetre skillet, heat the sliced chorizo in the olive oil, and quickly sauté the chicken pieces until lightly golden on the outside, but not cooked through. Add the diced onion and sliced garlic, and stir through. When the onions have turned translucent, add the paprika and the brewed saffron, and keep stirring through. Add the tomato paste, and a splash of sherry, and stir again.

Add the rice, and stir it through until every grain of rice is coated in the rich, golden colour. Add the corn, and stir through until evenly distributed. Add the water or broth (or stock), and stir through once more. Bring the liquid just to a light boil.

Carefully move the (very full!) pan to the oven, and bake uncovered for 20 minutes. Check to see if it needs a bit more liquid, and add up to a quarter cup if it does. Turn the heat off, and continue to cook with carryover heat for another 10 minutes. Test a few rice grains to make sure they are done. Scoop into shallow bowls, and serve with crusty bread and a salad on the side.

You can garnish with freshly chopped parsley if you like, or a pinch of pimentón - Spanish smoked paprika.

There are so very many more chicken and rice recipes out there to try, from the simple to the far more complex! Biryani, Jollof Rice, Oyakodon, Clay-pot Chicken Rice, Hainanese Chicken Rice, Zereshk Pulao...so many wonderful dishes yet to come.

July 27, 2014

Caribbean Curried Chicken Skillet Dinner


It's been a while since I made a rice-based skillet dinner, so I thought it was time. You can easily adapt this recipe to use boneless chicken thighs, if you prefer, simply by shortening the cooking time and finishing the cooking solely on the stovetop. However, you won't get quite as pretty an effect, and of course, you won't get the crispy, delicious chicken skin.

Caribbean Curried Chicken Skillet Dinner

Serves 4

8 bone-in chicken pieces
1 tablespoon unbleached flour
2 — 3 tablespoons Jamaican-style curry powder*
1 tablespoon peanut oil
1 cup parboiled rice
2/3 cup coconut milk
1 1/3 cups water
3 tablespoon shredded unsweetened coconut, toasted
2 large carrots, shredded
30 grams sultana or golden raisins
1/4 cup finely sliced green onions
1 — 2 Scotch Bonnet Chili peppers, minced

Preheat oven to 400 F.

Combine the flour, curry powder (and salt, if you are using an unsalted curry powder) in a shallow bowl, and toss the chicken pieces to lightly coat.

In a large skillet over medium heat, heat the peanut oil and add the chicken pieces, skin side down, working in batches if you need to. Sear the chicken until darkly golden brown on the skin side, about six to eight minutes, and then flip over to brown the other side, too (for about five minutes). Set the chicken aside on a clean plate.

While the chicken is browning, combine the coconut milk, water, and the remaining curry powder/flour mixture, whisking until smooth, and have it standing ready.

When all of the chicken is out of the pan, drain most of the fat (and any loose browned curry powder) leaving only a thin layer of oil in the pan. Add the shredded carrots, green onions, scotch bonnets, and raisins. Stir and fry for a minute or so, before adding the rice and toasted coconut. Stir around until the rice is thoroughly coated, scraping the bottom of the skillet with your spoon or spatula so that everything is evenly integrated.

Add the coconut milk mixture to the rice and stir well, to ensure that nothing is sticking to the bottom of your skillet.

Return the chicken to the pan, placing each piece skin-side up in a single layer so that the skin is not submerged in the liquid. Place skillet uncovered in the hot oven, on a middle shelf for 30 minutes. (check at 20 minutes to see if more liquid is needed).

Remove chicken pieces from the skillet onto serving plates, and spoon up the rice with a big serving spoon. The rice will be creamy-textured rather than pilaf style. If I have leftovers, I take the meat off the bones before cooling and refrigerating, to make re-heating in a skillet or microwave easier.


This dish can be pretty fiery and intense, so a fresh green salad will help provide a cooling counterpoint.

*Use a Jamaican-style curry powder if possible. Also, check to see if your curry powder contains salt; if not, you may want to add a half-teaspoon of kosher salt (or coarse sea salt).


May 24, 2014

Almond Chile Chicken


I almost called this "Not-Quite Kung Pao Chicken" as the primary difference is the use of almond slivers instead of crushed or whole peanuts. However, it turned out much too tasty to burden with a name that suggested it was not living up to its full potential. Another significant difference is the absence of Szechuan pepper, although it would be a great addition. This recipe makes no claim to authenticity, but it is delicious. With three sources of chile, it's also very hot.

It's helpful to allow the chicken to marinate for a little while, at the very least while you prepare the peppers and toast the almonds, but ideally at least for half an hour. You can easily add in another vegetable for an all-in-one dish green bell pepper, for example, or diced baby corn, or even finely chopped celery (to stay true to its Kung Pao roots), but don't crowd the chicken with a lot of other things. Maybe serve a simply steamed gai lan with a shot of oyster sauce, or sautéed baby bok choi with a nice dressing on the side. Serve the chicken over rice.

Almond Chile Chicken

4 Servings

400 grams boneless chicken (breast or thigh)
1/3 cup slivered almonds, toasted
1/2 small red onion, thinly sliced
handful of dried red chile pods
3 — 4 fresh red chiles (long, preferably)
3 cloves fresh garlic, minced
1 tablespoon peanut oil

Marinade and cooking sauce
2 tablespoons Chinese mushroom sauce (or oyster sauce)
2 tablespoons low-sodium soy sauce
1 teaspoon honey
1 tablespoon Sriracha sauce
1 tablespoon dry sherry (or Chinese wine)
1 teaspoon rice wine vinegar (or black vinegar)
1/2 teaspoon cornstarch

Garnish
green onion, thinly sliced
cilantro, stems removed

Combine the marinade ingredients in a large bowl, and stir until thoroughly combined. Cut the chicken into bit-sized pieces, and add it to the marinade, stirring well until the chicken is completely coated in sauce. Cover and let rest in the fridge for a few hours (if possible).

Thinly slice the red onion and mince the garlic, and set aside. Toast the almonds gently in a dry skillet until they are fragrant and golden brown, and set aside. Remove and discard the seeds from the fresh chiles and julienne the pods into nice, long matchsticks. Prepare the dry chile pods by removing the stem end, shaking out excess seeds, and breaking longer pods in half (or thirds).

Prepare any additional vegetables (either for this dish, or for a separate side), and slice the green onion and roughly chop the cilantro for your garnishes.

Have a half-cup or so of room temperature (or hot) water standing by once you're ready to fry.

Heat a large nonstick skillet (or wok, if you're set up for it) over high heat, and add the peanut oil. Using a slotted spoon or spider-tool, remove the chicken from the marinade (reserving the marinade to add later). Add the chicken in a couple of batches to the hot peanut oil, and let the pieces sear for a moment before giving it a quick stir. Add the red onion and stir through, and continue to sauté for another minute. Add the fresh chiles and the dry chile pods, and stir again. If you're adding diced baby corn, now is the time to add it, otherwise add any quicker-cooking items along with the marinade in a couple of minutes.

If the chicken starts to stick, or the marinade starts to burn, add a tablespoon of your stand-by water to loosen it up. Don't add too much water, or you'll be steaming your dish instead of frying it. You can get around this by simply using more peanut oil than indicated, but that makes for a much richer dish. Continue to sauté for another minute or so, and then add the reserved marinade along with another splash (ahem, tablespoon) of water, and stir rapidly to allow the sauce to cook through thoroughly and coat the chicken once more. Give it another couple of minutes sauté time, and add the almonds. Stir though, adding another tablespoon of water if it seems too dry, although you probably won't need to. Plate immediately, and garnish with the green onion and cilantro.

April 03, 2014

Turkey & Stuffing Skillet Dinner


A classic turkey dinner is a wonderful thing. Sometimes, however, it's just not in the cards⎯whether it's time or money that you don't have enough of, or maybe it's simply that a full turkey dinner can generate a daunting amount of leftovers. That's where this little "beauty" comes in. Well, actually, as you can see from the picture, this dish isn't really ready for its close-up. Fact is, while I make this several times per year, I just can't seem to photograph it in a way that does it justice. But it is such a tasty little number that I encourage you to try it despite its less than movie-star looks.

Think of it as an innovative pot-pie: silky gravy base with tender chunks of turkey, and a bread stuffing top crust fragrant with sage and thyme. Best of all, it comes together quickly. If you're cooking for just one or two, you'd be hard pressed to find a better stand in for the holiday classic. If you have some chicken gold on hand, by all means use it in place of the same amount of stock for a richer depth of flavour.

Turkey & Stuffing Skillet Dinner

Adapted from Eating Well's Stuffing-Topped Chicken

Serves 4

3 tablespoons canola oil
3/4 cup chopped celery
1/2 small onion, finely diced
2 cloves garlic, minced
5-6 slices bread, diced into small cubes
1/2 teaspoon ground sage
1/4 teaspoon ground thyme
1/2 teaspoon white pepper
pinch celery seed
2 tablespoons minced fresh sage
1 1/2 cups turkey (or chicken) broth at room temperature, divided
700 grams boneless turkey breast (or chicken thighs)
3 tablespoons all-purpose flour
1/2 teaspoon kosher salt
2 cups quartered cremini mushrooms
1/3 cup dry white wine or vermouth

Heat 2 tablespoons of oil in a large skillet. Add the celery, onion, and garlic. Sauté over medium-high heat for about 2 minutes, or until the onion starts to brown at the edges. Add the bread and dry seasonings (except the salt) and continue to cook stirring, until the celery has softened and the bread begins to crisp up, about two to three minutes more. Empty the bread mixture into a bowl, and stir in 1/3 cup of broth (stir like crazy with a fork to get it all evenly distributed). Set aside while you prepare the rest.

Trim any excess fat from the turkey, and slice into medium chunks, as if for a stew. Toss the chunks with salt and fresh sage.

In a separate small bowl, whisk together the room temperature broth and the flour until smooth. Set aside.

Preheat the broiler of your oven.

To the emptied skillet, add the remaining tablespoon of oil until it shimmers. Add the diced turkey (or chicken) and the fresh sage, and let cook for about 1 to 2 minutes without stirring. Add the mushrooms, and continue to cook, stirring as needed, until the turkey is cooked almost through, about 5 minutes.

Increase the heat under the skillet to high; add the wine (or vermouth) and cook, scraping up any browned bits with a wooden spoon, until almost all is evaporated, about two minutes. Stir in the reserved broth-flour mixture and cook, stirring constantly, until thickened and bubbly, about 5 minutes more, and then turn down the heat to low and allow to simmer for another 10 minutes, to ensure the rawness is cooked out of the flour. Spoon the reserved stuffing mixture evenly over the turkey mixture. Spritz the top of the stuffing with a little canola oil, and transfer the skillet to the oven and broil until the stuffing begins to crisp and brown, about 4 minutes, depending on your broiler (keep an eye on it).

Use your largest serving spoon to dish it onto plates or pasta-bowls. Serve with roasted brussels sprouts or baked yams on the side, and a dollop of cranberry chutney on the side for maximum festive flair.

October 08, 2013

Venetian Chicken Livers - Fegato di Pollo alla Veneziano


So! We've found a place to live, and will be moving in on November 1. My kitchen should be arriving shortly thereafter, and I am anxiously awaiting the opportunity to cook once again. Seriously, boiling eggs in an electric kettle may technically count as cooking, but crikey! What I wouldn't give for a simple skillet dinner right now...

In the interim, I've found a couple of photos in my archive from dishes we cooked earlier this summer, and so I plan to trickle those out until I'm cooking again. This one is from late June.

I apparently need to get more iron into my diet. I do take iron supplements - as much as my poor system can handle, but it's not enough to correct the serious deficit that I'm running, so I am finding ways to squeeze more red meats and offal into my diet. Yes, I know that there are plenty of vegetable sources of iron (I'm eating those too); I simply need all the iron I can get.

Liver is a rich source of easily absorbed iron, even poultry liver, so it seemed obvious to me that we should take a crack at a classic Venetian recipe for chicken livers with fettuccine. My husband was the cook this time, and I was the lucky person who simply had to show up and eat. This dish comes together very quickly, so make sure your prep is done before you start cooking.

Venetian Chicken Livers - Fegato di Pollo alla Veneziano
Adapted from Claudia Roden's Food of Italy

Serves 2

Fresh fettucini (2 servings)
225 grams fresh chicken livers, cleaned and sliced into medium-large chunks
1 - 2 shallots, sliced pole-to-pole into strips
2 cloves garlic, finely sliced
2 tablespoons butter
1 tablespoon olive oil
¼ teaspoon kosher salt
pinch white pepper
3 tablespoons red (or dry white) wine (approximately)
¼ cup freshly shredded parmesan cheese
2 tablespoons freshly chopped parsley

Prepare the pot with water for the pasta, and get it ready to drop the pasta (fresh pasta only takes about three minutes to cook). If you must use dry pasta, obviously start the pasta first, and adjust the timing accordingly. Warm some pasta bowls and have them standing by.

Clean and slice the livers, removing any grotty bits of sinew or connective tissue, and set aside. Slice the shallot(s) and garlic and set aside.

In a large skillet, heat the butter and the olive oil over medium-high heat until the butter foams and subsides, and then add the livers in a single layer. Sprinkle with the salt and white pepper, let them sear briefly to get a tiny bit of colour on them (about a minute). During that minute, drop your pasta into the boiling water, and make sure there's a colander or sieve ready to receive it. Give the livers a quick stir to flip them over, and push them to the outer edge of the skillet. Add the shallot strips and garlic into the bare centre of the skillet (you can add another bit of olive oil if it looks dry). Sauté briefly, and then gently stir the livers through the onion mixture. Add the wine (or a splash of vermouth) to deglaze and create a bit of a pan sauce, scraping up the bottom of the skillet. Continue to cook gently until the pasta is ready (in the other pot), and then turn off the heat under the livers.

Drain the pasta and portion into the warmed pasta bowls. Spoon the livers mixture over the pasta, being sure to pour any collected juices from the pan over each serving, and top with parmesan and parsley. Enjoy with a nice glass of wine.

If I recall correctly we utterly failed to remember to add the garlic, but it wasn't missed so it's clearly an optional ingredient (a Venetian may disagree with me). I do think that the next time I make this I might top it with a lemon gremolata, rather than just the parmesan and parsley, because I think it would beautifully - the sharpness of the lemon zest and raw garlic cutting through the richness of the dish. I'll be sure to report if that's the case.

June 18, 2013

Khoresht e Gharch: Persian Chicken & Mushroom Stew

I've been wanting to make this for ages, but somehow just haven't found the time, until now. The egg yolks make for a luxurious tasting sauce, sharpened slightly by the lemon juice and deepened by the brewed saffron. Do take the time to brew the saffron as indicated rather than simply throwing in a big pinch of the threads. It diffuses the flavour more thoroughly through the rest of the dish, and makes for a more even golden tone throughout.

Khoresht e Gharch
Persian Chicken Stew with Mushrooms
Adapted from My Persian Kitchen

Total Prep & Cooking Time: 65 minutes
Serves 8

8 chicken thighs, bone in, skin on
¼ teaspoon kosher salt
2 medium yellow onions, diced
2 cloves garlic, minced or crushed
½ cup water
600 grams mushrooms, chopped
1 tablespoon unbleached flour
Large pinch of saffron, brewed
¼ cup freshly squeezed lemon juice
1 tablespoon olive oil, divided
2 large egg yolks

Dice the onion fairly finely, and mince or crush the garlic. In a large pot, such as a dutch oven, sauté the onion and garlic in a half-tablespoon of olive oil over medium-high heat, until golden and translucent.

Season the chicken pieces with kosher salt. Scrape onion to the sides of the pot, and add the chicken pieces, skin side down. Cook for about 3 minutes on each side, then add ½ cup of water, stir well, cover, and cook on medium-low heat for 30 minutes.

While the chicken and onions cook, brew the saffron and prepare the mushrooms. To brew saffron, grind it (along with a pinch of salt) with a mortar and pestle until powdered. Put the powder in a small bowl or measuring cup, and add a couple of tablespoons of hot (recently boiled) water. Let it stand until you are ready to use it.

To prepare the mushrooms, clean and coarsely chop the mushrooms of your choice (removing any woody bits). Sauté the mushrooms in a half-tablespoon of oil over high heat, until their juices come out, and continue to cook until the liquid evaporates. Sprinkle the flour over the mushrooms and season with a little salt and pepper. Stir well, continuing to cook, and continue to stir and cook until it is well combined.

Add brewed Saffron and lemon juice to chicken and stir thoroughly. Add the mushrooms, and continue simmering (uncovered, now) for about 10 minutes. Beat the egg yolks in a bowl and carefully temper them with a bit of the hot liquid from the stew. Add the tempered egg yolks to the pot and continue cooking for another 15 minutes, stirring occasionally. Taste, and adjust salt and pepper if necessary.

Serve over rice.

March 04, 2013

Sweet & Sour Balti Chicken


The most shocking thing about this dish is how quick and easy it is. The second most shocking thing is how delicious it is. The only reason for those two things to be in that order is that you have to make it before you can taste it. Fortunately, that doesn't take long.

Many Indian recipes seem daunting, because they contain a laundry list of spices (possibly some obscure, if you don't have a large spice collection), and a great deal of chopping. Most shortcuts involve pre-packaged sauces that, while convenient, never seem to deliver the right intensity of fragrance that one gets from cooking from scratch.

Now, I should confess straight away that there is in fact a convenience item that makes this whole thing work. If you're fanatical about doing everything from scratch, go ahead and make your own hot mango chutney (I suppose you'd need to make your own tomato paste, too, in that case, but your mileage may vary). If you just happen to have some of your own mango chutney jarred up from a canning session, or lurking in the fridge from a recent previous endeavour, then use that (and I salute you!), but you get a pretty good result from a quality store-bought chutney.

This dish isn't precisely sour in the vinegary way that Chinese sweet and sour can be, but the mango chutney (and the yoghurt) give it a tanginess that skews to the sour side of the palate and offsets the sweetness beautifully. You may want to serve a vegetable side dish (or an aggressive array of side condiments). I recommend curry-roasted cauliflower florets, banana (raita or pachadi), or carrot raita to get some more vegetable matter onto your plate, but you could also add some quick-cooking vegetables, such as peas, half-way through the simmering time.

If, like me, you don't have a balti pan, you can use a wok, which is very similarly shaped. Failing that, you can use a large skillet, which works just fine.

Sweet & Sour Balti Chicken

Serves: 4
Total Prep & Cooking Time: 20 minutes

750 grams chicken (boneless, skinless)
3 tablespoons tomato paste
2 tablespoons plain Greek yoghurt
1 ½ teaspoons garam masala
1 teaspoon cayenne pepper
2 cloves garlic, crushed
2 tablespoons hot mango chutney
½ teaspoon kosher salt
1 teaspoon sugar
3 tablespoons canola oil
¾ cup water
1-2 serrano peppers, thinly sliced
¼ cup cilantro
2 tablespoons Half & Half / light cream

In a medium bowl, combine the tomato paste, yoghurt, garam masala, cayenne, crushed garlic, mango chutney, salt and sugar, and stir until smooth. If your chutney has huge pieces of mango, you may want to chop them up a bit, otherwise leave any chunks whole.

Dice the chicken into bite-sized pieces.

In a large skillet or wok, heat the oil over medium and scrape the tomato-yoghurt mixture into the hot oil. Stir gently but thoroughly, reduce the heat and cook for about 2 minutes, stirring occasionally. The paste and the oil will not truly integrate, but remain partially separated - that's okay.

Add the chicken to the pan, and stir to coat evenly with the tomato mixture. Add the water, and stir gently until the sauce becomes smooth and liquid. Simmer for about 8 minutes, or until the chicken pieces are cooked through and the sauce has thickened slightly. You may lower the heat and add a lid if the sauce is becoming too thick, or add another tablespoon or two of water.

Add half of the serrano chile slices and the light cream, and cook for 2 minutes, stirring gently.

Serve garnished with the remaining chiles and roughly chopped cilantro.


February 24, 2013

French Crêpes


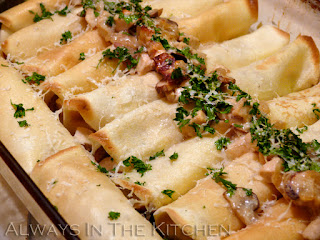
These simple crêpes are the lovely foundation for many different fillings and styles - from Suzette to seafood, from lemon-and-sugar to stacks of savouries sliced into neat wedges. Some particular favourites include a filling of bacon, mushroom, and chicken (topped with parmesan), and tomato, goat cheese, and fresh basil. You can fill them with pretty much anything you like. These ones are filled with a creamy mixture of bacon, chicken, mushrooms, onion, and brandy. The recipe for the filling is below. The filled and baked crêpes heat up wonderfully the next day. Best of all - these are not difficult. They take a little time if you cook one at a time (recommended, to start), but rather low effort, especially once you get the knack of tilting the pan around.

Crêpes (Plain)

Makes 12 crêpes (8" diameter)
Total Prep & Cooking Time: 40 minutes (faster if you can cook two at a time)

3 eggs
1 cup milk (1% is fine)
1 tablespoon oil
3/4 cup unbleached flour

Combine in a blender or food processor until smooth. If you are beating by hand, you may wish to take the extra step of straining the batter once you have finished mixing, to ensure a smooth result.

If you are making a filling, let the batter stand at room temperature until you finish preparing the filling.

Heat a crêpe pan or 8" (20 cm) nonstick skillet over medium heat until a drop of water dances. Spritz with canola oil, or brush lightly with mild oil of your choice.

Using a ladle or scoop that holds 3 tablespoons, measure your first crêpe's worth of batter. Lift the skillet off of the heat (I hold it in the air) and quickly pour the batter into the middle of the pan. Drop the ladle and rapidly tilt the pan in a circular motion, to spread the batter until it evenly covers the base of the pan. Return the pan to the burner, and allow the crepe to cook until lightly golden, and the edges release from the pan, about a minute or two.

Slide a silicone spatula under the crêpe (or grab the edge carefully with your fingers) and flip it over. Let it continue to cook for a minute, and then slide the crêpe onto your work surface for filling.

Repeat until all of the crêpe batter has been cooked.

If I am making baked crêpes, I fill the finished crêpe and place it in a greased baking dish while the next crêpe is cooking, so the process becomes an alternation of tasks. You can also make the crêpes ahead, and fill them all at once. Crêpes keep well in the fridge for a day or so (unfilled, separated by waxed or parchment paper sheets) and can be frozen for up to a month with no ill effect.


Chicken & Mushroom Crêpe filling

Makes enough to fill 12 8-inch crêpes (enough to serve four people)

4 pieces thick cut bacon
2 tablespoons butter
200 grams cremini mushrooms (or mushrooms of your choice)
450 grams cooked chicken breast
1 medium yellow onion, minced
1 teaspoon chicken bouillon paste
2 tablespoons brandy
3/4 cup Greek style yoghurt, plain (or sour cream)
2 teaspoon cornstarch
1/2 cup water
4 teaspoon grated parmesan cheese
1/4 cup parsley

Dice the bacon and fry until almost crisp, and remove most of the rendered fat from the pan. Add the butter, chopped mushrooms, and onion, and cook until tender. Add the brandy, and stir through, and then add the chicken paste. Add the water mixed with 1 teaspoon of the cornstarch and stir through, and then the and yoghurt mixed with the remaining 1 teaspoon of cornstarch. Stir and cook until the mixture is reduced to a thick creamy sauce. Add finely diced chicken, and stir through until everything is nicely heated.

Lightly grease a 9x13" baking dish, and preheat your oven to 350 F. On your work surface, lay one crêpe golden-side-down, and place two tablespoons of filling on the bottom third of the circle. Fold the bottom edge up, and then roll the crêpe into a compact cylinder. Place in the baking dish. Repeat until all the crêpes are filled and in the pan - they should just fit nicely, ten across and two side-ways. Any leftover filling can be mixed with the parmesan and parsley, and spooned down the centre of the row of crêpes.

Put the pan of crêpes in the oven for about ten minutes, and then broil for a few more minutes, or until the edges are golden-tinged.


February 12, 2013

Breast of Turducken

Intrigued by the idea of an extravagance like the infamous "turducken", but without the oven space (or the army of people to eat it up)? Why not make a smaller beastie overall by stuffing a turkey breast instead of a whole turkey? After all, Valentine's Day is coming, and if you were wanting a sexy little meal for two, with a bit of extra panache and just a few leftovers for sandwiches or a casserole, then this is the recipe for you.

Sure, it looks difficult, what with the layers and all, but I assure you that it is actually quite simple. It's just showy that way. Best of all, it's really two dishes in one, since the gravy is made from the braising liquid.

My initial inclination was to use duck confit for the "duck" portion of the turducken, but whilst shopping at Oyama Sausage Co., I noticed that they had a special on black truffle duck sausages, and asked myself "What could be fancier than that?" Since sausage is a ground mixture, it also solved the question of how I was going to keep the disparate layers from falling apart when sliced; I simply placed the sausage layer between the flattened turkey and chicken breasts.


Which is, in essence, almost my entire recipe, but for the cooking instructions. You could easily figure the rest out for yourself, I'm sure, but here are the details, just for fun:

Breast of Turducken

Serves 6 - 8

1 large turkey breast (about 750 grams)
250 grams duck sausage
1 large chicken breast (about 200 grams)
1/4 teaspoon kosher salt
1/2 tablespoon peanut oil (or other)
1/2 cup dry vermouth
1 1/2 cups turkey broth
2 tablespoons flour
salt & pepper to taste

Butterfly and pound flat the turkey breast. Take the duck sausage out of its casings, and spread three quarters of it evenly over the inner surface of the turkey. Add the chicken breast (also butterflied and pounded flat) and place the last bit of sausage in a thin line down the centre of the stack. Roll up (in such a way that the centre-line of sausage will run the length of the resulting roulade) and tie with butcher's twine at two-inch (or so) intervals. Rub the surface of the roulade with peanut oil (or olive oil, or grapeseed oil) and sprinkle with salt.


In a large skillet, over medium-high heat, sear the roulade on all sides. Add the vermouth, cover well with foil, and transfer to a preheated oven at 375 F for 1 hour, or until completely cooked (use a probe thermometer to get it to a safe temperature).

While the roulade is in the oven, you can prepare any side dishes that you like. Mashed potatoes are a great one, since you're going to have gravy. Carrots, corn, Brussels sprouts, yams, any or all of these make a fine side to your breast of turducken.

Let stand for 15 minutes on a carving board (loosely tented with the foil) to let rest before slicing. This gives you enough time to make some gravy (not shown, because it obscured the pretty bullseye pattern of the sliced roulade).

If your turkey broth is cold or room temperature to start (you could, of course, also use chicken broth or duck broth), shake it with the flour in a lidded container (holding tightly), and add to the now-empty skillet - do not clean the skillet first! Stir over medium heat until the gravy thickens, scraping up any goodness from the bottom of the skillet. If it is too thick, you can add a little more stock or water, or any vegetable water you might have from, say cooking potatoes, or carrots, or corn, or some other side dish.

If your turkey broth is hot, shake the flour with a little cold water and add it to the skillet after you have added the broth. Feel free to proceed in your usual gravy fashion, if you don't care for either of these methods. Let the gravy simmer very gently on low while you carve the roulade (make sure you remove the strings, first) and plate the rest of the meal, and then pour it into a gravy boat or bowl with spoon and take it to the table.

February 04, 2013

Venetian Chicken Frisinsal


There is a wonderful, medieval attraction to the notion of tearing apart a roasted chicken with one's bare hands, and this dish can be the wonderful result.

There are quite a few recipes for this floating around, many of which appear to be derivatives of "Tagliatelle W/ Chicken From The Venetian Ghetto" from Nigella Lawson's "How To Eat" or "Tagliatelle Frisinsal" which appears in Claudia Roden's "The Book of Jewish Food" which appears to be its antecedent.

I've adjusted the name into something that makes better sense for the amendments that I've made. Gone is the Tagliatelle, because I'm using broad egg noodles instead (and less of them). Other adjustments include opting in for the parsley which Nigella uses (absent from the original), and roasting the chicken on ribs of fennel (to be discarded after), which adds a subtle perfume to the dish, and lifts the chicken off of the roasting pan.

This is a glorious recipe. It may not look terribly exciting, and it is assuredly not low-fat, but it is wonderfully fragrant and delicious, making it a beautiful comfort food sort of meal.

Venetian Chicken Frisinsal
Serves 4

1 medium chicken
3-4 stalks of fennel
1 tablespoon extra-virgin olive oil
kosher salt, as needed
1 long sprig of fresh rosemary (about 5 inches)
1/3 cup golden sultana raisins
1/2 cup pine nuts
225 grams broad egg noodles

Rub the chicken with olive oil and salt lightly on all sides. Place the chicken, breast side down, onto your roasting pan (I use a large cast iron skillet) which has been lined with enough stalks of fennel to keep the chicken elevated from the bottom of the pan. Roast at 400F for 50 minutes, then turn the chicken breast-side up, and continue to roast until the chicken is completely cooked - 20 minutes to 1/2 hour will do nicely for a 3 pound chicken. Remove the chicken from the roasting pan to a plate, and allow to cool for twenty minutes or so, until it is cool enough for you to remove the chicken from the bones with your bare hands.

While the chicken is roasting (and then cooling), soak the sultanas in a little water for about half an hour, and then drain. Toast the pine nuts until just lightly golden brown - this can be done in a dry skillet on the stovetop, and only takes a few minutes. Mince the rosemary finely, and set aside. Chop the parsley as you like it, and set aside.

While the chicken is cooling, remove the fennel stalks from the roasting pan (let the drippings on them fall back into the pan) and discard. They are stringy and tough, and now overcooked, so there's not much use for them; they have given up their flavour to the chicken juices, which is as good a fate as they could hope for. If you really need to watch your fat intake, pour all of the drippings from the chicken into a bowl, and let the fat rise to the top. Skim off some of the fat as desired. Otherwise, just leave the drippings in the skillet, add the chopped rosemary, the pine nuts, and the drained raisins to the drippings, and bring to a simmer. Next, pour any liquid that has pooled around the chicken (on its cooling plate) into the skillet with the rest of the drippings. Reduce the heat to very low and cover, while you prepare the rest.

Bring a large pot of water up to the boil (for the pasta) while you remove the meat from the chicken. Using your hands, strip the meat and skin from the bones and tear into bite-sized shreds, putting them in a large serving bowl. Be sure to use the crispy skin, as well, but any flabby skin can be discarded with the bones. When all of the chicken is shredded* (you can put the bones aside to make stock or to freeze for later use), quickly cook the pasta (do add a little salt to the water). Egg noodles only take a few minutes to cook, which is handy. Drain the noodles, or use a spider-tool to lift the noodles right from the water onto the shredded chicken meat in the bowl. Pour the sauce of drippings, raisins, rosemary and pine nuts over the top, add the parsley, and toss gently to combine.

I recommend a fresh salad with a bit of crunch, to balance the richness of this dish. Fennel & Radish Salad is about perfect with this (since you already have the fennel).

In the spirit of full disclosure, I note that I actually removed the chicken breast (but not the tender) to a separate plate, because a whole chicken's worth of meat was more than we needed for the four servings of this dish. You could, of course, increase the amount of pasta, use all of the chicken, and feed two to four more people, especially if you had a side dish or two to round it out. The chicken breast that I hived away in this instance made a lovely chicken and fennel white pizza two days later.

*When you are stripping the meat from the chicken, be sure to take the meat from the back of the chicken - especially the two lovely roundish bits referred to as "the oysters" from just above the thighs. This is the closest thing to a tenderloin on a chicken, and is a wonderful bit not to be missed. They are small, firm, intensely flavourful bits of dark chicken meat, sometimes doled out as a special favour, or harboured as a cook's treat.

September 14, 2012

Summer Rolls, While We Still Can


Before I move entirely into my autumnal kitchen habits, here's one more dying-light-of-summer dish that I simply must share with you.

For years, I'd avoided summer rolls (aka salad rolls, aka fresh spring rolls), because the initial ones I'd tried were not really all that good, dry and bland, relying heavily on a giant wodge of unseasoned noodles to make up their bulk, and requiring constant, nay, desperate dipping into peanut sauce simply in order to swallow each bite. When I discovered, years later, that most summer rolls are in fact delightful treats, I felt rather foolish for avoiding them for so long.

Most of the versions you see in my neighbourhood tend to be either vegetarian or, more likely, prawn-centric, with a few veggies, a bit of (seasoned!) noodle, and a smart row of precisely lined up prawns down the centre. The dipping sauces tend to be a peanut affair (spicy if you're lucky), or nuoc cham, a Vietnamese dipping sauce made primarily of fish sauce, lime juice and rice vinegar, with some chiles and herbs thrown in. You can really use whatever dipping sauce you like - any Asian-style dumpling sauce is probably going to work fine, or plum sauce, or coconut chutney...even just painting a stripe of sriracha down the side before you dig in is going to work.

What made me actually decide to make these myself was the sudden, thunder-struck notion that coconut-lemongrass chicken would be really quite good in these. However, I've never seen such a thing for sale. The only solution was to get some rice paper wrappers, and start rolling my own. After that, I made some more, minus the chicken and coconut, and with double the vegetables (all nicely seasoned with nuoc cham, prior to rolling).

The following, consequently, is more of a general guideline, than a recipe, really. Vary them as much as you like - you're the one who is going to be enjoying them.

Lemongrass Chicken Summer Rolls

Makes 6 rolls

6 Banh trang rice wrappers
125 grams rice vermicelli, cooked
200 grams chicken breast
60 mL coconut milk
1/2 teaspoon lemongrass powder
1 carrot, shredded
8 centimetres English cucumber, matchstick cut
fresh Thai basil, shredded
fresh mint, shredded
2 tablespoons nuoc cham or lime juice with a pinch of salt

Cook the chicken in the coconut milk with the lemongrass powder. Remove the chicken from the coconut milk, and shred finely. Add the noodles into the coconut milk, and toss well to coat. Toss the cucumber and carrot with the nuoc cham, and allow to drain.

Dip one banh trang wrapper in water (or run it briefly under the tap) and immediately lay it flat on a wooden cutting board. In the bottom third of the circle, lay some of the chicken, some of the noodles, and some of the vegetables, as you would for making a burrito. Top with the shredded herbs. Cilantro is also a nice addition here.

Lift the bottom edge of the wrapper (which will now be pliable) and wrap it upward until it just covers the filling, and hold it there with one hand. Using your other hand, fold the sides inward, and then continue to roll from the bottom up until the roll is complete. Put aside on a plate and chill while you make the rest. Wrap tightly, so they hold together while you're eating them, but not so tightly that you tear the wrapper. A little practice will make them just right.

Serve with the dipping sauce of your choice - more nuoc cham, or peanut sauce are classics, but I prefer a nice, spicy, peanut-butter laced vinaigrette. You can always go crazy and have more than one, sauce, of course. Why decide?

For vegetarian/vegan summer rolls, simply omit the chicken, lemongrass, and coconut milk and increase the vegetables - you might want to add thinly sliced daikon or zucchini, or other crisp raw vegetables of your choice, to round it out. You could also add a julienne of spicy tofu. You may want to season your noodles with a little Nuoc cham (a vegetarian version, of course) if you're going all veggie. You can really put whatever you like in them.

These will keep until the next day, assuming you don't get up in the middle of the night and devour them. I'm just sayin'. Two rolls makes a good, light supper.


August 19, 2012

International Bento (China): Chicken wings bento


My last post reminded me that I've really fallen down on posting my bentos, so here's another one: Chinese-inspired chicken wings ("Beijing Wings" from Cook This, Not That!), pork fried rice, and baby bok choy with spicy vinaigrette.

The pork fried rice is much like pork fried rice anywhere - a bit of egg, a bit of bbq pork from a Chinese butcher, some onion, leftover plain long grain rice. There's an art to a great fried rice, but this one was just a quick, cobble-together: tasty, but not truly a classic of its kind.

The bok choy in vinaigrette did not enjoy waiting in the fridge until morning, and it looks as though I may have over-steamed it, too, as it's usually a bit brighter green. The vinaigrette is a mixture of soy sauce, rice vinegar, sesame oil, sambal oeklek, minced ginger, and minced garlic. I don't use measurements when I make this up, but I don't use much oil. It's more like a dipping sauce than a real vinaigrette, but it goes beautifully on steamed or stir-fried bok choy, gai lan, or other strong greens.

The wings are fairly simple to make, and are baked instead of fried, so, theoretically a bit healthier for you, even though the skin's still on.

Beijing Wings
Adapted from Cook This, Not That!

Serves 3 - 4

1 kilo chicken wings, jointed (freeze the tips for making stock)
1/3 cup low sodium soy sauce
3 tablespoons brown sugar (or honey)
4 cloves of garlic, minced
2 tablespoons freshly grated ginger
2 tablespoons butter
2 tablespoons Sriracha
1 - 2 tablespoons fresh lime juice (half a lime)
toasted sesame seeds
1 green onion, sliced

Combine the soy sauce, sugar, garlic, and ginger in a large glass or ceramic bowl. Add the wing sections (you can also buy just paddles or drumettes) and stir them around until they are well coated. Cover the container with its lid or plastic wrap, and refrigerate for at least an hour, four or eight hours being better (ideally, do this after breakfast to be ready for dinner).

Preheat the oven to 450F, and line a baking sheet with foil. Spray the baking sheet with a thin layer of canola spray (or brush lightly with peanut oil). Drain the wings from the marinade (discard the marinade). Lay out the wings in a single layer on the foil, and bake for about 15 minutes. The skin should start to get crispy. Turn the wings over and bake for another 5 to 10 minutes.

In a large skillet, melt the butter and Sriracha, stirring to combine. Remove the wings from the oven, and quickly add them to the skillet. Toss the chicken around in the hot sauce, and saute for a couple of minutes. Remove the chicken to a platter, and garnish with sesame seeds and thinly sliced green onion.

June 16, 2012

Chicken Pot Pie, Biscuit Top


I love chicken pot pie. I don't love it when it comes with too many peas, or a leathery, greasy pastry top, but if it has a quality pastry (which hasn't been allowed to get soggy), or better still, a biscuit topping, then it has got to be right up there with my favourite comfort foods.

It's also pretty easy, really. You make a creamy stew with chicken and vegetables of your choice, add the top, and pop it into the oven for a good 25 to 30 minutes on high heat, and voila! What could be better?

Well, I suppose it could be healthier than some of the versions out there, but there's loads of tricks to make the filling lower in fat, and if you use a slightly thinner layer of (lean) biscuit or scone dough over the top, you're setting your setting yourself up nicely to have a guilt-free wallow in a delicious dinner. Or lunch. Or supper. Whatever you want to call it, really.

The biscuit pie methodology works pretty much the same for any filling. Beef stew, chicken stew, vegetable stew - pretty much anything that can take the hit of being in a hot oven for half an hour makes a great biscuit pie. And, if you're the sort of cook who likes convenience and buys packets of biscuits instead of making your own, well, that works too. So really, it's all about the filling.

I like my chicken (or turkey, or pheasant) pies to be creamy, and I like to use kernel corn instead of peas. I also like to have uses for leftover roast chicken, although, to be fair, I have plenty of those already (but another is always welcome). The pie at the top of this post came about after eyeing the recipe in the Cook This, Not That! Kitchen Survival Guide, which I've posted about before. For example, in my last post, Gyoza Stir-Fry. I've made some minor seasoning changes to suit myself, and of course the use of biscuit instead of puff pastry is not from CTNT's receipe.

Chicken Pot Pie, with a Biscuit Crust
Serves 4

1 tablespoon butter
2 cups pearl onions (recipe calls for frozen, which I couldn't find, so I used fresh)
2 medium carrots, diced
2 garlic cloves
2 cups sliced cremini mushrooms
1 cup frozen corn kernels
meat from 2 roasted chicken legs with thighs, skinless, diced
1/4 cup flour
1 teaspoon chicken base (Better than Bouillon)
1 1/2 cups water
1 cup 1% Milk
1/4 cup half & half
1 bay leaf
1/8 teaspoon ground thyme
1/2 teaspoon mustard seeds

Make up the water and chicken base into a hot broth. Rinse corn kernels with hot water, in a sieve, so they drain instantly, and set aside.

Heat the butter in large skillet over med heat. When melted, add the onions, carrots and garlic. Cook until onions are translucent and carrots begin to soften, about 5 minutes. Add the bay leaf, thyme, and mustard seeds, and stir well. Add the mushrooms and cook, stirring occasionally for another 5 minutes. Stir in the chicken and the flour, using a silicone spatula or wooden spoon to stir well, so that veggies and meat are evenly coated with flour.

Slowly pour the warm broth in, either using whisk to help avoid clumping, or stirring well with your spoon/spatula while you pour. Once the broth is incorporated, and the sauce is smooth, add the milk (does not need to be warmed, but can be) and simmer for 10-15 minutes or until the sauce is thickened. Stir in corn. Season with salt and pepper, as needed.

Mix up your biscuit dough and roll out to fit the top of the casserole dish you will be using. Slice the biscuit into quarters, or leave it as one big sheet (if so, use a fork to poke some steam-release holes).

Heat over to 400 F. Pour chicken into a 1 1/2 quart casserole dish, and cover with the biscuit dough. Bake uncovered for 20-25 minutes until golden brown. If your casserole is really full, place a tray under to catch any drips, or you will need to spend some of your evening cleaning your oven floor!

March 20, 2012

Ají De Gallina: Peruvian Chicken with Chile & Cheese

If you have been following this blog for a while, you will know that I have made this dish before, using Cesar's recipe (or a modestly adapted version thereof).

This time, I was moved to streamline the recipe a little more, at least partly due to the fact that I had two whole chicken legs' worth of meat (leftover from a roasted chicken) waiting in the fridge to be turned into something tasty, and had actually made a nice stock out of the bones. I also had a jar of ají amarillo sauce lurking in the fridge, and some ground almonds in the freezer. When I realized that I had pretty much everything that I needed for the dish on hand, I sprang into action. I note that I used Portuguese buns because they were the only plain white bread we had in the house, but they worked beautifully.

Ají De Gallina

Serves: 4
Total Prep & Cooking time: 45 minutes

2-3 cups shredded cooked chicken
1/2 medium yellow onion, minced
3 cloves garlic, minced
3/4 cup 1% milk (or skim)
1 1/2 Portuguese buns (or three slices of bread)
3 tablespoons aji amarillo sauce
1/4 cup ground almonds
1 tablespoon chicken fat
1 cup chicken stock
1/2 cup freshly grated parmesan cheese
1/4 tsp Kosher salt
Ground black pepper to taste

Tear the buns or bread into pieces, soak in the milk for about half hour, then puree. I soaked the bread right in the mini-prep bowl, fitted with the metal blade, to minimize mess. If you are serving this traditionally, with plain rice and/or potatoes, you probably want to get them started now, along with the hard boiled eggs for garnish.

While the bread soaks, prepare the rest: shred the chicken into long threads, and set aside, and chop the onions and garlic.

Heat the chicken fat (or olive oil) in a skillet and add the minced garlic and onion. After 2-3 minutes add the ají sauce, and cook for 2 more minutes, stirring. Add the blended bread, stirring constantly. Add salt and pepper.

Little by little, pour in one cup of broth, still stirring. If the mix is too thick, add more broth (or hot water). Cook for a few more minutes, always stirring.

Add the chicken threads, parmesan and ground almonds, and stir well. Remove the skillet from the heat for a few minutes before serving, so the flavours integrate.

Serve with white rice and potato slices. Decorate with hard-boiled egg wedges and olives.

I should note that the kind of olives that should be served here would be closer to California Mission olives, or Mexican black olives, than the kalamatas shown here. *shrug* I like kalamatas better, and I had them on hand. Radishes also make a lovely garnish. We also had some red bell pepper strips, just to give us a little more vegetable in our dinner. Leftovers re-heated well for lunch, which was also a bonus.

This version is fairly potent - if you want a milder hit of the chile flavour, use 1-2 tablespoons of the sauce, instead of 3.


December 30, 2011

Margarita Chicken


This is a great little recipe, which I've only slightly adapted from Cook This! Not That!, and really mostly in terms of adding a few more beans (the two to three tablespoons in the original recipe hardly seemed adequate for a serving), and a side dish of simple red rice.

Now, while the recipe shows you how to easily doctor up a can of black beans (drain, add cumin, heat, add lime juice), if you happen to have some left over Spicy Thick Black Beans, simply use two cups of those, instead - you won't be doing any damage for the extra onion, garlic and pepper in the mix.

Margarita Chicken
Adapted from "Cook This! Not That!"
by David Zinczenko and Matt Goulding


Serves 4

Bean Bed
2 cups of black beans, drained
1/2 teaspoon ground cumin
juice from one lime

Chicken
1/2 tablespoon olive oil
4 boneless, skinless chicken breasts (about 4 oz. each)
1 cup salsa verde (warmed up, ideally)
1 cup grated Oaxaca cheese
Salt & Pepper as desired
cilantro, for garnish

If you are serving this dish with rice, get it started right away, and you should be able to easily do the rest in the time it takes the rice to cook (unless you're using instant rice, which I can't recommend). A tasty, simple version of red rice is to just add minced onion and a good sprinkle of ground annatto seed, cumin, and a pinch of salt to your regular steamed rice recipe.

Preheat your oven to 450 F, with the oven rack set to the middle. Heat the drained beans in a small saucepan, with the cumin, until thoroughly heated. Add the lime juice and stir through. Turn heat to low (or off), cover and hold until needed. Preheat your salsa in a small saucepan or in a cup in the microwave.

Salt and pepper your chicken lightly on both sides, and sear in a pre-heated skillet until deep golden brown on the first side - about 3 or 4 minutes - then flip over. As it sears on the second side, for another three minutes or so, gently spoon a little salsa verde over each chicken breast, spreading it with the spoon to just reach the edges of the chicken. Sprinkle with grated cheese, and then place uncovered in the oven for about five minutes, or until the chicken is cooked through and the cheese is bubbling.

To serve, spoon a quarter of the beans onto a luncheon-sized plate, and carefully place a chicken breast atop. Garnish with freshly chopped cilantro. Add the red rice to the side of the plate, and a couple of slices of avocado, and serve with lime wedges on the side for extra lime goodness. Leftovers work beautifully for lunch - I recommend slicing the chicken breast before stashing it away in the fridge, so it can reheat evenly (and more quickly!). I also deeply suspect that any leftovers, should you be so lucky, would make fantastic burritos. I intend to double the recipe next time, and find out.

The original recipe clocked in, according to the author, at 330 calories per serving. increasing the black beans to 1/2 a cup per serving, and adding a modest amount of red rice (3/4 cup of cooked rice) and even adding a quarter of avocado, raises the meal total to a mere (approximate) 525 calories for the whole meal (roughly 24% of those calories from fat) - absolutely still qualifying as a terrific, healthy dinner.

Quite a few of the other recipes from the book (and its companion publications) are available over at Men's Health.

July 26, 2011

Chicken Gold

This isn't a recipe, it's...well, it's kind of a secret. But, oh! It shouldn't be! It didn't used to be.

This is the dripping from a roast chicken. I roast my chickens in a cast iron skillet, and after the chicken comes out of the pan to rest (before carving), there's a lot of fatty liquid left behind. After the chicken has rested, and been carved, and after dinner has been finished and the plates cleared away, I do two things:

1) I take any remaining chicken meat off of the bones, and stash it in the fridge for future uses (I usually have at least a couple already in mind). The bones themselves generally go in the freezer, wrapped, to make chicken stock, if I have the room to store them.

2) I pour the liquid from under the chicken (on its carving plate) into a small, lidded container, and pour the dripping from the skillet on top of that.

The container sits innocuously on the counter until I have finished cleaning the skillet and tidying up, and by then the liquid will have magically separated out into the two layers you can (kind of) see above. I put a lid on it, label it with a sticky note, and pop it into the fridge.

Within a couple of hours, the fatty layer, which has risen to the top, becomes solid. This can be scraped off and discarded, if you are the sort of person who is frightened of a little chicken fat, or it can be used culinarily to make the best darn stew-dumplings you've ever had, or to roast up a gorgeous pan of Brussels sprouts, or even simply to fry up potatoes. But I digress. The fat is a valuable culinary ingredient, although I know not everyone in this fat-wary age is inclined to make use of it.

Underneath that layer of fat, however, is the true chicken gold. This is the distilled chickeny goodness that contains a wonderfully dense chicken flavour, as well as a rich, collagen-heavy texture. It sets up like aspic and, since the fat has risen to the surface where it can be removed, it is virtually fat free.

Think of it as a sort of chicken demi-glace. You can add it to darn near anything that needs a little punch of chicken flavour. You can save several chickens' worth and make the best chicken gravy you can possibly imagine (great with fried chicken), or dole it out by the spoonful to add a little fabulous to each soup, stew or pot pie. Diluted with a little water, it makes a beautiful, cloudless chicken broth.

Most excellently, you don't have to use it up all that promptly. The fat perfectly seals in the chicken gold and protects it from freezer burn as you stack up the little containers in the freezer (assuming you haven't just decided to use it the very next night). Once frozen, you can also slice the fatty part away from the concentrated juices, but I find it easier to just let it defrost, and scrape away as needed.

Even a generic, supermarket-type of chicken gives off excellent chicken gold, but it you go the extra mile and get a tasty organic or naturally raised bird, the results can be truly exceptional. Don't let it go to waste: you'd be pouring gold into the trash bin.

July 16, 2011

Butter Chicken Revisited

I first posted about butter chicken a few years ago (see link). Butter chicken is probably the single most popular dish in Indian restaurants in Vancouver, which is actually a little bit sad, because it means that almost every restaurant (don't worry, I do know there are exceptions) feels the need to keep one on the menu, however indifferent to it they might be. I've had a fair number of wretched ones, and almost never order it out, anymore. The good news is that it is a very easy dish to make, although the recipe looks a bit daunting. Some of that is the list of ingredients, but in all fairness most of those are spices.

I've updated and streamlined my recipe since the original one was posted on my old, non-blog recipe site (here).

Butter Chicken (2011)

Serves 4 - 6
Total Prep & Cooking time: 45 to 60 minutes

8 boneless, skinless raw chicken thighs
2 tablespoons hot tandoori masala
14.5 oz / 398 ml can diced tomatoes, with juices
2 tablespoons butter
2 tablespoons canola oil
3 bay leaves
1 inch of ginger root, peeled
3 large cloves of garlic
1 medium onion, roughly chopped
1/4 teaspoon cayenne pepper
1/4 teaspoon sugar
1/2 teaspoon kosher salt
2 tablespoons natural cashew butter (unsalted)
1 cup milk
1/2 cup water
1/2 cup cream
1/2 teaspoon garam masala
cilantro to garnish optional

Sprinkle tandoori masala evenly on both sides of the skinless chicken pieces and let them rest while you prepare the rest of the ingredients.

Prepare and measure out all ingredients ahead of time: this is not a chop-as-you-go endeavour. Use little bowls or plates to get organized. Items that are added at the same time can be put in the same bowl.

Ginger, garlic and onions can be finely ground together in a blender or food processor. You want them very finely minced, but not completely pureed. Scrape down the sides as necessary, to ensure a fine texture. Remove to a bowl, so they're ready to add when needed. Puree the tomatoes separately, with their liquid, and put them in a separate bowl (an immersion blender works well for this.

Heat the butter and oil in a large, non-stick skillet over medium heat, until the butter is melted and the pan is hot. Add the bay leaves, the onion/ginger/garlic paste, and fry, stirring often, until golden brown and all water has evaporated. Don't let it burn. Add the tomato puree, chile powder, salt and sugar, and fry until the water has all evaporated and the oil separates out into shiny orange-y droplets. This can take up to 10 minutes, so be patient and stir a lot. The mixture will be quite thick, almost dry.

Add the cashew paste and continue to stir and fry another few seconds, and then add the milk and water slowly, stirring the whole time, and raise the heat to bring the mixture to a boil. The sauce should be thick and almost custard-y in texture. You can always add more water later, if needed.

When the sauce has come to a boil, turn the burner to low. Shake any excess tandoori masala from the chicken, and slide the pieces gently into the pan, and spoon the sauce over each piece. Cover and simmer very gently for 25 minutes (you can also do this in the oven at 350℉, if you need the stovetop), stirring half-way through. Remove the chicken pieces carefully from the sauce and roughly chop the meat into large bite-sized pieces. Return the chicken pieces to the pan and stir into the sauce. Over medium heat, add the cream and garam masala, and cook for a further 5 minutes, until heated through. Garnish with cilantro, if you like.

I should also note that the sauce freezes beautifully, should you have any left (or if you only have a smaller amount of chicken - you can still make the whole recipe of suace, and then freeze the leftover). When you want to use it, simply defrost and heat in a skillet, slide more masala-rubbed chicken into it, simmer, and serve. Just like one of those ready-to-use sauces, but at a fraction of the cost, and much, much better.

The sauce on its own would make a pretty awesome pizza sauce, don't you think? Leftover chicken can also be mixed with rice and vegetables (curry-roasted cauliflower, for example) and wrapped in a roti or tortilla as a freezer-friendly stash of homemade goodness.

While not strictly correct, I've also had good luck substituting quality peanut butter for the cashew butter. I'm currently very impressed by the Nuts To You organic smooth peanut butter (unsalted), which may be the best I've ever had.

June 22, 2011

Mango Chili Chicken

This was one of the best dishes so far out of Cook This, Not That!, which I reviewed on my other blog at the end of last year. It has earned its way onto rotation, in fact. I've tweaked a few things: added garlic, changed the cooking order - no one wants overcooked peas, and even moments count.

This comes together pretty fast, so set the rice to cook before you get started. Alternatively, you could also serve this over flat, wide rice noodles, in which case simply get a pot of water on the boil so that you can quickly cook the noodles once the dish is ready.

Mango Chile Chicken

Serves 4
Total Prep and Cooking Time: 20 minutes

1 lb boneless, skinless chicken thighs
1 Ataulfo mango, peeled and diced
1 inch fresh ginger
1 tablespoon sambal oelek
1 tablespoon low sodium soy sauce
1/2 tablespoon olive oil
1/2 tablespoon toasted sesame oil
1 medium red onion (sliced or diced, as you prefer)
1/2 tablespoon cornstarch
2 to 3 cups sugar snap peas
2 garlic cloves

Combine soy sauce, sesame oil and cornstarch in a medium mixing bowl, and stir until smooth. Trim any fat from the chicken, and cut into large chunks - usually two to three pieces per thigh. Add the chicken to the soy mixture, stir well, and allow it to rest while you prepare the vegetables.

Peel and dice the mango, and set aside. Chop the onion and the ginger, and clean the snap peas. Dry the snap peas thoroughly, and remove their strings and tails. Leave the pods whole, or cut in half on a steep angle.

In a large, non-stick skillet, heat the olive oil over high heat. Add half of the chicken to the pan in a single layer. Let cook without moving the pieces for 30 seconds, then add the remaining chicken in the spaces around the first pieces. Allow to cook for a further 30 seconds undisturbed, then stir through. Let cook undisturbed again another 30 seconds to a minute, depending on the size of the pieces. If there is any marinade left in the bowl, throw it into the pan now.

Add the dry pea pods and stir fry for a minute or two. Push the chicken and peas to the sides of the pan, and add the onion, ginger and garlic to the middle Stir fry the onions briefly, then stir throughout the chicken pieces, and continue to stir fry until the onion starts to become translucent (a couple of minutes). Add a splash of water if it starts sticking (at any time). Add the diced mango and the sambal oelek, and stir just until the mango is warmed through. Serve over rice.

If you happen to have a few of those feisty little Thai chiles, you can add a minced chile to the initial sesame-soy marinade, too. Or, you could slice one into a pretty star shape and let it curl up attractively in a bowl of cold water and use it as a garnish. Hey, I'm just sayin'.

June 06, 2011

One Pan Chicken Dinner meets Cholula Chili Garlic Sauce

This dinner really needs another name. Maybe a fancier name. One Pan Chicken Dinner is tediously descriptive - you only need one pan, and it has chicken in it, along with the other components that make up the dinner. It really is good, solid, everyday cooking, though, so perhaps it should keep its workman-like name.

Clean up, it should be said, is fairly easy. In fact, the whole darn thing is easy! Choose the flavour profile you want to base your dinner on, and then season up your chicken parts accordingly (and your vegetable parts, too). Mexican flavours are always a good choice, but so are Indian, Italian, and Moroccan. Place your (bone in) chicken parts in the corners of your dish (you can line the dish with foil for even easier clean up, but any large baking dish or edged cookie tray will do. The more you're making, the bigger the tray you will need, obviously.

As I am continuing to work my way through the Cholula Hot Sauces that were sent to me, it was time to give the Chili Garlic variation a try, and push the dish slightly Mexican. Love chiles, love garlic, love both on chicken, so it was a good bet that I'd like the sauce. I was also pleased to see that the ingredient list didn't have any unexpectedly peculiar additions.

Tasting the sauce straight up, I found it to be flavourful, and very simple. It's fairly mild, as hot sauces go, certainly milder tasting than the classic Cholula. This makes it rather multi-purpose - I can see it being used to zest up all manner of dips and sauces - where I add chile, I'm also liable to add garlic, so there are likely many uses for this one, both in the cooking stages and the finishing stages.

In this instance, I painted the chicken thighs (skin on, bone in) with the Cholula Chili Garlic sauce before putting the pan in the oven. At that point, there was really only the chicken, the chunks of sweet potato, and the mushrooms in the dish. The chicken is baked at 400℉ for 45 minutes, so more delicate vegetables, such as the cauliflower and zucchini, were added later. The cauliflower was tossed with a little vegetable oil, salt, and ground cumin, which played nicely with the hot sauce. It was added half way through the cooking process, at which point I also re-lacquered the chicken with Cholula.

At the end, when the chicken came out of the oven, it got a final coat (each additional coat was from a fresh brush, of course; I have no desire to court cross-contamination in my kitchen). The zucchini could have used a turn part way through, but that didn't happen; what you can't see, though, is that bottom sides of those pale zucchini chunks were all golden brown and delicious. The excess chicken fat runs off of the thighs and spreads through the bottom of the dish, touching each vegetable with a rich kiss of chicken-y goodness. You can use whatever vegetables you like, of course, providing they are good roasters. I frequently use yellow potatoes, brussels sprouts, whole garlic cloves, carrot chunks, fennel bulb quarters, and even turnips or parsnips. Whatever roasting-friendly veggies you have in your crisper will do. Add them based on the required cooking time, of course.

The chicken was very tasty, in its crisp, crackling armour of hot sauce. It retained enough of the garlic flavour to be noticed, and went beautifully with the cumin-y cauliflower and the chunks of sweet potato. I would definitely do this one again.

April 16, 2011

Takikomi Gohan

Another rice post - but rather different from risotto!

I've always enjoyed the small bowls of mixed rice, or takikomi gohan that one can get in Japanese restaurants - they provide a wonderful, warm, savory hit of satisfaction. The kind I tend to see around Vancouver are usually made with chicken, with mushroom, or with both, and I went for the combination, since it struck me as a fine idea for a casual supper at home.

I went looking online for suggestions regarding recipes, and there certainly is a number to choose from, each with a different approach to the necessary components. After a lot of searching, I finally came back to the incredibly useful Just Hungry food blog, the sister site of Just Bento. Her recipes are for straight-up mushroom (one traditional, one vegan), but she does mention the addition of diced chicken instead of bean curd, so that's the option I took. I thought I was getting the chicken pieces small enough, but next time I will dice them more finely.

The recipe itself is simplicity, if you are using a rice cooker. Chop your mushrooms (and chicken) and allow to marinate for an hour or so in a small amount of a mixture of roughly equal proportions of soy sauce, mirin, and sake. Add this mixture on top of the rice and water mixture in your rice cooker, then turn it on as usual for plain rice. Gently mix with a paddle when it is cooked, to integrate everything. Garnish as you please.

It is not a particularly elegant dish, as you can see below. It is simple, comforting, and easy fare, and one I intend to repeat again soon. The leftovers, as you can see above, made absolutely charming onigiri for a bento lunch the next day (and froze fairly nicely, too).

You can use whatever mushrooms you like. We used a combination of shiitake, king oyster, and enoki. Next time, I plan to include shimeji (beech mushroom), since I found that HMart carries the more widely cultivated bunashimeji. But really, any mushroom that you enjoy eating will work just fine.

I'm surprised it took me so long to try making this for myself, because it is very rewarding for the small amount of prep involved. Even if you've never had the restaurant version, you might want to give this a try: it is a solid entry in the grand category of soothing rice-with-bits dishes.