Showing posts with label Breads. Show all posts

October 31, 2014

Cornmeal Dumplings


Chili and cornbread is a really classic combination. Cornbread, of course, can take many different shapes and forms, not to mention bonus flavours and the eternal debate between sweet/not-sweet that rages through the Americas. My favourite, growing up, was Southern Spoon Bread, a cornbread leavened with beaten egg whites into a lusciously light accompaniment to almost any meal. But I like all kinds of breads made from corn.

Stew Dumplings are the fastest form of bread that I know. They're quicker to whip up than cornbread, biscuits, or scones. The dough requires no resting period like tortillas or arepas, and because they cook on the stovetop, right on top of whatever savoury concoction you're already simmering, they take very little time to cook. No oven pre-heating, no extra pan(s) to grease. I like Stew Dumplings for beef or chicken stew, but chili feels like it needs a little extra something. So, after looking at my cornbread recipe, I decided to simply swap out some of the all-purpose flour with yellow cornmeal in my classic Stew Dumplings recipe. It worked wonderfully, and the next time I do this I may also add some chile flakes, to make them prettier.

While I used these on top of a simple ground beef and bean chili, I think you could also use them on a chicken stew with great success, especially a green chile chicken stew.

Cornmeal Dumplings

Makes 8 dumplings
(serves 4)
Total Prep & Cooking Time: 20 minutes

2/3 cup all-purpose flour
1/3 cup yellow cornmeal (not superfine)
2 teaspoons baking powder
Pinch chile flakes (optional)
1/2 teaspoon kosher salt
1-2 tablespoons chicken fat or canola oil
1/2 cup 1% milk

In a medium mixing bowl, use a fork to stir together the flour, cornmeal, baking powder, and salt. Add the chicken fat (or canola oil), and stir it through – it will give the flour a lumpy appearance, which is fine – keep stirring until the lumps are very small. Add the chile flakes, if using, and stir through.

Make a well in the middle of the flour mixture, and pour the milk in all at once. Stir (with a fork) very rapidly and thoroughly, until all of the dry flour is brought into a stiff, sticky, batter. Use a tablespoon to drop eight (8) dollops of batter evenly over the surface of a bubbling, hot stew. Make sure there is sufficient liquid in the stew – the dumplings should just have their “feet” wet, but mostly be sitting on top of solid lumps. If there is too much liquid, the dumplings will sink a bit. They'll still taste good, but will expand downward instead of upward, and be a bit denser and wetter.

Cover the pot tightly, set the burner temperature to low (so the chilli doesn’t burn) and let the dumplings cook for 15 minutes – no peeking! Do not lift the lid until the dumplings are cooked, or they will become dense and soggy. Serve two dumplings per person.

If you're one of those really organized pantry people, you might want to jar-or-bag up premixed dry ingredients, since you only then need to add a dollop of fat and the milk (you could also use milk powder in a mix, for truly hardcore, and just add water and oil).

For classic Stew Dumplings, replace the cornmeal with more all-purpose flour, and add 1/4 cup chopped fresh parsley.

October 01, 2014

Cheese Scones


Breads are very satisfying things to make, whether slow-rising yeasted types, batter-style quick breads, or the near instant gratification of the biscuit/scone family. They're a great base for (or addition to) breakfast, the savoury ones pair wonderfully with soups or stews, and any of them can be made into a sandwich or snack with little to no effort. They are infinitely customizable in either sweet or savoury directions.

Coffee shops throughout North America all seem to offer at least one variety, but unless you luck into a place that makes its own (or it happens to be delivery day) you're likely to get something that tastes more of dry flour than whatever the signature ingredient is.

These are tender and not at all dry, and even hold up pretty well at room temperature for a few days, if you can hold out that long.

If you think they look suspiciously like my biscuits - you'd be right. The biggest change is substituting some of the milk for a beaten egg, which is also used to glaze the finished scone. The principals and the principles are otherwise pretty much the same.

Cheese Scones

Makes 8 large, or 16 small

2 cups all purpose flour
4 teaspoons baking powder
1/4 teaspoon Kosher salt
1/2 teaspoon cream of tartar
1 teaspoon sugar
1/3 cup butter
1 large egg, beaten
about 1/2 cup milk
1 1/2 - 2 cups grated tasty cheese (I used sharp cheddar and gouda)

Preheat the oven to 450°F.

In a medium mixing bowl, combine the dry ingredients. Add the grated cheese, or any other additional flavourings (for example, a pinch of cayenne might be nice) at this time. Using a pastry-blender or a fork, or two knives, cut in the butter until the mixture is crumbly and the little lumps of butter are about corn-kernel sized or smaller. 

In a small bowl, beat the egg. Reserving 1 tablespoon of the beaten egg in the bowl to use as a glaze later, pour the rest into a liquid-measuring cup. Add just enough milk until you reach the 2/3 cup marker.

Create a well in the middle of the flour mixture and pour the milk/egg in all at once.  Hold the bowl steady and, using a fork, stir rapidly but briefly until the dough comes together in a ragged mass.  Quickly dump it out onto a clean counter, and knead very lightly and briefly until the flour is incorporated.  You may need to add a little extra flour, but probably not.  Go cautiously —— too much flour makes the dough tough. It's okay if they're a little sticky. Use a bench knife or dough scraper to lift the dough off the counter as needed.

Pat out the dough into a thick square, and slice into four squares. Cut each of the squares in half diagonally for large scones, and for small scones cut each of the large scones in half again. Try to make sure that your cuts are up and down through the dough —— don't drag the knife sideways out of the dough, or it interferes with them rising later. You can use shaped cutters, of course, if it's important for them to be uniform.

Place the scones on a lightly greased (or silpat) baking sheet, ideally far enough apart that they won't become fused together as they rise. Use a pastry brush to brush the top of each piece with the reserved beaten egg. Be sure to only brush along the tops and not spill down the sides, because that will actually inhibit the scones from rising properly as they bake.

Bake for 12 - 15 minutes, or until they have gotten tall and golden.

September 07, 2014

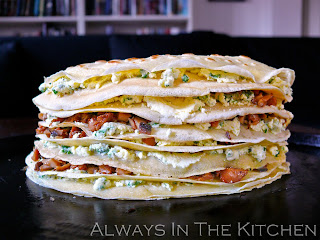
Gâteau de Crêpes


Looking for something interesting to do with a batch of crêpes? This is a Gâteau de Crêpes, aka Crêpe Cake or Crêpe Stack. It can be savoury, like this ones (full of mushrooms, herbs, and mascarpone), or they can be sweet (for example, alternately layered with dark chocolate and sour cherry jam). The possibilities are almost endless.

Since I was making only two servings (albeit very filling servings), I used a total of six crêpes, but in order to get a tall and pretty tower of a gâteau, I cut them in half and made a half-moon shaped stack.

For a filling, I chose duxelles (basically, finely chopped mushrooms, onion, garlic, butter, and brandy that have been sautéed together into an almost paste consistency), and a cheese mixture of mascarpone, crushed garlic, fresh parsley, basil, and sage, a good pinch of salt and a tablespoon or two of butter, which functioned as a sort of delicious glue to keep any stray mushrooms from running amok. If I'd done a better job chopping my mushrooms, the glue factor would have been moot, but worth including from a flavour perspective in any event.

If you are making a round Gâteau de Crêpes, simply double the ingredients and leave your crêpes intact.

Gâteau de Crêpes

Serves 2

6 6-inch crêpes, each sliced in half

Duxelles
450 grams mixed mushrooms, finely minced
(I used half chanterelles, half cremini)
2 tablespoons butter
1/4 medium onion, finely minced
2 cloves crushed garlic
2 tablespoons brandy
Kosher salt

If you have a food processor, use it to pulse the mushrooms until they are finely chopped. Otherwise, you'll need a knife and a bit more patience than I have. In a medium skillet over medium heat, sauté the onion, garlic, and mushrooms in the butter. Add a pinch of salt, and continue to sauté until the mushrooms start to stick. If you have any fresh thyme, you might want to add a pinch or two. Add the brandy, and stir through. Turn the heat to low and continue to cook and stir until the brandy has evaporated, and the mass becomes a purée.

Savoury Mascarpone
125 grams mascarpone
2 cloves garlic, crushed
large pinch of salt
2 tablespoons butter
1/3 cup chopped fresh herbs (parsley, basil, sage)

Mix everything together with a fork until thoroughly integrated.

If your crêpes are cold, warm them up. They won't be spending much time in the oven at the end, and you don't want them to start out chilly.

Lightly butter (or oil) a baking sheet (or pizza pan).

On each crêpe-half, spread a small amount of the mascarpone cream and a tablespoon or so of the duxelles. Be sure to spread the fillings all the way to the edges, to keep the stack from sagging at the sides. Place the first crêpe on the greased sheet, and then stack each "filled" crêpe-half on top of the previous one, until you run out of filling and crêpes. If you like, you can top the final crêpe with some grated parmesan, but it works just fine without, as well.

Place in a 400 F oven for about 10 minutes, or until the mascarpone is bubbling slightly and the top appears crisp at the edges.

Slice into two portions with a sharp chef's knife (a serrated knife would be more difficult to slice cleanly). Cut each slice again, to serve as an appetizer. Serve right away, or at room temperature. I served this one right away, with a chopped salad to follow.

Here it is once more, just before it went into the oven.

Flat side:


Round side:

July 13, 2014

Strawberry Shortcake


There are generally two camps for Strawberry Shortcake lovers -- the biscuit camp and the sponge cake camp. As you can see here, I clearly fall into Camp Biscuit. In fact, it was not until I was in my late teens that I learned about the sponge cake variation. It sounded good, but was a little disappointing when I tried it. Sponge cake gives you a much softer overall dessert -- easily made in advance, and easily sliced and portioned for a crowd, for sure -- but the firmer, yet still tender, biscuit gives each serving of this dessert an individual, more impressive character: each biscuit becoming a small work of art assembled for each guest. The crisply sweet finish on the golden top crust, the squish of the top of the biscuit descending into the tender interior of whipped cream and macerated berries, feel more decadent to me.

The biscuit method for Strawberry Shortcake is almost laughably easy: make your favourite drop-biscuit dough with an extra teaspoon of sugar per cup of flour, and before baking brush the tops with cream and sprinkle with a little more sugar.

If strawberries are not your thing, plenty of other fruits also work beautifully: raspberries, or peaches, or my all-time favourite, the tiniest possible blackberries.

Strawberry Shortcake

Serves 4

Berries:

3 - 4 cups sliced strawberries
2 tablespoons sugar

Toss the strawberries with the sugar and refrigerate, covered, for a couple of hours, stirring once or twice.

Shortcake Biscuits:

1 cup pastry flour
2 teaspoons sugar, plus extra to finish
2 teaspoons baking powder
1/2 teaspoon baking soda
pinch of salt
3 tablespoons butter
7 tablespoons milk
1 tablespoon cream

Combine flour, sugar, baking powder, baking soda, and salt. Cut in the butter with a pastry blender (or use your usual method, if different), and set aside until you're ready to bake the biscuits, say... just after dinner.

Preheat the oven to 450 F, and lightly grease a baking sheet. Make a well in the flour mixture and add the milk all at once. Stir rapidly with a fork until it becomes a sticky dough without streaks of dry flour. Drop in four equal spoonsful to make four biscuits on your baking sheet. Lightly press the biscuit into shape, flattening the top slightly if necessary. Brush the tops with cream and sprinkle lightly with sugar. Bake for 12 - 15 minutes, or until risen and golden brown. Allow to cool slightly before assembling, so that the whipped cream doesn't melt.

Whipped Cream:
Whip 3/4 cup of cream with a teaspoon of sugar and a quarter teaspoon vanilla extract (or use vanilla sugar), until you have stiff peaks.

To assemble:

Use a fork to separate the biscuits into top and bottom halves. Spoon whipped cream onto the bottoms, top with berries, then another dollop of whipped cream before perching the lids on top. Serve immediately.


April 24, 2014

Dutch Baby, aka Popover Pancake


Wow, there's a lot of names for this one. In addition to Dutch Baby and Popover Pancakes, they are also called Dutch Puffs, Puff(ed) Pancakes, Oven Pancakes, and German Pancakes, although they don't seem much like the pfannkuchen I've seen so far here in Germany. Probably a few other names that I've missed, too. It is essentially the kissing cousin of Yorkshire Pudding (minus the dripping), and is frequently served drenched in butter, and/or preserves or syrups. You know, like pancakes. A fan of the classics will want to top it with lemon juice and confectioner's sugar. Lunatics like me might periodically tend toward toppings such as thick fruit yoghurt (or breakfast fruit Quark), or peanut butter (either you'll find that sounds delightful or abominable, I'm afraid. I go one further, and add syrup on top of the peanut butter). Some versions call for laying apples in caramel on the bottom, before the batter goes in, or simply laying the apple slices on top of the batter before it goes into the oven. Those are pretty good, too.

That being said, you could certainly just fill the otherwise empty crater of the finished pancake with sausages and fried onions, and I wouldn't turn that down, either.

Pancake politics aside, these are breathtakingly easy to make. If you've got a cast iron skillet, all the better, as this is cooked at high heat (notorious enemy of non-stick and plastic handles). A steel skillet should also work pretty well. I've used my 10 3/4 inch cast iron skillet for this one.

Dutch Baby
Serves 2

3 large eggs (at room temperature)
1/2 cup flour
1/2 cup whole milk
pinch kosher salt
2 tablespoons butter

In a mixing bowl, beat the eggs with a whisk until smooth. Add the flour slowly, whisking as you go, until it is all blended together. Add the milk and the pinch of salt, and continue to whisk until smooth. Set aside to rest while you preheat the oven.

Preheat the oven (rack in the middle) to 425 F. At the same time, preheat your cast iron skillet over medium heat on the stove-top (you could preheat it in the oven, but then the butter might burn when you add it). When the oven is fully preheated, and the skillet is nicely hot, but not smoking, add the butter, and swirl it around so that it is completely melted, and evenly coats the bottom of the pan.

Scrape the batter all at once into the hot, buttered skillet, and immediately place the skillet in the oven. Do not cover the skillet. Bake until the pancake has puffed up like a popover, and the edges are browned and start to pull away from the pan. This should take about 15 minutes, depending on your oven, so keep an eye on it. This time could be put to excellent use frying up some bacon.

Once the edges are nicely golden brown and puffed, remove the pancake from the oven and serve it up hot.

Note that this is not a soufflé, or a true popover. The middle will begin to deflate a bit as soon as it comes out of the oven, giving a softer, more sponge-like texture to the interior of the finished pancake.

January 19, 2014

Breakfast at home: Biscuits & Gravy Skillet Breakfast


Have you ever wanted to have biscuits and gravy for breakfast, but also wanted it to be super easy? The answer, which you have surely already guessed, is to cook them in the same pan. I saw a picture of this somewhere on the internet, and decided to make it using my own recipes, instead of boxed mixes.

Technically, the only real time-saver here is that you do not need to get out a baking sheet for the biscuits (or wash the baking sheet afterward) but it still feels like a win. You want to scale your batch of biscuits to just as many as will fit in your skillet, otherwise you'll have to break out the baking sheet anyway. This was a very hearty breakfast for two, using 340 grams of sausage, and half of a slightly modified version of my classic biscuit recipe (ie, a biscuit recipe calling for only one cup of flour). You can find the classic biscuit recipe in this link. Ah, but you've noticed that I said a modified version of that recipe: well, it couldn't be a simpler modification - I simply added a little extra milk (two to three tablespoons) so that you have a sticky, wet dough, instead of a regular biscuit dough. That's because I decided to go with a "drop biscuit" method rather than a rolled/patted biscuit - but I also note that you don't have to use drop biscuits for this - the regular biscuit method would also work just as well (although it does require an additional step of patting out the dough and cutting it into biscuit shapes of your choice).

So, after all of that talk about biscuits, what about the gravy? Well, you need to start with the gravy, of course, since it goes on the bottom. You can use any white sausage gravy that you like - perhaps this one from my previous, more traditional Biscuits & Gravy post.

Preheat your oven to 425-450 F (depending on how hot your oven runs), with a rack in the middle position. Make sure your skillet will actually fit in your oven - this can be a problem with larger skillets and apartment-sized ovens, and it really sucks. Make sure yours fits, even if you have to scale your recipe down to a smaller pan size.

Start with the gravy, which you make in your skillet, on the stovetop. Good white gravy takes time for the raw flour taste to cook out of it, so the gravy won't be at all harmed by continuing to simmer on low heat while you mix the biscuit dough.

So, now that your gravy is (gently) bubbling away on the stove, take three minutes (give or take) to whip up a batch of biscuits. If you're using drop biscuits, as soon as they are mixed, you can use a tablespoon to dollop the dough evenly over the top of the gravy. Try to to this quickly, so that the biscuits cook evenly. If you are patting out your biscuit dough and cutting rounds, once the biscuits are all cut out, lay them onto the gravy.

As soon as all the biscuits are in the skillet, move the skillet to the oven (uncovered), and set your timer for 15 minutes. If the biscuits are golden, like these ones, take them out and spoon them into serving bowls, along with the gravy itself, of course. If your biscuits are still pale, maybe crank the broiler on and give them another few minutes.


The biscuits will be amazingly tender, acting a bit like a steamed dumpling. The bottom of each dumpling is thoroughly drenched in gravy flavour, and you will not need a knife to cut them; just scoop up delicious mouthfuls of biscuit and gravy with a fork or spoon, as you see fit.

Now, if you're the sort of person that doesn't consider it breakfast without eggs, just poach or fry up some eggs while the biscuits are in the oven, and serve them right on top of the dished-up biscuits and gravy.

October 18, 2013

Reduce, Reuse, Recycle: Bacon Fat Biscuits


I'm not sure, but this might encompass all of the above principles: reduce the amount of groceries purchased (no extra purchase of solid fat for baking); reuse the fat drained from cooking bacon; recycle the fat into an entirely different dish. Okay, those last two are kind of similar, but I'm giving it points because the re-use is not for the same dish or type of cooking, and because it's actually incorporated into the recipe as opposed to simply being a cooking medium (the usual fate of reused fats, if I'm not mistaken). It's economical and delicious!

The biscuits shown above were made with unstrained bacon fat, which is why they are a bit flecked in appearance. To get a less speckled effect, you can strain the fat through a fine sieve (or possibly cheesecloth) to get a more homogenous, lard-white colour. I also was using (solid) bacon fat that was a little on the soft side, which actually seems to inhibit rising a bit; these could be taller.

You can do a straight-up substitution of whatever butter/lard/shortening etc. that you currently use for biscuits, but if you don't have a biscuit recipe, here's one to try:

Bacon Fat Biscuits

Makes 9 biscuits, or tops an 8 - 12 inch pot pie, depending on how thick or thin you want your topping.

Total prep and cooking time: 25 minutes

2 cups all purpose flour
4 teaspoons baking powder
1/2 teaspoon salt
1/2 teaspoon cream of tartar
2 teaspoons sugar
1/3 cup rendered bacon fat, in solid form (chill until firm)
3/4 cup milk - I use 1% milk

Preheat the oven to 450 F.

In a medium mixing bowl, sift together the dry ingredients - to be fair, I don't really sift, I aerate them with a whisk, but do whichever pleases you most. Add raisins, herbs, cheese, or any other additional flavourings at this time. Using a pastry-blender or a fork (and a lot of patience) cut in the bacon fat until the mixture is crumbly and the little lumps of fat are about corn-kernel sized. If your bacon fat is frozen hard, you can do this step in a food processor fitted with a metal blade.

Create a well in the middle of the mixture and pour the milk in all at once. Hold the bowl steady and, using a fork, stir rapidly and briefly until the dough comes together in a ragged mass. Quickly dump it out onto a clean counter, and knead very lightly and briefly until the flour is incorporated. You may need to add a little extra flour, but probably not. Go cautiously - too much flour makes tough biscuits.

Pat out the dough into a rough rectangle, and slice into the size of biscuits that you want. Place them on an ungreased cookie-sheet and bake for 12 - 15 minutes, or until they have gotten tall and golden.

If you are using the biscuits as a topping for pot pie, pat out the dough into the shape and size of your stew-pot. Stab the biscuits with a fork to make a few air-holes, and lift the entire thing (no cutting necessary) onto the bubbling hot stew. Place in the 450 F oven, and bake uncovered for about 25 minutes. It does take longer when the biscuit is cooked over a stew.

Bonus Tip: freeze your bacon drippings in a spare measuring cup until you have enough, or create a form out of tinfoil wrapped around your 1/3 cup measure, and store it (covered) in the freezer until it is full.

These would be awesome for Biscuits and Gravy, don't you think?

You can use the same technique to make pie crust, of course. Some of my friends will remember the potluck to which I brought sour cherry pie with a bacon fat crust, the leftovers of which were served with my friend Rodney's homemade gelato for breakfast.

June 05, 2013

Rolled Oat Bread


I love the smell, taste, and texture of fresh bread. I also love the satisfaction that comes with the dramatic transformation of water, grain, salt, and oil into a glorious new form that somehow connects us back through generations untold. Sure, we have some fancy equipment to make the process easier, now, but if you want, you can still easily do the whole process old-school; the satisfaction is there either way.

This loaf of bread uses wheat flour, but also relies heavily on rolled oats for its mass. This makes for a bread that is a bit lower on the glycemic index than a straight wheat flour bread, if that interests you. It also makes for a heartier, more filling bread, which is excellent either for toasting in the morning (or whenever you toast your bread), or for sandwich making. It's sturdy enough to provide a mighty raft for baked beans or fried eggs, or whatever else you might like to pile on it. It's delicious enough that it can be eaten purely on its own (or, for those inclined, with a skim of butter). The crumb is airy and tender, but with a little chew from the oats. It also has a slightly dark note from the use of walnut oil. You can make it even healthier by using stoneground whole wheat flour in place of the unbleached white.

There is a lot of rising time for this bread, which is part of the reason for the wonderful flavour. So plan to make it on a day when you don't need to be out and about (although you can dash out briefly, if needed, in some of the rising phases). You will note the fairly small amount of yeast required to make two big loaves - this is because "the longer the rise, the less yeast you need". Economical!

Rolled Oat Bread
Adapted from Breadtime Stories by Susan Jane Cheney

Makes 2 Loaves
Time commitment: 6 - 7 hours

3 cups water
1 cup old fashioned rolled oats
2 teaspoons kosher salt
2 tablespoons walnut oil (or toasted sesame oil)
1 teaspoon active dry yeast
5 1/4 cups unbleached wheat flour

Boil 2 cups of water and pour over the oats. Stir in the salt and oil, and let cool to room temperature while you make the sponge.

Heat 1 cup water until lukewarm, and place in a big preheated mixing bowl. Sprinkle with a tablespoon of flour, and mix well. Sprinkle the yeast over the water and wait 15 minutes for the yeast to prove.

If/when the yeast proves, add a cup of the flour and beat the mixture at least a hundred strokes. Set in a draft-free area, covered, and let a sponge develop - about 50 - 60 minutes. I put it inside the oven (with the oven light on, if it's a chilly day).

Combine the oat mixture and the sponge. Add the rest of the flour (or as much of it as needed to make a dough), and knead the dough until it is smooth and elastic. Shape the dough into a large ball, and place in a large oiled bowl to rise for about 2 hours. (this is your one opportunity to run out of the house, should you need to). Press the air out of the dough, and let it rise again, this time for just 1 hour. Press the air out again, shape into loaves, place in oiled bread pans, and let rise until the dough has not-quite doubled (about 45 minutes). Let the bread rise on the countertop, during which time you can pre-heat the oven to 350 F with the rack in the middle. If you like, brush the tops of the loaves with an egg wash, or rub them with a little of olive oil.

Bake the loaves for about 60 minutes, until the loaves are brown, with firm sides, and sound hollow when tapped on the bottom. De-pan the bread onto racks and let them cool completely before bagging up to store. Leave the loaves for at least 15 minutes after they come out of the oven before slicing (I'm assuming that you won't be able to resist having some warm, fresh bread, because I never can).

April 04, 2013

Yorkshire Puddings


Yorkshire puddings are essentially a simple popover that has been flavoured with the drippings of the roast that they are made to accompany. They are airy, eggy, and made a perfect vessel to drunkenly cradle a gravy payload, half of which seeps slowly into the rest of your plate (and, if you're lucky), particularly your potatoes.

The batter is remarkably like crêpe batter. The only difference, really, is that instead of putting any fat in the batter, you place it in the cups of the popover/muffin tin before adding the batter. Well, and they're cooked in a very, very hot oven, as opposed to over a medium-ish flame on the stovetop. But enough about crêpes.

Yorkshire puddings are also somewhat terrifying for a lot of cooks - not because they're difficult, but because they require precise adherence to the rules, or they will come out as sad, dense little muffin-pucks. Some cooks claim that it's best to make the batter a bit ahead and let it rest - something about rehydrating the flour, I think - and I always do, simply for convenience. Here are the rules that make all the difference:

1) Preheat the empty popover or muffin tin. Preheat the hell out of it. I like to put mine into the oven 15 minutes before the roast is due to come out, and then leave it in when I crank the temperature up so that it will be ready to cook the popovers. That baby is hot! If you omit this step, all is lost. Have a dinner roll instead.

2) Preheat the fat. Once the roast is out of the oven, whether you are using roast drippings for a proper pud, or vegetable oil, or some leftover chicken fat that you've got stashed in the freezer (looks at ceiling, whistles to self), get the fat into the blazing hot pan...and put the pan back in the oven, for at least a few minutes, and put the overhead fan on high. If you omit this step, the pan and fat will not be hot enough, and all is lost. Have a dinner roll instead.

3) Add the batter quickly to the hot fat in the cups. Use a pouring jug with a spoon drip-catcher for maximum efficiency (actually, true maximum efficiency suggests that you would have your batter standing by in a squeeze bottle with a large bore opening, but unless you have such a pancake dispenser sort of setup, a jug with a lip (such as a big measuring cup) is your best bet). If you omit this step, the pan will cool down too much, and all is lost. Have a dinner roll instead.

4) Get the tin back into the oven pronto! Do not open the oven door until the puds are cooked - or at least 15 minutes have gone by. If you omit this step, all is lost. Have a dinner roll instead.

5) Marvel at how beautifully risen and crazy tall your popovers are, and serve right away.

A note about using vegetable oil instead of drippings or schmaltz - for the love of dinner, please use something with a really high smoke point, or you will fill your kitchen with acrid burnt-fat smell, and...and all is lost. Have a dinner roll instead.

So...here's the recipe. I really do measure the flour by weight, but if you don't, it's approximately a scant cup of sifted flour)

Yorkshire Puddings

Makes 12 regular-muffin sized

115 grams flour
3 eggs
285 mL 1% milk
1/8 teaspoon kosher salt
3 tablespoons fat (roast dripping, schmaltz, or high-smoke-point oil)

Whisk the eggs, flour, salt, and milk together until smooth to make your batter. Pour the batter into a jug, and let it sit for 30 minutes before you use it.

See the critical steps listed above, or this abbreviated version: Turn your oven up to 475F, and place a dry 12 cup muffin tray in the oven to heat up for at least 5 minutes (or however long it takes the oven to get up to that temperature).

Place 1 teaspoon of fat in each muffin hole, and put the tray back into the oven and heat until fat is very hot, at least another 5 minutes.

Extract the muffin tin and carefully (and quickly!) pour the batter into fat in the muffin cups - only half-fill each cup. This bit kind of looks gross, because the fat swirls all around the batter. That's fine; it's supposed to.

Close the door and cook for 15 minutes without opening the oven door, reduce heat to 350 F and bake for another 5 - 10 minutes, or until golden.


If you have leftover puds, try them for breakfast, gently re-heated and filled with jam, or cheese, or even scrambled eggs! If the exterior is a little squidgy from sitting overnight, blot well with paper towels before heating/filling. They lose their crispness, but they are still delicious.

February 24, 2013

French Crêpes


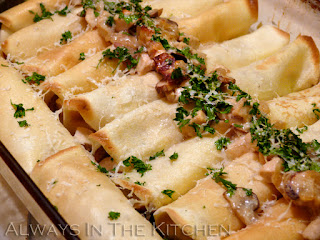
These simple crêpes are the lovely foundation for many different fillings and styles - from Suzette to seafood, from lemon-and-sugar to stacks of savouries sliced into neat wedges. Some particular favourites include a filling of bacon, mushroom, and chicken (topped with parmesan), and tomato, goat cheese, and fresh basil. You can fill them with pretty much anything you like. These ones are filled with a creamy mixture of bacon, chicken, mushrooms, onion, and brandy. The recipe for the filling is below. The filled and baked crêpes heat up wonderfully the next day. Best of all - these are not difficult. They take a little time if you cook one at a time (recommended, to start), but rather low effort, especially once you get the knack of tilting the pan around.

Crêpes (Plain)

Makes 12 crêpes (8" diameter)
Total Prep & Cooking Time: 40 minutes (faster if you can cook two at a time)

3 eggs
1 cup milk (1% is fine)
1 tablespoon oil
3/4 cup unbleached flour

Combine in a blender or food processor until smooth. If you are beating by hand, you may wish to take the extra step of straining the batter once you have finished mixing, to ensure a smooth result.

If you are making a filling, let the batter stand at room temperature until you finish preparing the filling.

Heat a crêpe pan or 8" (20 cm) nonstick skillet over medium heat until a drop of water dances. Spritz with canola oil, or brush lightly with mild oil of your choice.

Using a ladle or scoop that holds 3 tablespoons, measure your first crêpe's worth of batter. Lift the skillet off of the heat (I hold it in the air) and quickly pour the batter into the middle of the pan. Drop the ladle and rapidly tilt the pan in a circular motion, to spread the batter until it evenly covers the base of the pan. Return the pan to the burner, and allow the crepe to cook until lightly golden, and the edges release from the pan, about a minute or two.

Slide a silicone spatula under the crêpe (or grab the edge carefully with your fingers) and flip it over. Let it continue to cook for a minute, and then slide the crêpe onto your work surface for filling.

Repeat until all of the crêpe batter has been cooked.

If I am making baked crêpes, I fill the finished crêpe and place it in a greased baking dish while the next crêpe is cooking, so the process becomes an alternation of tasks. You can also make the crêpes ahead, and fill them all at once. Crêpes keep well in the fridge for a day or so (unfilled, separated by waxed or parchment paper sheets) and can be frozen for up to a month with no ill effect.


Chicken & Mushroom Crêpe filling

Makes enough to fill 12 8-inch crêpes (enough to serve four people)

4 pieces thick cut bacon
2 tablespoons butter
200 grams cremini mushrooms (or mushrooms of your choice)
450 grams cooked chicken breast
1 medium yellow onion, minced
1 teaspoon chicken bouillon paste
2 tablespoons brandy
3/4 cup Greek style yoghurt, plain (or sour cream)
2 teaspoon cornstarch
1/2 cup water
4 teaspoon grated parmesan cheese
1/4 cup parsley

Dice the bacon and fry until almost crisp, and remove most of the rendered fat from the pan. Add the butter, chopped mushrooms, and onion, and cook until tender. Add the brandy, and stir through, and then add the chicken paste. Add the water mixed with 1 teaspoon of the cornstarch and stir through, and then the and yoghurt mixed with the remaining 1 teaspoon of cornstarch. Stir and cook until the mixture is reduced to a thick creamy sauce. Add finely diced chicken, and stir through until everything is nicely heated.

Lightly grease a 9x13" baking dish, and preheat your oven to 350 F. On your work surface, lay one crêpe golden-side-down, and place two tablespoons of filling on the bottom third of the circle. Fold the bottom edge up, and then roll the crêpe into a compact cylinder. Place in the baking dish. Repeat until all the crêpes are filled and in the pan - they should just fit nicely, ten across and two side-ways. Any leftover filling can be mixed with the parmesan and parsley, and spooned down the centre of the row of crêpes.

Put the pan of crêpes in the oven for about ten minutes, and then broil for a few more minutes, or until the edges are golden-tinged.


January 12, 2013

Khachapuri: Georgian Cheese Bread


There are quite a number of types of khachapuri, and this one is generally referred to as Ajarian (Acharuli/Adjaruli). There are also round Imeruli, kubdari (which also contains meat), Megruli (which has extra cheese on top), Ossuri (also contains potato), and many other intriguing looking variations.

I'd been wanting to try this for ages. As a lifelong fan of all combinations of bread and cheese, and as someone who enjoys a nice eggy filling, in retrospect it's kind of a surprise that it took me this long.

I usually bring freshly made bread to housewarming events. However, I had been eyeing a few recipes with intent* prior to my friend Lisa's housewarming / birthday party, and decided that this Khachapuri recipe (from Everyday Russian) was the perfectly over-the-top bread to bring to the a housewarming party that was also a celebration of a significant birthday.

* When I say "with intent", you can imagine the same sort of intent that a kitty has, when crouched low, eyes fixed on target, and tail twitching with increasing agitation. That kind of intent.

So, in order to prevent myself from chickening out at the last moment, I told everyone that this is what I would bring. And so, I did. Here's the various stages of first-time Khachapuri-making, in pictures:

Mix up the dough (link for recipe) and let it rise - the dough is quite similar to a rich challah dough, full of egg and quite yellow (although, that may depend on your eggs):


Meanwhile, mix up the filling of cheese (I used a combination of grated full-fat mozzarella and crumbled feta), butter, and hard-boiled eggs, mashing everything together into a crumbly mass:


Divide risen dough into four pieces.

Roll out one piece of dough into a large circle, as though you were making a thin pizza crust, and cover the dough with a quarter of the filling, leaving a bare dough perimeter.

Beginning at the near side, start to roll the dough up over the filling, as though you were making a jelly-roll. Stop rolling just before you get to the middle:


Beginning from the far side, roll the dough up over the filling, again stopping before you get to the middle, so that there is a little window of filling:

Pinch and fold the unrolled ends to make a little boat shape:

Place the boats on a foil-lined baking sheet, and let rise for another 20 minutes or so (this step seems to be missing from the original recipe), then brush with beaten egg so that the finished bread will have a shiny golden brown glaze to it:


Bake at 425 F for approximately 20 minutes, or until puffed, golden, and delicious looking.


I failed to take a close up of one of the breads once it was sliced and ready to serve at the party, but I can say with confidence that they were very well received indeed, and definitely take a place of pride as a fun and somewhat unusual (in these parts, at least) item to bring to any event. I'm quite keen to make this again, hopefully soon. I might even devour them all myself!

Apparently, in many places there is a further step of sliding a raw egg into the middles, and putting them back in the oven until the egg is cooked to your liking. This seems to be a breakfast iteration, and is very popular in cafes - which makes perfect sense, as someone else gets to get up early to make the dough. I imagine you could cobble together some sort of advance preparation and hold them in the fridge until ready to cook, but frankly even the idea of that makes me a little nervous, and would take up a lot of precious real estate in my tiny fridge. Perhaps some of the more adventurous bread bakers out there can let me know if they've had success with such a method.

July 02, 2012

Breakfast at home: Biscuits & Gravy

One of my favourite breakfast foods from the USA is biscuits and gravy. Not a lot of places up here offer it, and of those that do, well, they tend to do it fairly badly - gluey, gloppy stuff, usually without much in the way of sausage meat, sometimes with unanticipated and unwanted alternative seasonings. This is a pity, because anyone ordering biscuits and gravy is not likely to want to be surprised by avant garde seasonings - certainly not without warning.

Biscuits and gravy is a hot, filling breakfast, it's also comfort food at its finest. It doesn't need to be lethally rich, either, especially if you're serving alongside eggs. Easy on the fat - there's plenty of flavour to go around.

I like the name "Sawmill Gravy", but while most people seem to accept pretty much any white sausage gravy as "sawmill", I understand that name belongs more properly to the lumbercamp style of gravy, conditions of which necessitated the use of tinned, evaporated milk. I've also heard "cream gravy", but since I use milk, I'll just stick with "White Sausage Gravy". It's pretty simple, and very delicious.

Make up biscuits according to whatever biscuit bible you adhere to, and make the gravy while they bake up in the oven.

White Sausage Gravy
Serves 4

225-340 grams pork breakfast sausage
3 tablespoons unbleached flour
2 1/2 cups milk (I use 1%)
sprinkle granulated onion
black pepper to taste

Remove casings (if any) from the sausage and break it up into little chunks (chop it with a chef's knife, if you like). In a large skillet, over medium heat, cook and stir the sausage until it's turned the lightest shade of gold, and rendered its fat out. Continue to break down the sausage pieces as you go. Modern sausage can be quite lean, but if you have richer sausage, spoon out all but about a tablespoon. If your sausage was quite plain, you may want to add a tiny pinch each of leaf oregano or marjoram, ground sage, and ground thyme but don't go overboard. The pork should be the star of this show.

Sprinkle the flour over the sausage, and stir it through, scraping the bottom of the pan, until it starts to turn light butterscotch in colour. Then, while stirring constantly, add the milk a little at a time, working the sauce to keep it smooth and lump free. If free-handing makes you nervous, switch to a whisk. Don't pause in moving your spatula or whisk until at least half the milk is incorporated, and then you'll have a little more leeway.

Once all of the milk is in, continue to cook over medium low, so that everything is bubbling gently until the sauce is thickened. Sprinkle the granulated onion over, stir it through, and then taste for salt. I never add extra salt, because there's enough in the sausage, but your mileage may vary, as they say. Grind some black pepper over the pan, turn the heat to low, and continue to stir occasionally. Give it a final taste to adjust the seasonings, split your hot biscuits open, spoon the gravy over, and serve right away. A little extra pepper on top never hurts, either.


February 12, 2011

Pizza Bianca


Oh, how I do love my pizza. We have it at least once a month, sometimes more, and we always make it from scratch. Palle is especially fond of non-tomato sauced pizzas, although he's generally pretty happy with any homemade pizza, including old faithful - pepperoni and mushroom with a classic, oregano-laden sauce. In the interests of keeping our pizza consumption from being monotonous, I like to try new things, from time to time. A recent effort involved miso gravy for the sauce, and shabu-shabu thin cut beef dressed with sesame oil and soy sauce. It went over rather well, and I'll certainly be keeping that in mind the next time I have leftover miso gravy lurking in the fridge.

But this one really wowed me. It's not even a recipe (excepting the crust, which is my usual recipe (expired link removed, please see comments below for recipe) using a three-hour rise and a fraction of the yeast) I was particularly pleased to be able to make it entirely out of things that I already had on hand, repurposing leftover roasted chicken and roasted fennel from the previous night's lemon risotto dinner, and using up the tail end of bocconcini which we had after making Messy Giuseppes (Palle's rather Italianate Sloppy Joes). Even the parsley was leftover from garnishing the risotto!

I chopped up the fennel, which had been roasted in thick wedges. I used the tenderest bits of fennel and scattered them over the crust - no sauce, I simply depended upon the olive oil that had been used to roast the fennel to get the party started. Next, meat from the roasted thighs and legs and back of the roast chicken. I generally pull the meat off the bones after dinner, while it is still warm, and plate it up for easy use later, and so it certainly stood me in good stead here. I chopped up the larger pieces, and tore some with my fingers, to get nice distribution. Finally, I dotted the small amount of bocconcini around the perimeter, sprinkled the whole thing with the already-chopped parsley, and bashed it into the oven until the crust started to turn gold. Once out of the oven, we grated some long strands of parmesan over it, and watched them melt artistically onto the pizza.

This was really a triumph of keeping things simple, too. I resisted the urge to add peppers or mushrooms or anything else, didn't overload on the cheese, and ended up with a very satisfying pizza that was very different from the taco pizza, vegetarian pizzas, or buffalo-wing pizzas that I've shared before.

There's a lot more things I want to try, pizza-wise, but for the record, I have no objection to any particular style of pizza. I like thick crust, thin crust, wood-fired, grilled, red-sauced, mustard-sauced, no-sauce at all. Best of all, I like my pizzas homemade.

November 13, 2010

Challah and Challah Swirl


I don't bake bread as often as I used to. Some of that is because I usually choose low-glycemic breads for everyday consumption, and I haven't really got the patience for making flourless breads or sourdough breads myself, or at least not on any sort of regular basis. Challah is really more of a special occasion bread to me, enriched with oil and eggs as it is; not being Jewish, I feel free to take liberties with challah which might or might not be acceptable to some. At any rate, it had been quite a while since I made any, and I felt it was high time.

My challah loaves are usually done in the traditional free-form braid (sometimes, as a smaller braid stacked on top of a larger braid, if I'm feeling fancy, or have a housewarming to go to). This time, however, I felt like making something that would easily fit into my toaster for breakfast during the week, so I crammed my braid into a loaf pan, and split the difference, as it were.

For the second loaf, I wanted something fun. I had contemplated making it into a set of nine cinnamon buns, but laziness won the day, and I settled on rolling it up into a log, and putting that into a second loaf pan.


As you can see, my rolling/shaping skillz are far from "mad". I am rather grievously out of practice, and should probably submit myself to some sort of remedial practice regime until the results are fit to photograph. This one managed to have the swirl quite uneven, as well as rising higher on one end than the other, because I was sloppy about making sure the rolled out dough was even. Quite lopsided. Hmph! Perhaps it was simply depressed by the rather ratty-looking pan that I used for it, next to the pristine loaf pan for the regular challah.

No matter, both loaves were delicious. The swirl was effected by mixing brown sugar with equal parts cinnamon and ground cardamom, a combination which I highly recommend, and which will be repeated the next time I feel the urge to get fancy with my bread. The swirl loaf also toasted up beautifully. I am partial to a slice of strong cheddar on toasted spiced and/or raisined breads, and this combination didn't disappoint at all.

I may have to make it again soon...just for the practice, of course!

The recipe that I use is from Claudia Roden's wonderful The Book of Jewish Food. I note that she spells it "Hallah", another common spelling, but one I cannot get used to. Her recipe makes four medium-sized loaves, so I cut it in half here, for two loaves or one stacked braid:

Challah
Adapted from the Hallah recipe in The Book of Jewish Food by Claudia Roden

1 tablespoon dry yeast
1 cup 2 tablespoons warm water
1/4 cup sugar
2 eggs, beaten, plus 1 egg for glazing
1/2 tablespoon kosher salt
1/4 cup vegetable oil
4 to 5 cups all-purpose flour
Optionally, sesame seeds or poppy seeds for garnish

Proof the yeast in the warm water with a pinch of the sugar, in a large mixing bowl. Let it stand until it foams. Meanwhile, in a small bowl, combine the rest of the sugar, the salt, the eggs and oil and beat well. When the yeast is foamy, add the egg mixture and stir well.

To the wet mixture, add a cup and a half of flour and beat for approximately 100 strokes in the same direction. The batter will be thin and should become lump free during the process. Add another cup of flour and beat that in, too. Add the rest of the flour gradually, as needed, until the dough becomes a soft, slightly sticky dough. Turn the dough out onto a lightly floured counter, and knead for about ten minutes by hand, until the dough becomes shiny, supple, and doesn't stick to your hands too much. You can add a little more flour as needed to prevent the sticking enough to be able to knead the dough.

Place the bread dough in a large, lightly oiled bowl, turning the dough so that the top has a thin film of oil over it, and cover it lightly with a sheet of plastic wrap. Place in a warm, draft-free spot, such as the inside of an unlit oven with the light turned on. Let it rise for 2 to 3 hours, or until it doubles in size.

Squeeze the air out of the dough (also called "punching down", but you don't need to be that rough), and shape the bread as you wish, into two loaves or a single, stacked loaf. Place on a greased baking sheet or in a loaf pan, as you will, and allow to rise until just about double, about an hour.

Use a pastry brush to gently brush the beaten egg glaze over the exposed surfaces of the bread. If you want to add seeds, sprinkle them on top of the glaze, so they will stick. Do not skip the glaze - this is what gives the lovely burnished golden brown colour. Your loaves will be pale and incomplete looking without it.

Bake at 350℉ for 30 - 40 minutes for two loaves, 40 - 50 minutes for a big stacked braid. Test them for doneness by tapping the bottom - they should sound hollow.

November 11, 2010

Coconut Pancakes


In the novel City of Bones (by Cassandra Clare), Clary Fry orders coconut pancakes at a diner in New York. It was a minor detail in a scene, and not relevant to the storyline, but the idea struck me hard as a good one. Why had I never had coconut pancakes before? I had to make some.

I looked online, but didn't find any recipes that really caught my fancy - many of them being more crepe-like or using coconut flour, which I didn't have on hand. I decided to simply modify several existing pancake recipes that I already make.

Coconut Pancakes

Makes: 10 - 12 fluffy pancakes (4" diameter)
Total Prep & Cooking Time: 45 minutes

1 1/4 cups unbleached flour
1/4 cup fine unsweetened coconut
2 tablespoons sugar
1/2 teaspoon kosher salt
2 teaspoons baking powder
2 tablespoons melted butter
3/4 cup unsweetened coconut milk
3/4 cup 1% milk
1 egg, beaten

In a medium mixing bowl, combine the dry ingredients, mixing well with a fork. In a separate bowl, or large measuring cup, combine the wet ingredients (start with the 3/4 cup of milk amount), beating well until smooth.

Make a well in the middle of the dry mixture and pour in the wet ingredients all at once. Stir rapidly with a fork to combine. The batter will be quite thick, but if it starts looking more like biscuit dough, add extra milk, 1/4 cup at a time. Continue to stir with a fork until all dry bits are integrated. Don't try to make it totally lump-free - a few small lumps in the batter are normal, and you don't want to overmix it. Plus, the coconut makes it look lumpier than it really is. Let the batter stand for about 15 minutes.

Spritz a large, non-stick skillet with canola oil, and allow it to heat over medium-high heat until you can flick a drop of water on the surface, and it dances. You can use a teaspoon to make a "tester" pancake if you like. Use a large, shallow serving spoon to scoop batter into the pan - I can fit three pancakes in my 12-inch skillet. Allow them to cook until the edges start to look a little dry, and little bubbles are rising to the surface in the middle of the pancake (about two minutes, but check underneath as needed), then flip the pancakes and cook for another minute or so.

Transfer finished pancakes to a rack in a warm oven to hold until all of the pancakes are ready. You probably won't need to re-spray the skillet before ladling the next set of pancakes in, but it's a good idea to aim for the empty spaces between where the previous pancakes cooked, just to help preserve the pan's non-stick surface.

Serve with any of your favourite pancake toppings. We had ours with whisky syrup (and some with orange-flower honey). I bet Nutella would be terrific, with or without bananas...

Leftover pancakes re-heat beautifully in the toaster for a quick weekday breakfast.

July 31, 2010

Chocolate Buttermilk Pancakes


I once had a lovely brunch that featured a bitter orange chocolate waffle with bourbon cream. It was chocolatey with out being overly sweet, and the bitter orange was a delightful counterpoint.

Since that day, I've been slightly haunted by thoughts of chocolate pancakes. Since my attempts at chocolatifying oatmeal cookies turned out so well, why not use the same adaptation for pancakes? I didn't have any orange, bitter or otherwise, but I figured that it should be pretty good anyway, especially with a little whiskey syrup poured over.

You can make these in a food processor! The metal blade continually slices through any forming gluten strands, preventing it from getting tough.

Chocolate Buttermilk Pancakes
Makes 8 or 9 medium pancakes, or 6 bigger ones

1 large egg
1 cup buttermilk
3/4 cup all purpose flour
1/4 cup dark cocoa powder
1 teaspoon baking powder
1/2 teaspoon baking soda
2 tablespoons sugar
2 tablespoons melted butter
1/2 teaspoon salt
1 teaspoon vanilla extract
pinch of cinnamon (optional)

Combine egg and buttermilk in a food processor fitted with a metal blade (not a mixing hook) and blitz for about a half-minute to make sure everything is thoroughly integrated. Add the rest of the ingredients and process on high for one whole minute.

Pre-heat a large non-stick skillet over medium-high flame. Spritz with a little canola oil. Ladle out pancake batter, making two or three pancakes at a time, depending on the size of your pan (I get three modestly sized pancakes in a 12" skillet). Cook, keeping an eye on the temperature, until bubbles start to form throughout the surface and the edges start to look dry. Then turn each pancake over, and cook for a couple of more minutes on the other side. Keep warm on a rack in a warmed oven until all the pancakes are ready.

Since I make three at a time, I like to sort of rotate where I put the batter to make sure I'm using most of the surface of the pan. This is mostly just to keep the pan from overheating where nothing is being cooked.

It is entirely reasonable to fry up some bacon in another pan, while all this is going on.


Why didn't I do this before? Next time, perhaps a little orange zest into the mix, or maybe just serve with a good bitter orange marmalade.

January 02, 2010

Venison Biscuit Pie

Biscuit Pie is one of my winter comfort staples. You can make it with just about anything that you can make into a stew, just like a regular pot-pie, but the topping is not the standard puff-pastry that starts crisp but quickly turns to greasy sog as you pierce the shell and begin to eat, and it isn't the industrial-tough standard pastry shell that tastes floury and has the texture of under-tanned leather. No, the topping here is, obviously, biscuit. If you can make a stew, you can make it into a biscuit pie.

You can get fancy, if you like, and cut out adorable little biscuit rounds and place them with great precision in some kind of fancy pattern before popping the pot into the oven, or you can do it the way my mother did her steak and kidney pie, which is to press the dough out into a single, surface-covering circle (or rectangle, if you use a baking dish instead of the stew pot), stab it vigorously with a fork to allow the steam to escape and promote even cooking, and simply lay it on top of the bubbling stew before shoving the whole thing in the oven. You get to break the crust into appropriately sized chunks with a swift scoop of your dishing spoon as you serve it up.

The bottom of the biscuit, once it is all cooked, will have absorbed just enough of the gravy from the stew to become meltingly tender, like using good bread to mop the bottom of a soup bowl.

My classic recipe is Steak & Mushroom Biscuit Pie, but for this one, I used some venison stew meat procured from the newly re-opened (and fabulous!) Jackson's Meats in Kitsilano, cremini mushrooms, carrot, parsnip, onion and garlic. The gravy is a little thinner here, because I wanted the venison flavour to pop, so it's a bit more jus like and less full-on gravy. The great thing is, you can customize that bit to your heart's content. I used red wine and vegetable stock to make the jus/gravy, and we added juniper berries to accent the venison (although, my juniper berries may not have been very fresh, and their flavour contribution was considerably more modest than I would have liked). The venison was dark and tender and lean, and the vegetables were cooked just through, and some fresh rosemary from my garden gave it a little hit of freshness that perked it, and me, right up.

If I'm feeling the need for a lot of biscuit in my dinner (the comfort food version), I will use a full batch of biscuits to fit my stew pot, but if there's lots of other food involved, salads and side dishes and whatnot, then I'll use a half-recipe, and shorten the cooking time a little.

July 05, 2009

Tortillas, carnitas and salsa, oh my!

For Canada Day, we went out for British pub food. For America Day, we stayed in and made Mexican food. It seemed strangely appropriate.I really like Mexican food. There's even (finally) a few places in town where you can get the good stuff, if you know where to look. Don't get me wrong, I like Tex-Mex and Cali-Mex quite a bit, too, but real Mexican food is in a class of its own, and is pretty darn amazing.

I've been meaning to try making flour tortillas for some time. I had made corn tortillas once before, to intermediate success (I didn't have a tortilla press, and ended up using my cast iron frying pan to squish them flat), but I hadn't ventured into the realm of flour tortillas. This weekend, I decided that it was time.


I had bookmarked a Tortilla recipe on Orangette some time ago, and so I dusted it off (so to speak) and got going. I don't generally use vegetable shortening, but I would have used lard...except that I was fresh out. Lard is incredibly hard to source in my neighbourhood, so after a quick attempt to secure some, I decided to use the duck fat that I had standing by in the freezer. They turned out surprisingly well, and were as e asy as Molly (Orangette) suggested they would be. I think that next time, I might use a little less fat, as my other tortilla recipes are a bit leaner, and these ones were (deliciously) quite rich.

So, with a pile of fresh tortillas soon to be had, I needed to come up with a game plan for what to serve them with. I considered making tacos al pastor, since I have some fresh pineapple in the fridge, but lacked some of the other ingredients. I settled on carnitas, and chose David Lebovitz's recipe as my guideline. I note that I removed the cinnamon stick about half-way through the cooking process, because I didn't want it to overwhelm. It takes a while to make, but I was planning to be in the house attending to other matters most of the afternoon, so it worked out pretty well, timing wise.


For salsa, we went with a simple green salsa of garlic, cilantro, serrano chiles, and lime juice, with
just a touch of salt. Quick blitz in the mini-prep, and it was good to go, and hot as hell. You can find the inspiration for the green salsa in Brandon's comment on the Tortillas recipe link.
Finally, I figured a salad was in order. I combined roughly equal amounts of diced red pepper, radishes and avocado with corn kernels, a sprinkling of cilantro and the juice of a lime. A little salt was added at the table, to keep it from sogging out the dish, and to allow for individual tastes. It was remarkably good, and I intend to remember it the next time I'm wanting a salad for a potluck or picnic or barbeque-type event. Or, you know, the next time I'm making Mexican food.

To top things off, we had a little cocktail called the Capitan, which is essentially a Manhattan made with Pisco instead of bourbon. Lovely, really.

The very end of the evening, when we were lying around in a carnitas-induced coma, we dragged out the tiny bottle of Xtabentun, a fermented honey and anise liqueur that we brought back from our trip to the Yucatan in February. If only we had checked our baggage, we could have brought back more...

June 20, 2008

Scottish Oat Bread

It's not bread in the sandwichy-way, which may be immediately noticable from the photograph. Rather, it's bread in the tea-time way, or perhaps in the ginger way. That is to say, in some ways, it bears a resemblance in taste and texture to old-fashioned, cake-style gingerbread (as opposed to gingerbread cookies), except that it doesn't contain ginger. Although, of course, you could add some.

I am aware that I am rambling.

This recipe dates back at least to the 1970s, when my mother acquired it from a friend (who was not Scottish, it should perhaps be noted) and immediately adopted it as a favourite. It may not be, in fact, Scottish, in the same way that the salad toppings we know as Russian or French dressing are not really Russian or French. Perhaps the presence of oats, or the combination of oats and molasses (although Scottish cuisine is heavier on treacle, than molasses) leads to the association.

However, the fact I have yet to see any recipe from Scotland that appears similar (with the possible exception of Broonie), does not mean that it isn't really Scottish, either. What really raises my suspicions is the fact that there is no added fat of any kind. No lard, no butter, no oil... only the naturally occurring fat in the eggs and buttermilk/yoghurt, really. Which just does not seem very Scottish, to me. Perhaps one of my kind readers can shed some light on whether this recipe does owe its heritage to Scotland or thereabouts - I encourage you to do so, as I would really like to know.

So, without further meandering, here is my mother's recipe for Scottish Oat Bread. It makes two squat loaves, stores well in fridge or freezer (or countertop, even, for about a week if it's not too warm/humid), and it makes a very tasty breakfast when toasted and lightly spread with cream cheese.

Scottish Oat Bread

2 eggs
2/3 cup blackstrap molasses
1/2 cup brown sugar
2 cups buttermilk or yoghurt
2 teaspoons baking soda
3 cups stoneground whole wheat flour
1 teaspoon kosher salt
1 teaspoon baking powder
1/2 cup rolled oats
1/2 - 2 cups nuts or raisins (optional)

In a medium mixing bowl, beat together the eggs, molasses, sugar, and buttermilk. In another bowl, mix all of the dry ingredients - the flour, oatmeal, baking soda, baking powder, and salt. Dump the dry ingredients on top of the egg and molasses mixture, and stir gently with a wooden spoon or spatula, just to combine. About half way through the stirring, add the raisins or nuts, if you like.

Divide batter between two lightly greased or oil-spritzed regular-sized loaf pans. Bake at approximately 350 F. for 35 - 45 minutes, depending on your oven. A toothpick or cake tester should come out clean.

Serve fresh and warm with a little butter, or cold with cream cheese.

April 22, 2007

Pancakes for breakfast

I've been a little distracted lately, for a couple of reasons: One, we're looking for a new place to live, which is time-consuming and tedious, and two, I've been unable to update my non-blog site for Always in the Kitchen for a few weeks, due to some stupid glitch at Shaw. So, I was waiting to post this entry from a couple of weekends ago, because I wanted to link to the recipe on the other site. Since I don't know when that is going to happen, I'll simply post it here, and re-post it there when updates are once again possible.

Grrr.
I think that most people like pancakes of some sort... you may prefer crepes, or blintzes, or blini, but really, they're all in the same yummy family of food best served hot off the griddle and into waiting hearts and mouths. I am an ecumenical flatbread eater; I love them all. Flat or fluffy, as long as they're cooked through (cookie dough has nothing to fear from raw pancake batter). I'm happy to try any variant, any topping or filling.

A couple of years ago, I fell for buckwheat pancakes, and since I don't find myself making any sort of pancakes all that often (despite my fondness for pancakes I also tend to crave savory foods in the morning, and I'm not usually organized enough to be making pancakes and bacon at the same time), but when I do, they're usually buckwheat. My current favourite recipe is from Molly of Orangette fame, but as she posted her recipe to the now-defunct Saucy online magazine, I don't know if there is a copy floating around online that I can point you to.

However, although I seriously groove on the buckwheat cakes, I'm also pretty happy to eat just about any kind of pancake. My mother's pancakes where whole wheat, full of bran and wheat germ and local eggs and unpasturized milk, sturdy rather than fluffy, and small enough that an adept flipper could make three in one 10 1/2-inch cast iron skillet. They were very tasty, and very healthy, and there was, sadly, no recipe for them, which means that they are lost to the ages and the ever-more-distant memories of my father, my sister, and I.

When I moved to the big city, I discovered buttermilk pancakes. Many of the examples I found in restaurants and cafes were doughy and sometimes not cooked all the way through, or were full of blueberries which, while not a bad choice, certainly wasn't to my taste. Eventually I discovered some good ones, and then really great ones, and finally I set about learning how to make them for myself.

As a former helper in my mother's kitchen, I had the cooking part down, I just needed a good recipe to start from. I've fiddled around with a few, and settled on this as a solid favourite. It's very similar to Molly's buckwheat recipe, in fact. Sturdier than an airy pancake, fluffier than a "health" pancake, and with a certain something from the lemon (although, you could leave out the lemon zest if you wanted a more straight-forward pancake). If you want them to be healthier, reverse the amounts of the two flours.


Lemon-scented Pancakes


Serves 2

Total prep and cooking time: 1 hour 30 minutes (including 1 hour rest time)


3/4 cup unbleached white flour

1/4 cup stoneground whole wheat flour

1 tablespoon buttermilk powder

1 tablespoon sugar

2 teaspoons baking powder

1/2 teaspoon kosher salt

1 extra large egg

2 tablespoons canola oil

3/4 cup 1% milk

zest of one lemon

2 teaspoons fresh lemon juice

Mix the flours, buttermilk powder (sieved), sugar, baking powder and salt in a small bowl. Stir with a dry whisk or a fork until well combined.

In a medium mixing bowl, beat the egg, canola oil, milk, lemon zest and lemon juice thoroughly with a whisk. Add the combined flour mixture to the wet mixture, and stir just barely until combined. Don't try to stir out all the lumps, they will take care of themselves.

Cover and let rest in the fridge for an hour (or overnight). Fry over medium heat on a non-stick skillet that has been lightly spritzed with canola oil. When the pancake is starting to look dry around the edges and there are bubbles breaking throughout (and a few are staying open), it's time to flip them over.

Make them any size you like - silver dollar-sized are adorable as part of a bigger breakfast, and larger ones heat up splendidly for a quick breakfast the next day...if you have any left over. This recipe makes about 4 to 5 large pancakes, perfect for two.