December 27, 2014

Scalloped Potatoes


Scalloped potatoes are one of my favourite holiday side-dishes. They're quite cooperative - you can generally cook them at whatever temperature you are already using for your ham or turkey or other festive fare (simply adjust the time), and require little minding once they go into the oven. Classic, simple, and satisfying.

These are the antithesis of fast food - a slow-baking, satisfying dish that yields the unexpected dividend of being a terrific breakfast dish the next day - topped with a sunny-side or poached egg, or diced and turned into Spanish tortilla (in which case, add more garlic).

Made with milk rather than cream (but no less creamy), and with a nice sprinkle of cheese at the end, these are richer tasting than they really are. If you're having a large holiday feast with many dishes, you can easily get six servings out of this, and if you're having a pared-down holiday dinner, it serves four generously.

Scalloped Potatoes

The way my mother used to make them

Makes a 9x9 inch baking dish
Serves 4 - 6

1 kilogram half-waxy potatoes (such as Yukon Gold)
1 small onion, finely chopped
2 tablespoons all-purpose flour (approximately)
1 cup whole milk
1/2 cup coarsely grated parmesan cheese
Kosher or coarse sea salt
nutmeg

Prepare your 9x9 baking dish by lightly buttering or oiling it. Preheat your oven to 350-375 F if you don't have anything else already requiring a specific temperature.

Peel the potatoes and slice them thinly, but not quite paper thin (I disagree with the venerable Martha Stewart on that one). Peel and dice the onion. Place 1 tablespoon of flour in a very fine sieve and have it within easy reach.

Place a layer of potatoes in the baking dish, slightly overlapping the edges like fish scales. Sprinkle sparingly with salt, add about a third of the onions, and use the sieve to dust a small amount of the flour evenly over the entire dish. Repeat until you have run out of potatoes (no need to flour the final, top of the potatoes, though a further pinch of salt there is fine). You shouldn't need more flour for the layering stage than the initial tablespoon - go easy, to prevent the dish from becoming gluey.

Shake together the milk and the other tablespoon of flour, and pour it gently over the potatoes, making sure the whole top layer of potatoes gets wet with the milk. The milk should only come up about half way through the stack of potatoes - they should not be swimming in milk!

Cover the baking dish with foil, and place in the oven (I like to put a drip tray under it, in case the milk boils over) to bake for 45 minutes to one hour (test with a knife - it should slide easily through the potatoes with no resistance). If, due to the varied times and temperatures of your other dishes, your potatoes are done earlier than you need, simply remove them from the oven and hold them aside (still covered with foil) until about 15 minutes before you want to serve them (perfect resting time for a roast chicken, or duck, for example), before going on to the next step.

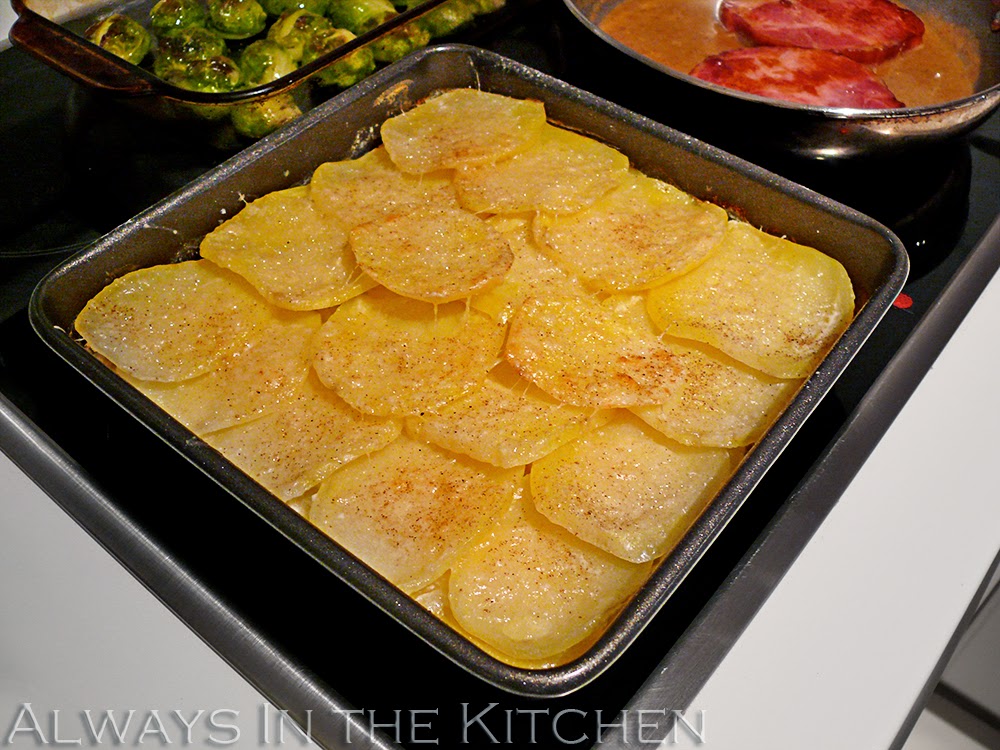
Remove the foil, and sprinkle evenly with the cheese. Sprinkle a delicate, tiny amount of nutmeg over the whole dish, and return, uncovered, to the oven to cook for another 15 minutes or until the top is lightly golden on the edges (or more deeply browned, if that's your preference).

Use a flipper-type spatula to loosen the edges, cut into portions, and serve.

December 21, 2014

Kartoffel Eintopf: German Potato Stew


Potatoes play a fairly important role in German cuisine. Spring, Summer, Fall, or Winter, there's a potato dish (or several to choose from) for every season, every occasion. At the very least, the humble "Salzkartoffeln" (often manifested as a simple, peeled, boiled potato) is an all-purpose and upstanding accompaniment in a land that has not fallen prey to the fear of carbohydrates.

Potato soup and potato stew are stalwarts of the restaurant menus around the Rhine, especially in Fall and Winter. They come together quickly, don't take a laundry list of ingredients (and can often be made entirely with items already in the German pantry), and are satisfying for lunch or dinner, or as a first course.

There are a ton of recipes out there, and a zillion (roughly) variations. With or without meat, and with or without dairy are the biggest party lines to be drawn, and quite frankly, I see merits to all of these. Here is my recipe for Kartoffel Eintopf (with ham, without dairy) which can be on the table in less than 30 minutes any day of the week.

Kartoffel Eintopf

Serves 2 - 4

3 large potatoes (Yukon Gold or similar)
3 large carrots
1 large onion
3 cloves garlic
2 tablespoons olive oil
3 bay leaves
75 grams ham
2 cups vegetable broth or stock
celery salt to taste
white pepper to taste
pinch marjoram or thyme
1 tablespoon flour
water as needed

Optional:
1 stalk of celery or 1/4 celeriac
1 leek
(technically, the ham is also optional)

Coarsely dice the potatoes, carrot and onion. Finely dice the garlic, celery or celeriac and leek (if using), and ham.

In a moderately large soup pot, heat the olive oil. Add the onions, garlic, and bay leaves, and saute until the onions start to turn translucent. Add the ham, celery salt, white pepper, and marjoram, and stir through. Add the potatoes and carrots and stir about until everything is lightly coated with the oil. Add the vegetable broth, and if necessary, enough water to 3/4 cover the vegetables. Bring up to a simmer.

Make a slurry of cold water and the flour (I shake mine together in a plastic lidded container until smooth), and add to the soup. Bring up to a simmer, reduce the heat, cover, and let cook for about 20 minutes. Remove lid, and if necessary, continue to cook until the liquid thickens into a light gravy.

If you are using ham and vegetable broth, you probably will not need much more if anything in the way of salt, but do taste and add a little if necessary. Serve with a hearty, crusty bread, and maybe a nice salad.

December 14, 2014

Christmas Treats: Kalte Schnauze


This is one of the most beloved of all the Christmas baking of my childhood. I love the shortbread, mincemeat tarts, my sister's candy cane cookies and other classics, absolutely, but this was always the most hotly anticipated item - partially because of the chocolatey richness, and partially because my mother always made it at least three weeks before Christmas, and insisted that it took three weeks to "cure". In reality, she was merely spacing out the Christmas baking, but wanted us to leave it alone until the middle of the holiday season.

Kalte Schnauze means "cold nose" in German. By the time we got our Canadian hands on it, it was spelled "Kalter Schnautze" and I'm really not sure how it came into our holiday tradition, or who gave us the recipe. It is written out in pencil on a slip of paper that was in my mother's recipe box. It might have been our Dutch neighbour, or possibly some of the Mennonite relatives, but I do not recall; I only remember that it bumped Nanaimo Bars from the number one place in our chocolatey hearts. When I arrived in Germany, I found that it has a whole host of other names, too - Kalter Hund (Cold Dog) for example, Kellerkuchen (Cellar Cake) - presumably because you store it in a cool place - and Kekskuchen (Cookie Cake), for obvious reasons. There are versions ranging all over northern Europe, and parts of the United Kingdom, as well.

I've encountered some debate online as to the inclusion of, variously, eggs, rum, and coffee. My version has all three, and as it is a long standing family favourite, that's quite good enough for me.

One final note: the use of coconut fat is original to this recipe, and not some flavour-of-the-moment substitution. It's essential to the creamy and melting texture of the finished dessert.

Kalte Schnauze

Makes an 11x7 baking dish

225 grams solid coconut fat
2 cups powdered sugar/confectioner's sugar
1 cup cocoa powder
2 eggs
1 tablespoon instant coffee
1 teaspoon vanilla extract
1 teaspoon rum
2 tablespoons very hot water
1 package of thin "German Social Tea" style biscuits (or Butter Kekse)

Line the baking dish with waxed paper (ensure it comes up over the sides, to make removal possible later). You can also use plastic wrap - this doesn't actually go in the oven at any point.

Pour the hot water over the vanilla extract and the rum, and let stand.

In a large mixing bowl, mix the eggs, sugar, coffee, with an electric mixer until thoroughly combined. Add the warm rum/vanilla mixture and mix again.

Melt the coconut fat over low heat. Add a quarter of the melted coconut fat to the chocolate mixture, stirring/mixing well to combine, and repeat until all of the coconut fat is smoothly integrated.

Place the bowl with the chocolate mixture over a pan of hot water, so it does not set up too fast while you are working.

Pour/scoop enough chocolate mixture into the prepared pan to just cover the bottom. Take your tea biscuits, and lay them in a single layer over the chocolate, leaving a small space between each biscuit. Top with a layer of chocolate mixture, and repeat. You should have a minimum of three layers of biscuits, as shown here, ending with chocolate on top. I used large, square biscuits for this one, but I remember using smaller, rectangular ones as a kid. The advantage of the smaller ones is that you can alternate direction of the biscuits, which results in small, creamy, bonus deposits of chocolate in the finished squares. If your biscuits do not fit nicely into your baking dish, break or cut them into smaller pieces to get full coverage. You will never be able to tell, once it's done, or if the biscuits didn't break cleanly.

The amount of biscuits you need is going to depend on the size of your pan and the size of the biscuits themselves. I've never needed more than one package of any size (and often much less than a whole package), but if you're nervous, get two.

Allow to cool completely, then cover tightly with plastic wrap and let stand someplace cool (do not refrigerate) for a couple of days before you dig in. The biscuits, so crisp when you lay them into the chocolate, soften and become quite easily sliceable after a day or two of rest in their chocolate bed.

These are very rich, so cut them small and treat them like truffles. I note that if you cut them all into squares at once, the biscuit edges will start to dry out, which you can see here. It is better to leave them in a solid piece, cutting off only the number of squares you wish to serve at any given time.

December 07, 2014

Arroz con Pollo, Chorizo, y Choclo: Rice with Chicken, Chorizo, and Corn


Rice-based skillet dinners (or other one-pot meals) are very rewarding to make and to eat. I grew up on my mother's iteration of chicken and rice, but as an adult, I've discovered the joy of so many different versions from all over the world. Takikomi Gohan in the Japanese style, for example, Chinese Chicken Fried Rice, Caribbean Chicken & Rice, Italian Chicken Risotto, Russian Chicken Plov, and of course, the many, many versions of Arroz con Pollo - Chicken and Rice to our Spanish speaking friends.

My version plays up the Spanish and Latin American flavours, with saffron and chorizo that you might find in Europe, and the corn that you might find in a Peruvian variation. The method is rather like an oven-finished paella (in the Mark Bittman style); a quick weeknight meal that you can put in the table without a lot of fuss.

I have used fresh corn, cut off the cob, but you could as easily use frozen kernels.

Arroz con Pollo, Chorizo, y Choclo

Serves 4

1 3/4 cups short grain rice, such as Bomba
400 grams boneless chicken, chopped
1 - 2 cups sliced cured chorizo
3 1/2 cups water or chicken broth
1 tablespoon olive oil
1 medium yellow onion, diced
1 fresh corn cob worth of corn kernels (approximately 1 1/4 cups)
2 garlic cloves, sliced
1 tablespoon tomato paste
1 pinch saffron, brewed
2 teaspoon paprika
splash of dry sherry

Preheat your oven to 400 F., with the rack in the middle or lower-middle slot.

To brew your saffron, grind it with the back of a spoon in a small dish, and add a tablespoon or so of near-boiling water. Let stand for about 10 minutes while you prep the rest of the ingredients

In a 30-centimetre skillet, heat the sliced chorizo in the olive oil, and quickly sauté the chicken pieces until lightly golden on the outside, but not cooked through. Add the diced onion and sliced garlic, and stir through. When the onions have turned translucent, add the paprika and the brewed saffron, and keep stirring through. Add the tomato paste, and a splash of sherry, and stir again.

Add the rice, and stir it through until every grain of rice is coated in the rich, golden colour. Add the corn, and stir through until evenly distributed. Add the water or broth (or stock), and stir through once more. Bring the liquid just to a light boil.

Carefully move the (very full!) pan to the oven, and bake uncovered for 20 minutes. Check to see if it needs a bit more liquid, and add up to a quarter cup if it does. Turn the heat off, and continue to cook with carryover heat for another 10 minutes. Test a few rice grains to make sure they are done. Scoop into shallow bowls, and serve with crusty bread and a salad on the side.

You can garnish with freshly chopped parsley if you like, or a pinch of pimentón - Spanish smoked paprika.

There are so very many more chicken and rice recipes out there to try, from the simple to the far more complex! Biryani, Jollof Rice, Oyakodon, Clay-pot Chicken Rice, Hainanese Chicken Rice, Zereshk Pulao...so many wonderful dishes yet to come.

November 22, 2014

Lentil, Mushroom, & Walnut Shepherd's Pie


One of the first German recipes that I made once I moved to Germany was Linseneintopf, a thick and hearty lentil stew, often served with sliced or whole sausages as one of the components. We were really taken with the original dish, but it has been nagging at me for some time that it would make a wonderful vegetarian (or vegan) main course as well.

Just for the sake of variety, I made this one into a Shepherd's Pie rather than making the potatoes simply part of the stew, but you could do it either way. This is the sort of hearty, vegetarian dish that shows it European heritage in its flavours, and is intensely satisfying to eat.

As this is a compound dish that is baked in the oven, I suspect German cooks would classify this as an Auflauf (casserole), rather than an Eintopf (one-pot stew).

Lentil, Mushroom, & Walnut Shepherd's Pie

Serves 4 (generously)

250 grams dry brown lentils
400 grams fresh mushrooms
1 cup toasted walnut pieces
1 medium onion, diced finely
2 cloves of garlic, minced
2 medium carrots, diced finely
3/4 cup celery, diced finely
1 tablespoon olive oil
2 bay leaves
pinch of marjoram
4 cups vegetable broth or water
pinch kosher salt
Black pepper

4 medium-sized potatoes, peeled
1/4 cup milk or non-dairy "milk"
1 tablespoon butter or mild-flavoured oil

To toast the walnuts pieces, spread them in a single layer on a baking sheet and bake at 350 F for about 10 minutes, or until fragrant. If the skins are too bitter, you can rub the warm walnut pieces with a towel, which will remove much of the skin. You can also toast walnuts on the stovetop in a dry skillet, but you need to watch them very carefully, and stir frequently, or they will burn. If you have walnut halves, chop them roughly.

Wipe the mushrooms clean, remove any gnarly bits or tough stems, and coarsely chop. I used a mixture of chanterelles and hedgehog mushrooms, because my farmers market is awesome, but you can use any fresh mushrooms you like -- to be honest, really fancy mushrooms may get a bit overwhelmed by the robust flavour of this dish.

Wash and pick over the lentils. In a dutch oven, heat the olive oil over medium-high heat. Saute the onion, celery and carrot briefly. When onion turns translucent, add the garlic, bay leaves, marjoram (you can substitute oregano if need be) and pinch of salt. If you are using water instead of broth, increase the salt to a half teaspoon.

Add the chopped mushrooms, and stir through. When the mushrooms start to give off a little liquid, add the walnuts, and stir through again.

Add the (washed, drained) lentils, the broth (or water), and bring to a low simmer. Cover and simmer gently for 20 minutes, or until nicely thickened. Taste, adjust for salt, and if necessary, add a small pinch of sugar to balance the flavours. If it tastes a little flat (for example, if your lentils were a bit old, this can happen) you may wish to add a teaspoon of red wine vinegar, to brighten it up and provide a little acidity. Finish with with freshly ground black pepper.

While the lentils simmer, make your mashed potatoes. Boil or steam your potatoes until tender, and drain. Keep the potatoes in the same, hot pan, and break them up with a spoon (or the edge of your masher) so that excess moisture can evaporate. That's advice from Julia Child, folks, and ever since I adopted it, my mashed potatoes have had a more awesome texture. Add the butter (or oil) and milk (or "milk") and mash until smooth.

Dollop the mashed potatoes carefully over the lentil stew, and smooth the top down (or crenellate it with a fork, whatever you like). Brush the top with a little extra butter or oil if you like it to be a bit crusty on top. You could also sprinkle it with a bit of paprika. Bake the stew at 350 F for about 20 minutes, or until the top is golden and inviting. Use a large serving spoon to dish into serving bowls or plates.

Leftovers heat up fairly well in the microwave, or in an oven-proof dish in a regular oven.

November 15, 2014

Grilled Cheddar & Mango Chutney Sandwich


It is my understanding that every food blogger must at some point commit a post to a cheese sandwich. This is one of my favourites.

Okay, okay, it's not really grilled, it's panfried in a skillet. We called these "toasted cheese sandwiches" when I was a kid. You could absolutely grill it, though.

In my mind, I invented this recipe, a natural outgrowth of my favourite childhood cheddar-and-pickle relish (non-grilled) sandwiches, but honestly I was not at all surprised to discover that plenty of other people had already invented it. It's a winning combination and, if not original, utterly delicious and well deserving of widespread enjoyment.

You make it exactly as you think you do:

Grilled Cheddar & Mango Chutney Sandwich

2 slices sandwich-type bread
Sufficient aged cheddar cheese to cover at least one of the bread slices
Sufficient mango chutney (I prefer the spicy version) to cover (thinly) one of the bread slices
butter

You may wish to finely chop any extra-large pieces of mango in your chutney, for ease of eating.

Assemble the sandwich exactly how you'd expect by spreading one of the slices of bread with chutney, covering the chutney with cheese, covering the cheese with the other slice of bread. Butter the outside slices of bread, and fry the sandwich over medium-high heat until golden, then (carefully) flip and repeat.

Serve with soup. Again from my childhood, a Simple Tomato Soup (recipe in the comments below) is a clear winner. But might I also suggest a Mulligatawny, or Brown Lentil & Tomato Soup?

November 06, 2014

Züricher Geschnetzeltes (Zürich-style Meat Strips in Mushroom Cream Sauce)


Geschnetzeltes is a wonderfully complicated word to say, especially if you're trying to say it with a Swiss-German accent ("Züri-Gschnätzlets") for the first time. Essentially, it means thinly sliced meat, and would probably be classed as a "stir fry" cut in North America. Supermarkets carry them both seasoned (for Gyros or Kebab) or unseasoned. The unseasoned ones are likely destined to become Züricher (aka "Zürcher" or "Züri") Geschnetzeltes. But what you really need to know about this dish is that it's delicious, and pretty easy to make.

The most traditional Swiss version uses veal, but Germany seems to more often use pork, so that's what I'm making here. I've seen chicken and turkey versions, too, but in these parts, unless the meat is otherwise specified, there's a pretty good chance it'll be pork.

Züricher Geschnetzeltes are usually served with Rösti (in Switzerland) or Spätzle (Germany), but can also be served with potatoes, noodles, or rice. You can see from the photo that we went with Rötkohl as a vegetable side dish.

Züricher Geschnetzeltes

Serves 4
Total Prep & Cooking Time: 30 minutes

500 grams Geschnetzeltes (your choice of meat, thinly sliced)
1-2 tablespoons all-purpose flour
1 small onion, finely chopped
200 grams fresh mushrooms, chopped
1/2 tablespoon paprika (sweet)
2 tablespoons vegetable oil
1/3 cup white wine (dry)
2/3 cup cream
1/2 teaspoon cornstarch, dissolved in 1 tablespoon cold water
Kosher salt
Lemon Zest (fresh - about half a lemon's worth)
Parsley, freshly chopped for garnish (optional)

Toss the meat strips in the flour with a good pinch of salt, and shake off (discard) any excess flour. Finely dice or mince the onion. Slice the mushrooms into bite-sized pieces.

Heat 1 tablespoon of oil in a large skillet. Quickly sear the meat strips over high heat, stirring or turning as needed to brown both sides, but not cooking all the way through. Remove the meat to a plate.

Add the other tablespoon oil to the emptied skillet, and add the minced onion and the mushrooms. Fry until golden, and then add the paprika. Stir through, and then add the white wine and let it boil until almost dry. Pour in the cream. Lower the heat and simmer until the sauce is creamy. Combine the cornstarch and cold water and stir until smooth. Add to the sauce and stir through until the sauce is thickened slightly.

Return the meat and its juices to the skillet and cook for two or three minutes until heated through and tender. Taste the sauce, and season with salt and pepper as desired. Grate fresh lemon zest over the pan, reserving a little to top each plated serving. Garnish with parsley if you wish.

Serve over rösti, spätzle, rice, boiled potatoes, or wide egg noodles.

October 31, 2014

Cornmeal Dumplings


Chili and cornbread is a really classic combination. Cornbread, of course, can take many different shapes and forms, not to mention bonus flavours and the eternal debate between sweet/not-sweet that rages through the Americas. My favourite, growing up, was Southern Spoon Bread, a cornbread leavened with beaten egg whites into a lusciously light accompaniment to almost any meal. But I like all kinds of breads made from corn.

Stew Dumplings are the fastest form of bread that I know. They're quicker to whip up than cornbread, biscuits, or scones. The dough requires no resting period like tortillas or arepas, and because they cook on the stovetop, right on top of whatever savoury concoction you're already simmering, they take very little time to cook. No oven pre-heating, no extra pan(s) to grease. I like Stew Dumplings for beef or chicken stew, but chili feels like it needs a little extra something. So, after looking at my cornbread recipe, I decided to simply swap out some of the all-purpose flour with yellow cornmeal in my classic Stew Dumplings recipe. It worked wonderfully, and the next time I do this I may also add some chile flakes, to make them prettier.

While I used these on top of a simple ground beef and bean chili, I think you could also use them on a chicken stew with great success, especially a green chile chicken stew.

Cornmeal Dumplings

Makes 8 dumplings
(serves 4)
Total Prep & Cooking Time: 20 minutes

2/3 cup all-purpose flour
1/3 cup yellow cornmeal (not superfine)
2 teaspoons baking powder
Pinch chile flakes (optional)
1/2 teaspoon kosher salt
1-2 tablespoons chicken fat or canola oil
1/2 cup 1% milk

In a medium mixing bowl, use a fork to stir together the flour, cornmeal, baking powder, and salt. Add the chicken fat (or canola oil), and stir it through – it will give the flour a lumpy appearance, which is fine – keep stirring until the lumps are very small. Add the chile flakes, if using, and stir through.

Make a well in the middle of the flour mixture, and pour the milk in all at once. Stir (with a fork) very rapidly and thoroughly, until all of the dry flour is brought into a stiff, sticky, batter. Use a tablespoon to drop eight (8) dollops of batter evenly over the surface of a bubbling, hot stew. Make sure there is sufficient liquid in the stew – the dumplings should just have their “feet” wet, but mostly be sitting on top of solid lumps. If there is too much liquid, the dumplings will sink a bit. They'll still taste good, but will expand downward instead of upward, and be a bit denser and wetter.

Cover the pot tightly, set the burner temperature to low (so the chilli doesn’t burn) and let the dumplings cook for 15 minutes – no peeking! Do not lift the lid until the dumplings are cooked, or they will become dense and soggy. Serve two dumplings per person.

If you're one of those really organized pantry people, you might want to jar-or-bag up premixed dry ingredients, since you only then need to add a dollop of fat and the milk (you could also use milk powder in a mix, for truly hardcore, and just add water and oil).

For classic Stew Dumplings, replace the cornmeal with more all-purpose flour, and add 1/4 cup chopped fresh parsley.

October 22, 2014

Breakfast at Home: Rösti (Swiss and German Hashbrowns)


Rösti are essentially a Swiss version of hashbrowns, specific to the German-speaking part of Switzerland, and differentiated geographically by an imaginary border called the Röstigraben ("rösti ditch") from its French-speaking and Italian-speaking neighbours.

Rheinisch Germany seems to enjoy rösti most often at lunchtime. These are often called Tellerrösti ("plate rösti") and are almost the size of the plate that they arrive on. To make it a complete meal, the rösti usually has various toppings: ham, mushrooms, and/or cheese are popular choices. Where cheese is added, they're usually popped under the broiler for a few minutes to melt it into bubbly goodness.

If rösti seem a bit similar to latkes or other potato pancakes (especially the smaller ones, or ones that are made with a ragged edge), indeed they are. However, there are some telling differences. The primary discrepancy is that latkes normally call for egg, and often flour as a binder, making it more of a fritter, whereas rösti rely solely on the starch in the potato to hold them together. Here in Germany there is something of an analogue for that, too, which is the deep-fried Reibekuchen (also called Kartoffelpuffer). These potato and onion fritters served with smooth applesauce or ketchup, are popular local festival fare. Not quite a latke, not quite a pakora.

There appears to be much disagreement about the perfect rösti recipe: what kind of potato to use, floury or starchy? Start with raw, par-boiled, or fully cooked potatoes? Should you add onion? Can you add tiny cubes of ham? Do you fry it it butter or oil or pork fat or duck fat? Should you leave the edges natural (ie: ragged) or should you pat them into place, or use a swirling motion with the pan to round the edges out naturally? Pan fry, or shallow fry?

The good news is that the lack of a definitive recipe means that you can lean toward your own preferences, without feeling like you're doing it wrong. And if anyone tells you otherwise, they can make their own rösti.

That being said, I like to use cold, fully cooked potatoes for my rösti, for three reasons: 1) I don't have to squeeze liquid out of the raw potato shreds; 2) the potato shreds are easier to compress into a cohesive mass; and 3) the cooking time is shorter. I just make sure to boil a few extra potatoes the night before.

Rösti

Makes 1 (6-inch rösti)
Total Prep & Cooking time: 15 minutes

1 medium* potato, such as Yukon Gold, cooked and cooled completely (overnight in the fridge is great)
large pinch kosher salt
1 - 2 tablespoons grated onion (optional)
1/2 - 1 tablespoon butter (duck fat is also nice, if you have it)

The potato can have the peel on or off, it's entirely up to you.

In an 8" skillet, melt the butter over medium-high heat. Meanwhile, dry your potato well with paper towel, and grate it on a medium-large-holed grater onto a cutting board. If you are adding onions, grate them separately.

When the butter is hot, add the potato strands all at once into the pan, and spread them about loosely and evenly. Sprinkle with salt, and add any onions (you can also use finely sliced green onion here).

Using a spatula, pat the potato mass into a nice, rounded shape, pressing down from time to time to ensure good contact with the bottom. Do not "stir" the potatoes. You want the ones touching the bottom of the pan to crisp up and get beautifully golden, and that takes a little time. If you have a lot of potato, it will be a thicker cake, and may take a little longer.

Continue to press the potato cake from time to time, both around the edges and across the top, to compact the potatoes into a cohesive cake. Use firm, but gentle pressure - you don't want to mash the potato strands, but you do want them to hold together. Check the temperature and make sure that the potatoes are sizzling, but not burning. Reduce the heat, if necessary.

When the bottom has developed a golden brown and delicious crust (this takes about 5 to 7 minutes, I find), you are ready to flip it over. Use the widest turning spatula that you have and move fast, if you're confident. If you're not confident, or if despite your best efforts, the potato isn't holding together as nicely as you would like, slide the rösti out of the skillet onto a plate. Cover the rösti with an inverted plate, and flip it over so the crisp bottom side is now on top. Slide the rösti back into the skillet with the crisp side up, and continue to cook for about another five minutes. The thicker the rösti, the longer it takes to cook through, especially if you're adding raw ingredients into the mix.

Slide the rösti onto your plate and you're ready to go - add a layer of ham and cheese and give it a quick broil, or top it with poached eggs and hollandaise for a fantastic breakfast.

You can make your rösti quite large, with multiple potatoes, in which case the inverted-plate method of flipping it over is pretty much essential. The finished rösti can then be sliced into wedges or quarters, as you like. For a thick rösti, you might consider finishing it in the oven, especially if you have eggs to poach or hollandaise to stir.

I realize that none of the above tells you how to pronounce "rösti", and the pronunciation itself is somewhat regional. The tricky bits are the ö which is pronounced somewhere between the "o" in 'dog' and the "oo" in 'good'. The s is pronounced "sh". So... rushti is not that far off, while still not being all that close. I'm sorry.


*How big is a "medium" potato? I use one about the size of my fist, but your mileage (and your fist) may vary. That's about 200 grams raw weight.

October 15, 2014

Roasted Vegetable Salad with Yoghurt & Lime Dressing


Composed salads like this one are dead easy to figure out without a recipe, so consider the ingredients I've chosen as a mere guideline for your own favourite roasted vegetables and flavours. I like to season one or two of the roasted vegetables each a little differently, to add depth and warmth to the flavours. As a bonus, if you make a big batch they make a wonderful side dish for dinner the night before, which means you get to be virtuous by using up leftovers to make this tasty salad.

I've chosen cheese, nuts, and (optional) egg to boost the protein and give staying power to this salad, but you could definitely omit the egg, sub out the cheese, and go vegan with chickpeas, or maybe marinated tofu. The egg in the ingredient list is purely optional and is not shown here, but was included in the version of this salad that my husband took to work. He also topped everything with a squirt of Sriracha sauce, so there you go.

Beyond the selection of vegetables and accompaniments, the dressing is what brings this sort of salad together. In Germany, yoghurt-based dressings are very popular, so I've been experimenting with them more than usual. This one is Yoghurt & Lime dressing, and we liked it so much that it's sure to appear again very soon. For vegans, I'd switch the dressing for something sesame or tahini based.

Always In The Kitchen Roasted Vegetable Salad

Base:
Romaine Lettuce, raw, coarsely chopped

Vegetable Rows:
Purple Cabbage (raw, thinly sliced)
Roasted Butternut Squash (seasoned with cayenne)
Roasted cauliflower (seasoned with cumin or curry powder)
Roasted Beets, diced

Accompaniments:
Feta
Walnut halves, toasted
hard boiled egg, sliced (optional, not shown)

To roast the squash and cauliflower, I cut them into bite-sized pieces, toss with a mixture of a little water, a little olive oil, some kosher salt, and the seasoning of choice. Toss thoroughly, then tip out into a roasting pan in a single layer (include a tablespoon or two of the oil/water liquid), and roasted at about 425 F for 20 to 30 minutes, as needed. I prefer not to mix the vegetables before roasting, but your mileage may vary. For the beets, I top-and-tail them, quarter them, and wrap them, skins on, in a package made of aluminum foil with a pinch of salt and a teaspoon of olive oil. I roast them for about an hour, or until easily pierced with a fork. Remove them from the foil (carefully! That steam is hot!) and the skins should rub right off with a paper towel (or clean j-cloth). Then simply dice them to the size you want. You can also use Orange Flower Glazed Beets instead, if you're lucky enough to have some leftover.

Yoghurt & Lime Dressing

Makes 3 servings

150 grams plain yoghurt
1 large clove garlic, pressed/minced
⅛ teaspoon kosher salt
⅛ teaspoon white pepper
zest of one lime

Combine in a small bowl and beat with a fork until well integrated. Taste, and adjust for salt and garlic, as desired.

Place the lettuce in a bowl, and arrange the roasted vegetables, raw cabbage, and whichever accompaniments you choose in rows over the lettuce. Drizzle generously with dressing. Eat as is, or toss first, if you want the dressing more evenly distributed.

Add a drizzle of Sriracha, if that sounds good to you.