November 12, 2005

Cooking for the weather

The rains are upon us, and show no sign of leaving. Unlike the grumblers that I hear around me, I don't really mind the rain, although it can make getting about a bit less comfortable and restricts certain passtimes. I'm sure even a lazy scientist could swiftly disabuse me of the notion that rain in the city is anything resembling clean, but there's a certain refreshing feeling of renewal that comes with the damp, as though nature is doing some of the housework for you. You can retain this pretense as long as you don't look down at the brownish sludge that has become of the crimson and yellow leaves that fell in the dry, cool days at the beginning of autumn.

After enough grey days in a row, however, even I start getting a little techy. This is when I turn to the large pyrex baking dish, and start sifting through recipes from Italy, Mexico, West Africa... places whose warmth is imbeded in the cuisine. I can borrow a little of that sunshine, culinarily, and cosy up on the sofa with a steaming plate or bowl of something hot - usually in more ways than one.

So, of course, I had been waiting for a suitable run of crummy weather to try out Giada De Laurentiis's Manicotti. Surprisingly, I felt the recipe needed some adjusting right from the get-go, and set about lacing the beef and ricotta filling with my triumvarate of Italian pick-me-up flavours: fennel seed, pepper flakes, and oregano. I upped the garlic considerably, too, under the theory that it would ward off any inconvenient cold or flu germs going around, but I use a LOT of garlic, so that should surprise no one.

I had the requisite amount of tomato sauce lurking in the freezer from a previous dinner, so it was a relative snap to put together. I do find that the very best tools for stuffing manicotti are one's fingers. My mother used dainty parfait spoons, whose bowls were small enough not to rupture the tender pasta, and I had a brief fling with the notion of using a pastry bag, which I eventually threw over in favour of the tools I was born with. This sped things up considerably, although it did require a bit more in the way of clean-up than more refined methods.

This is certainly a dish that I would repeat - I might find some twists and turns along the way, but it was a very tasty dinner and we enjoyed the leftovers at work for a couple of days, too. Any good dinner that also yields lunches for the coming week is worth noting. Having recently had good success with a simple pasta dish of farfalle with asparagus in a roasted red pepper sauce, I'm now eyeing the manicotti with the thought of changing up standard tomato for something a little more exotic. Mind you, I'm also contemplating finding a way to work roasted fennel slices into the filling, but that's just me: always thinking about my next meal, sometimes while I'm still eating the one I've got in front of me.

November 07, 2005

What Could Be Better


... than homemade oven-baked chicken fingers? Maybe knowing that it's a fraction of the price of restaurant chicken fingers, maybe it's knowing that it's considerably healthier than fried versions, or maybe it's just that it takes less than half an hour to make 'em. You decide.

The recipe notes that Panko is good for the breadcrumbs, but when I was making this batch I ran out. I substituted freshly processed breadcrumbs instead - it was actually even easier to get them to cling to the chicken. The first half of the batch was done with Panko, though, which is utterly bone white. Because it doesn't brown much in the oven, I decided to add a bit of paprika to the bowl of Panko crumbs This worked very well, although it wasn't really obvious in the raw stage. They baked up beautifully golden, as you can see.

Rather than the egg-dip method, I used the Dijon variation listed at the bottom of the recipe, but in a fit of cleverness, I added a pinch of cayenne pepper and a tablespoon of light sour cream to the mustard to make a pleasingly smooth bite. The Dijon variation is awesome - it has become my preferred method, because I can just dump all of the chicken pieces into the mustard bowl and mix them around. It's very quick.

November 02, 2005

Cornmeal Cheddar Onion Bread - that's almost a meal

I have a lot to live up to, in the bread-making department.

When I first started making bread, it was my mother's brown bread that I made. Dense with whole wheat and added wheat germ and bran, dark with molasses, enriched with eggs and baked in six-loaf batches, her bread was a hearty, filling loaf that rounded out a bowl of soup or stew into a dinner quite handily. The recipe, for which - alas! - I do not have a written copy, was tricksy. She gave it over and over to friends and community members who admired her bread, but they almost universally reported failure of their attempts to replicate her bread.

For some reason, her recipe just didn't work well for others, but I was one of the few who could even come close - although mine never rose quite as high as hers and therefore was a little denser and a little crumblier. That was the bread that I grew up with as sandwich bread; a sandwich made from two of these slices would sit with you for a while.

We did occasionally have other, lighter breads in the house, when I was growing up, usually in the form of soft French loaves - batards - that were our favourite base for garlic bread on spaghetti dinner nights. I was enamoured of their airy texture, which was foreign and exotic seeming to me, but didn't have the sugary squidge of the white sandwich bread my schoolmates had in their lunches. In my late teens I discovered sourdough rye breads, and cheese breads. Despite my affection for "regular" bread, what a delightful discovery these new breads were! My eyes were opened to the possibilities.


When I began experimenting with bread baking in my twenties, I quickly came up with a heartier type of white bread of my own: The Cornmeal Cheddar Onion loaf. I played with the proportion of cornmeal to wheat flour, and experimented with using raw minced onion or sauteed. I adjusted the level of cheese, and since I was at the time shifting towards sharp or aged cheeses, that simple change afforded a whole new level of cheese flavours.

It's a tasty bread, but it does have limited applications. It makes excellent toast, for example, and a shockingly good toasted cheese sandwich, but sweet applications and peanut butter are pretty much out of the question. It was originally designed as a breakfast bread - something heartier than your average loaf, to stay with you in the morning, but it translates to other meals pretty well. The cornmeal does reduce the amount of glutinous spring in the bread, so untoasted sandwiches can be a touch crumbly, but with a little capicolla and fresh mozzarella...maybe a little basil...it can be a delicious lunch. At mid-day or in the evening, next to a steaming bowl of soup, it holds its own.

Cornmeal Cheddar Onion Bread

Makes 1 loaf

1 cup warm water
1 tablespoon active dry yeast
1 teaspoon sugar
1 egg, beaten
3 tablespoons olive oil
1/2 small onion, very finely minced
2 1/2 to 2 3/4 cups unbleached all-purpose flour
3/4 cup yellow cornmeal
1 cup grated sharp cheddar
pinch salt

In a large mixing bowl, sprinkle the yeast and sugar over the warm water. Let stand until it gets foamy-looking. While the yeast is getting foamy, sauté the onion in the olive oil. It will seem like a lot of olive oil, but go with it - that's how much the bread needs. When the onion is soft and translucent, remove from the heat and allow it to cool. Mix the flour, cornmeal, cheese, and salt together in a separate bowl.

Add the beaten egg to the foamy yeast mixture, and then stir in the somewhat-cooled onion and olive oil. Add a cup of the flour mixture to the wet mixture, and beat with a wooden spoon for about 100 strokes. This will help the overall texture of the bread. Add the rest of the flour mixture and stir slowly until it is all incorporated into a nice doughy ball. If your dough is still quite sticky and wet, dust it with flour.

Turn the dough out onto a lightly floured surface, and knead until it starts to feel like a cohesive bread dough. This can take up to ten minutes of kneading, and you may need to add a little flour here and there to keep it from sticking to your fingers. That's okay, but don't get carried away and add so much flour that the bread dough becomes stiff and unyielding.

Place the ball of dough in a lightly oil mixing bowl. Allow the bread to rise, covered, in a draft-free area for 45 minutes to 1 hour, or until nicely doubled. Press the air out of it ("punch it down") and shape it carefully into a loaf. Place in a greased loaf pan, and allow to rise in a draft-free area for about ½ hour. Place in a pre-heated oven at 375°F and let bake for 35-40 minutes, or until it sounds hollow when tapped on the bottom. Turn out of the pan to cool on a wire rack.

Note: If you like a nice, shiny brown top crust, you may wish to brush it with a little egg wash before putting it in the oven. Just beat up an egg with a little water, and use a pastry brush to apply a thin layer of the wash to the loaf just before it goes in the oven.


October 26, 2005

Pie: A Day in the Life

Sometimes, I go to almost ridiculous lengths to use up something in the fridge, or even just to use a particular condiment or treasured ingredient. On this particular occasion, I had a jar of Jamaican Tomato Relish, redolent with allspice and feisty with fresh habanero chiles in the fridge. It had just reached the stage where it had finished curing and was ready for eating.

Now, it so happens that I'm quite fond of meat pies with chutneys and relishes, so that decided dinner for me. I ventured into the slightly labour-intensive world of pie-making, just so that I could use my relish. I decided on a simple beef and onion pie, moistened ever so slightly with a couple of tablespoons of tomato paste, and seasoned with a touch of curry powder, some fresh ginger, ground allspice, thyme, and garlic - to compliment and sometimes echo - the flavours in the relish.
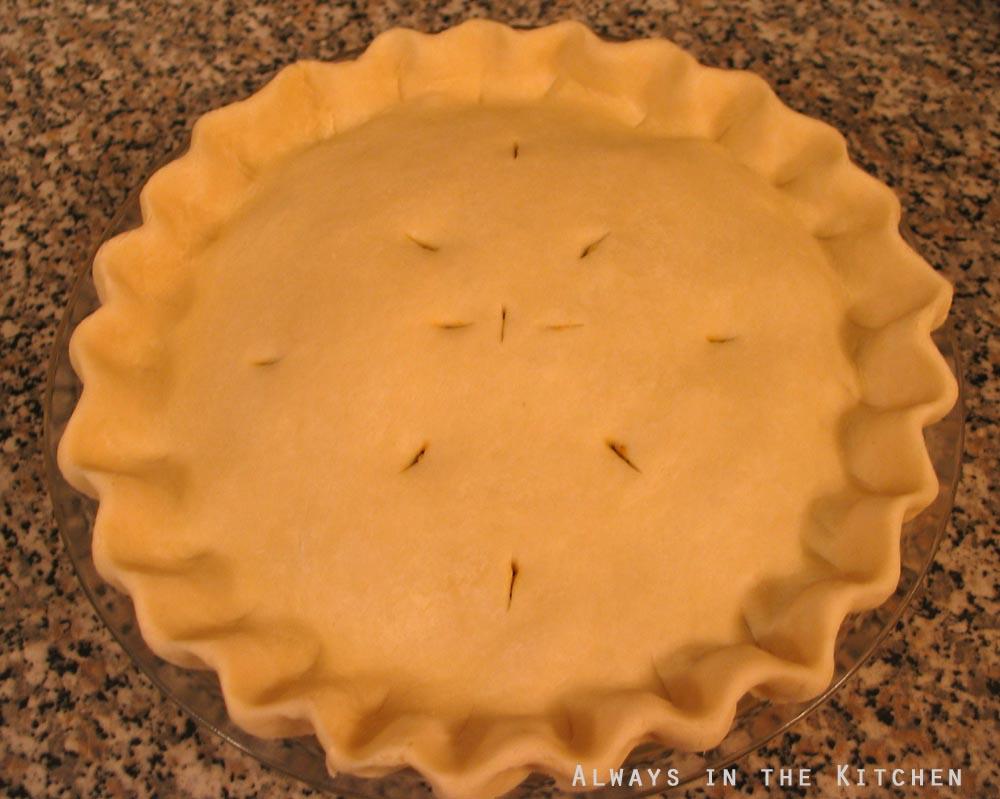
During the above stage, the top-crust was partially rolled out and resting in the freezer. After I got the filling in and smoothed out, I took the top-crust out, let it sit on the counter for a moment, and then finished rolling it out.
I am a compulsive pie-crimper. I know no other way. I cannot bear to do the fork-pressed edges, because I can feel my mother's laziness-accusing gaze from the heavens. So, I crimp all pies. Even lattice-tops.
A teensy bit of egg-wash on the top of the pie gives it a lovely golden colour. I start my filled pies at 450 F for ten minutes, then reduce to 350 F to finish baking - 30 - 40 minutes, usually.

Coleslaw is one of my favourite accompaniments to meat pie. Its cool, raw veggie flavours and creamy sauce contrast beautifully with the hot, meaty filling and the flaky crust.

I have long been an advocate of pie-making. They freeze (whole) quite well, and they reheat (whole or by the slice) in the oven rather well, too. In a household of two, a meat pie will last for two or three meals, depending on what else is served or how much restraint we're manage to summon. And the relish? Delicious.

October 22, 2005

Simple Fancy (Fennel Soup)

There is always something that seems a little on the fancy side, when it comes to creamy soups - ones that didn't come from a can, that is. They tend to be loaded with butter and cream, and have a silky texture that is both comforting and lulling. They make me think of French restaurants, and indeed, that is often where I have them.

Every once in a while, though, I bother to make my own. It isn't difficult, and it only takes about an hour of lazy-work, and there aren't that many ingredients required. Ever since I picked up a fennel bulb recently - to make a roasted fennel and Italian sausage pizza (no pictures, I'm afraid) - I've been thinking about the pile of plump, round, white and brightly green fennel in my local greengrocer. Coincidentally enough, I've also had a recipe for fennel soup beckoning me from a cookbook that I've had for some years. It does call for a modest amount of butter, but needs only plain milk rather than cream, and uses not only the flesh of the fennel bulb, but also the roasted seeds and the fronds from the top as a garnish.

Today, since breakfast was light and dinner will be late, we decided to make lunch - a rarity on the weekend. A quick trip up the street to pick up some fennel, and then back to the stove to begin the magical transformation into soup.
I won't lie to you - there is a little chopping involved. Fennel, happily, is very easy to chop. You simply remove the heavy, stringy, outer layer, cut in half pole-to-pole, and then slice half-moon pieces as easily as cutting an onion. With a little practice, even that doesn't take long, and you're practically done at that point.

Fennel Soup
Adapted from the Australian Women's Weekly Fruit & Vegetable Cookbook.
Serves 4

2 tablespoons butter
2 medium bulbs of fennel, trimmed and sliced
1 medium onion, peeled and diced
1 medium apple, peeled, cored, and diced
1 clove of garlic, crushed
3 cups of light chicken stock
1 cup of milk
2 teaspoons of fennel seeds, toasted

Remove the stalks from the fennel and reserve for another use or discard. Save some of the fronds for garnish - set them aside.

In a medium-large pot, melt the butter. Add the sliced fennel, the onion and apple, and stir and cook until the onion starts to turn translucent and the volume of vegetable matter reduces in the pot (softens enough to compact). Add the stock, and bring to a boil. Reduce the heat and simmer for 15 minutes, or until the chunkiest bit of fennel is tender to the tip of a knife. Allow to cool slightly while you pour two teaspoons of fennel seeds into a small frying pan, and toast over a medium heat until they start to turn colour and smell fragrant. Be careful not to burn them.

When the fennel is tender, puree the soup in batches (add the toasted fennel seed to the first batch) - be careful when pureeing hot soup - never fill your blender more than half-way up. If you have an immersion blender, that would also work. Once all of the soup is pureed, return it to the pot on the stove. Add the milk and stir well. Taste the soup to see if you need to add any salt. The chicken stock may have added enough, but if not you can add a little pinch of salt now, and stir it through. Heat the soup gently until it is warmed through, but be careful not to let it boil. Top individual bowls with a good pinch of chopped fennel fronds, and a grinding of black pepper. Serve with bread to mop up every last bit of soup from your bowl.

So simple. Yet still, it feels a little fancy.

October 17, 2005

Leftovers: The Eternal Question

It is the blessing and curse of family feasts that the memorable meals we create also generate a substantial amount of leftovers. This is particularly true in the case of turkey-related meals, because a small family will have leftovers from even a tiny bird, and a large family typically overestimates how many pounds of bird it will take to sedate its members into a tryptophan-induced stupor. Everyone wants to be sure that there's at least enough bird leftover to make a turkey sandwich or two, preferably on sourdough bread spread with cranberry sauce and maybe just a touch of stuffing - because nothing says holiday leftovers like bread stuffed with bread. Except, in my case, I would rather chop the hapless leftovers into small pieces, smother them in a velouté sauce, and cover them with bread - er, biscuit, actually.

The biscuit dough was a little feistier than usual, or I was a little heavier-handed, because this batch wasn't as featherlight as is typical. Still, it's a whole new lease on life for turkey leftovers (and the bits of bacon that cling tenaciously to the skin) that a) uses up most of the leftovers at once, so they don't languish in the fridge or freezer, and b) is significantly different from the feast whence it came in flavours, despite being full of turkey goodness. A little corn, some sliced carrots, some mushrooms - turkey is very veggie-friendly, so you could easily add whatever you like best: some braised fennel, peas, yam chunks, even potatoes if you feel your dinner is not sufficiently carbohydrate-rich.

And, if by chance (and it would have to be by chance, in my household) there's a teensy bit of wine leftover from the dinner or there's an extra unopened bottle lurking around just waiting for a purpose in its life, you pour yourself a glass and sit down to a meal that's fit for anyone who knows good food.

October 13, 2005

Experimental cooking: Dijon Dill Chicken Bake


I had a little fresh dill lurking in the fridge, and I knew it could't lurk much longer. I like dill, but outside of pickles, Cooking Light's Orzo & Chickpea Salad, and the odd veggie-dip, I don't have a lot of uses for it. I made the salad last week for an office potluck - Mediterranean theme - and still had a half-bunch of fresh dill to use up.

I had seen a recipe once in the low-fat cookbook Looneyspoons for a dill-and-sour cream chicken dish, but I didn't write it down because it seemed a little bland to me. However, armed with the experience of making Pörkölt, I thought I'd take the idea and run with it. It was pretty tasty - I have some minor tweaks to make it better, but it is definitely worth making again. Like the Pörkölt, it's low-effort cooking, but very rewarding.

Next time, I might roast some asparagus and dice it up to add at the last minute.

Dijon-Dill Chicken Bake

serves 3

10 chicken tenders or slices of chicken breast
1 1/2 cups light sour cream
2 - 3 tablespoons Dijon mustard - or to taste
1/4 cup finely minced fresh dill
1 clove of garlic, crushed
1/2 teaspoon cornstarch
zest of one lemon
pinch of salt
black pepper to taste

Preheat oven to 350 F. Spritz an 8" Pyrex baking dish with canola oil.
Mix sauce ingredients (everything but the chicken) briskly with a whisk. Taste, and add more Dijon if necessary, or adjust for salt. This, minus the cornstarch, would make a fabulous veggie or chip dip, by the way. I'm just sayin'.

Place a couple of spoonfuls of sauce in the baking dish, and smooth to cover. Lay the chicken tenders in a single layer over the sauce. Pour the rest of the sauce on top, and smooth over the chicken so that it is completely covered. Place in preheated oven and bake uncovered for 35 - 40 minutes. Remove from oven and stir gently to even the sauce texture. Serve over rice, preferably with a bright green vegetable. There's lots of sauce, which is perfect for rice, pasta, mashed potatoes, or some other sauce-loving starch.

What would I do differently next time? I might add a shot of tobasco sauce. I would definitely increase the garlic to 2 cloves, because I love garlic, and I think that adding a pinch of dry mustard powder in the sauce would be a good way to round out the depth of the mustard flavour without it getting too mustardy. And I'm definitely considering the asparagus.

October 08, 2005

Roast Lamb to Cure the Blues

I sometimes get into a little wee rut, making the same things over and over until I feel entirely uninspired, and even a fridge full of food does not inspire me. I mope over my meal calendar and stare at the spines of my cookbooks, and sigh. It's the cooking blues. I know that fantastic dishes lurk within their pages, some triumphs of the past, some perhaps of the future. There's a sense of overwhelming work involved with the idea of either reproducing a past glory or tackling something brand new that is a part-and-parcel of the whole stuck-in-a-rut cooking blues feeling.

Sometimes the cure does come from a recipe or a cookbook, fallen magically open to something that looks both delicious and undaunting to my frazzled mind. More often, though, I am captured by the sight of something in the market that gets the motor running again. This week, it was a lovely half-roast lamb - from the shank side (which makes it easier to debone at any stage). Roasts are lovely because they can require minimal preparation time, take a while in the oven, and you can surround them with things that are both delicious and suitable to the task at hand.

For this little devil, I lay down a few springs of fresh rosemary, cut some slits into the roast and thrust slivers of garlic into them, rubbed the whole thing lightly with canola oil (olive would have been fine, too) seasoned liberally with salt and pepper, and tossed it in a 400 F oven for an hour and a half. The potatoes are chunks of Yukon Gold - a lovely, lovely, medium starch potato that roasts up very well and, as I am wont to add to almost any roast, a fistful of peeled garlic cloves went in half-way through cooking. The potatoes finished cooking, getting a nicely rosemary-infused crust in the roasting pan (actually, my 10 3/4" cast iron frying pan) while the lamb rested on a plate. A few chopped vegetables and a little feta later, we had a salad, and heartbeats later, we each had a plate of sliced rare lamb, golden roast potatoes, a few cloves of garlic, and a Greco-Turkish salad.

Blues? What blues?

October 05, 2005

Memories

Those of you who read the essays on my main site have already been subjected to a large number of my memories of food from my childhood, so when Ana of Pumpkin Pie Bungalow tagged me to participate in the Five Childhood Food Memories meme, it took me a bit of head-scratching to come up with five that I haven't already blathered on about ad infinitum.

Here we go:

1) Topless Tarts. One Christmas, when I was about five or six, I was helping my mother bring out holiday goodies to our guests. After a long afternoon of baking, I was very pleased with the number of different items that we had created, and was proud to serve them up to company. The very last batch of mincemeat tarts were open-style, as we had used up all the pastry and didn't have time to make more. I blithely took a tray of them in and loudly offered all of our guests "topless tarts." My mother had to explain to me what all of the arched eyebrows and giggles were about, but I don't think the explanation really took hold until I was older. I managed to be mortified anyway.

2) Bread-bun crabs. I helped my mother bake bread as far back as I can remember, from the time when I thought that greasing up the loaf-pans, or fetching ingredients from the cupboards or storage room was a real privilege as opposed to a chore. If I had been good, I would get a small amount of risen dough, sliced evenly from the six loaves that she was shaping, to make a bun for dinner. The earliest buns were simple round affairs, where I would attempt to mimic the shaping and spanking procedure that my mother used to shape her bread. As I got more skilled at handling the dough, my buns became more and more elaborate, culminating in the crab, complete with dough pincers and little currants for eyes. After that one, every bun that I made was a crab.

3) Peeling potatoes. We were a decidedly meat-and-potatoes family, although I understand that the portions of meat that we ate in proportion to the vegetables, was considerably smaller than average. Potatoes were far and away the most common starch, to the point that one of us kids was usually deputized to peel them and put them on to boil. If for some reason, five o'clock had rolled around and mom wasn't back from whatever excursion she was on, one of us would inevitably get started on the potatoes to speed up the process of getting dinner ready for the moment when dad got home. We ate a LOT of potatoes. Mostly boiled, but sometimes mashed, scalloped or baked.

4) Writing it down. My mother often cooked her most common dishes from the top of her head, not needing to look at a recipe. Many of these dishes didn't have a recipe to begin with, and existed solely upstairs. In a fit of journalism or pragmatism, I can't recall which, I began writing down the recipes while my mother was making them - laboriously writing on little recipe cards. I was fanatical about amounts, because I didn't realize how unimportant they are outside of baking, and thus still have recipe cards that instruct me to use .580 kg of beef for baked spaghetti for six.

5) More jam. My dad was probably one of the biggest supporters in my learning how to cook, for one specific reason: Anything that I made, he ate without complaining, and said "thank you" when he had finished. Eventually, I began to judge the relative worth of different dishes by how he managed to eat them: straight up and quickly was a very good sign, more slowly, and with an abundance of condiments was a clue that I had gone wrong somewhere. I remember particularly when the light dawned on me. In a fit of "cooking healthy" I had made pancakes with neither salt nor sugar. Never in my life had I seen my dad put so much jam on a pancake, and gradually, the reason for it sank in. My respect for him rose even higher when I realized how many years he had been doing this. He only ever complimented the things that I had done very well but his stoic acceptance, even appreciation of the effort that went into the dishes that weren't so good is an enduring memory. To me, that showed a greater love than any unearned praise.

I guess it's my turn to tag someone, so I'm picking on Joe from Culinary in the Desert.

October 03, 2005

L'Chaim!


I'm not Jewish, but I am very interested in Jewish food and the traditions that go along with them. I find the sheer number of dietary prohibitions kind of boggling, but I greatly enjoy many of the foods that go with the various holidays.

In a somewhat ecumenical spirit, I occasionally do a cook-along with a variety of different religious and secular food-related holidays and events. Since it is currently Rosh Hashanah on the Jewish calendar, I decided that honeycake was the way to go.


A few years ago, I was given a wonderful cookbook by Claudia Roden - The Book of Jewish Food. The recipes for challah (my favourite bread to make) and honeycake alone are worth the cost of the book, but there's an amazing amount of other good recipes as well. Like most of my favourite cookbooks, this one is part story, part history, lots of recipes, and has a very distinctive personality.

The cake itself is rich with things that I enjoy in their own context: coffee, rum, orange zest, and above all - honey. It is incredibly sweet, containing almost a cup each of sugar and honey, but that makes it an amazing "keeper" that can last for most of forever without spoiling. In fact, I find that it is invariably better the next day, as the first day it can be a teensy bit on the dry side. It gets moister as time goes on, which is a bad thing in blueberry muffins, but a good thing in honeycake.

I've been a fan of the very notion of honeycake since Winnie-the-Pooh's little friend Roo jumped up and down with glee at the notion of "chocolate honeycake!" for their picnic. My latest cookbook, Nigella Lawson's Feast contains a chocolate honeycake... adorably decorated with marzipan bees (which brings to mind David Sylvian's album Dead Bees on a Cake but which is disconcerting at the moment, as my kitchen is lately filled with dying bees). I may have to make that one next.

In the meantime - L'Shana Tova to my Jewish friends - Happy New Year! May it be a sweet one.